Tensorflow(2.0+) 对五类医学图像进行分类
文章目录
- 前言
- 一,导入 TensorFlow 和其他库
- 二,加载并探索数据集
-
-
- 1,浏览数据集
- 2,加载图像的路径
- 3,可视化一些图像
-
- 三, 创建数据集
-
-
- 1,为加载器定义一些参数:
- 2,在开发模型时,我们使用 80% 的图像进行训练,使用 20% 的图像进行验证。
- 3,可视化数据
- 4,我将使用这些数据集训练模型,稍后将它们传递给它们Model.fit
- 5,配置数据集以提高性能
- 6,标准化数据
-
- 四,创建模型
-
-
- 1,Sequential模型
- 2,编译模型
- 3,型号汇总
- 4,训练模型
- 5,可视化训练结果
- 6,预测新数据
-
- 总结
前言
本文主要用于学习记录,可能会存在些许错误,望读者谅解:
随着人工智能的不断发展,机器学习这门技术也越来越重要,很多人都开启了学习机器学习,本文就介绍了使用Tensorflow对五类医学图像进行分类模型的训练。
一,导入 TensorFlow 和其他库
import matplotlib.pyplot as plt
import numpy as np
import PIL
import tensorflow as tf

from tensorflow import keras
from tensorflow.keras import layers
from tensorflow.keras.models import Sequential
二,加载并探索数据集
1,浏览数据集
本教程使用大约 5000 张医学照片的数据集。数据集包含五个子目录,每个类一个:
2,加载图像的路径
import pathlib
data_dir = r'D:\virtual_desk\others\5类医学图像'
data_dir = pathlib.Path(data_dir)
3,可视化一些图像
image_count = len(list(data_dir.glob('*/*.jpeg')))
print(image_count)
腹部图像可视化
PIL.Image.open(str(腹部CT[0]))
脑部CT = list(data_dir.glob('脑部CT/*'))
PIL.Image.open(str(脑部CT[0]))
三, 创建数据集
1,为加载器定义一些参数:
batch_size = 32
img_height = 90
img_width = 90
2,在开发模型时,我们使用 80% 的图像进行训练,使用 20% 的图像进行验证。
train_ds = tf.keras.utils.image_dataset_from_directory(
  data_dir,
  validation_split=0.2,
  subset="training",
  seed=123,
  image_size=(img_height, img_width),
  batch_size=batch_size)
val_ds = tf.keras.utils.image_dataset_from_directory(
  data_dir,
  validation_split=0.2,
  subset="validation",
  seed=123,
  image_size=(img_height, img_width),
  batch_size=batch_size)
class_names您可以在这些数据集的属性中找到类名。这些对应于按字母顺序排列的目录名称。
class_names = train_ds.class_names
print(class_names)
3,可视化数据
以下是训练数据集中的前九幅图像:
import matplotlib.pyplot as plt
plt.rcParams['font.sans-serif'] = ['SimHei']

plt.figure(figsize=(10, 10))
for images, labels in train_ds.take(1):
  for i in range(9):
    ax = plt.subplot(3, 3, i + 1)
    plt.imshow(images[i].numpy().astype("uint8"))
    plt.title(class_names[labels[i]])
    plt.axis("off")
4,我将使用这些数据集训练模型,稍后将它们传递给它们Model.fit
for image_batch, labels_batch in train_ds:
  print(image_batch.shape)
  print(labels_batch.shape)
  break
结果:

image_batch是形状的张量(32, 90, 90, 3)。这是一批 32 张形状的图像90x90x3(最后一个维度是指颜色通道 RGB)。label_batch是 shape 的张量,(32,)这些是 32 幅图像的对应标签。
5,配置数据集以提高性能
AUTOTUNE = tf.data.AUTOTUNE
train_ds = train_ds.cache().shuffle(1000).prefetch(buffer_size=AUTOTUNE)
val_ds = val_ds.cache().prefetch(buffer_size=AUTOTUNE)
6,标准化数据
normalization_layer = layers.Rescaling(1./255)
normalized_ds = train_ds.map(lambda x, y: (normalization_layer(x), y))
image_batch, labels_batch = next(iter(normalized_ds))
first_image = image_batch[0]
# Notice the pixel values are now in `[0,1]`.
print(np.min(first_image), np.max(first_image))
四,创建模型
1,Sequential模型
num_classes = len(class_names)

model = Sequential([
  layers.Rescaling(1./255, input_shape=(img_height, img_width, 3)),
  layers.Conv2D(16, 3, padding='same', activation='relu'),
  layers.MaxPooling2D(),
  layers.Conv2D(32, 3, padding='same', activation='relu'),
  layers.MaxPooling2D(),
  layers.Conv2D(64, 3, padding='same', activation='relu'),
  layers.MaxPooling2D(),
  layers.Flatten(),
  layers.Dense(128, activation='relu'),
  layers.Dense(num_classes)
])
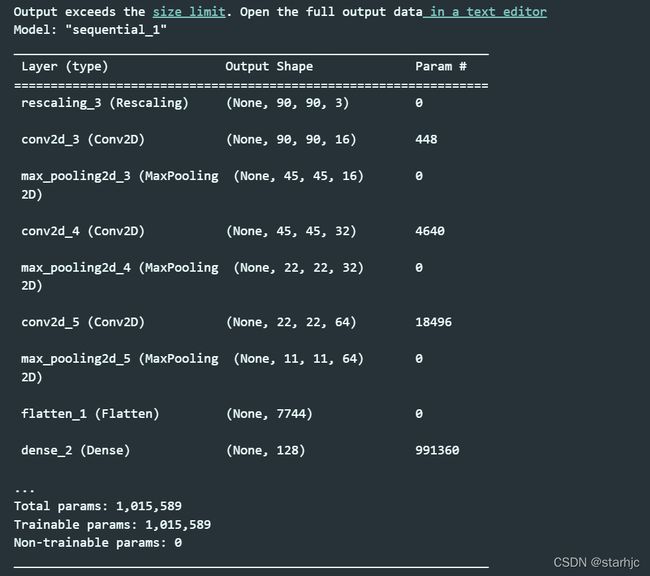
Sequential模型由三个卷积块 组成,每个块中tf.keras.layers.Conv2D都有一个最大池化层 ( tf.keras.layers.MaxPooling2D)。有一个全连接层 ( tf.keras.layers.Dense),其顶部有 128 个单元,由 ReLU 激活函数 ( ‘relu’) 激活.
2,编译模型
model.compile(optimizer='adam',
              loss=tf.keras.losses.SparseCategoricalCrossentropy(from_logits=True),
              metrics=['accuracy'])
3,型号汇总
model.summary()
4,训练模型
epochs=10
history = model.fit(
  train_ds,
  validation_data=val_ds,
  epochs=epochs
)
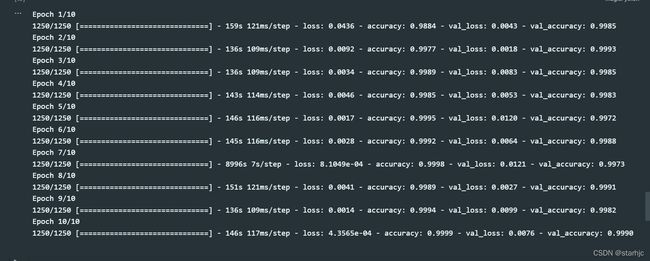
结果:

从训练集和验证集可以看出,该模型在验证集和测试的准确率高达99.9%,不存在过拟合的情况,也不需要再使用数据增强或dropout等方法了。
5,可视化训练结果
acc = history.history['accuracy']
val_acc = history.history['val_accuracy']

loss = history.history['loss']
val_loss = history.history['val_loss']

epochs_range = range(epochs)

plt.figure(figsize=(8, 8))
plt.subplot(1, 2, 1)
plt.plot(epochs_range, acc, label='Training Accuracy')
plt.plot(epochs_range, val_acc, label='Validation Accuracy')
plt.legend(loc='lower right')
plt.title('Training and Validation Accuracy')

plt.subplot(1, 2, 2)
plt.plot(epochs_range, loss, label='Training Loss')
plt.plot(epochs_range, val_loss, label='Validation Loss')
plt.legend(loc='upper right')
plt.title('Training and Validation Loss')
plt.show()
6,预测新数据
腹部CT_path = r"D:\virtual_desk\others\5类医学图像\腹部CT\000000.jpeg"

img = tf.keras.utils.load_img(
    腹部CT_path, target_size=(img_height, img_width)
)
img_array = tf.keras.utils.img_to_array(img)
img_array = tf.expand_dims(img_array, 0) # Create a batch

predictions = model.predict(img_array)
score = tf.nn.softmax(predictions[0])

print(
    "This image most likely belongs to {} with a {:.2f} percent confidence."
    .format(class_names[np.argmax(score)], 100 * np.max(score))
)
总结
通过对图片分类可以学到
1,有效地从磁盘加载数据集。
2,检查和理解数据
3,构建输入管道
4,建立模型
5,训练模型
6,测试模型


