深度学习实战(七)——目标检测API训练自己的数据集(R-FCN数据集制作+训练+测试)
TensorFlow提供的网络结构的预训练权重:https://cloud.tencent.com/developer/article/1006123
将voc数据集转换成.tfrecord格式供tensorflow训练用:https://blog.csdn.net/guoyunfei20/article/details/80626040
训练自己的数据集大体流程如右侧所示:

caffe版的流程:RFCN使用教程(测试或训练自己的数据)
在进行深度学习时,对数据集的制作通常包括以下几个步骤:
1、对图片重新命名
2、图片标注(生成.xml文件)
3、将.xml文件转成相应数据集的格式
4、建立.test格式文件
这个人的博客里有好多关于xml文件的处理:https://blog.csdn.net/gusui7202?t=1
具体以VOC数据的制作为例进行说明:
新建一个存放数据集的文件,可命名为VOC,VOC下一共有五个文件夹,对于目标检测任务来说,通常只用到前三个文件夹,Annotations、JPEGImages和ImageSets。
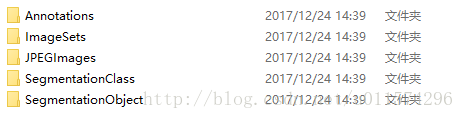
下面分别来讲。
1)JPEGImages文件夹
文件夹里包含了训练图片和测试图片,混放在一起
注:train图片和test图片要分两个文件夹放,它们里面的图片的命名必须都从000001开始顺序往下编号。要不后面有你哭的
2)Annatations文件夹
文件夹存放的是xml格式的标签文件,每个xml文件都对应于JPEGImages文件夹的一张图片
3)ImageSets文件夹
Action存放的是人的动作,暂时不用
Layout存放的人体部位的数据,暂时不用
Main存放的是图像物体识别的数据,Main里面有test.txt , train.txt, val.txt ,trainval.txt.这四个文件我们后面会生成
Segmentation存放的是可用于分割的数据
4)其他的文件夹不解释了,分割XXX等用的
一、对图片重命名【1】【2】
1.1 建数据集文件夹+图片重命名
新建以上三个文件夹,再ImageSets文件夹下在新建Main文件夹。
"""
用来对图片进行重命名,并初始化目录结构
"""
import cv2
import os

if __name__=='__main__':
    path = os.getcwd()
    #imgs = os.listdir(path+"\\imgs\\shengdaixirou\\")
    imgs = os.listdir(path+"\\JPEGImages\\mixture3\\") #进入当前目录

    #print(imgs)#查看读取的文件内容
    #creat file
    if os.path.exists('JPEGImages') == False:
        os.mkdir('JPEGImages')
    if os.path.exists('Annotations') == False:
        os.mkdir('Annotations')
    if os.path.exists('ImageSets') == False:
        os.mkdir('ImageSets')
        os.mkdir('ImageSets/Main')
    cnt = 391 #图片名字从000391开始编号
    prename = "000390"
    for img in imgs:
        #temp=cv2.imread(path+"\\imgs\\shengdaixirou\\"+img)
        temp=cv2.imread(path+"\\JPEGImages\\mixture3\\"+img)
        #os.remove(path+"\\imgs\\"+img) #清空该文件夹
        #print(prename[0:len(prename)-len(str(cnt))]+str(cnt)) #验证重命名是否好用.中括号里面的部分表示名字的前3位‘000’,str(cnt)负责后三位的计数
        cv2.imwrite(path+"\\JPEGImages\\text1_remaining\\"+prename[0:len(prename)-len(str(cnt))]+str(cnt)+".jpg",temp)
        print ("renamed "+img+" to "+prename[0:len(prename)-len(str(cnt))]+str(cnt)+".jpg")
        cnt+=1
    print ("done!")
或者另一种方法(未检验):
import os
path = "E:\\image"
filelist = os.listdir(path) #该文件夹下所有的文件(包括文件夹)
count=0
for file in filelist:
    print(file)
for file in filelist:   #遍历所有文件
    Olddir=os.path.join(path,file)   #原来的文件路径
    if os.path.isdir(Olddir):   #如果是文件夹则跳过
        continue
    filename=os.path.splitext(file)[0]   #文件名
    filetype=os.path.splitext(file)[1]   #文件扩展名
    Newdir=os.path.join(path,str(count).zfill(6)+filetype)  #用字符串函数zfill 以0补全所需位数
    os.rename(Olddir,Newdir)#重命名
    count+=1
摘自:https://blog.csdn.net/u011574296/article/details/72956446
二、图片标注
使用labelIImg来标注图片,具体的安装过程及使用过程如下:
https://mp.csdn.net/postedit/88706760
注:
每个图片和标注得到的xml文件,JPEGImages文件夹里面的一个训练图片,对应Annotations里面的一个同名XML文件,一一对应,命名一致。
- 标注自己的图片的时候,类别名称请用小写字母,比如汽车使用car,不要用Car
- 写的只识别小写字母,如果你的标签含有大写字母,可能会出现KeyError的错误。
三、格式转换.xml-》.csv-》tfrecord
3.1 xml转csv
# -*- coding: utf-8 -*-
"""
Created on Tue Jan 16 00:52:02 2018

@author: Xiang Guo
"""

import os
import glob
import pandas as pd
import xml.etree.ElementTree as ET

os.chdir('E:\\Tensorflowtext\\VOCMaker-master\\VOCMaker\\VOCMaker\\Annotations\\text1_eightclass')#cvs的保存路径
path = 'E:\\Tensorflowtext\\VOCMaker-master\\VOCMaker\\VOCMaker\\Annotations\\text1_eightclass'#xml文件的路径
def xml_to_csv(path):
    xml_list = []
    for xml_file in glob.glob(path + '/*.xml'):
        tree = ET.parse(xml_file)
        root = tree.getroot()
        for member in root.findall('object'):
            value = (root.find('filename').text,
                     int(root.find('size')[0].text),
                     int(root.find('size')[1].text),
                     member[0].text,
                     int(member[4][0].text),
                     int(member[4][1].text),
                     int(member[4][2].text),
                     int(member[4][3].text)
                     )
            xml_list.append(value)
    column_name = ['filename', 'width', 'height', 'class', 'xmin', 'ymin', 'xmax', 'ymax']
    xml_df = pd.DataFrame(xml_list, columns=column_name)
    return xml_df


def main():
    image_path = path
    xml_df = xml_to_csv(image_path)
    xml_df.to_csv('tv_vehicle_labels.csv', index=None) #csv文件名(改成自己的名字)
    print('Successfully converted xml to csv.')


main()
3.2 csv转tfrecord
在工程文件下创建py文件,命名为generate_tfrecord.py或者其他的名字(train文件夹下是所有的图片)
# -*- coding: utf-8 -*-
"""
由CSV文件生成TFRecord文件
"""
"""
Usage:
  #一、程序中要根据你的工作路径修改:
  1、os.chdir('E:\\Tensorflowtext\\VOCMaker-master\\VOCMaker\\VOCMaker\\') #python文件所在路径
  2、def class_text_to_int(row_label): #对应的标签返回一个整数,后面会有文件用到
      if row_label == 'lizhuangwobaoman': #根据你标签数设置相应标签及序号
        return 1
        ...
    elif row_label == 'zhengchangpilie':
        return 12
    else:
        None

  #二、每次生成训练和测试tf文件时需要修改相应的图片地址
  path = os.path.join(os.getcwd(), 'images\\train') #‘images\\train’训练/测试图片所在文件夹

  #三、生成tf文件所用指令
  # Create train data:
  python generate_tfrecord.py --csv_input=ImageSets/train_labels.csv --output_path=ImageSets/train.record
  # Create test data:
  python generate_tfrecord.py --csv_input=ImageSets/text_test.csv --output_path=ImageSets/test.record #ImageSets是.csv文件所在文件夹,ImageSets是生成的.record文件所在文件夹
"""
'''
代码:https://zhuanlan.zhihu.com/p/35854575
'''
import os
import io
import pandas as pd
import tensorflow as tf

from PIL import Image #从文件加载图像
from object_detection.utils import dataset_util
from collections import namedtuple #namedtuple是继承自tuple的子类。namedtuple创建一个和tuple类似的对象,而且对象拥有可访问的属性。

os.chdir('E:\\Tensorflowtext\\VOCMaker-master\\VOCMaker\\VOCMaker') #python文件所在路径

flags = tf.app.flags
flags.DEFINE_string('csv_input', '', 'Path to the CSV input')
flags.DEFINE_string('output_path', '', 'Path to output TFRecord')
FLAGS = flags.FLAGS

# TO-DO replace this with label map
def class_text_to_int(row_label):
    if row_label == 'lizhuangwobaoman':
        return 1
    elif row_label == 'jixinghouyan':
        return 2
    elif row_label == 'houbunangzhong':
        return 3
    elif row_label == 'pilienangzhong':
        return 4
    elif row_label == 'shengdaixiaojie':
        return 5
    elif row_label == 'shengdaixirou':
        return 6
    elif row_label == 'shengdainangzhong':
        return 7
    elif row_label == 'jixinghuiyanyan':
        return 8
    elif row_label == 'huiyannangzhong':
        return 9
    elif row_label == 'zhengchangshengdai':
        return 10
    elif row_label == 'zhengchanghuiyan':
        return 11
    elif row_label == 'zhengchangpilie':
        return 12
    else:
        return None

def split(df, group):
    data = namedtuple('data', ['filename', 'object']) #namedtuple是python中的存储数据类型。定义一个namedtuple类型data,并包含filename和object属性
    gb = df.groupby(group)#groupby()根据表的某一列(filename)内容进行分组聚合
    return [data(filename, gb.get_group(x)) for filename, x in zip(gb.groups.keys(), gb.groups)]

def create_tf_example(group, path):
    with tf.gfile.GFile(os.path.join(path, '{}'.format(group.filename)), 'rb') as fid:
        encoded_jpg = fid.read()
    encoded_jpg_io = io.BytesIO(encoded_jpg)
    image = Image.open(encoded_jpg_io)
    width, height = image.size
    """tf.gfile.GFile(path, decodestyle)
    函数功能:实现对图片的读取。
    函数参数:(1)
    path:图片所在路径(2)
    decodestyle: 图片的解码方式。(‘r’:UTF-8编码; ‘rb’:非UTF-8编码)
    """
    filename = group.filename.encode('utf8')
    image_format = b'jpg'
    xmins = []
    xmaxs = []
    ymins = []
    ymaxs = []
    classes_text = []
    classes = []

    for index, row in group.object.iterrows():
        xmins.append(row['xmin'] / width)
        xmaxs.append(row['xmax'] / width)
        ymins.append(row['ymin'] / height)
        ymaxs.append(row['ymax'] / height)
        classes_text.append(row['class'].encode('utf8'))
        classes.append(class_text_to_int(row['class']))

    tf_example = tf.train.Example(features=tf.train.Features(feature={
        'image/height': dataset_util.int64_feature(height),
        'image/width': dataset_util.int64_feature(width),
        'image/filename': dataset_util.bytes_feature(filename),
        'image/source_id': dataset_util.bytes_feature(filename),
        'image/encoded': dataset_util.bytes_feature(encoded_jpg),
        'image/format': dataset_util.bytes_feature(image_format),
        'image/object/bbox/xmin': dataset_util.float_list_feature(xmins),
        'image/object/bbox/xmax': dataset_util.float_list_feature(xmaxs),
        'image/object/bbox/ymin': dataset_util.float_list_feature(ymins),
        'image/object/bbox/ymax': dataset_util.float_list_feature(ymaxs),
        'image/object/class/text': dataset_util.bytes_list_feature(classes_text),
        'image/object/class/label': dataset_util.int64_list_feature(classes),
    }))
    return tf_example

def main(_):
    writer = tf.python_io.TFRecordWriter(FLAGS.output_path)
    path = os.path.join(os.getcwd(), 'JPEGImages\\train') #训练、测试文件所在文件夹
    examples = pd.read_csv(FLAGS.csv_input)
    grouped = split(examples, 'filename')
    for group in grouped:
        tf_example = create_tf_example(group, path)
        writer.write(tf_example.SerializeToString())

    writer.close()
    output_path = os.path.join(os.getcwd(), FLAGS.output_path)
    print('Successfully created the TFRecords: {}'.format(output_path))

if __name__ == '__main__':
    tf.app.run()
还有一个版本是针对train下的图片按类别装在各自的文件夹下的提取过程(我在这)
注:直接在编译环境中运行该代码会出现下面的提示:

这个可忽略,按下面的操作流程来就没问题了:
在“开始-Anaconda3-Anaconda Prompt”调出命令行,改变工作目录至该工程所在文件夹下,即 E:\\Tensorflowtext\\VOCMaker-master\\VOCMaker\\VOCMaker,输入下面命令行
转换train.csv对应的是
python generate_TFR.py --csv_input=ImageSets/train.csv --output_path=ImageSets/train.record #前后的 ImageSets 分别是.csv和.record所在的文件夹名称
转换test.csv对应的是
python generate_TFR.py --csv_input=ImageSets/test.csv --output_path=ImageSets/test.record
出现下图即为转换成功

转换过程中的两个常见bug:
xml文件转化成tfrecord格式出现错误TypeError: None has type NoneType, but expected one of: int, long
UnicodeEncodeError: 'utf-8' codec can't encode character '\udcd5' in position 2214: surrogates not a
四、生成test文件(这步可去掉)
根据已生成的xml,在Main文件夹下存放四个txt文件

其中test.txt保存用于测试集的图片编号(如“000123”),
- test.txt是测试集
- train.txt是训练集
- val.txt是验证集
- trainval.txt是交叉验证集,即训练和验证集的总和
原文:https://blog.csdn.net/xlz2017/article/details/80426887
VOC2007中,trainval大概是整个数据集的50%,test也大概是整个数据集的50%;train大概是trainval的50%,val大概是trainval的50%。上面所占百分比可根据自己的数据集修改,如果数据集比较少,test和val可少一些。
python版代码:
# -*- coding:utf8 -*-
"""
该代码根据已生成的xml,制作VOC2007数据集中的trainval.txt;train.txt;test.txt和val.txt
%trainval占总数据集的50%,test占总数据集的50%;train占trainval的50%,val占trainval的50%;
%上面所占百分比可根据自己的数据集修改,如果数据集比较少,test和val可少一些
"""

import os
import random
trainval_percent = 0.66  #trainval占整个数据集的百分比,剩下部分就是test所占百分比
train_percent = 0.5  #train占trainval的百分比,剩下部分就是val所占百分比
xmlfilepath = 'Annatations'
txtsavepath = 'ImageSets\Main'
total_xml = os.listdir(xmlfilepath)

num=len(total_xml)
list=range(num)
tv=int(num*trainval_percent)
tr=int(tv*train_percent)
trainval= random.sample(list,tv)
train=random.sample(trainval,tr)

ftrainval = open('ImageSets/Main/trainval.txt', 'w')
ftest = open('ImageSets/Main/test.txt', 'w')
ftrain = open('ImageSets/Main/train.txt', 'w')
fval = open('ImageSets/Main/val.txt', 'w')

for i  in list:
    name=total_xml[i][:-4]+'\n'
    if i in trainval:
        ftrainval.write(name)
        if i in train:
            ftrain.write(name)
        else:
            fval.write(name)
    else:
        ftest.write(name)

ftrainval.close()
ftrain.close()
fval.close()
ftest .close()
原文:https://blog.csdn.net/weixin_40428368/article/details/82116794
另一篇把一个文件夹中的所有文件名统计到一个txt中 https://blog.csdn.net/qq_34806812/article/details/81674290)
五、创建标签映射.pbtxt文件,即下面label_map_path要导入的文件
在data目录下, 建一个.txt文件,更改后缀为.pbtxt,你可以发现已经提供了一些了,随便复制一个,改个名字,修改内容和你的数据集匹配。
item {
  id: 1
  display_name: "card"
}
item {
  id: 2
  display_name: "cat"
}
有几类就写几个item,id从1开始。
六、配置文件和模型
6.1 进入 Object Detection github寻找目标模型

我这里选择的是rfcn_resnet101_coco.config ,点击打开并复制里面的代码到新建的名为rfcn_resnet101_coco.config的文件里,并在E:\\Tensorflowtext\\VOCMaker-master\\VOCMaker\\VOCMaker目录下新建一个名为traning的文件夹,并把rfcn_resnet101_coco.config放到training文件夹中,如下图(后续生成的一些文件会跟它一个路径,所以最好单建一文件夹存放)

6.2 配置模型
用文本编辑器打开ssd_mobilenet_v1_coco.config文件,并做如下修改:
- num_classes:是标签类别数,把这修改为自己的classes num

2.将所有PATH_TO_BE_CONFIGURED的地方修改为自己之前设置的路径(共5处)

注:
train_input_reader里的input_path是训练数据的路径
eval_input_reader里的input_path对应测试数据集record的路径
两者的label_map_path相同,都是上面的标签映射文件所在路径
3.这两行导入相应的预训练模型。
![]()
关于这两行代码,是官方训练好的模型的,如果你想从头训练,就删除,微调的话,需要下载这个模型的ckpt文件。
4.修改迭代的数据数

我这里设为1。这个要看显卡的性能,一般为1、4、8及以上
七、训练
将目录切换到object_detection根目录(即工程目录中),shift+右键-》在此处打开命令窗口-》打开tensorflow工作环境,输入下面的命令,将train_dir和pipeline_config_path改成自己的路径。
python train.py --logtostderr --train_dir=training/ --pipeline_config_path=training/ssd_mobilenet_v1_coco.config
- --train_dir:训练参数存放路径
- --pipeline_config_path:config文件路径
python train.py --logtostderr --train_dir=rfcn_training --pipeline_config_path=rfcn_training/rfcn_resnet101_coco.config
python3 train.py --logtostderr --train_dir=rfcn_training/rfcn_resnet101_train_dir/rfcn_resnet101_coco_rusult --pipeline_config_path=rfcn_training/rfcn_resnet101_coco.config
训练一段时间后,可以ctrl+c中断训练,下次在运行上面命令会自动加载最近的ckpt的,可以继续训练,所以不用担心需要从头训练。
可以通过可视化的页面看优化的的情况
通过“开始-Anaconda3-Anaconda Prompt”调出命令行,定位到你训练后log文件保存的位置;

cd 到log文件的上一级目录;即工作目录至 models\research\object_detection (上图与本目录无关)执行下面的命令
tensorboard --logdir=training
出现下图

复制上图所圈处的地址到火狐浏览器打开,会出现下图的界面

可以看到每迭代一次的情况。
参数保存点都在training目录下,可以进去看一下,数字最大的就是最新的。
保存模型时,你会注意到需要4种类型的文件才能保存:
“.meta”文件:包含图形结构。
“.data”文件:包含变量的值。
“.index”文件:标识检查点。
“checkpoint”文件:具有最近检查点列表的协议缓冲区。

检查点文件保存到磁盘
关于保存模型参数的知识见这里
八、测试
8.1 生成pd文件
在20张图上训练两个多小时(可能会出现训练中断或者卡顿,那应该是显存不足,所以重新输入上述命令接着训练,是的,是接着上次中断的地方开始训练),迭代到了8000次。
我们可以先来测试一下目前的模型效果如何,关闭命令行。在 D:\python3\models-master\research\object_detection 文件夹下找到 export_inference_graph.py 文件,要运行这个文件,还需要传入config以及checkpoint的相关参数。
“开始-Anaconda3-Anaconda Prompt”调出命令行,改变工作目录至 models-master\research\object_detection 执行下面的命令
python export_inference_graph.py --input_type image_tensor --pipeline_config_path training/ssd_mobilenet_v1_coco.config --trained_checkpoint_prefix training/model.ckpt-31012 --output_directory ZJL_CYX_inference_graph
其中基本有两处需要修改:
- pipeline_config_path :config路径
- model.ckpt-9378,9378就是你training’目录下最大数字的那个
- output_directory:是输出模型的文件夹名称,需要修改,也就是计算图输出的目录,我选择的是自己新建的一个card_inference_graph目录
运行上述命令后会在object_detection文件夹下生成ZJL_CYX_inference_graph文件夹(存放生成的文件最好单独建一个),内容如下图,这样计算图就导出到了ZJL_CYX_inference_graph中了,下面就可以开始测试了。
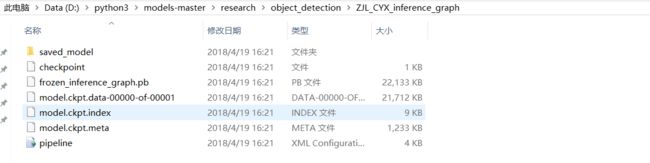
到此为止,我们的模型已经构建完成了,接下来是开始测试效果了
这是我自己的路径:
python export_inference_graph.py --input_type image_tensor --pipeline_config_path rfcn_training/rfcn_resnet101_tfrecord.config --trained_checkpoint_prefix rfcn_training/run/model.ckpt-1041 --output_directory rfcn_training\rfcn_resnet101_tfrecord_result
python export_inference_graph.py --input_type image_tensor --pipeline_config_path rfcn_training/rfcn_resnet101_coco.config --trained_checkpoint_prefix rfcn_training/bingbian_res101_train_dir/bingbian_result_dir/model.ckpt-149583 --output_directory rfcn_training/bingbian_res101_train_dir/bingbian_train_result_graph/
8.2 测试
测试还是利用官方的测试demo,object_detection_tutorial.ipynb,只要稍作修改。
- MODEL_NAME = ‘card_inference_graph’,改成自己的计算图目录
- PATH_TO_LABELS = os.path.join(‘data’, ‘card.pbtxt’),换成自己的映射
- 修改NUM_CLASSES = 1,因为我只有一类
- 删除下载模型的部分代码
- PATH_TO_TEST_IMAGES_DIR = ‘test_images’,根据这个吧测试的图片放到test_images目录下,最好修改名称为image+数字.jpg, 然后把测试代码索引1-3改成你测试图片的索引,比如你有3张测试图片名字为image3.jpg,image4.jpg,image5.jpg,就 把索引改成3-6.
把以下代码复制到新建的python文件中,我这里命名为ZJLCYX_test.py 将其保存到D:\python3\models-master\research\object_detection 文件夹下,关于这个代码的介绍见这里
'''
1.# What model to download. 用自己构建的模型,所以不用下载模型
MODEL_NAME = 'ZJL_CYX_inference_graph' #这里做了修改
#MODEL_FILE = MODEL_NAME + '.tar.gz'
#DOWNLOAD_BASE = 'http://download.tensorflow.org/models/object_detection/'

# Path to frozen detection graph. This is the actual model that is used for the object detection.
PATH_TO_CKPT = MODEL_NAME + '/frozen_inference_graph.pb'

# List of the strings that is used to add correct label for each box.
PATH_TO_LABELS = os.path.join('data', 'ZJL_CYX.pbtxt')

NUM_CLASSES = 2   #只有两个标签
2.修改测试图片的路径
# If you want to test the code with your images, just add path to the images to the TEST_IMAGE_PATHS.
PATH_TO_TEST_IMAGES_DIR = 'test_images'
#TEST_IMAGE_PATHS = [ os.path.join(PATH_TO_TEST_IMAGES_DIR, 'image{}.jpg'.format(i)) for i in range(1, 3) ]
TEST_IMAGE_PATHS = os.listdir('D:\\python3\\models-master\\research\\object_detection\\test_images')
os.chdir('D:\\python3\\models-master\\research\\object_detection\\test_images')
'''
import numpy as np
import os
import six.moves.urllib as urllib
import sys
import tarfile
import tensorflow as tf
import zipfile

from collections import defaultdict
from io import StringIO
from matplotlib import pyplot as plt
from PIL import Image

# This is needed since the notebook is stored in the object_detection folder.
sys.path.append("..")
from object_detection.utils import ops as utils_ops

if tf.__version__ < '1.4.0':
  raise ImportError('Please upgrade your tensorflow installation to v1.4.* or later!')
# ## Env setup
# In[2]:

# This is needed to display the images.
get_ipython().magic('matplotlib inline')

# ## Object detection imports
# Here are the imports from the object detection module.

# In[3]:

from utils import label_map_util
from utils import visualization_utils as vis_util
# # Model preparation

# ## Variables
#
# Any model exported using the `export_inference_graph.py` tool can be loaded here simply by changing `PATH_TO_CKPT` to point to a new .pb file.
#
# By default we use an "SSD with Mobilenet" model here. See the [detection model zoo](https://github.com/tensorflow/models/blob/master/research/object_detection/g3doc/detection_model_zoo.md) for a list of other models that can be run out-of-the-box with varying speeds and accuracies.

# In[4]:
# What model to download.
MODEL_NAME = 'ZJL_CYX_inference_graph'
#MODEL_FILE = MODEL_NAME + '.tar.gz'
#DOWNLOAD_BASE = 'http://download.tensorflow.org/models/object_detection/'
# Path to frozen detection graph. This is the actual model that is used for the object detection.
PATH_TO_CKPT = MODEL_NAME + '/frozen_inference_graph.pb'
# List of the strings that is used to add correct label for each box.
PATH_TO_LABELS = os.path.join('data', 'ZJL_CYX.pbtxt')
NUM_CLASSES = 2
# ## Download Model
# In[ ]:
# ## Load a (frozen) Tensorflow model into memory.

# In[5]:
detection_graph = tf.Graph()
with detection_graph.as_default():
  od_graph_def = tf.GraphDef()
  with tf.gfile.GFile(PATH_TO_CKPT, 'rb') as fid:
    serialized_graph = fid.read()
    od_graph_def.ParseFromString(serialized_graph)
    tf.import_graph_def(od_graph_def, name='')

# ## Loading label map
# Label maps map indices to category names, so that when our convolution network predicts `5`, we know that this corresponds to `airplane`.  Here we use internal utility functions, but anything that returns a dictionary mapping integers to appropriate string labels would be fine

# In[6]:


label_map = label_map_util.load_labelmap(PATH_TO_LABELS)
categories = label_map_util.convert_label_map_to_categories(label_map, max_num_classes=NUM_CLASSES, use_display_name=True)
category_index = label_map_util.create_category_index(categories)

# ## Helper code
# In[7]:

def load_image_into_numpy_array(image):
  (im_width, im_height) = image.size
  return np.array(image.getdata()).reshape(
      (im_height, im_width, 3)).astype(np.uint8)

# # Detection

# In[8]:

# For the sake of simplicity we will use only 2 images:
# image1.jpg
# image2.jpg
# If you want to test the code with your images, just add path to the images to the TEST_IMAGE_PATHS.
PATH_TO_TEST_IMAGES_DIR = 'test_images'
#TEST_IMAGE_PATHS = [ os.path.join(PATH_TO_TEST_IMAGES_DIR, 'image{}.jpg'.format(i)) for i in range(1, 3) ]
TEST_IMAGE_PATHS = os.listdir('D:\\python3\\models-master\\research\\object_detection\\test_images')
os.chdir('D:\\python3\\models-master\\research\\object_detection\\test_images')
# Size, in inches, of the output images.
IMAGE_SIZE = (12, 8)

# In[9]:

def run_inference_for_single_image(image, graph):
  with graph.as_default():
    with tf.Session() as sess:
      # Get handles to input and output tensors
      ops = tf.get_default_graph().get_operations()
      all_tensor_names = {output.name for op in ops for output in op.outputs}
      tensor_dict = {}
      for key in [
          'num_detections', 'detection_boxes', 'detection_scores',
          'detection_classes', 'detection_masks'
      ]:
        tensor_name = key + ':0'
        if tensor_name in all_tensor_names:
          tensor_dict[key] = tf.get_default_graph().get_tensor_by_name(
              tensor_name)
      if 'detection_masks' in tensor_dict:
        # The following processing is only for single image
        detection_boxes = tf.squeeze(tensor_dict['detection_boxes'], [0])
        detection_masks = tf.squeeze(tensor_dict['detection_masks'], [0])
        # Reframe is required to translate mask from box coordinates to image coordinates and fit the image size.
        real_num_detection = tf.cast(tensor_dict['num_detections'][0], tf.int32)
        detection_boxes = tf.slice(detection_boxes, [0, 0], [real_num_detection, -1])
        detection_masks = tf.slice(detection_masks, [0, 0, 0], [real_num_detection, -1, -1])
        detection_masks_reframed = utils_ops.reframe_box_masks_to_image_masks(
            detection_masks, detection_boxes, image.shape[0], image.shape[1])
        detection_masks_reframed = tf.cast(
            tf.greater(detection_masks_reframed, 0.5), tf.uint8)
        # Follow the convention by adding back the batch dimension
        tensor_dict['detection_masks'] = tf.expand_dims(
            detection_masks_reframed, 0)
      image_tensor = tf.get_default_graph().get_tensor_by_name('image_tensor:0')

      # Run inference
      output_dict = sess.run(tensor_dict,
                             feed_dict={image_tensor: np.expand_dims(image, 0)})

      # all outputs are float32 numpy arrays, so convert types as appropriate
      output_dict['num_detections'] = int(output_dict['num_detections'][0])
      output_dict['detection_classes'] = output_dict[
          'detection_classes'][0].astype(np.uint8)
      output_dict['detection_boxes'] = output_dict['detection_boxes'][0]
      output_dict['detection_scores'] = output_dict['detection_scores'][0]
      if 'detection_masks' in output_dict:
        output_dict['detection_masks'] = output_dict['detection_masks'][0]
  return output_dict

# In[10]:

for image_path in TEST_IMAGE_PATHS:
  image = Image.open(image_path)
  # the array based representation of the image will be used later in order to prepare the
  # result image with boxes and labels on it.
  image_np = load_image_into_numpy_array(image)
  # Expand dimensions since the model expects images to have shape: [1, None, None, 3]
  image_np_expanded = np.expand_dims(image_np, axis=0)
  # Actual detection.
  output_dict = run_inference_for_single_image(image_np, detection_graph)
  # Visualization of the results of a detection.
  vis_util.visualize_boxes_and_labels_on_image_array(
      image_np,
      output_dict['detection_boxes'],
      output_dict['detection_classes'],
      output_dict['detection_scores'],
      category_index,
      instance_masks=output_dict.get('detection_masks'),
      use_normalized_coordinates=True,
      line_thickness=8)
  plt.figure(figsize=IMAGE_SIZE)
plt.imshow(image_np)然后再D:\python3\models-master\research\object_detection\test_images文件夹下放测试的图。最后打开spider运行ZJLCYX_test.py 文件。
ps:若工程不在jyputer的安装目录下,可以通过参考更改Jupyter notebook的工作空间,将Jupyter的工作空间改到你的工程路径下。
运行结果如下图
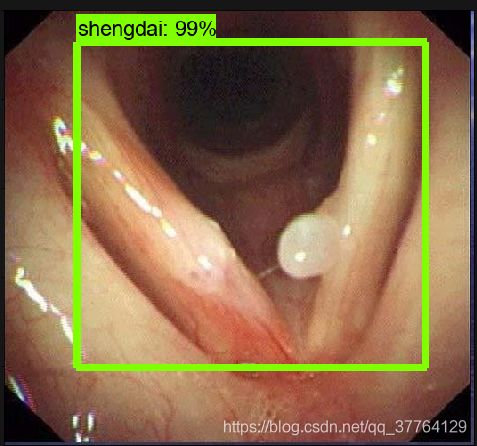
训练不够时会出现这种情况:

- 如果你的测试图片上面没有框的话,有几种可能,第一,你的标签没有统一,就是labelimg软件标注的类别,和映射以及生成tfrecord中的标签名要一致。 当然最大的可能其实是你的样本数太少或者训练时间太短,这是为什么呢?因为了解目标检测的人肯定知道,我们一般对每张图片生成数百上千张的框,那么多框肯定不可 能都有效的,我们首先排除框的手法就是删除置信度低的,一般50%以下的删除,其次是根据IOU,利用NMS非极大值抑制来减少。我们现在关注前一个,我们进入画框的 程序里看一下,也就是utils里visualization_utils.py文件,往下找到画框的函数,发现果然有一个阈值的min_score_thresh参数,而且默认正是0.5, 也就是说置信度低于50%的框我们是不画出来的。那就很明显了,正因为我们样本不足或者训练时间太少,模型训练不充分,导致预测时每个框的置信度都很低, 从我的测试图中可以看出,基本只有2%左右,也就是0.02,远小于0.5,自然也就不会画框了。所以你需要调低这个阈值,就可以显示框了,当然最好还是训练时间长一点【3】。
参考博客:
【1】目标检测Tensorflow object detection API之构建自己的模型:https://zhuanlan.zhihu.com/p/35854575
【2】TensorFlow之目标检测API接口调试(超详细):https://blog.csdn.net/zong596568821xp/article/details/82015126
【3】Tensorflow目标检测API:https://cryer.github.io/2018/04/object_detection/
【4】全面,对各部分代码有说明:https://www.cnblogs.com/zyly/p/9248394.html#_label3_3
参考:
关于这个api详细全面的操作流程介绍见:https://zhuanlan.zhihu.com/p/35854575(操作步骤很详细,好!!!)
* VOC2007数据集制作-进行自己数据集的训练,可用于目标检测、图像分隔等任务:https://blog.csdn.net/u012426298/article/details/80334292
制作自己的voc数据集并通过yolov3训练 :https://blog.csdn.net/qq_34806812/article/details/81673798
* SSD训练自己的数据集(一): 制作VOC数据集:https://blog.csdn.net/xlz2017/article/details/80426887
**关于 xml_to_csv转换tfrecord格式之debug:https://blog.csdn.net/mrjiale/article/details/82765976
****【SSD目标检测】1:图片、视频内的物体检测与定位(这个一个目标检测的系列完整demo,可以参考这个做):https://blog.csdn.net/zzZ_CMing/article/details/81128460