运维项目2---实现nfs共享
拓扑及主机配置
graph LR
client(客户端)-->proxy(代理)
proxy-->web1(web1)
proxy-->web2(web2)
proxy-->web3(web3)
web1-->nfs(nfs)
web2-->nfs
web3-->nfs
web1-->db(数据库)
web2-->db
web3-->db
| 主机角色 | 主机名 | IP地址 |
|---|---|---|
| client | client | eth0: 192.168.4.10/24 |
| 代理服务器 | proxy | eth0: 192.168.4.5/24 eth1: 192.168.2.5/24 |
| web服务器 | web1 | eth1: 192.168.2.11/24 |
| web服务器 | web2 | eth1: 192.168.2.12/24 |
| web服务器 | web3 | eth1: 192.168.2.13/24 |
| 数据库服务器 | database | eth1: 192.168.2.21/24 |
| NFS服务器 | nfs | eth1: 192.168.2.31/24 |
配置额外的web服务器
- 初始化
[root@zzgrhel8 ~]# clone-vm7
Enter VM number: 3
VM tedu_node03 Create... ...
[root@zzgrhel8 ~]# clone-vm7
Enter VM number: 4
VM tedu_node04 Create... ...

[root@zzgrhel8 ~]# virsh start tedu_node03
[root@zzgrhel8 ~]# virsh start tedu_node04

[root@zzgrhel8 ~]# virsh console tedu_node03
CentOS Linux 7 (Core)
Kernel 3.10.0-862.el7.x86_64 on an x86_64
localhost login: root
Password: 123456
# 执行以下命令,初始化
hostnamectl set-hostname web2
nmcli connection modify eth1 ipv4.method manual ipv4.addresses 192.168.2.12/24
nmcli connection down eth1
nmcli connection up eth1
echo a | passwd --stdin root

[root@localhost ~]# logout
CentOS Linux 7 (Core)
Kernel 3.10.0-862.el7.x86_64 on an x86_64
web2 login:  # 按ctrl+]

[root@zzgrhel8 ~]# virsh console tedu_node04
CentOS Linux 7 (Core)
Kernel 3.10.0-862.el7.x86_64 on an x86_64
localhost login: root
Password: 123456
# 执行以下命令,初始化
hostnamectl set-hostname web3
nmcli connection modify eth1 ipv4.method manual ipv4.addresses 192.168.2.13/24
nmcli connection down eth1
nmcli connection up eth1
echo a | passwd --stdin root

[root@localhost ~]# logout
CentOS Linux 7 (Core)
Kernel 3.10.0-862.el7.x86_64 on an x86_64
web2 login: # 按ctrl+]- 配置web服务器
# 配置yum
[root@web2 ~]# vim /etc/yum.repos.d/local.repo
[local_repo]
name=CentOS-$releasever - Base
baseurl=ftp://192.168.2.254/centos-1804
enabled=1
gpgcheck=0
[root@web3 ~]# vim /etc/yum.repos.d/local.repo
[local_repo]
name=CentOS-$releasever - Base
baseurl=ftp://192.168.2.254/centos-1804
enabled=1
gpgcheck=0

# 把web1的nginx打包拷贝到web2和web3上
[root@web1 ~]# cd /usr/local/
[root@web1 local]# tar czf /root/nginx.tar.gz nginx
[root@web1 local]# cd
[root@web1 ~]# scp nginx.tar.gz 192.168.2.12:/root/
[root@web1 ~]# ^12^13   # 将上一条命令的12换成13执行

# 在web2和web3上解压,实现nginx部署
[root@web2 ~]# tar xf nginx.tar.gz -C /usr/local/
[root@web3 ~]# tar xf nginx.tar.gz -C /usr/local/

# 把web1上的service文件拷贝到web2和web3上
[root@web1 ~]# scp /usr/lib/systemd/system/nginx.service 192.168.2.12:/usr/lib/systemd/system/
[root@web1 ~]# ^12^13

# 在web2和web3上启服务
[root@web2 ~]# systemctl daemon-reload
[root@web2 ~]# systemctl enable nginx.service --now
[root@web2 ~]# ss -tlnp | grep :80
LISTEN     0      128          *:80
[root@web3 ~]# systemctl daemon-reload
[root@web3 ~]# systemctl enable nginx.service --now
[root@web3 ~]# ss -tlnp | grep :80
LISTEN     0      128          *:80

- 配置web2和web3支持php
[root@web2 ~]# yum install -y php php-fpm php-mysql
[root@web2 ~]# systemctl enable php-fpm --now

[root@web3 ~]# yum install -y php php-fpm php-mysql
[root@web3 ~]# systemctl enable php-fpm --now
访问测试2.11 ,2.12,2.13


- 在web1、web2、web3上任意的一个页面上新建文章,另外的两台主机,也可以看到更新。因为3台web服务器新建文章时,都是把数据存入到数据库服务器了。

配置NFS服务器
- 准备环境
[root@zzgrhel8 ~]# clone-vm7
Enter VM number: 5
VM tedu_node05 Create... ...
[root@zzgrhel8 ~]# virsh start tedu_node05
[root@zzgrhel8 ~]# virsh console tedu_node05
CentOS Linux 7 (Core)
Kernel 3.10.0-862.el7.x86_64 on an x86_64
localhost login: root
Password: 123456

# 执行以下命令进行初始化
hostnamectl set-hostname nfs
nmcli connection modify eth1 ipv4.method manual ipv4.addresses 192.168.2.31/24
nmcli connection down eth1
nmcli connection up eth1
echo a | passwd --stdin root

[root@localhost ~]# logout
CentOS Linux 7 (Core)
Kernel 3.10.0-862.el7.x86_64 on an x86_64
web2 login: # 按ctrl+]- 配置NFS服务
[root@nfs ~]# vim /etc/yum.repos.d/local.repo
[local_repo]
name=CentOS-$releasever - Base
baseurl=ftp://192.168.2.254/centos-1804
enabled=1
gpgcheck=0

# 安装nfs
[root@nfs ~]# yum install -y nfs-utils.x86_64

# 配置共享
[root@nfs ~]# mkdir /web_share
[root@nfs ~]# vim /etc/exports
/web_share      192.168.2.0/24(rw,no_root_squash)

启动服务。注意,NFS服务依赖rpcbind服务
[root@nfs ~]# systemctl enable rpcbind --now
[root@nfs ~]# ss -tlnp | grep :111
LISTEN     0      128          *:111
[root@nfs ~]# systemctl enable nfs --now
[root@nfs ~]# ss -tlnp | grep :2049
LISTEN     0      64           *:2049
# 验证
[root@nfs ~]# showmount -e
Export list for nfs:
/web_share 192.168.2.0/24
- 迁移文件至nfs共享
1. 将网页目录保留权限,打压缩包
[root@web1 ~]# cd /usr/local/nginx/
[root@web1 nginx]# tar cpzf /root/html.tar.gz html
2. 拷贝文件至nfs服务器
[root@nfs ~]# tar xf html.tar.gz -C /web_share/[root@web1 ~]# scp html.tar.gz 192.168.2.31:/root/
3. 在nfs服务器上解压
[root@nfs ~]# tar xf html.tar.gz -C /web_share/4. 删除web服务器html目录中的内容
[root@web1 ~]# rm -rf /usr/local/nginx/html/*
[root@web2 ~]# rm -rf /usr/local/nginx/html/*
[root@web3 ~]# rm -rf /usr/local/nginx/html/*
5. 此时,通过浏览器访问各web服务器,将会报403错误


6. 在各web服务器上挂载共享目录

[root@web1 ~]# yum install -y nfs-utils
[root@web1 ~]# echo '192.168.2.31:/web_share/html /usr/local/nginx/html nfs defaults 0 0' >> /etc/fstab
[root@web1 ~]# mount -a
[root@web1 ~]# df -h /usr/local/nginx/html/
文件系统                      容量  已用  可用 已用% 挂载点
192.168.2.31:/web_share/html   17G  1.2G   16G    7% /usr/local/nginx/html


[root@web2 ~]# yum install -y nfs-utils
[root@web2 ~]# echo '192.168.2.31:/web_share/html /usr/local/nginx/html nfs defaults 0 0' >> /etc/fstab
[root@web2 ~]# mount -a
[root@web2 ~]# df -h /usr/local/nginx/html/
文件系统                      容量  已用  可用 已用% 挂载点
192.168.2.31:/web_share/html   17G  1.2G   16G    7% /usr/local/nginx/html


[root@web3 ~]# yum install -y nfs-utils
[root@web3 ~]# echo '192.168.2.31:/web_share/html /usr/local/nginx/html nfs defaults 0 0' >> /etc/fstab
[root@web3 ~]# mount -a
[root@web3 ~]# df -h /usr/local/nginx/html/
文件系统                      容量  已用  可用 已用% 挂载点
192.168.2.31:/web_share/html   17G  1.2G   16G    7% /usr/local/nginx/html
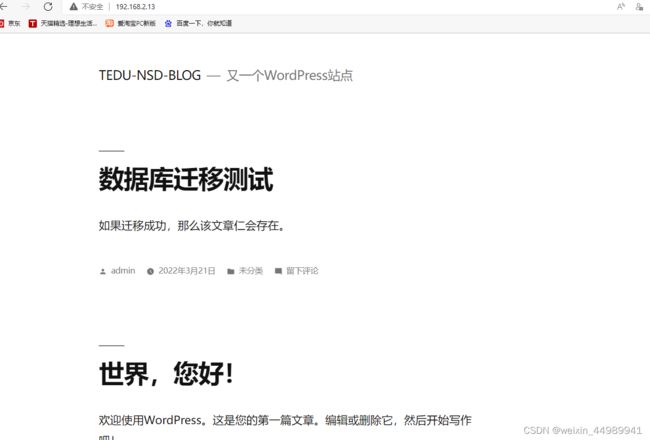
7. 此时,通过浏览器访问各web服务器,又将恢复正常
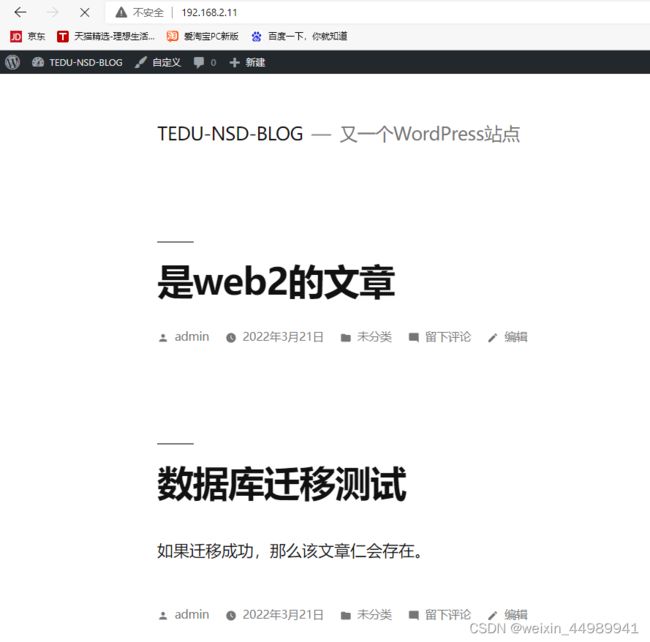

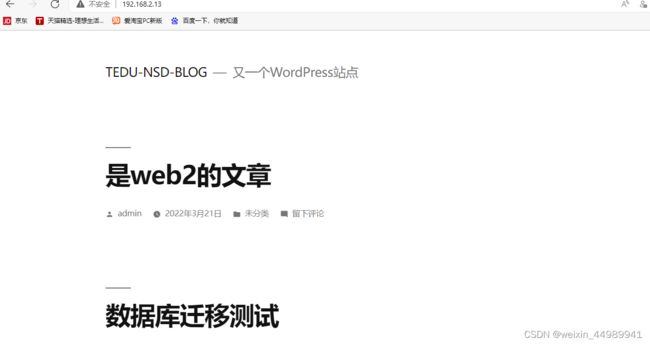
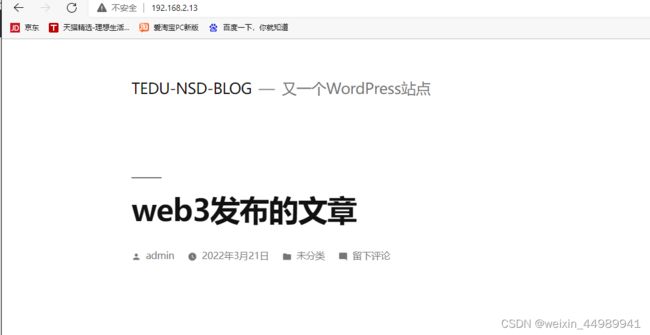
8. 在任意一台web服务器上新建文章,查看web是否同步
配置代理服务器
- 准备环境
[root@zzgrhel8 ~]# clone-vm7
Enter VM number: 6
VM tedu_node05 Create... ...
[root@zzgrhel8 ~]# virsh start tedu_node06
[root@zzgrhel8 ~]# virsh console tedu_node06
CentOS Linux 7 (Core)
Kernel 3.10.0-862.el7.x86_64 on an x86_64
localhost login: root
Password: 123456

# 执行以下命令进行初始化
hostnamectl set-hostname proxy
nmcli connection modify eth1 ipv4.method manual ipv4.addresses 192.168.2.5/24
nmcli connection modify eth0 ipv4.method manual ipv4.addresses 192.168.4.5/24
nmcli connection down eth1
nmcli connection up eth1
nmcli connection down eth0
nmcli connection up eth0
echo a | passwd --stdin root

[root@localhost ~]# logout
CentOS Linux 7 (Core)
Kernel 3.10.0-862.el7.x86_64 on an x86_64
proxy login: # 按ctrl+]- 配置HAProxy服务器
[root@proxy ~]# yum install -y haproxy
[root@proxy ~]# vim /etc/haproxy/haproxy.cfg
# 删除63行到结尾,然后追加以下内容
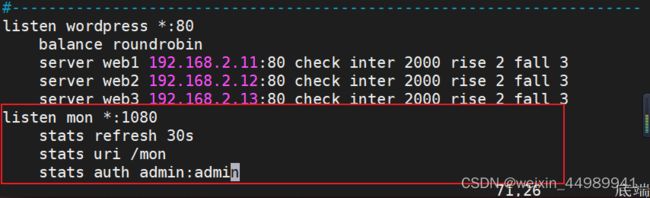
listen wordpress *:80
balance roundrobin
server web1 192.168.2.11:80 check inter 2000 rise 2 fall 3
server web2 192.168.2.12:80 check inter 2000 rise 2 fall 3
server web3 192.168.2.13:80 check inter 2000 rise 2 fall 3
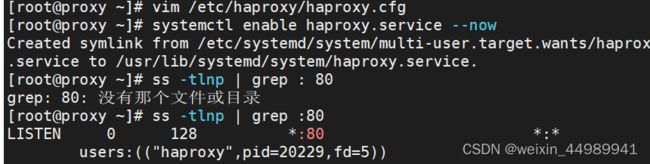
[root@proxy ~]# systemctl enable haproxy.service --now
[root@proxy ~]# ss -tlnp | grep :80
LISTEN 0 128 *:80
-
客户端访问http://192.168.4.5或http://192.168.2.5仍然可以正常访问
-
为HAProxy配置监控页面

[root@proxy ~]# vim /etc/haproxy/haproxy.cfg
# 在结尾追加以下内容
listen mon *:1080
    stats refresh 30s
    stats uri /mon
    stats auth admin:admin
[root@proxy ~]# systemctl restart haproxy
访问http://192.168.4.5:1080/mon。不断访问http://192.168.4.5,在监控页可以看到不同的服务器有连接数。

配置名称解析
- 通过本机hosts文件实现名称解析
真机为Linux:
[root@zzgrhel8 ~]# echo -e "192.168.2.5\twww.lab.com" >> /etc/hosts真机为Windows:
如果客户端是windows主机,则使用记事本程序打开
C:\windows\System32\drivers\etc\hosts添加名称解析


-
访问http://www.lab.com
-
当点击http://www.lab.com页面中任意链接时,地址栏上的地址,都会变成`192.168.2.11`。通过以下方式修复它:


在nfs服务器上修改配置文件
[root@nfs ~]# vim /web_share/html/wp-config.php
# define('DB_NAME', 'wordpress')它的上方添加以下两行:
define('WP_SITEURL', 'http://www.lab.com');
define('WP_HOME', 'http://www.lab.com');
修改后点击时IP地址不会变。