前端Docker部署实战
前端Docker部署实战
背景
最近公司架构大佬,一直在培训K8s,跟组内成员大佬,唠嗑的时候顺便提到了Dokcer,回想到接触docker还是17年的时候研究了一番,当时做了许多笔记,到现在为止已经在我的笔记里吃灰了好久。最近自己再弄以前买的服务器就打算操作一番。
前言
1 安装docker
环境准备
   1. 需要会一点服务器基础知识。
   2. Centos7.
   3. 当前使用xshell操作
环境查看
# 系统内核
[root@iZbp1a48kwmva61kyrz5caZ ~]# uname -r
3.10.0-957.21.3.el7.x86_64
查看系统环境
  #系统版本
  [root@iZbp1a48kwmva61kyrz5caZ ~]# cat /etc/os-release
    NAME="CentOS Linux"
    VERSION="7 (Core)"
    ID="centos"
    ID_LIKE="rhel fedora"
    VERSION_ID="7"
    PRETTY_NAME="CentOS Linux 7 (Core)"
    ANSI_COLOR="0;31"
    CPE_NAME="cpe:/o:centos:centos:7"
    HOME_URL="https://www.centos.org/"
    BUG_REPORT_URL="https://bugs.centos.org/"

    CENTOS_MANTISBT_PROJECT="CentOS-7"
    CENTOS_MANTISBT_PROJECT_VERSION="7"
    REDHAT_SUPPORT_PRODUCT="centos"
    REDHAT_SUPPORT_PRODUCT_VERSION="7"
安装docker
帮助文档:https://docs.docker.com/
whereis docker
![]()
由于之前已经安装过了,所以我们现在重新安装,首先卸载docker,然后再一步一步安装docker流程
# 1.卸载旧的docker版本
$ sudo yum remove docker \
                  docker-client \
                  docker-client-latest \
                  docker-common \
                  docker-latest \
                  docker-latest-logrotate \
                  docker-logrotate \
                  docker-engine
# 2.通过仓库安装 需要的安装包
$ sudo yum install -y yum-utils
# 3.设置镜像仓库
1. $ sudo yum-config-manager \
    --add-repo \
    https://download.docker.com/linux/centos/docker-ce.repo(国外版本不推荐)
2.国内版本 (作者使用的是阿里云的)
 $ sudo yum-config-manager --add-repo http://mirrors.aliyun.com/docker-ce/linux/centos/docker-ce.repo
# 4.安装docker相关命令 docker-ce 社区版本 docker-ee 企业版本
$ sudo yum install docker-ce docker-ce-cli containerd.io
# 5.启动docker
[root@iZbp1a48kwmva61kyrz5caZ ~]# systemctl start docker
[root@iZbp1a48kwmva61kyrz5caZ ~]# docker version
Client: Docker Engine - Community
 Version:           20.10.2
 API version:       1.41
 Go version:        go1.13.15
 Git commit:        2291f61
 Built:             Mon Dec 28 16:17:48 2020
 OS/Arch:           linux/amd64
 Context:           default
 Experimental:      true

Server: Docker Engine - Community
 Engine:
  Version:          20.10.2
  API version:      1.41 (minimum version 1.12)
  Go version:       go1.13.15
  Git commit:       8891c58
  Built:            Mon Dec 28 16:16:13 2020
  OS/Arch:          linux/amd64
  Experimental:     false
 containerd:
  Version:          1.4.3
  GitCommit:        269548fa27e0089a8b8278fc4fc781d7f65a939b
 runc:
  Version:          1.0.0-rc92
  GitCommit:        ff819c7e9184c13b7c2607fe6c30ae19403a7aff
 docker-init:
  Version:          0.19.0
  GitCommit:        de40ad0
看到这里基本上docker 安装成功。
# 6.卸载docker
1.删除依赖
$  sudo yum remove docker-ce docker-ce-cli containerd.io
2.删除资源
$ sudo rm -rf /var/lib/docker
$ sudo rm -rf /var/lib/containerd
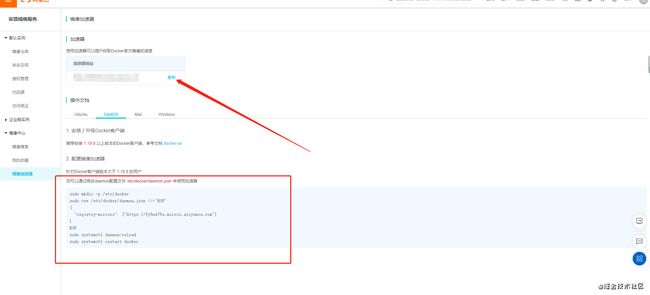
阿里云镜像加速
阿里云地址:https://cr.console.aliyun.com/cn-hangzhou/instances/mirrors?spm=5176.12901015.0.i12901015.7c3a525cAYfWD1
Docker的常用命令
docker主要核心几大模块
镜像:(Image)
docker镜像就好比是一个模板
容器:(Container)
Docker利用容器技术独立运行一个或者一个组应用 相当于一个简化版的linux
启动、停止、删除
仓库:(Repository)
公有仓库
私有仓库
数据卷:(Volumn)
数据卷 是被设计用来持久化数据的,它的生命周期独立于容器,Docker 不会在容器被删除后自动删除 数据卷,
并且也不存在垃圾回收这样的机制来处理没有任何容器引用的 数据卷。如果需要在删除容器的同时移除数据卷。
docker version  # 版本信息
docker info     # docker系统详细信息
docker --help   # 帮助命令
输入docker --help 可查看各种docker相关命令操作
[root@iZbp1a48kwmva61kyrz5caZ ~]# docker --help

Usage:  docker [OPTIONS] COMMAND

A self-sufficient runtime for containers

Options:
      --config string      Location of client config files (default "/root/.docker")
  -c, --context string     Name of the context to use to connect to the daemon (overrides DOCKER_HOST env var and default context set with "docker context use")
  -D, --debug              Enable debug mode
  -H, --host list          Daemon socket(s) to connect to
  -l, --log-level string   Set the logging level ("debug"|"info"|"warn"|"error"|"fatal") (default "info")
      --tls                Use TLS; implied by --tlsverify
      --tlscacert string   Trust certs signed only by this CA (default "/root/.docker/ca.pem")
      --tlscert string     Path to TLS certificate file (default "/root/.docker/cert.pem")
      --tlskey string      Path to TLS key file (default "/root/.docker/key.pem")
      --tlsverify          Use TLS and verify the remote
  -v, --version            Print version information and quit

Management Commands:
  app*        Docker App (Docker Inc., v0.9.1-beta3)
  builder     Manage builds
  buildx*     Build with BuildKit (Docker Inc., v0.5.1-docker)
  config      Manage Docker configs
  container   Manage containers
  context     Manage contexts
  image       Manage images
  manifest    Manage Docker image manifests and manifest lists
  network     Manage networks
  node        Manage Swarm nodes
  plugin      Manage plugins
  secret      Manage Docker secrets
  service     Manage services
  stack       Manage Docker stacks
  swarm       Manage Swarm
  system      Manage Docker
  trust       Manage trust on Docker images
  volume      Manage volumes

Commands:
  attach      Attach local standard input, output, and error streams to a running container
  build       Build an image from a Dockerfile
  commit      Create a new image from a container's changes
  cp          Copy files/folders between a container and the local filesystem
  create      Create a new container
  diff        Inspect changes to files or directories on a container's filesystem
  events      Get real time events from the server
  exec        Run a command in a running container
  export      Export a container's filesystem as a tar archive
  history     Show the history of an image
  images      List images
  import      Import the contents from a tarball to create a filesystem image
  info        Display system-wide information
  inspect     Return low-level information on Docker objects
  kill        Kill one or more running containers
  load        Load an image from a tar archive or STDIN
  login       Log in to a Docker registry
  logout      Log out from a Docker registry
  logs        Fetch the logs of a container
  pause       Pause all processes within one or more containers
  port        List port mappings or a specific mapping for the container
  ps          List containers
  pull        Pull an image or a repository from a registry
  push        Push an image or a repository to a registry
  rename      Rename a container
  restart     Restart one or more containers
  rm          Remove one or more containers
  rmi         Remove one or more images
  run         Run a command in a new container
  save        Save one or more images to a tar archive (streamed to STDOUT by default)
  search      Search the Docker Hub for images
  start       Start one or more stopped containers
  stats       Display a live stream of container(s) resource usage statistics
  stop        Stop one or more running containers
  tag         Create a tag TARGET_IMAGE that refers to SOURCE_IMAGE
  top         Display the running processes of a container
  unpause     Unpause all processes within one or more containers
  update      Update configuration of one or more containers
  version     Show the Docker version information
  wait        Block until one or more containers stop, then print their exit codes

Run 'docker COMMAND --help' for more information on a command.

To get more help with docker, check out our guides at https://docs.docker.com/go/guides/
镜像命令 (Image)
    docker images   # 镜像地址
    #explain
    REPOSITORY     TAG       IMAGE ID       CREATED       SIZE
    仓库            标签        id           创建时间       大小
docker search 搜索镜像
[root@iZbp1a48kwmva61kyrz5caZ /]# docker search mysql
NAME                              DESCRIPTION                                     STARS     OFFICIAL   AUTOMATED
mysql                             MySQL is a widely used, open-source relation…   10414     [OK]
mariadb                           MariaDB is a community-developed fork of MyS…   3866      [OK]
mysql/mysql-server                Optimized MySQL Server Docker images. Create…   762                  [OK]
percona                           Percona Server is a fork of the MySQL relati…   524       [OK]
centos/mysql-57-centos7           MySQL 5.7 SQL database server                   87
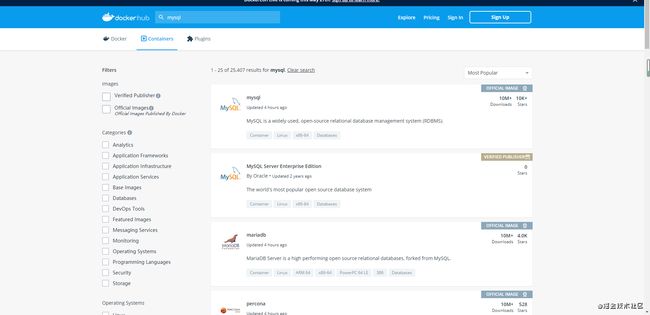
也可以在dockerhub上搜索镜像
容器命令(Container)
docker pull centos #下载最新的centos
新建容器运行
docker run [可选参数] imageid

#参数说明
--name="Name"   # 容器名称 用来区分容器
-d              # 后台方式运行
-i -t           # 使用交互方式 进入容器查看
-p              # 随机指定端口
    -p 主机端口:容器端口(常用)
    -p ip:主机端口容器端口
    -p 容器端口
    容器的端口
-P


#测试 启动并进入容器
[root@iZbp1a48kwmva61kyrz5caZ /]# docker run -it centos /bin/bash
[root@7a19fe65ed43 /]# ls  查看内部
bin  etc   lib	  lost+found  mnt  proc  run   srv  tmp  var
dev  home  lib64  media       opt  root  sbin  sys  usr
列出所运行的容器
[root@iZbp1a48kwmva61kyrz5caZ /]# docker ps
CONTAINER ID   IMAGE     COMMAND   CREATED   STATUS    PORTS     NAMES
[root@iZbp1a48kwmva61kyrz5caZ /]# docker ps -a
CONTAINER ID   IMAGE     COMMAND       CREATED         STATUS                        PORTS     NAMES
7a19fe65ed43   centos    "/bin/bash"   3 minutes ago   Exited (130) 10 seconds ago             priceless_napier
退出、删除命令
exit 容器退出
Ctrl+P+Q 不停止推出

docker rm 容器id                  # 删除指定的容器 不能删除正在运行的
docker rm -f $(docker ps -aq)     # 删除所有容器
docker ps -a -q | xargs docker rm # 删除所有容器
启动、停止容器
docker start 容器id
docker restart 容器id
docker stop 容器id
docker kill 容器id
常用其他命令
# docker run -d 镜像名
[root@iZbp1a48kwmva61kyrz5caZ /]# docker run -d centos
07422da5b573599ecc27184295cf7b6cb3fb839668969216f1f6bfd1b8b52e50
#问题
docker ps 发现centos停止
常见坑货 docker 容器在后台运行 就必须有一个前台进程 docker发现没有应用
#查看日志
docker logs -f -t --tail  num[数量]  容器id 没有日志
docker运行程序
创建第一个hello-world项目
# 1.运行hello-world 镜像
[root@iZbp1a48kwmva61kyrz5caZ ~]# docker run hello-world
Unable to find image 'hello-world:latest' locally
latest: Pulling from library/hello-world
0e03bdcc26d7: Pull complete
Digest: sha256:31b9c7d48790f0d8c50ab433d9c3b7e17666d6993084c002c2ff1ca09b96391d
Status: Downloaded newer image for hello-world:latest

Hello from Docker!
This message shows that your installation appears to be working correctly.

To generate this message, Docker took the following steps:
 1. The Docker client contacted the Docker daemon.
 2. The Docker daemon pulled the "hello-world" image from the Docker Hub.
    (amd64)
 3. The Docker daemon created a new container from that image which runs the
    executable that produces the output you are currently reading.
 4. The Docker daemon streamed that output to the Docker client, which sent it
    to your terminal.

To try something more ambitious, you can run an Ubuntu container with:
 $ docker run -it ubuntu bash

Share images, automate workflows, and more with a free Docker ID:
 https://hub.docker.com/

For more examples and ideas, visit:
 https://docs.docker.com/get-started/
我们可以看到,他执行了几步
1.没有找到hello-world镜像
2.然后去远程DockerHub上拉去镜像,如果有则pull拉取,如果没有则会返回找不到
3.pull成功后可以看到签名信息,就代表拉取镜像成功。
查看镜像
# 查看拉取的镜像
[root@iZbp1a48kwmva61kyrz5caZ ~]# docker images
REPOSITORY    TAG                 IMAGE ID       CREATED         SIZE
hello-world   latest              bf756fb1ae65   14 months ago   13.3kB
部署nginx
1.搜索镜像
docker search nginx
2.下载镜像
docker pull nginx
3.运行
docker run -d --name nginx01 -p 4444:80 ngixn #以后台方式启动
可以通过以外网的4444端口方位docker内部的80端口;
公网端口要在阿里云安全组配置
测试查看
[root@iZbp1a48kwmva61kyrz5caZ /]# curl locahost:4444
curl: (6) Could not resolve host: locahost; Unknown error
[root@iZbp1a48kwmva61kyrz5caZ /]# curl localhost:4444
Welcome to nginx!
Welcome to nginx!
If you see this page, the nginx web server is successfully installed and
working. Further configuration is required.
For online documentation and support please refer to
nginx.org.
Commercial support is available at
nginx.com.
Thank you for using nginx.
#进入容器
[root@iZbp1a48kwmva61kyrz5caZ /]# docker exec -it nginx01 /bin/bash
root@6a214c47903b:/# ll
bash: ll: command not found
root@6a214c47903b:/# ls
bin boot dev docker-entrypoint.d docker-entrypoint.sh etc home lib lib64 media mnt opt proc root run sbin srv sys tmp usr var
root@6a214c47903b:/# where nginx
bash: where: command not found
root@6a214c47903b:/# whereis nginx
nginx: /usr/sbin/nginx /usr/lib/nginx /etc/nginx /usr/share/nginx
容器数据卷使用
什么是容器数据卷
就是我们的每一个容器都是一个简化版的操作系统,
Dockerfile
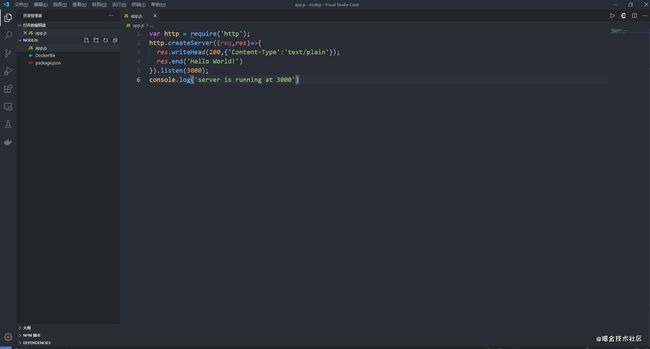
创建Dockefile
此文以安装node为例
  1.mkdir nodejs
  2.cd nodejs && npm init -y
  3.新增app.js Dockerfile
如图所示:
 FROM node:14.5.0-alpine3.12
#执行命令,创建文件夹
RUN mkdir -p /home/Service
WORKDIR /home/Service
COPY . /home/Service
RUN npm install

EXPOSE 3000
CMD ["npm","start"]
保存。
在当前目录执行开始构建镜像
docker build -t nodejs:latest .
构建完成后执行docker images 可以看到执行的镜像
docker run -itd -p 4444:80 nodejs
然后在浏览器输入地址
docker-compose
docker-cmpose是什么
docker-compose 是一个用来把 docker 自动化的东西。
有了 docker-compose 你可以把所有繁复的 docker 操作全都一条命令,自动化的完成。
为什么要用 docker-compose,它解决了什么
用通俗的语言来说,我们平时操作 docker 还是很原始的一系列动作,你手动使用 docker 的动作可以拆分成几个步骤
1 找到一个系统镜像 // docker search
2 安装好 vm 或者 virtual box // apt-get install docker
3 在 vm 中安装镜像 // docker run -d -it 你的镜像
4 略..
对于 docker-compose 有两个基本的概念:
服务(service):一个应用容器,即 docker 容器,比如之前所说的mysql 容器、nginx 容器
项目(project):由一组关联的应用容器组成的一个完整业务单元,比如上面所讲的由 mysql、web app、nginx 容器组成的网站。docker-compose 面向项目进行管理。
使用docker-compose安装nginx
1.首先安装docker-compose
国内
sudo curl -L https://download.fastgit.org/docker/compose/releases/download/1.27.4/docker-compose-`uname -s`-`uname -m` > /usr/local/bin/docker-compose
sudo chmod +x /usr/local/bin/docker-compose #设置权限
2.在文件新建docker-compose.yml文件
version: "3"
services:
  nginx:                        # 服务名称
    image: nginx:latest
    ports:
    - 2333:80                   # 暴漏端口
    volumes:                    # 挂载
    - /root/nginx/html:/usr/share/nginx/html  #映射文件
    - /root/nginx/nginx.conf:/etc/nginx/nginx.conf  #映射
    privileged: true           #  容器nginx调用权限问题
version: 表示我们的compose文件的版本,目前有1,2,3,每个版本语法不尽相同,这里以版本2为例,具体可参考 docker-compose 文档。
services: 即我们要开始定义服务,每个docker容器为一个服务。
app: 这里我们定义了第一个服务,app 为其名字
nginx:服务名称
image:服务镜像
port:该服务指定暴漏端口号
build: 指定该容器构建参数
volumes: 与 dockerfile 中 -v 参数相似,这里是将当前文件夹挂载到容器的/user/nginx/html 目录下
working_dir: 指定容器工作目录
environment: 设置环境变量。由于 laravel 框架在环境变量已有值的情况下不会加载.env 配置,这里 DB_HOST和 REDIS_HOST 就是.env 文件中配置数据库连接的参数,我们设置它以便连接docker 的数据库,database 和 redis 是接下来定义的服务名称。
3.编写nginx.conf文件
  #解决SPA缓存问题
    map $sent_http_content_type $expires {
        default off;
        text/html epoch; # means no-cache vue(SPA)项目只要不缓存index.html就可以了,其它所有的静态资源每次打包更新时自带哈希值(会自动获取最新)
    }
http {
    include       mime.types;
    default_type  application/octet-stream;
    sendfile        on;
    keepalive_timeout  65;

    #gzip  on;
    server {
        listen       80;
        server_name  xxxxxxxx;
        location / {
             root    /usr/share/nginx/html;
             index  index.html index.htm;
             try_files $uri $uri/ /index.html last;
       }
        #error_page  404              /404.html;

        # redirect server error pages to the static page /50x.html
        #
        error_page   500 502 503 504  /50x.html;
        location = /50x.html {
            root   html;
        }
    }
}
4.编排docker-compose
cd 到文件当前目录 执行
docker-compose up -d
-d 表示在后台运行服务,执行完毕后哦,会发现开始编排服务,依次执行命令。然后在浏览器输入地址
执行成功说明docker-compose编排已经成功。
结尾
到这已经差不多大致完结了。后续会持续更新修改,看到这的别玩忘了点个赞~
