卷积神经网络手势识别之剪刀石头布
剪刀石头布手势识别
1.加载数据并解压
(1)使用wget下载训练样本和测试样本的压缩文件
!wget  https://storage.googleapis.com/laurencemoroney-blog.appspot.com/rps.zip

!wget https://storage.googleapis.com/laurencemoroney-blog.appspot.com/rps-test-set.zip
(2)调用os 与zipfile方法解压文件
import os
import zipfile

local_zip = 'C:\\Users\\……\\tmp\\rps.zip'#训练样本集目录
zip_ref = zipfile.ZipFile(local_zip, 'r')#打开训练样本集路径并读取压缩文件
zip_ref.extractall('\\tmp\\')#将训练集解压至tmp子目录下
zip_ref.close()#关闭压缩文件

local_zip = 'C:\\Users\\……\\tmp\\rps-test-set.zip'#测试样本集目录
zip_ref = zipfile.ZipFile(local_zip, 'r')#打开测试样本集路径并读取压缩文件
zip_ref.extractall('\\tmp\\')#将测试集解压至tmp子目录下
zip_ref.close()#关闭压缩文件
注:具体路径需要根据自己的电脑设置哦
(3)查看样本数据并列出前10个样本的文件名
import os
rock_dir = os.path.join('/tmp/rps/rock')#石头
paper_dir = os.path.join('/tmp/rps/paper')#布
scissors_dir = os.path.join('/tmp/rps/scissors')#剪刀

print('total training rock images:', len(os.listdir(rock_dir)))#listdir显示当前路径下的文件列表
print('total training paper images:', len(os.listdir(paper_dir)))#len计算当前文件列表中有多少文件
print('total training scissors images:', len(os.listdir(scissors_dir)))

rock_files = os.listdir(rock_dir)#把存储石头的文件夹中把它的文件名列出来赋值给rock_files
print(rock_files[:10])#把列表对像的前10个文件名列出来

paper_files = os.listdir(paper_dir)
print(paper_files[:10])

scissors_files = os.listdir(scissors_dir)
print(scissors_files[:10])
运行结果

(4)可视化,查看样本图片
%matplotlib inline

import matplotlib.pyplot as plt
import matplotlib.image as mpimg

pic_index = 2#取2个文件可视化

#分别从石头,剪刀,布三类样本中取两个文件进行可视化

next_rock = [os.path.join(rock_dir, fname)
                for fname in rock_files[pic_index-2:pic_index]]#for循环:rock_files[2-2:2]]
next_paper = [os.path.join(paper_dir, fname)
                for fname in paper_files[pic_index-2:pic_index]]
next_scissors = [os.path.join(scissors_dir, fname)
                for fname in scissors_files[pic_index-2:pic_index]]

for i, img_path in enumerate(next_rock+next_paper+next_scissors):#enumerate
  print(i,img_path)#enumerate就是枚举的意思,把元素一个个列举出来,第一个是什么,第二个是什么,所以他返回的是元素以及对应的索引。
  img = mpimg.imread(img_path)#使用matplotlib.image方法就可以把img_path路径下的文件读进来,img实际上图像的编码,是一个张量
  plt.imshow(img)#使用matplotlib.pyplot方法把图片显示出来
  plt.axis('Off')
  plt.show()
2.数据预处理与模型构建
数据预处理
首先对训练样本和测试样本归一化;除了归一化外,还要对训练样本进行一系列的数据增强,比如旋转,平移,剪切,缩放,水平翻转,使得样本数增加,从而提高网络的泛化能力减少网络过拟合的风险。
import tensorflow as tf
import keras_preprocessing
from keras_preprocessing import image
from keras_preprocessing.image import ImageDataGenerator

TRAINING_DIR = "/tmp/rps/"
training_datagen = ImageDataGenerator(#调用ImageDataGenerator对数据进行初始化
      rescale = 1./255,#把三个通道的编码都除以255进行归一化处理,可以防止网络计算量过大
	  rotation_range=40,#如果输入层计算量过大的话,通过前向传递第一个隐层计算量也会很大
      width_shift_range=0.2,#如果使用sigmoid激活函数,还会存在饱和区工作的问题
      height_shift_range=0.2,
      shear_range=0.2,
      zoom_range=0.2,
      horizontal_flip=True,
      fill_mode='nearest')

VALIDATION_DIR = "/tmp/rps-test-set/"
validation_datagen = ImageDataGenerator(rescale = 1./255)#测试样本归一化

train_generator = training_datagen.flow_from_directory(
	TRAINING_DIR,
	target_size=(150,150),#把训练样本的大小规整为150×150
	class_mode='categorical'#分类任务将class_mode设为可分类型的
)

validation_generator = validation_datagen.flow_from_directory(
	VALIDATION_DIR,
	target_size=(150,150),#把测试样本的大小规整为150×150
	class_mode='categorical'#分类任务将class_mode设为可分类型的
)

model = tf.keras.models.Sequential([#调用tensorflow下的keras的models库下的Sequential,Sequential表示网络是顺序连接诶起来的
    # Note the input shape is the desired size of the image 150x150 with 3 bytes color
    # This is the first convolution
    tf.keras.layers.Conv2D(64, (3,3), activation='relu', input_shape=(150, 150, 3)),
    tf.keras.layers.MaxPooling2D(2, 2),
    # The second convolution
    tf.keras.layers.Conv2D(64, (3,3), activation='relu'),
    tf.keras.layers.MaxPooling2D(2,2),
    # The third convolution
    tf.keras.layers.Conv2D(128, (3,3), activation='relu'),
    tf.keras.layers.MaxPooling2D(2,2),
    # The fourth convolution
    tf.keras.layers.Conv2D(128, (3,3), activation='relu'),
    tf.keras.layers.MaxPooling2D(2,2),
    # Flatten the results to feed into a DNN
    tf.keras.layers.Flatten(),
    tf.keras.layers.Dropout(0.5),
    # 512 neuron hidden layer
    tf.keras.layers.Dense(512, activation='relu'),
    tf.keras.layers.Dense(3, activation='softmax')
])


model.summary()#调用model.summary方法查看网络结构
模型结构:
- 整个网络有4对卷积+池化,后接一个全连接层,接一个输出层
- 每个卷积都是3×3的卷积核,每个池化都是2×2的池化核,最大池化做特征压缩。激活函数都是relu
- 网络输入是150×150的三通道彩色图像
- 4个卷积层,前两个卷积层是64个通道,后两个卷积层是128个通道
- 在全连接层之前要做一个flatten操作,最后一个池化层拉直成一个向量,在把128个通道两成一个更大的向量
- 这样就可以输入全连接隐层,全连接隐层有512个神经元,激活函数用的是relu
- 最后输出层是3个神经元,因为石头剪刀布是三分类问题,使用的是softmax激活函数,使得三个输出加起来等于1

3. 模型训练与优化
model.compile(loss = 'categorical_crossentropy', optimizer='rmsprop', metrics=['accuracy'])#定义损失函数,分类问题使用交叉熵损失函数,使用rmsprop动态调整学习步长,网络性能使用accuracy衡量
#history = model.fit(train_generator, epochs=25, validation_data = validation_generator, verbose = 1)
history = model.fit_generator(train_generator, epochs=25, validation_data = validation_generator, verbose = 1)#调用model.fit_generator进行模型训练
#把处理好的train_generator,validation_generator作为参数输入,训练25个epoch,verbose = 1表示日志记录,即将每一轮的训练记录到history中
model.save("rps.h5")#训练完成后,将模型的参数保存到rps.h5文件中
4.模型评价
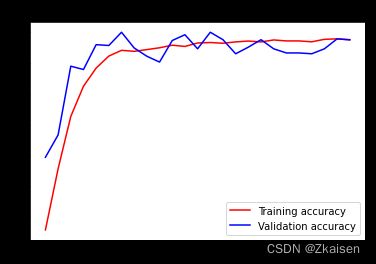
训练整体较稳定,有时会出现测试样本准确度高于训练样本,这可能是由于训练样本不足造成的,此时我们可以增加训练样本,调优或者增加训练次数,调优的时候我们可以改变网络结构,比如增加网络的层数,增加隐层神经元数量
import matplotlib.pyplot as plt
acc = history.history['accuracy']
val_acc = history.history['val_accuracy']
loss = history.history['loss']
val_loss = history.history['val_loss']

epochs = range(len(acc))

plt.plot(epochs, acc, 'r', label='Training accuracy')#红线画出训练样本准确度
plt.plot(epochs, val_acc, 'b', label='Validation accuracy')#蓝线画出测试样本准确度
plt.title('Training and validation accuracy')
plt.legend(loc=0)
plt.figure()


plt.show()
5.投入使用
import numpy as np
from google.colab import files
from keras.preprocessing import image#调用了keras.preprocessingimage这个库

uploaded = files.upload()#调用了google.colab files的upload方法,可以从云或本地的文件夹里边加载数据集

for fn in uploaded.keys():#使用for循环可以加载一批样本

  # predicting images
  path = fn#加载文件的路径
  img = image.load_img(path, target_size=(150, 150))#读取三维图片即张量
  x = image.img_to_array(img)#将图像张量转化成数组
  x = np.expand_dims(x, axis=0)#把图像拉直成向量

  images = np.vstack([x])#把三个通道的向量接起来
  classes = model.predict(images, batch_size=10)#调用网络进行预测,分批次处理,10个为一批
  print(fn)
  print(classes)#输出分类结果,采用的是OneHot编码,三个输出分别是石头,布,剪刀,值为1的位置对应着预测结果


