pytorch笔记:实现简易LSTM
1 lstm理论部分
详细可见 机器学习笔记 RNN初探_刘文巾的博客-CSDN博客
2 torch.nn.LSTM
2.1 参数
– input_size
– hidden_size
– num_layers
– bias
– batch_first :设置了之后,输出的维度为(batch, seq_len, hidden_size);否则为(seq_len,batch,hidden_size)
– dropout
– bidirectional
2.2 输入
– input (seq_len, batch, input_size)
– h_0 (num_layers * num_directions, batch, hidden_size)
– c_0 (num_layers * num_directions, batch, hidden_size)
seq_len:每一次喂入的sequence有多长(一句话有几个单词)
input_size:每一个单词的embedding dimension(一个word是由几个维度的embedding组成的)
num_layers:有几层RNN
num_directions:是单向RNN还是双向RNN
hidden_size:隐藏层的维度(每个单词在隐藏层中有多少维组成它的embedding)
2.3 输出
– output (seq_len, batch, num_directions * hidden_size)
– h_n (num_layers * num_directions, batch, hidden_size)
– c_n (num_layers * num_directions, batch, hidden_size)
3 pytorch实现
我们还是用用pytorch实现简易RNN_刘文巾的博客-CSDN博客 一样的例子,记用sin预测cos,以示对照
3.1 导入库 & 超参数设定
import torch
import numpy as np
import matplotlib.pyplot as plt

TIME_STEP=10
INPUT_SIZE=1
HIDDEN_SIZE=32
LR=0.02
3.2 定义LSTM
class LSTM(torch.nn.Module):
    def __init__(self):
        super(LSTM,self).__init__()

        self.lstm=torch.nn.LSTM(
            input_size=INPUT_SIZE,
            hidden_size=HIDDEN_SIZE,
            num_layers=1,
            batch_first=True)
        '''
batch_first的用法和RNN是一样的
设置batch_first为True,那么输入数据的维度为(batch_size,time_step,input_size)
如果不设置这个值,或者设置为False,那么输入数据的维度为(time_step,batch_size,input_size)
        '''

        self.out=torch.nn.Linear(HIDDEN_SIZE,1)

    #__init__部分和RNN几乎是一样的

    def forward(self,x,h_n,h_c):
#和RNN类似,上一个时间片的隐藏层状态也要一直传下去,只不过这边我们要传两个值

        r_out,(h_n,h_c)=self.lstm(x,(h_n,h_c))
#r_out [Batch_size,Time_step(即前面的seq_len),hidden_size]
#h_n h_c [Batch_size,num_layers*num_direction,hidden]

        r_out=r_out.view(-1,HIDDEN_SIZE)
        out=self.out(r_out)
        out=out.view(-1,TIME_STEP,1)
        return(out,(h_n,h_c))

lstm=LSTM()
print(lstm)
'''
LSTM(
  (lstm): LSTM(1, 32, batch_first=True)
  (out): Linear(in_features=32, out_features=1, bias=True)
)
'''
3.3 设定优化函数和损失函数
optimizer=torch.optim.Adam(lstm.parameters(),lr=LR)

loss_func=torch.nn.MSELoss()
3.4 训练与验证模型
h_n=torch.zeros((1,1,HIDDEN_SIZE))
h_c=torch.zeros((1,1,HIDDEN_SIZE))
for step in range(100):
    start=step*np.pi
    end=(step+1)*np.pi

    steps=np.linspace(start,end,TIME_STEP,dtype=np.float32)
#这里dtype这一部分一定要加,不然的话会报错
#RuntimeError: expected scalar type Double but found Float
    x_np=np.sin(steps).reshape(1,TIME_STEP,INPUT_SIZE)

    y_np=np.cos(steps).reshape(1,TIME_STEP,1)
    #和RNN一样,目标:用sin预测cos

    x=torch.from_numpy(x_np)
    y=torch.from_numpy(y_np)

    prediction,(h_n,h_c)=lstm(x,h_n,h_c)

    h_n=h_n.data
    h_c=h_c.data
#隐藏状态向后传

    loss=loss_func(prediction,y)

    optimizer.zero_grad()
    #清空上一步的参与更新参数值

    loss.backward()
    #误差反向传播,计算参数更新值

    optimizer.step()
    #将参数更新值施加到rnn的parameters上


    if(step % 10==0):
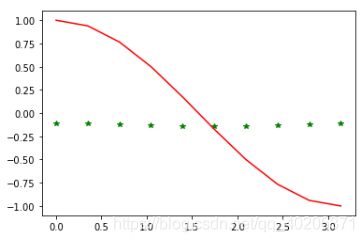
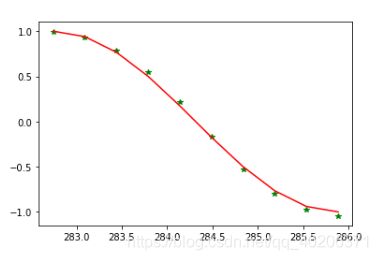
        plt.plot(steps,prediction.data.numpy().flatten(),'g*')
        plt.plot(steps,y_np.flatten(),'r-')
        plt.show()
4 实验结果
4.1 一开始
最后


