SpringBoot基本配置
参数配置:
Thymeleaf的默认参数配置:
搭配依赖配置使用----依赖配置
在application.properties中可以配置thymeleaf模板解析器属性
# THYMELEAF (ThymeleafAutoConfiguration)
#开启模板缓存(默认值:true)
spring.thymeleaf.cache=true
#Check that the template exists before rendering it.
spring.thymeleaf.check-template=true
#检查模板位置是否正确(默认值:true)
spring.thymeleaf.check-template-location=true
#Content-Type的值(默认值:text/html)
spring.thymeleaf.content-type=text/html
#开启MVC Thymeleaf视图解析(默认值:true)
spring.thymeleaf.enabled=true
#模板编码
spring.thymeleaf.encoding=UTF-8
#要被排除在解析之外的视图名称列表,用逗号分隔
spring.thymeleaf.excluded-view-names=
#要运用于模板之上的模板模式。另见StandardTemplate-ModeHandlers(默认值:HTML5)
spring.thymeleaf.mode=HTML5
#在构建URL时添加到视图名称前的前缀(默认值:classpath:/templates/)
spring.thymeleaf.prefix=classpath:/templates/
#在构建URL时添加到视图名称后的后缀(默认值:.html)
spring.thymeleaf.suffix=.html
#Thymeleaf模板解析器在解析器链中的顺序。默认情况下,它排第一位。顺序从1开始,只有在定义了额外的TemplateResolver Bean时才需要设置这个属性。
spring.thymeleaf.template-resolver-order=
#可解析的视图名称列表,用逗号分隔
spring.thymeleaf.view-names=
配置Servlet容器:
#配置程序端口,默认为8080
server.port= 8080
#用户绘画session过期时间,以秒为单位
server.session.timeout=
# 配置默认访问路径,默认为/
server.context-path=
配置Tomcat:
# 配置Tomcat编码,默认为UTF-8
server.tomcat.uri-encoding=UTF-8
# 配置最大线程数
server.tomcat.max-threads=1000
配置资源文件:
# 默认值为(也就是前缀) /**
spring.mvc.static-path-pattern=
# 默认值为 classpath:/META-INF/resources/,classpath:/resources/,classpath:/static/,classpath:/public/
spring.resources.static-locations=这里设置要指向的路径,多个使用英文逗号隔开
数据源配置:
在src/main/resources/application.properties中配置数据源信息。
spring.datasource.url = jdbc:mysql://localhost:3306/spring?useUnicode=true&characterEncoding=utf-8
#url: jdbc:mysql://localhost:3306/db01?useUnicode=true&characterEncoding=UTF-#8&useSSL=false&useJDBCCompliantTimezoneShift=true&useLegacyDatetimeCode=false&serverTimezone=GMT%2b8
spring.datasource.username = root
spring.datasource.password = root
spring.datasource.driver-class-name = com.mysql.jdbc.Driver
spring.datasource.url: jdbc:mysql://localhost:3306/db01?useUnicode=true&characterEncoding=UTF-8&useSSL=false&useJDBCCompliantTimezoneShift=true&useLegacyDatetimeCode=false&serverTimezone=GMT%2b8
依赖配置
maven中scope依赖范围的概念
依赖范围就是用来控制依赖和三种classpath(编译classpath,测试classpath、运行classpath)的关系,Maven有如下几种依赖范围:
- **compile:**编译依赖范围。如果没有指定,就会默认使用该依赖范围。使用此依赖范围的Maven依赖,对于编译、测试、运行三种classpath都有效。典型的例子是spring-code,在编译、测试和运行的时候都需要使用该依赖。
- test: 测试依赖范围。使用次依赖范围的Maven依赖,只对于测试classpath有效,在编译主代码或者运行项目的使用时将无法使用此依赖。典型的例子是Jnuit,它只有在编译测试代码及运行测试的时候才需要。
- **provided:**已提供依赖范围。使用此依赖范围的Maven依赖,对于编译和测试classpath有效,但在运行时候无效。典型的例子是servlet-api,编译和测试项目的时候需要该依赖,但在运行项目的时候,由于容器以及提供,就不需要Maven重复地引入一遍。
内嵌Tomcat:
<dependency>
    <groupId>org.springframework.bootgroupId>
    <artifactId>spring-boot-starter-webartifactId>
dependency>


<dependency>
    <groupId>javax.servletgroupId>
    <artifactId>jstlartifactId>
dependency>


<dependency>
    <groupId>org.apache.tomcat.embedgroupId>
    <artifactId>tomcat-embed-jasperartifactId>
    <scope>providedscope>
dependency>
Thymeleaf配置:
搭配配置文件使用----参数配置
Thymeleaf是一款用于渲染XML/XHTML/HTML5内容的模板引擎。类似JSP,Velocity,FreeMaker等,它也可以轻易的与Spring MVC等Web框架进行集成作为Web应用的模板引擎。与其它模板引擎相比,Thymeleaf最大的特点是能够直接在浏览器中打开并正确显示模板页面,而不需要启动整个Web应用。它的功能特性如下:
- Spring MVC中@Controller中的方法可以直接返回模板名称,接下来Thymeleaf模板引擎会自动进行渲染
- 模板中的表达式支持Spring表达式语言(Spring EL)
- 表单支持,并兼容Spring MVC的数据绑定与验证机制
- 国际化支持
国际化(使用):i18n
Spring官方也推荐使用Thymeleaf,所以本篇代码整合就使用Thymeleaf来整合。
<dependency>
    <groupId>org.springframework.bootgroupId>
    <artifactId>spring-boot-starter-thymeleafartifactId>
dependency>
spring-boot-starter-thymeleaf会自动包含spring-boot-starter-web,所以我们就不需要单独引入web依赖了。
logback配置:
日志级别从低到高分为TRACE < DEBUG < INFO < WARN < ERROR < FATAL,如果设置为WARN,则低于WARN的信息都不会输出。Spring Boot中默认配置ERROR、WARN和INFO级别的日志输出到控制台
实际开发中我们不需要直接添加该依赖,你会发现spring-boot-starter其中包含了 spring-boot-starter-logging,该依赖内容就是 Spring Boot 默认的日志框架 logback。而博主这次项目的例子是基于上一篇的,工程中有用到了Thymeleaf,而Thymeleaf依赖包含了spring-boot-starter,最终我只要引入Thymeleaf(spring-boot-starter-thymeleaf)即可。
<dependency>
    <groupId>org.springframework.bootgroupId>
    <artifactId>spring-boot-starter-loggingartifactId>
dependency>
综合:spring-boot-starter-thymeleaf > spring-boot-starter > spring-boot-starter-logging,看图:
[外链图片转存失败,源站可能有防盗链机制,建议将图片保存下来直接上传(img-VFrSkhyl-1612922008616)(…\常见注解\image\thymeleaf.png)]
Spring Boot官方推荐优先使用带有-spring的文件名作为你的日志配置(如使用logback-spring.xml,而不是logback.xml),命名为logback-spring.xml的日志配置文件,spring boot可以为它添加一些spring boot特有的配置项。
<configuration scan="true" scanPeriod="60 seconds" debug="false">
    <contextName>febscontextName>
    <property name="log.path" value="log" />
    <property name="log.maxHistory" value="15" />
    <property name="log.colorPattern" value="%magenta(%d{yyyy-MM-dd HH:mm:ss}) %highlight(%-5level) %yellow(%thread) %green(%logger) %msg%n"/>
    <property name="log.pattern" value="%d{yyyy-MM-dd HH:mm:ss} %-5level %thread %logger %msg%n"/>


    <appender name="console" class="ch.qos.logback.core.ConsoleAppender">
        <encoder>
            <pattern>${log.colorPattern}pattern>
        encoder>
    appender>


    <appender name="file_info" class="ch.qos.logback.core.rolling.RollingFileAppender">
        <rollingPolicy class="ch.qos.logback.core.rolling.TimeBasedRollingPolicy">
            <fileNamePattern>${log.path}/info/info.%d{yyyy-MM-dd}.logfileNamePattern>
            <MaxHistory>${log.maxHistory}MaxHistory>
        rollingPolicy>
        <encoder>
            <pattern>${log.pattern}pattern>
        encoder>
        <filter class="ch.qos.logback.classic.filter.LevelFilter">
            <level>INFOlevel>
            <onMatch>ACCEPTonMatch>
            <onMismatch>DENYonMismatch>
        filter>
    appender>

    <appender name="file_error" class="ch.qos.logback.core.rolling.RollingFileAppender">
        <rollingPolicy class="ch.qos.logback.core.rolling.TimeBasedRollingPolicy">
            <fileNamePattern>${log.path}/error/error.%d{yyyy-MM-dd}.logfileNamePattern>
        rollingPolicy>
        <encoder>
            <pattern>${log.pattern}pattern>
        encoder>
        <filter class="ch.qos.logback.classic.filter.LevelFilter">
            <level>ERRORlevel>
            <onMatch>ACCEPTonMatch>
            <onMismatch>DENYonMismatch>
        filter>
    appender>

    <root level="debug">
        <appender-ref ref="console" />
    root>

    <root level="info">
        <appender-ref ref="file_info" />
        <appender-ref ref="file_error" />
    root>
configuration>
多环境日志输出:
据不同环境(prod:生产环境,test:测试环境,dev:开发环境)来定义不同的日志输出,在 logback-spring.xml中使用 springProfile 节点来定义,方法如下:
文件名称不是logback.xml,想使用spring扩展profile支持,要以
logback-spring.xml命名
<springProfile name="test,dev">
    <logger name="com.dudu.controller" level="info" />
springProfile>

<springProfile name="prod">
    <logger name="com.dudu.controller" level="ERROR" />
springProfile>
数据存储:
搭配配置文件:
MySQL:
<dependency>
    <groupId>org.springframework.bootgroupId>
    <artifactId>spring-boot-starter-jdbcartifactId>
dependency>
<dependency>
    <groupId>mysqlgroupId>
    <artifactId>mysql-connector-javaartifactId>
dependency>
spring-boot-starter-jdbc 默认使用tomcat-jdbc数据源,如果你想使用其他的数据源,比如这里使用了阿里巴巴的数据池管理,你应该额外添加以下依赖:
<dependency>
    <groupId>com.alibabagroupId>
    <artifactId>druidartifactId>
    <version>1.0.19version>
dependency>
Mybatis:
<dependency>
<groupId>org.mybatis.spring.bootgroupId>
<artifactId>mybatis-spring-boot-starterartifactId>
<version>1.3.0version>
dependency>
<dependency>
<groupId>mysqlgroupId上面
> mysql-connector-javaartifactId>
dependency>
这里不引入spring-boot-starter-jdbc依赖,是由于mybatis-spring-boot-starter中已经包含了此依赖。上面引入数据源依赖就多于了。
分页插件:
使用到物理分页插件pagehelper,用法还算简单,配置如下pom.xml中添加依赖:
<dependency>
    <groupId>com.github.pagehelpergroupId>
    <artifactId>pagehelper-spring-boot-starterartifactId>
    <version>1.1.0version>
dependency>
然后只需在查询list之前使用PageHelper.startPage(int pageNum, int pageSize)方法即可。pageNum是第几页,pageSize是每页多少条。
@Override
    public List<LearnResouce> queryLearnResouceList(Map<String,Object> params) {
        PageHelper.startPage(Integer.parseInt(params.get("page").toString()),
                             Integer.parseInt(params.get("rows").toString()));
        return this.learnMapper.queryLearnResouceList(params);
    }
配置异常:
依赖配置异常:
内嵌Tomcat:
<dependency>
    <groupId>org.apache.tomcat.embedgroupId>
    <artifactId>tomcat-embed-jasperartifactId>
    <scope>providedscope>
dependency>
有添加provided的情况:
- 右键运行启动类,访问页面报404错误
- 使用spring-boot:run运行正常
- 打包成jar,通过 java -jar demo-0.0.1-SNAPSHOT.jar 运行报错
- 打包成war,通过 java -jar demo-0.0.1-SNAPSHOT.war 运行正常
把provided 注释掉的情况
- 右键运行启动类,访问页面正常
- spring-boot:run运行 访问页面正常
- 打包成jar,通过 java -jar demo-0.0.1-SNAPSHOT.jar 运行报错
- 打包成war,通过 java -jar demo-0.0.1-SNAPSHOT.war 运行正常
-
就是有加provided的时候,右键运行启动类访问页面的时候,提示404错误。jar运行也报404,
-
spring-boot:run以及war运行都可以
[外链图片转存失败,源站可能有防盗链机制,建议将图片保存下来直接上传(img-T0xZ5o8k-1612922008625)(…\常见注解\image\no_provided.png)]
从上面可以看出来,jar包运行的时候会404错误,因为默认jsp不会被拷贝进来,而war包里面有包含了jsp,所以没问题。
自定义配置:
资源映射:
自定义资源映射addResourceHandlers:
比如,我们想自定义静态资源映射目录的话,只需重写addResourceHandlers方法即可。
@Configuration
public class MyWebMvcConfigurerAdapter extends WebMvcConfigurerAdapter {
    /**
     * 配置静态访问资源
     * @param registry
     */
    @Override
    public void addResourceHandlers(ResourceHandlerRegistry registry) {
        registry.addResourceHandler("/my/**").addResourceLocations("classpath:/my/");
        super.addResourceHandlers(registry);
    }
}
addResourceLocations指的是文件放置的目录,addResoureHandler指的是对外暴露的访问路径
@Configuration
public class MyWebMvcConfigurerAdapter extends WebMvcConfigurerAdapter {
    /**
     * 指定外部的目录资源
     * @param registry
     */
	@Override
    public void addResourceHandlers(ResourceHandlerRegistry registry) {
        registry.addResourceHandler("/my/**").addResourceLocations("file:E:/my/");
        super.addResourceHandlers(registry);
    }
}
页面跳转:
页面跳转addViewControllers
重写WebMvcConfigurerAdapter中的addViewControllers方法即可达到效果了
/**
     * 以前要访问一个页面需要先创建个Controller控制类,再写方法跳转到页面
     * 在这里配置后就不需要那么麻烦了,直接访问http://localhost:8080/toLogin就跳转到login.jsp页面了
     * @param registry
     */
    @Override
    public void addViewControllers(ViewControllerRegistry registry) {
        registry.addViewController("/toLogin").setViewName("login");
        super.addViewControllers(registry);
    }
值的指出的是,在这里重写addViewControllers方法,并不会覆盖WebMvcAutoConfiguration中的addViewControllers(在此方法中,Spring Boot将“/”映射至index.html),这也就意味着我们自己的配置和Spring Boot的自动配置同时有效,这也是我们推荐添加自己的MVC配置的方式。
拦截器:
拦截器addInterceptors:
拦截器在我们项目中经常使用的,这里就来介绍下最简单的判断是否登录的使用。
要实现拦截器功能需要完成以下2个步骤:
- 创建我们自己的拦截器类并实现 HandlerInterceptor 接口
- 其实重写WebMvcConfigurerAdapter中的addInterceptors方法把自定义的拦截器类添加进来即可
首先,自定义拦截器代码:
代码注释部分:链接
package com.dudu.interceptor;
public class MyInterceptor implements HandlerInterceptor {
    /*
    *在Controller处理之前进行调用(请求发生前执行),如果请求上没有绑定用户则被拦截,即返回false
    *方法返回值为true的时候请求才会被执行。
    */
    @Override
    public boolean preHandle(HttpServletRequest request, HttpServletResponse response,
                             Object handler) throws Exception {
        boolean flag =true;
        User user=(User)request.getSession().getAttribute("user");
        if(null==user){
            response.sendRedirect("toLogin");
            flag = false;
        }else{
            flag = true;
        }
        return flag;
    }
    /*
    *该方法也是需要当前对应的Interceptor的preHandle方法的返回值为true时才会执行。
    *
    *postHandle,它的执行时间是在处理器进行处理之后,也就是在Controller的方法调用之后执行,
    *但是它会在DispatcherServlet进行视图的渲染之前执行,也就是说在这个方法中你可以对ModelAndView进行操作。
    */
    @Override
    public void postHandle(HttpServletRequest request, HttpServletResponse response,
                           Object handler, ModelAndView modelAndView) throws Exception {
    }
    /*
    *该方法也是需要当前对应的Interceptor的preHandle方法的返回值为true时才会执行。
    *
    *该方法将在整个请求完成之后,也就是DispatcherServlet渲染了视图执行。(这个方法的主要作用是用于清理资源的)
    */
    @Override
    public void afterCompletion(HttpServletRequest request, HttpServletResponse response,
                                Object handler, Exception ex) throws Exception {
    }
}
这里我们简单实现了根据session中是否有User对象来判断是否登录,为空就跳转到登录页,不为空就通过。
接着,重写WebMvcConfigurerAdapter中的addInterceptors方法如下:
/**
* 拦截器
* @param registry
*/
@Override
public void addInterceptors(InterceptorRegistry registry) {
    // addPathPatterns 用于添加拦截规则
    // excludePathPatterns 用户排除拦截
    registry.addInterceptor(
        new MyInterceptor()).addPathPatterns("/**").excludePathPatterns("/toLogin","/login");
    super.addInterceptors(registry);
}
==addPathPatterns("/")==对所有请求都拦截,但是排除了/toLogin和/login**请求的拦截。
日志配置:
默认日志logback配置:具体参考依赖配置中的 logback配置
Logback是log4j框架的作者开发的新一代日志框架,它效率更高、能够适应诸多的运行环境,同时天然支持SLF4J。
数据源配置:
Spring Boot默认使用tomcat-jdbc数据源,如果你想使用其他的数据源,比如这里使用了阿里巴巴的数据池管理,除了在application.properties配置数据源之外,你应该额外添加以下依赖:
<dependency>
    <groupId>com.alibabagroupId>
    <artifactId>druidartifactId>
    <version>1.0.19version>
dependency>
修改Application.java:
@SpringBootApplication
public class Application {

    public static void main(String[] args) {
        SpringApplication.run(Application.class, args);
    }

    @Autowired
    private Environment env;

    //destroy-method="close"的作用是当数据库连接不使用的时候,就把该连接重新放到数据池中,方便下次使用调用.
    @Bean(destroyMethod =  "close")
    public DataSource dataSource() {
        DruidDataSource dataSource = new DruidDataSource();
        dataSource.setUrl(env.getProperty("spring.datasource.url"));
        dataSource.setUsername(env.getProperty("spring.datasource.username"));//用户名
        dataSource.setPassword(env.getProperty("spring.datasource.password"));//密码
        dataSource.setDriverClassName(env.getProperty("spring.datasource.driver-class-name"));
        dataSource.setInitialSize(2);//初始化时建立物理连接的个数
        dataSource.setMaxActive(20);//最大连接池数量
        dataSource.setMinIdle(0);//最小连接池数量
        dataSource.setMaxWait(60000);//获取连接时最大等待时间,单位毫秒。
        dataSource.setValidationQuery("SELECT 1");//用来检测连接是否有效的sql
        dataSource.setTestOnBorrow(false);//申请连接时执行validationQuery检测连接是否有效
        dataSource.setTestWhileIdle(true);//建议配置为true,不影响性能,并且保证安全性。
        dataSource.setPoolPreparedStatements(false);//是否缓存preparedStatement,也就是PSCache
        return dataSource;
    }
}
ok,这样就算自己配置了一个DataSource,Spring Boot会智能地选择我们自己配置的这个DataSource实例。
Mybatis集成:
方案一:注解形式
Mybatis注解的方式好简单,只要定义一个dao接口,然后sql语句通过注解写在接口方法上。最后给这个接口添加@Mapper注解或者在启动类上添加@MapperScan(“com.dudu.dao”)注解都行。
package com.dudu.dao;
/**
 * Created by tengj on 2017/4/22.
 * Component注解不添加也没事,只是不加service那边引入LearnMapper会有错误提示,但不影响
 */
@Component
@Mapper
public interface LearnMapper {
    @Insert("insert into learn_resource(author, title,url) values(#{author},#{title},#{url})")
    int add(LearnResouce learnResouce);

    @Update("update learn_resource set author=#{author},title=#{title},url=#{url} where id = #{id}")
    int update(LearnResouce learnResouce);

    @DeleteProvider(type = LearnSqlBuilder.class, method = "deleteByids")
    int deleteByIds(@Param("ids") String[] ids);


    @Select("select * from learn_resource where id = #{id}")
    @Results(id = "learnMap", value = {
            @Result(column = "id", property = "id", javaType = Long.class),
            @Result(property = "author", column = "author", javaType = String.class),
            @Result(property = "title", column = "title", javaType = String.class)
    })
    LearnResouce queryLearnResouceById(@Param("id") Long id);

    @SelectProvider(type = LearnSqlBuilder.class, method = "queryLearnResouceByParams")
    List<LearnResouce> queryLearnResouceList(Map<String, Object> params);

    class LearnSqlBuilder {
        public String queryLearnResouceByParams(final Map<String, Object> params) {
            StringBuffer sql =new StringBuffer();
            sql.append("select * from learn_resource where 1=1");
            if(!StringUtil.isNull((String)params.get("author"))){
                sql.append(" and author like '%").append((String)params.get("author")).append("%'");
            }
            if(!StringUtil.isNull((String)params.get("title"))){
                sql.append(" and title like '%").append((String)params.get("title")).append("%'");
            }
            System.out.println("查询sql=="+sql.toString());
            return sql.toString();
        }

        //删除的方法
        public String deleteByids(@Param("ids") final String[] ids){
            StringBuffer sql =new StringBuffer();
            sql.append("DELETE FROM learn_resource WHERE id in(");
            for (int i=0;i<ids.length;i++){
                if(i==ids.length-1){
                    sql.append(ids[i]);
                }else{
                    sql.append(ids[i]).append(",");
                }
            }
            sql.append(")");
            return sql.toString();
        }
    }
}
需要注意的是,简单的语句只需要使用@Insert、@Update、@Delete、@Select这4个注解即可,但是有些复杂点需要动态SQL语句,就比如上面方法中根据查询条件是否有值来动态添加sql的,就需要使用@InsertProvider、@UpdateProvider、@DeleteProvider、@SelectProvider等注解。
这些可选的 SQL 注解允许你指定一个类名和一个方法在执行时来返回运行 允许创建动态 的 SQL。 基于执行的映射语句, MyBatis 会实例化这个类,然后执行由 provider 指定的方法. 该方法可以有选择地接受参数对象.(In MyBatis 3.4 or later, it’s allow multiple parameters) 属性: type,method。type 属性是类。method 属性是方法名。 注意: 这节之后是对 类的 讨论,它可以帮助你以干净,容于阅读 的方式来构建动态 SQL。
方案二:xml配置方式:
xml配置方式保持映射文件的老传统,优化主要体现在不需要实现dao的是实现层,系统会自动根据方法名在映射文件中找对应的sql,具体操作如下:
编写Dao层的代码,新建LearnMapper接口,无需具体实现类。
package com.dudu.dao;
@Mapper
public interface LearnMapper {
    int add(LearnResouce learnResouce);
    int update(LearnResouce learnResouce);
    int deleteByIds(String[] ids);
    LearnResouce queryLearnResouceById(Long id);
    public List<LearnResouce> queryLearnResouceList(Map<String, Object> params);
}
修改application.properties 配置文件:
#指定bean所在包
mybatis.type-aliases-package=com.dudu.domain
#指定映射文件
mybatis.mapperLocations=classpath:mapper/*.xml
添加LearnMapper的映射文件:
在src/main/resources目录下新建一个mapper目录,在mapper目录下新建LearnMapper.xml文件。
通过mapper标签中的namespace属性指定对应的dao映射,这里指向LearnMapper。
<mapper namespace="com.dudu.dao.LearnMapper">
  <resultMap id="baseResultMap" type="com.dudu.domain.LearnResouce">
    <id column="id" property="id" jdbcType="BIGINT"  />
    <result column="author" property="author" jdbcType="VARCHAR"/>
    <result column="title" property="title" jdbcType="VARCHAR"/>
    <result column="url" property="url" jdbcType="VARCHAR"/>
  resultMap>

  <sql id="baseColumnList" >
    id, author, title,url
  sql>

  <select id="queryLearnResouceList" resultMap="baseResultMap" parameterType="java.util.HashMap">
    select
    <include refid="baseColumnList" />
    from learn_resource
    <where>
      1 = 1
      <if test="author!= null and author !=''">
        AND author like CONCAT(CONCAT('%',#{author,jdbcType=VARCHAR}),'%')
      if>
      <if test="title != null and title !=''">
        AND title like  CONCAT(CONCAT('%',#{title,jdbcType=VARCHAR}),'%')
      if>

    where>
  select>

  <select id="queryLearnResouceById"  resultMap="baseResultMap" parameterType="java.lang.Long">
    SELECT
    <include refid="baseColumnList" />
    FROM learn_resource
    WHERE id = #{id}
  select>

  <insert id="add" parameterType="com.dudu.domain.LearnResouce" >
    INSERT INTO learn_resource (author, title,url) VALUES (#{author}, #{title}, #{url})
  insert>

  <update id="update" parameterType="com.dudu.domain.LearnResouce" >
    UPDATE learn_resource SET author = #{author},title = #{title},url = #{url} WHERE id = #{id}
  update>

  <delete id="deleteByIds" parameterType="java.lang.String" >
    DELETE FROM learn_resource WHERE id in
    <foreach item="idItem" collection="array" open="(" separator="," close=")">
      #{idItem}
    foreach>
  delete>
mapper>
异常处理:
通过ControllerAdvice注解处理异常:
Spring Boot提供的ErrorController是一种全局性的容错机制。此外,你还可以用@ControllerAdvice注解和@ExceptionHandler注解实现对指定异常的特殊处理。
这里介绍两种情况:
- 局部异常处理 @Controller + @ExceptionHandler
- 全局异常处理 @ControllerAdvice + @ExceptionHandler
局部异常处理:
局部异常主要用到的是@ExceptionHandler注解,此注解注解到类的方法上,当此注解里定义的异常抛出时,此方法会被执行。如果@ExceptionHandler所在的类是@Controller,则此方法只作用在此类。如果@ExceptionHandler所在的类带有@ControllerAdvice注解,则此方法会作用在全局。
该注解用于标注处理方法处理那些特定的异常。被该注解标注的方法可以有以下任意顺序的参数类型:
Throwable、Exception 等异常对象;
ServletRequest、HttpServletRequest、ServletResponse、HttpServletResponse;
HttpSession 等会话对象;
org.springframework.web.context.request.WebRequest;
java.util.Locale;
java.io.InputStream、java.io.Reader;
java.io.OutputStream、java.io.Writer;
org.springframework.ui.Model;
并且被该注解标注的方法可以有以下的返回值类型可选:
ModelAndView;
org.springframework.ui.Model;
java.util.Map;
org.springframework.web.servlet.View;
@ResponseBody 注解标注的任意对象;
HttpEntity or ResponseEntity;
void;
以上罗列的不完全,更加详细的信息可参考:Spring ExceptionHandler。
举个简单例子,这里我们对除0异常用@ExceptionHandler来捕捉。
@Controller
public class BaseErrorController extends  AbstractController{
    private Logger logger = LoggerFactory.getLogger(this.getClass());

    @RequestMapping(value="/ex")
    @ResponseBody
    public String error(){
        int i=5/0;
        return "ex";
  }

    //局部异常处理
    @ExceptionHandler(Exception.class)
    @ResponseBody
    public String exHandler(Exception e){
      // 判断发生异常的类型是除0异常则做出响应
      if(e instanceof ArithmeticException){
          return "发生了除0异常";
      }
      // 未知的异常做出响应
      return "发生了未知异常";
    }
}
全局异常处理:
在spring 3.2中,新增了@ControllerAdvice 注解,可以用于定义@ExceptionHandler、@InitBinder、@ModelAttribute,并应用到所有@RequestMapping中。
简单的说,进入Controller层的错误才会由@ControllerAdvice处理,拦截器抛出的错误以及访问错误地址的情况@ControllerAdvice处理不了,由SpringBoot默认的异常处理机制处理。
我们实际开发中,如果是要实现RESTful API,那么默认的JSON错误信息就不是我们想要的,这时候就需要统一一下JSON格式,所以需要封装一下。
统一json格式进行封装:
/**
* 返回数据
*/
public class AjaxObject extends HashMap<String, Object> {
    private static final long serialVersionUID = 1L;

    public AjaxObject() {
        put("code", 0);
    }

    public static AjaxObject error() {
        return error(HttpStatus.SC_INTERNAL_SERVER_ERROR, "未知异常,请联系管理员");
    }

    public static AjaxObject error(String msg) {
        return error(HttpStatus.SC_INTERNAL_SERVER_ERROR, msg);
    }

    public static AjaxObject error(int code, String msg) {
        AjaxObject r = new AjaxObject();
        r.put("code", code);
        r.put("msg", msg);
        return r;
    }

    public static AjaxObject ok(String msg) {
        AjaxObject r = new AjaxObject();
        r.put("msg", msg);
        return r;
    }

    public static AjaxObject ok(Map<String, Object> map) {
        AjaxObject r = new AjaxObject();
        r.putAll(map);
        return r;
    }

    public static AjaxObject ok() {
        return new AjaxObject();
    }

    public AjaxObject put(String key, Object value) {
        super.put(key, value);
        return this;
    }

    public AjaxObject data(Object value) {
        super.put("data", value);
        return this;
    }

    public static AjaxObject apiError(String msg) {
        return error(1, msg);
    }
}
上面这个AjaxObject就是我平时用的,如果是正确情况返回的就是:
{
    code:0,
    msg:“获取列表成功”,
    data:{
        queryList :[]
    }
}
正确默认code返回0,data里面可以是集合,也可以是对象,如果是异常情况,返回的json则是:
{
    code:500,
    msg:“未知异常,请联系管理员”
}
然后创建一个自定义的异常类:
public class BusinessException extends RuntimeException implements Serializable {

    private static final long serialVersionUID = 1L;
    private String msg;
    private int code = 500;

    public BusinessException(String msg) {
        super(msg);
        this.msg = msg;
    }

    public BusinessException(String msg, Throwable e) {
        super(msg, e);
        this.msg = msg;
    }

    public BusinessException(int code,String msg) {
        super(msg);
        this.msg = msg;
        this.code = code;
    }

    public BusinessException(String msg, int code, Throwable e) {
        super(msg, e);
        this.msg = msg;
        this.code = code;
    }

    public String getMsg() {
        return msg;
    }

    public void setMsg(String msg) {
        this.msg = msg;
    }

    public int getCode() {
        return code;
    }

    public void setCode(int code) {
        this.code = code;
    }
}
注:spring 对于 RuntimeException 异常才会进行事务回滚
Controler中添加一个json映射,用来处理这个异常
@Controller
public class BaseErrorController{
    @RequestMapping("/json")
    public void json(ModelMap modelMap) {
        System.out.println(modelMap.get("author"));
        int i=5/0;
    }
}
最后创建这个全局异常处理类:
/**
 * 异常处理器
 */
@RestControllerAdvice
public class BusinessExceptionHandler {
	private Logger logger = LoggerFactory.getLogger(getClass());


	/**
	 * 应用到所有@RequestMapping注解方法,在其执行之前初始化数据绑定器
	 * @param binder
	 */
	@InitBinder
	public void initBinder(WebDataBinder binder) {
		System.out.println("请求有参数才进来");
	}

	/**
	 * 把值绑定到Model中,使全局@RequestMapping可以获取到该值
	 * @param model
	 */
	@ModelAttribute
	public void addAttributes(Model model) {
		model.addAttribute("author", "嘟嘟MD");
	}

	@ExceptionHandler(Exception.class)
	public Object handleException(Exception e,HttpServletRequest req){
		AjaxObject r = new AjaxObject();
		//业务异常
		if(e instanceof BusinessException){
			r.put("code", ((BusinessException) e).getCode());
			r.put("msg", ((BusinessException) e).getMsg());
		}else{//系统异常
			r.put("code","500");
			r.put("msg","未知异常,请联系管理员");
		}

		//使用HttpServletRequest中的header检测请求是否为ajax,
        //如果是ajax则返回json, 如果为非ajax则返回view(即ModelAndView)
		String contentTypeHeader = req.getHeader("Content-Type");
		String acceptHeader = req.getHeader("Accept");
		String xRequestedWith = req.getHeader("X-Requested-With");
		if ((contentTypeHeader != null && contentTypeHeader.contains("application/json"))
				|| (acceptHeader != null && acceptHeader.contains("application/json"))
				|| "XMLHttpRequest".equalsIgnoreCase(xRequestedWith)) {
			return r;
		} else {
			ModelAndView modelAndView = new ModelAndView();
			modelAndView.addObject("msg", e.getMessage());
			modelAndView.addObject("url", req.getRequestURL());
			modelAndView.addObject("stackTrace", e.getStackTrace());
			modelAndView.setViewName("error");
			return modelAndView;
		}
	}
}
@ExceptionHandler 拦截了异常,我们可以通过该注解实现自定义异常处理。其中,@ExceptionHandler 配置的 value 指定需要拦截的异常类型,上面我配置了拦截Exception,
再根据不同异常类型返回不同的相应,最后添加判断,如果是Ajax请求,则返回json,如果是非ajax则返回view,这里是返回到error.html页面。
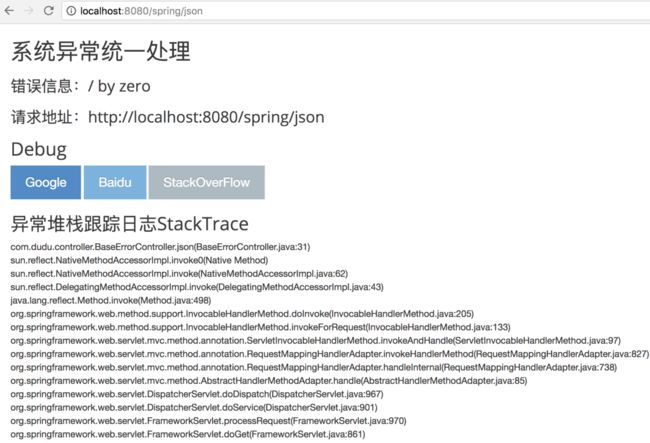
为了展示错误的时候更友好,我封装了下error.html,不仅展示了错误,还添加了跳转百度谷歌以及StackOverFlow的按钮,如下:
<html xmlns:th="http://www.thymeleaf.org" layout:decorator="layout">
<head>
    <title>Spring Boot管理后台title>
    <script type="text/javascript">
    script>
head>
<body>
<div layout:fragment="content" th:remove="tag">
    <div  id="navbar">
        <h1>系统异常统一处理h1>
        <h3 th:text="'错误信息:'+${msg}">h3>
        <h3 th:text="'请求地址:'+${url}">h3>

        <h2>Debugh2>
        <a th:href="@{'https://www.google.com/webhp?hl=zh-CN#safe=strict&hl=zh-CN&q='+${msg}}"
           class="btn btn-primary btn-lg" target="_blank" id="Google">Googlea>
        <a th:href="@{'https://www.baidu.com/s?wd='+${msg}}"
           class="btn btn-info btn-lg"  target="_blank" id="Baidu">Baidua>
        <a th:href="@{'http://stackoverflow.com/search?q='+${msg}}"
           class="btn btn-default btn-lg"  target="_blank" id="StackOverFlow">StackOverFlowa>
        <h2>异常堆栈跟踪日志StackTraceh2>
        <div th:each="line:${stackTrace}">
            <div th:text="${line}">div>
        div>
    div>
div>
<div layout:fragment="js" th:remove="tag">
div>
body>
html>
访问http://localhost:8080/json的时候,因为是浏览器发起的,返回的是error界面:
如果是ajax请求,返回的就是错误:
{ "msg":"未知异常,请联系管理员", "code":500 }
这里我给带@ModelAttribute注解的方法通过Model设置了author值,在json映射方法中通过 ModelMap 获取到改值。
认真的你可能发现,全局异常类我用的是@RestControllerAdvice,而不是@ControllerAdvice,因为这里返回的主要是json格式,这样可以少写一个@ResponseBody。
总结
到此,SpringBoot中对异常的使用也差不多全了,本项目中处理异常的顺序会是这样,当发送一个请求:
- 拦截器那边先判断是否登录,没有则返回登录页。
- 在进入Controller之前,譬如请求一个不存在的地址,返回404错误界面。
- 在执行@RequestMapping时,发现的各种错误(譬如数据库报错、请求参数格式错误/缺失/值非法等)统一由@ControllerAdvice处理,根据是否Ajax返回json或者view。
SpringBoot热部署
要想实现热部署,首先要知道到什么是热部署,如何知道热部署已经生效,怎样测试!!!
回归正题:
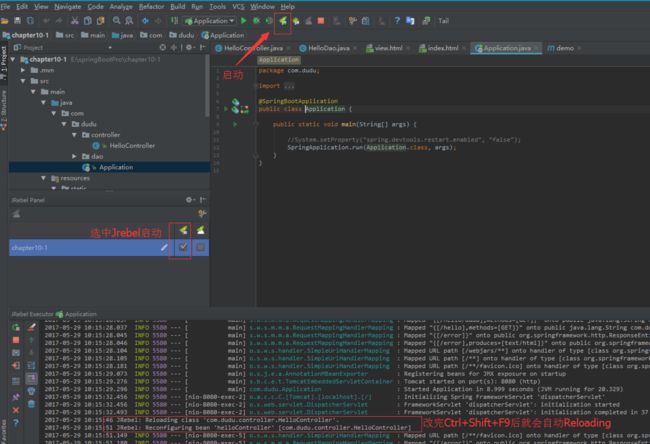
如何测试热部署是否可用呢,你可以先写个简单的Controller方法,返回个字符串,然后启动项目,接着修改下这个方法返回的字符串,Ctrl+Shift+F9编译下当前类,然后再刷新下页面看看是否内容改变了。
在 Spring Boot,模板引擎的页面默认是开启缓存,如果修改页面内容,刷新页面是无法获取修改后的页面内容,所以,如果我们不需要模板引擎的缓存,可以进行关闭。
spring.freemarker.cache=false
spring.thymeleaf.cache=false
spring.velocity.cache=false
经过简单的测试,发现大多数情况可以使用热部署,有效的解决了改动个小小的地方就要重新启动项目的痛点,不过还是有一些情况下需要重新启动,不可用的情况如下:
1:对于一些第三方框架的注解的修改,不能自动加载,比如:spring mvc的@RequestMapping
2:application.properties的修改也不行
3:log4j的配置文件的修改不能即时生效
由于方法过多,这里就单独描述了,三种热部署的方式:
- Spring Loaded
- Spring-boot-devtools
- JRebel插件
Spring Loaded(配置+依赖):
Spring Loaded是一个用于在JVM运行时重新加载类文件更改的JVM代理,Spring Loaded允许你动态的新增/修改/删除某个方法/字段/构造方法,同样可以修改作用在类/方法/字段/构造方法上的注解.也可以新增/删除/改变枚举中的值。
Spring Loaded有两种方式实现,分别是Maven引入依赖方式或者添加启动参数方式。如下:
Maven依赖方式:>
<plugin>
    <groupId>org.springframework.bootgroupId>
    <artifactId>spring-boot-maven-pluginartifactId>
    <dependencies>
        <dependency>
        <groupId>org.springframeworkgroupId>
        <artifactId>springloadedartifactId>
        <version>1.2.6.RELEASEversion>
        dependency>
    dependencies>
plugin>
启动:mvn spring-boot:run
注意:maven依赖的方式只适合spring-boot:run的启动方式,右键那种方式不行。
出现如下配置表实配置成功:
[INFO] Attaching agents: [C:\Users\tengj\.m2\repository\org\springframework\springloaded\1.2.6.RELEASE\
              				springloaded-1.2.6.RELEASE.jar]
添加启动参数方式:>
这种方式是右键运行启动类
首先先下载对应的springloaded-1.2.6.RELEASE.jar,可以去上面提到的官网获取
然后引用maven依赖已经下载好的路径
然后打开下图所示的Edit Configurations配置,在VM options中输入:
-javaagent:C:\Users\tengj\.m2\repository\org\springframework\springloaded\1.2.6.RELEASE\
    		springloaded-1.2.6.RELEASE.jar -noverify
[外链图片转存失败,源站可能有防盗链机制,建议将图片保存下来直接上传(img-eBFGJxbe-1612922008633)()]
然后直接右键运行启动类即可启动项目。
上面2种方式随便选择一种即可,当系统通过 mvn spring-boot:run启动或者 右键application debug启动Java文件时,系统会监视classes文件,当有classes文件被改动时,系统会重新加载类文件,不用重启启动服务。
注:IDEA下需要重新编译文件 Ctrl+Shift+F9或者编译项目 Ctrl+F9
Spring-boot-devtools(依赖+插件):
spring-boot-devtools为应用提供一些开发时特性,包括默认值设置,自动重启,livereload等。
想要使用devtools热部署功能,maven添加依赖如下:
<dependencies>
    <dependency>
        <groupId>org.springframework.bootgroupId>
        <artifactId>spring-boot-devtoolsartifactId>
        <optional>trueoptional>
    dependency>
dependencies>
将依赖关系标记为可选
依赖的默认属性:
在Spring Boot集成Thymeleaf时,
spring.thymeleaf.cache属性设置为false可以禁用模板引擎编译的缓存结果。现在,devtools会自动帮你做到这些,禁用所有模板的缓存,包括Thymeleaf, Freemarker, Groovy Templates, Velocity, Mustache等。
更多的属性,请参考DevToolsPropertyDefaultsPostProcessor。
自动重启:
自动重启的原理在于spring boot使用两个classloader:不改变的类(如第三方jar)由base类加载器加载,正在开发的类由restart类加载器加载。应用重启时,restart类加载器被扔掉重建,而base类加载器不变,这种方法意味着应用程序重新启动通常比“冷启动”快得多,因为base类加载器已经可用并已填充。
所以,当我们开启devtools后,classpath中的文件变化会导致应用自动重启。当然不同的IDE效果不一样,Eclipse中保存文件即可引起classpath更新(注:需要打开自动编译),从而触发重启。而IDEA则需要自己手动CTRL+F9重新编译一下(感觉IDEA这种更好,不然每修改一个地方就重启,好蛋疼)
排除静态资源文件:
静态资源文件在改变之后有时候没必要触发应用程序重启,例如thymeleaf模板文件就可以实时编辑,默认情况下,更改/META-INF/maven, /META-INF/resources ,/resources ,/static ,/public 或/templates下的资源不会触发重启,而是触发live reload(devtools内嵌了一个LiveReload server,当资源发生改变时,浏览器刷新,下面会介绍)。
可以使用spring.devtools.restart.exclude属性配置,例如:
spring.devtools.restart.exclude=static/**,public/**
如果想保留默认配置,同时增加新的配置,则可使用:
spring.devtools.restart.additional-exclude属性
观察额外的路径:
如果你想观察不在classpath中的路径的文件变化并触发重启,则可以配置 spring.devtools.restart.additional-paths 属性。
不在classpath内的path可以配置spring.devtools.restart.additionalpaths属性来增加到监视中,同时配
spring.devtools.restart.exclude可以选择这些path的变化是导致restart还是live reload。
关闭自动重启:
设置 spring.devtools.restart.enabled 属性为false,可以关闭该特性。可以在application.properties中设置,也可以通过设置环境变量的方式。
public static void main(String[] args) {
    System.setProperty("spring.devtools.restart.enabled", "false");
    SpringApplication.run(MyApp.class, args);
}
使用一个触发文件:
若不想每次修改都触发自动重启,可以设置spring.devtools.restart.trigger-file指向某个文件,只有更改这个文件时才触发自动重启。
自定义自动重启类加载器:
默认时,IDE中打开的项目都会由restart加载器加载,jar文件由Base加载器加载,但是若你使用multi-module的项目,并且不是所有模块都被导入到IDE中,此时会导致加载器不一致。这时你可以创建META-INF/spring-devtools.properties文件,并增加restart.exclude.XXX,restart.include.XXX来配置哪些jar被restart加载,哪些被base加载。如:
restart.include.companycommonlibs=/mycorp-common-[\\w-]+\.jar
restart.include.projectcommon=/mycorp-myproj-[\\w-]+\.jar
基于Spring-boot-devtools依赖,集成LiveReload插件:
DevTools内置了一个LiveReload服务,可以在资源变化时用来触发浏览器刷新。当然这个需要你浏览器安装了LiveReload插件,并且启动这个插件才行。很有意思,这里介绍下如何弄。
先去谷歌商店安装LiveReload插件,自己准备梯子。
[外链图片转存失败,源站可能有防盗链机制,建议将图片保存下来直接上传(img-aVWZT7rp-1612922008634)(…\常见注解\image\LiveReload.png)]
安装好在要自动刷新的页面点击下图中图标,启动应用后更新页面内容或者css等都会触发页面自动刷新了。如下图,圈中的就是,点一下会变黑就是启动了。
修改完html页面后,Ctrl+Shift+F9,没有重启,页面也会自动刷新了。(这里补充一下,之前没有涉及浏览器改动,但是这个效果还是会出现,可能是由于依赖和浏览器版本的更新换代,已经优化了这个效果。)
JRebel(插件):
在IDEA中打开插件管理界面,按照下面的提示先安装上:
[外链图片转存失败,源站可能有防盗链机制,建议将图片保存下来直接上传(img-cSABF1Lc-1612922008636)(…\常见注解\image\JRebel.png)]
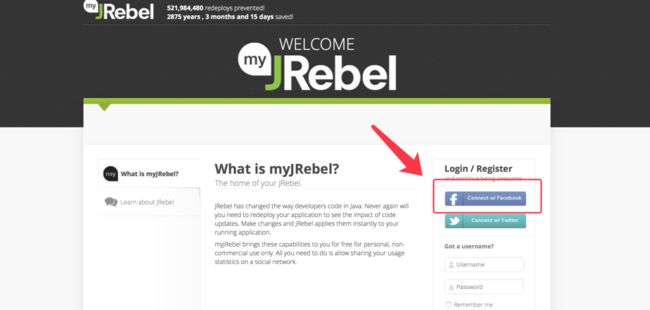
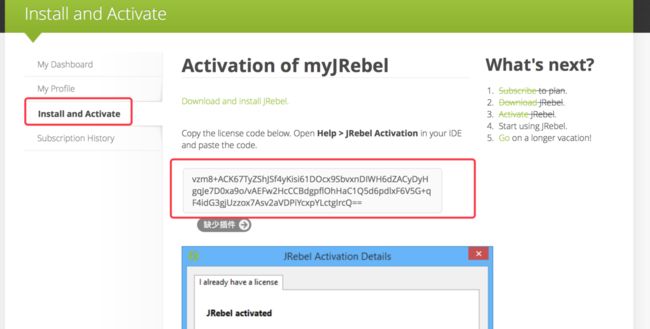
安装完插件后,需要去获取正版的激活码,这个可以直接去官网https://my.jrebel.com获取(需自备梯子)
1:通过fackbook登录,没有就去注册一个
2:填写一些资料后(资料必须填写完整,否则JRebel激活不了),复制激活码即可
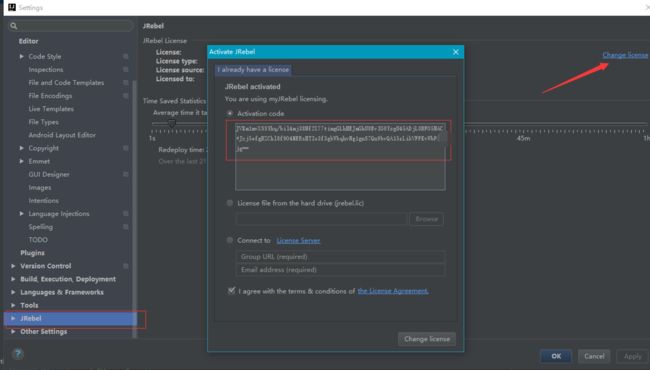
3:重启IDEA后,在IDEA的Settings中找到JRebel输入复制的激活码即可
出现绿色,即表示激活成功了。

4: 接着就如下所示,勾中JRebel方式后启动即可,即可享受JRebel带来的超爽体验
整合
springboot+mysql+redis+layui
SpringBoot+mysql+Mybatis+Thymeleaf+Vue.js
项目配置:
Spring Boot: 1.5.9.RELEASE
Maven: 3.5
Java: 1.8
Thymeleaf: 3.0.7.RELEASE
Vue.js: v2.5.11
mysql与数据源依赖:
<dependency>
	<groupId>mysqlgroupId>
	<artifactId>mysql-connector-javaartifactId>
dependency>

<dependency>
	<groupId>com.alibabagroupId>
	<artifactId>druidartifactId>
	<version>1.0.19version>
dependency>
对应application.properties配置:
## 数据库访问配置
spring.datasource.type=com.alibaba.druid.pool.DruidDataSource
spring.datasource.driver-class-name = com.mysql.jdbc.Driver
spring.datasource.url = jdbc:mysql://localhost:3306/spring?useUnicode=true&characterEncoding=utf-8
spring.datasource.username = root
spring.datasource.password = root

# 下面为连接池的补充设置,应用到上面所有数据源中
# 初始化大小,最小,最大
spring.datasource.initialSize=5
spring.datasource.minIdle=5
spring.datasource.maxActive=20
# 配置获取连接等待超时的时间
spring.datasource.maxWait=60000
# 配置间隔多久才进行一次检测,检测需要关闭的空闲连接,单位是毫秒
spring.datasource.timeBetweenEvictionRunsMillis=60000
# 配置一个连接在池中最小生存的时间,单位是毫秒
spring.datasource.minEvictableIdleTimeMillis=300000
spring.datasource.validationQuery=SELECT 1 FROM DUAL
spring.datasource.testWhileIdle=true
spring.datasource.testOnBorrow=false
spring.datasource.testOnReturn=false
# 打开PSCache,并且指定每个连接上PSCache的大小
spring.datasource.poolPreparedStatements=true
spring.datasource.maxPoolPreparedStatementPerConnectionSize=20
# 配置监控统计拦截的filters,去掉后监控界面sql无法统计,'wall'用于防火墙
spring.datasource.filters=stat,wall,log4j
# 合并多个DruidDataSource的监控数据
#spring.datasource.useGlobalDataSourceStat=true
对应bean配置:
package com.dudu.config;

/**
 * Druid配置
 *
 * @author dudu
 * @date 2017-12-11 0:00
 */
@Configuration
public class DruidConfig {
    private Logger logger = LoggerFactory.getLogger(DruidConfig.class);

    @Value("${spring.datasource.url:#{null}}")
    private String dbUrl;
    @Value("${spring.datasource.username: #{null}}")
    private String username;
    @Value("${spring.datasource.password:#{null}}")
    private String password;
    @Value("${spring.datasource.driverClassName:#{null}}")
    private String driverClassName;
    @Value("${spring.datasource.initialSize:#{null}}")
    private Integer initialSize;
    @Value("${spring.datasource.minIdle:#{null}}")
    private Integer minIdle;
    @Value("${spring.datasource.maxActive:#{null}}")
    private Integer maxActive;
    @Value("${spring.datasource.maxWait:#{null}}")
    private Integer maxWait;
    @Value("${spring.datasource.timeBetweenEvictionRunsMillis:#{null}}")
    private Integer timeBetweenEvictionRunsMillis;
    @Value("${spring.datasource.minEvictableIdleTimeMillis:#{null}}")
    private Integer minEvictableIdleTimeMillis;
    @Value("${spring.datasource.validationQuery:#{null}}")
    private String validationQuery;
    @Value("${spring.datasource.testWhileIdle:#{null}}")
    private Boolean testWhileIdle;
    @Value("${spring.datasource.testOnBorrow:#{null}}")
    private Boolean testOnBorrow;
    @Value("${spring.datasource.testOnReturn:#{null}}")
    private Boolean testOnReturn;
    @Value("${spring.datasource.poolPreparedStatements:#{null}}")
    private Boolean poolPreparedStatements;
    @Value("${spring.datasource.maxPoolPreparedStatementPerConnectionSize:#{null}}")
    private Integer maxPoolPreparedStatementPerConnectionSize;
    @Value("${spring.datasource.filters:#{null}}")
    private String filters;
    @Value("{spring.datasource.connectionProperties:#{null}}")
    private String connectionProperties;

    @Bean
    @Primary
    public DataSource dataSource(){
        DruidDataSource datasource = new DruidDataSource();

        datasource.setUrl(this.dbUrl);
        datasource.setUsername(username);
        datasource.setPassword(password);
        datasource.setDriverClassName(driverClassName);
        //configuration
        if(initialSize != null) {
            datasource.setInitialSize(initialSize);
        }
        if(minIdle != null) {
            datasource.setMinIdle(minIdle);
        }
        if(maxActive != null) {
            datasource.setMaxActive(maxActive);
        }
        if(maxWait != null) {
            datasource.setMaxWait(maxWait);
        }
        if(timeBetweenEvictionRunsMillis != null) {
            datasource.setTimeBetweenEvictionRunsMillis(timeBetweenEvictionRunsMillis);
        }
        if(minEvictableIdleTimeMillis != null) {
            datasource.setMinEvictableIdleTimeMillis(minEvictableIdleTimeMillis);
        }
        if(validationQuery!=null) {
            datasource.setValidationQuery(validationQuery);
        }
        if(testWhileIdle != null) {
            datasource.setTestWhileIdle(testWhileIdle);
        }
        if(testOnBorrow != null) {
            datasource.setTestOnBorrow(testOnBorrow);
        }
        if(testOnReturn != null) {
            datasource.setTestOnReturn(testOnReturn);
        }
        if(poolPreparedStatements != null) {
            datasource.setPoolPreparedStatements(poolPreparedStatements);
        }
        if(maxPoolPreparedStatementPerConnectionSize != null) {
            datasource.setMaxPoolPreparedStatementPerConnectionSize(
                maxPoolPreparedStatementPerConnectionSize);
        }

        if(connectionProperties != null) {
            datasource.setConnectionProperties(connectionProperties);
        }

        List<Filter> filters = new ArrayList<>();
        filters.add(statFilter());
        filters.add(wallFilter());
        datasource.setProxyFilters(filters);

        return datasource;
    }

    @Bean
    public ServletRegistrationBean druidServlet() {
        ServletRegistrationBean servletRegistrationBean = new ServletRegistrationBean(
            new StatViewServlet(), "/druid/*");

        //控制台管理用户,加入下面2行 进入druid后台就需要登录
        //servletRegistrationBean.addInitParameter("loginUsername", "admin");
        //servletRegistrationBean.addInitParameter("loginPassword", "admin");
        return servletRegistrationBean;
    }

    @Bean
    public FilterRegistrationBean filterRegistrationBean() {
        FilterRegistrationBean filterRegistrationBean = new FilterRegistrationBean();
        filterRegistrationBean.setFilter(new WebStatFilter());
        filterRegistrationBean.addUrlPatterns("/*");
        filterRegistrationBean.addInitParameter("exclusions",
                                                "*.js,*.gif,*.jpg,*.png,*.css,*.ico,/druid/*");
        filterRegistrationBean.addInitParameter("profileEnable", "true");
        return filterRegistrationBean;
    }

    @Bean
    public StatFilter statFilter(){
        StatFilter statFilter = new StatFilter();

       //slowSqlMillis用来配置SQL慢的标准,执行时间超过slowSqlMillis的就是慢。
        statFilter.setLogSlowSql(true);
        statFilter.setMergeSql(true); //SQL合并配置
        statFilter.setSlowSqlMillis(1000);//slowSqlMillis的缺省值为3000,也就是3秒。
        return statFilter;
    }

    @Bean
    public WallFilter wallFilter(){
        WallFilter wallFilter = new WallFilter();
        //允许执行多条SQL
        WallConfig config = new WallConfig();
        config.setMultiStatementAllow(true);
        wallFilter.setConfig(config);
        return wallFilter;
    }
}
mybatis相关依赖:
<dependency>
	<groupId>org.mybatis.spring.bootgroupId>
	<artifactId>mybatis-spring-boot-starterartifactId>
	<version>1.3.1version>
dependency>

<dependency>
	<groupId>tk.mybatisgroupId>
	<artifactId>mapper-spring-boot-starterartifactId>
	<version>1.1.5version>
dependency>

<dependency>
	<groupId>com.github.pagehelpergroupId>
	<artifactId>pagehelper-spring-boot-starterartifactId>
	<version>1.2.3version>
dependency>

<build>
	<plugins>
		<plugin>
			<groupId>org.springframework.bootgroupId>
			<artifactId>spring-boot-maven-pluginartifactId>
		plugin>

		<plugin>
			<groupId>org.mybatis.generatorgroupId>
			<artifactId>mybatis-generator-maven-pluginartifactId>
			<version>1.3.5version>
			<dependencies>

				<dependency>
					<groupId>mysqlgroupId>
					<artifactId>mysql-connector-javaartifactId>
					<version>5.1.44version>
				dependency>
				<dependency>
					<groupId>tk.mybatisgroupId>
					<artifactId>mapperartifactId>
					<version>3.4.0version>
				dependency>
			dependencies>
			<executions>
				<execution>
					<id>Generate MyBatis Artifactsid>
					<phase>packagephase>
					<goals>
						<goal>generategoal>
					goals>
				execution>
			executions>
			<configuration>

				<verbose>trueverbose>

				<overwrite>trueoverwrite>

				<configurationFile>src/main/resources/mybatis-generator.xmlconfigurationFile>
			configuration>
		plugin>
	plugins>
build>
上面引入了mybatis相关的一些依赖以及generator的配置,这里generator配置文件指向src/main/resources/mybatis-generator.xml文件,具体一会贴出。
对应application.properties配置:
#指定bean所在包
mybatis.type-aliases-package=com.dudu.domain
#指定映射文件
mybatis.mapperLocations=classpath:mapper/*.xml

#mapper
#mappers 多个接口时逗号隔开
mapper.mappers=com.dudu.util.MyMapper
mapper.not-empty=false
mapper.identity=MYSQL

#pagehelper
pagehelper.helperDialect=mysql
pagehelper.reasonable=true
pagehelper.supportMethodsArguments=true
pagehelper.params=count=countSql
通用Mapper配置:
通用Mapper都可以极大的方便开发人员,对单表封装了许多通用方法,省掉自己写增删改查的sql。
通用Mapper插件网址:https://github.com/abel533/Mapper。
package com.dudu.util;

import tk.mybatis.mapper.common.Mapper;
import tk.mybatis.mapper.common.MySqlMapper;

/**
 * 继承自己的MyMapper
 *
 * @author
 * @since 2017-06-26 21:53
 */
public interface MyMapper<T> extends Mapper<T>, MySqlMapper<T> {
    //FIXME 特别注意,该接口不能被扫描到,否则会出错
}
这里实现一个自己的接口,继承通用的mapper,关键点就是这个接口不能被扫描到,不能跟dao这个存放mapper文件放在一起。
最后在启动类中通过MapperScan注解指定扫描的mapper路径:
package com.dudu;
@SpringBootApplication
//启注解事务管理
@EnableTransactionManagement // 启注解事务管理,等同于xml配置方式的 Mybatis Generator配置:
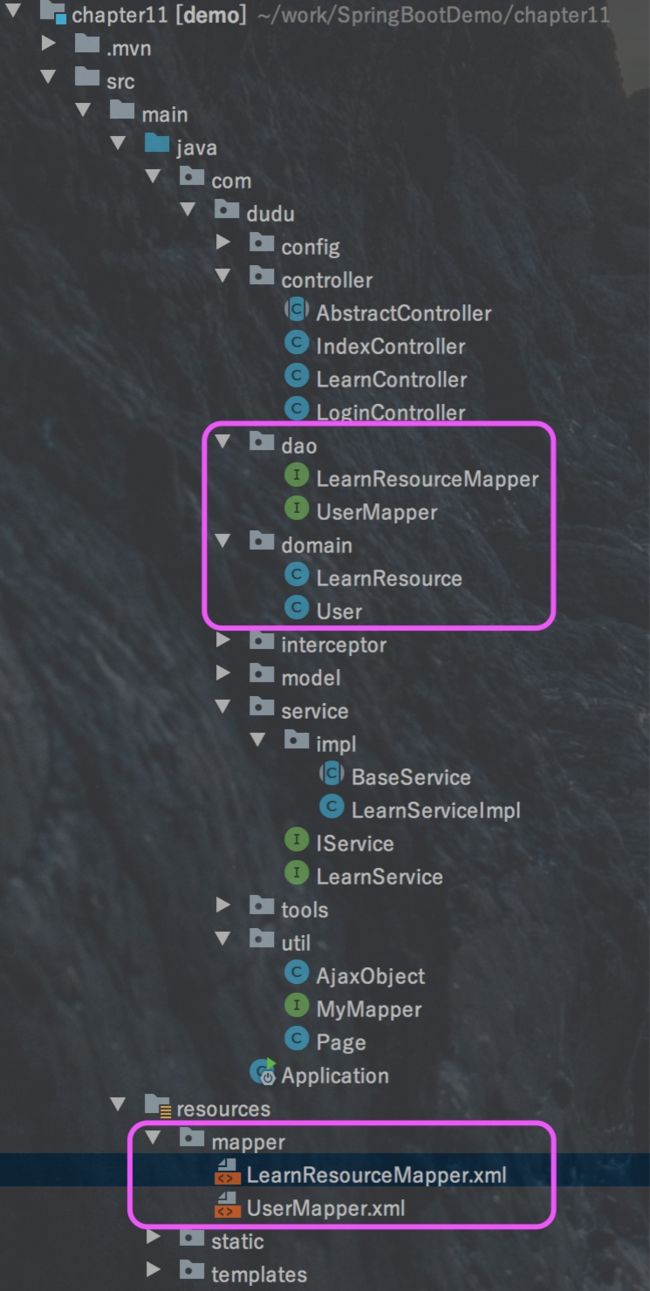
这里配置一下上面提到的mybatis-generator.xml文件,该配置文件用来自动生成表对应的Model,Mapper以及xml,该文件位于src/main/resources下面
Mybatis Geneator 详解: http://blog.csdn.net/isea533/article/details/42102297。
<generatorConfiguration>

    <properties resource="application.properties"/>

    <context id="Mysql" targetRuntime="MyBatis3Simple" defaultModelType="flat">

        <plugin type="tk.mybatis.mapper.generator.MapperPlugin">
            <property name="mappers" value="com.dudu.util.MyMapper" />

          <property name="caseSensitive" v
          alue="true"/>
        plugin>


        <commentGenerator>
            <property name="javaFileEncoding" value="UTF-8"/>
            <property name="suppressDate" value="true"/>
            <property name="suppressAllComments" value="true"/>
        commentGenerator>


        <jdbcConnection driverClass="${spring.datasource.driver-class-name}"
                        connectionURL="${spring.datasource.url}"
                        userId="${spring.datasource.username}"
                        password="${spring.datasource.password}">
        jdbcConnection>

        <javaTypeResolver>
            <property name="forceBigDecimals" value="false"/>
        javaTypeResolver>


        <javaModelGenerator targetPackage="com.dudu.domain" targetProject="src/main/java">
            <property name="enableSubPackages" value="true"/>
            <property name="trimStrings" value="true"/>
        javaModelGenerator>


        <sqlMapGenerator targetPackage="mapper" targetProject="src/main/resources">
            <property name="enableSubPackages" value="true"/>
        sqlMapGenerator>


       <javaClientGenerator type="XMLMAPPER" targetPackage="com.dudu.dao" targetProject="src/main/java">
            <property name="enableSubPackages" value="true"/>
       javaClientGenerator>


        <table tableName="LEARN_RESOURCE" domainObjectName="LearnResource"
               enableCountByExample="false" enableUpdateByExample="false"
               enableDeleteByExample="false" enableSelectByExample="false"
               selectByExampleQueryId="false">
            <generatedKey column="id" sqlStatement="Mysql" identity="true"/>
        table>
    context>
generatorConfiguration>
其中,我们通过
其中tk.mybatis.mapper.generator.MapperPlugin很重要,用来指定通用Mapper对应的文件,这样我们生成的mapper都会继承这个通用Mapper
<plugin type="tk.mybatis.mapper.generator.MapperPlugin">
	<property name="mappers" value="com.dudu.util.MyMapper" />

  <property name="caseSensitive" value="true"/>
plugin>
这样就可以通过mybatis-generator插件生成对应的文件啦
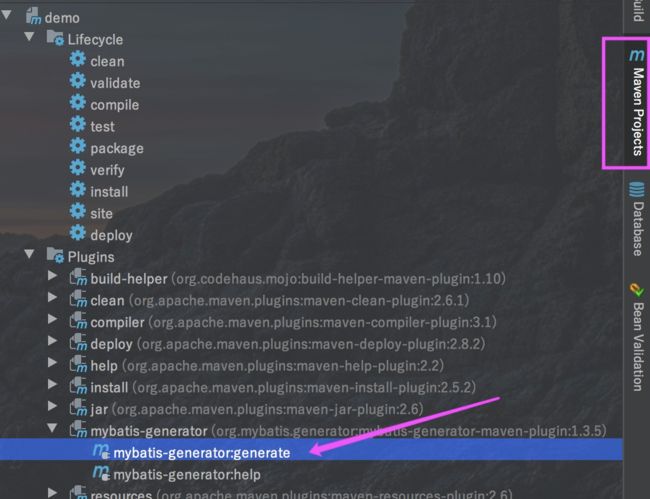
如果不是IDEA开发环境也可以直接通过命令:mvn mybatis-generator:generate
脚本初始化
CREATE DATABASE /*!32312 IF NOT EXISTS*/`spring` /*!40100 DEFAULT CHARACTER SET utf8 */;
USE `spring`;
DROP TABLE IF EXISTS `learn_resource`;

CREATE TABLE `learn_resource` (
  `id` bigint(20) NOT NULL AUTO_INCREMENT COMMENT 'ID',
  `author` varchar(20) DEFAULT NULL COMMENT '作者',
  `title` varchar(100) DEFAULT NULL COMMENT '描述',
  `url` varchar(100) DEFAULT NULL COMMENT '地址链接',
  PRIMARY KEY (`id`)
) ENGINE=MyISAM AUTO_INCREMENT=1029 DEFAULT CHARSET=utf8;

insert into `learn_resource`(`id`,`author`,`title`,`url`) values (999,'官方SpriongBoot例子','官方SpriongBoot例子','https://github.com/spring-projects/spring-boot/tree/master/spring-boot-samples');
insert into `learn_resource`(`id`,`author`,`title`,`url`) values (1000,'龙果学院','Spring Boot 教程系列学习','http://www.roncoo.com/article/detail/124661');
insert into `learn_resource`(`id`,`author`,`title`,`url`) values (1001,'嘟嘟MD独立博客','Spring Boot干货系列','http://tengj.top/');
insert into `learn_resource`(`id`,`author`,`title`,`url`) values (1002,'后端编程嘟','Spring Boot视频教程','http://www.toutiao.com/m1559096720023553/');
Controller层
到此为止,基本的配置结束了,我们开始实现业务的逻辑,Controller层代码如下
/** 教程页面
 * Created by tengj on 2017/12/19
 */
@Controller
@RequestMapping("/learn")
public class LearnController  extends AbstractController{
    @Autowired
    private LearnService learnService;
    private Logger logger = LoggerFactory.getLogger(this.getClass());

    @RequestMapping("")
    public String learn(Model model){
        model.addAttribute("ctx", getContextPath()+"/");
        return "learn-resource";
    }

    /**
     * 查询教程列表
     * @param page
     * @return
     */
    @RequestMapping(value = "/queryLeanList",method = RequestMethod.POST)
    @ResponseBody
    public AjaxObject queryLearnList(Page<LeanQueryLeanListReq> page){
        List<LearnResource> learnList=learnService.queryLearnResouceList(page);
        PageInfo<LearnResource> pageInfo =new PageInfo<LearnResource>(learnList);
        return AjaxObject.ok().put("page", pageInfo);
    }
    /**
     * 新添教程
     * @param learn
     */
    @RequestMapping(value = "/add",method = RequestMethod.POST)
    @ResponseBody
    public AjaxObject addLearn(@RequestBody LearnResource learn){
        learnService.save(learn);
        return AjaxObject.ok();
    }

    /**
     * 修改教程
     * @param learn
     */
    @RequestMapping(value = "/update",method = RequestMethod.POST)
    @ResponseBody
    public AjaxObject updateLearn(@RequestBody LearnResource learn){
        learnService.updateNotNull(learn);
        return AjaxObject.ok();
    }

    /**
     * 删除教程
     * @param ids
     */
    @RequestMapping(value="/delete",method = RequestMethod.POST)
    @ResponseBody
    public AjaxObject deleteLearn(@RequestBody Long[] ids){
        learnService.deleteBatch(ids);
        return AjaxObject.ok();
    }
}
通用Service:
正常情况下具体业务是每个模块的service里面定义许多方法,然后mapper中实现。
但是博主查看插件文档后发现一个通用Mapper在Spring4中的最佳用法。那就是通用的Service。
具体可以查看这里了解:https://gitee.com/free/Mapper2/blob/master/wiki/mapper/4.Spring4.md.
定义通用service接口
/**
 * 通用接口
 */
@Service
public interface IService<T> {

    T selectByKey(Object key);

    int save(T entity);

    int delete(Object key);

    int updateAll(T entity);

    int updateNotNull(T entity);

    List<T> selectByExample(Object example);

    //TODO 其他...
}
具体实现通用接口类
/**
 * 通用Service
 * @param
 */
public abstract class BaseService<T> implements IService<T> {

    @Autowired
    protected Mapper<T> mapper;
    public Mapper<T> getMapper() {
        return mapper;
    }

    @Override
    public T selectByKey(Object key) {
        //说明:根据主键字段进行查询,方法参数必须包含完整的主键属性,查询条件使用等号
        return mapper.selectByPrimaryKey(key);
    }

    @Override
    public int save(T entity) {
        //说明:保存一个实体,null的属性也会保存,不会使用数据库默认值
        return mapper.insert(entity);
    }

    @Override
    public int delete(Object key) {
        //说明:根据主键字段进行删除,方法参数必须包含完整的主键属性
        return mapper.deleteByPrimaryKey(key);
    }

    @Override
    public int updateAll(T entity) {
        //说明:根据主键更新实体全部字段,null值会被更新
        return mapper.updateByPrimaryKey(entity);
    }

    @Override
    public int updateNotNull(T entity) {
        //根据主键更新属性不为null的值
        return mapper.updateByPrimaryKeySelective(entity);
    }

    @Override
    public List<T> selectByExample(Object example) {
        //说明:根据Example条件进行查询
        //重点:这个查询支持通过Example类指定查询列,通过selectProperties方法指定查询列
        return mapper.selectByExample(example);
    }
}
到此基本的增删改查通用service就写好了,具体业务的service就直接继承这个接口即可,也可以添加额外的方法,例如:
public interface LearnService  extends IService<LearnResource>{
    public List<LearnResource> queryLearnResouceList(Page<LeanQueryLeanListReq> page);
    public void deleteBatch(Long[] ids);
}
具体实现service
 /**
 * Created by tengj on 2017/4/7.
 */
@Service
public class LearnServiceImpl extends BaseService<LearnResource>  implements LearnService {

    @Autowired
    private LearnResourceMapper  learnResourceMapper;

    @Override
    public void deleteBatch(Long[] ids) {
        Arrays.stream(ids).forEach(id->learnResourceMapper.deleteByPrimaryKey(id));
    }

    @Override
    public List<LearnResource> queryLearnResouceList(Page<LeanQueryLeanListReq> page) {
        PageHelper.startPage(page.getPage(), page.getRows());
        return learnResourceMapper.queryLearnResouceList(page.getCondition());
    }
}
可以看到,具体LearnServiceImpl这边就实现了2个方法,其他的都使用了通用service的,在开发上剩下了许多功夫。
Mapper相关
在自动生成的mapper文件中实现sevice自定义的方法:
public interface LearnResourceMapper extends MyMapper<LearnResource> {
    List<LearnResource> queryLearnResouceList(Map<String,Object> map);
}
LearnResourceMapper.xml:
<mapper namespace="com.dudu.dao.LearnResourceMapper">
  <resultMap id="BaseResultMap" type="com.dudu.domain.LearnResource">

    <id column="id" jdbcType="BIGINT" property="id" />
    <result column="author" jdbcType="VARCHAR" property="author" />
    <result column="title" jdbcType="VARCHAR" property="title" />
    <result column="url" jdbcType="VARCHAR" property="url" />
  resultMap>
    <select id="queryLearnResouceList" resultType="com.dudu.domain.LearnResource">
      SELECT * from learn_resource where 1=1
      <if test="author != null and author!= ''">
        and author like CONCAT('%',#{author},'%')
      if>
      <if test="title != null and title!= ''">
        and title like CONCAT('%',#{title},'%')
      if>
      order by id desc
    select>
mapper>
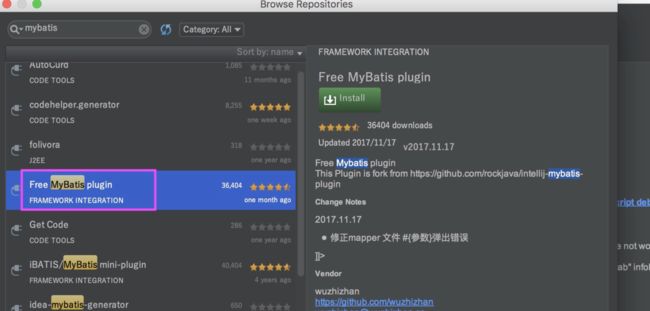
IDEA可以安装这个插件,这样就可以直接从Mapper文件跳转到xml了

上面提到druid有对应的监控界面,启动项目后输入http://localhost:8090/spring/druid 即可登录,界面效果如下

总结
到此,一套适合企业级开发的Spring Boot应用模板就好了,Mybatis+通用Mapper、Mybatis Geneator确实可以省下很多开发成本,提高效率。
本文主要信息转载于:嘟嘟独立博客


