ASGNet论文和代码解读
原文链接:ASGNet论文
开源代码:ASGNet-main
网络结构:
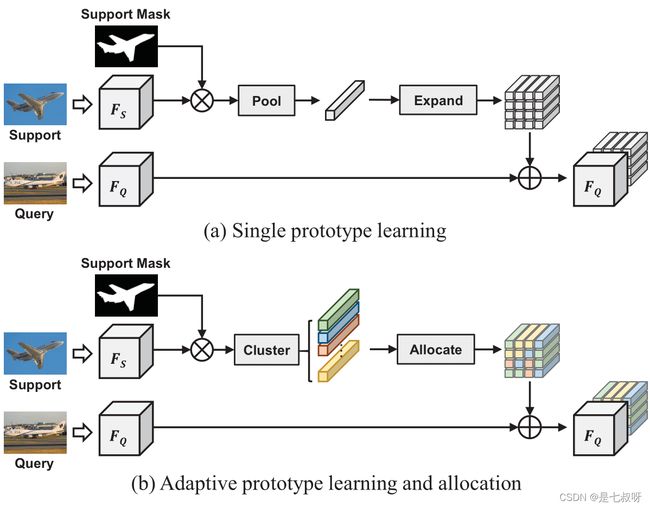
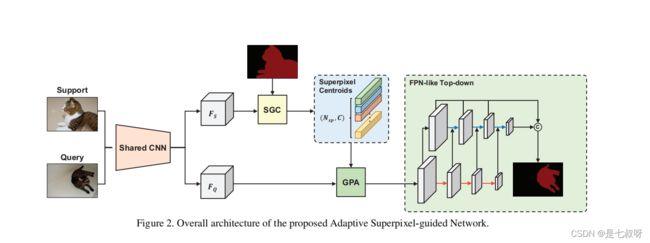
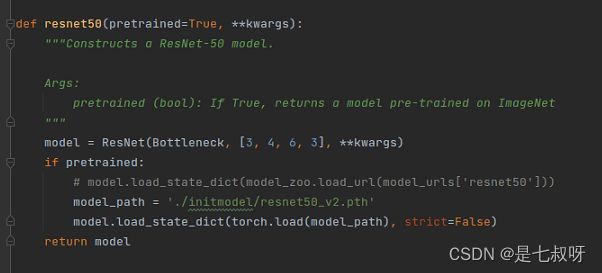
一、下载 ImageNet 中预训练的Shared CNN,并将它们放入 initmodel 目录中
- 然后,通过将支持特征传递给带有支持掩码的SGC,我们得到了超像素质心,并将其视为原型。
- 之后,为了获得更精确的像素级导航,我们采用GPA模块将原型与查询功能匹配。
- 最后,我们使用特征丰富模块[30],建立了一个类似FPNlike[16]的自上而下结构来引入多尺度信息。

二、asgnet.py
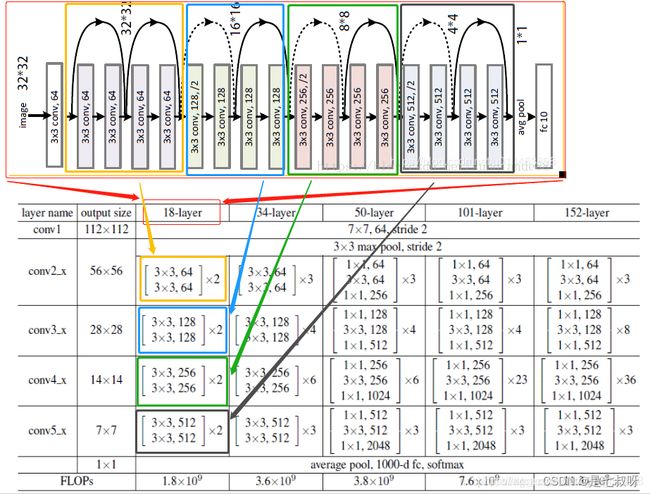
!!(通道数变化【注意layer1、2、3、4都是循环调用block[3, 4, 6, 3]次,但是只有第一次有下采样】layer0:3-64-64-128、layer1:128-64-64*4=256+(下采样128-256)、layer2:256-128-128-1284=512(+下采样256-512)、layer3:512-256-256-2564=1024(+下采样512-1024)、layer4:1024-512-512-512*4=2048(+下采样1024-2048通道))
!!self.inplanes每次构造完layer都会通过self.inplanes = planes * block.expansion扩大4倍。
2.1 forward函数layer0
在train.py中调用model:output, main_loss, aux_loss = model(s_x=s_input, s_y=s_mask, x=input, y=target, s_seed=s_init_seed)
在asgnet.py中forward函数:
def forward(self, x, s_x=torch.FloatTensor(1,1,3,473,473).cuda(), s_y=torch.FloatTensor(1,1,473,473).cuda(), s_seed=None, y=None):
forward函数中输入参数:
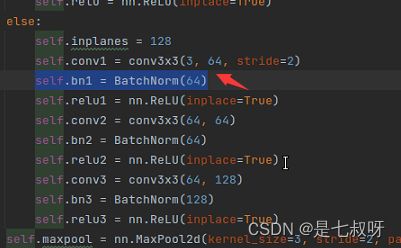
2.11 - 将查询集原图x输入定义好的layer0:`self.layer0 = nn.Sequential(resnet.conv1, resnet.bn1, resnet.relu1, resnet.conv2, resnet.bn2, resnet.relu2,
resnet.conv3, resnet.bn3, resnet.relu3, resnet.maxpool);其中==resnet.conv1==为resnet.py中的self.conv1 = conv3x3(3, 64, stride=2)`
![]()
函数如下:输入通道3,输出通道数64,步长2
def conv3x3(in_planes, out_planes, stride=1):
    """3x3 convolution with padding"""
    return nn.Conv2d(in_planes, out_planes, kernel_size=3, stride=stride,
                     padding=1, bias=False)
接着resnet.bn1:self.bn1 = BatchNorm(64),BatchNorm直接调用BatchNorm = torch.nn.BatchNorm2d
PS:2. torch.nn.BatchNorm2d的作用:(批归一化)参考:【pytorch系列】 nn.BatchNorm2d用法详解
self.bn1 = BatchNorm(64) # 64为上一步输出的通道数
机器学习中,进行模型训练之前,需对数据做归一化处理,使其分布一致。在深度神经网络训练过程中,通常一次训练是一个batch,而非全体数据。每个batch具有不同的分布产生了internal covarivate shift问题——在训练过程中,数据分布会发生变化,对下一层网络的学习带来困难。
Batch Normalization强行将数据拉回到均值为0,方差为1的正太分布上,一方面使得数据分布一致,另一方面避免梯度消失。
之后进行resnet.relu1,resnet.py中调用:self.relu1 = nn.ReLU(inplace=True)

PS:nn.ReLU(inplace=True)激活
inplace默认为false
inplace为True,将会改变输入的数据 ,否则不会改变原输入,只会产生新的输出
inplace:can optionally do the operation in-place. Default: False
注: 产生的计算结果不会有影响。利用in-place计算可以节省内(显)存,同时还可以省去反复申请和释放内存的时间。但是会对原变量覆盖,只要不带来错误就用。
关于激活函数的详细解释参考:ReLU激活函数及其他激活函数
2.12 继续两次卷积、批归一化、relu激活
下一步循环进行resnet.conv2, resnet.bn2, resnet.relu2,,卷积通道数64-64
- resnet.conv2:
self.conv2 = conv3x3(64, 64)输入通道64,输出通道64的3*3大小卷积
接着类似重复resnet.conv3, resnet.bn3, resnet.relu3,卷积通道数64-128
- resnet.conv3:
self.conv3 = conv3x3(64, 128)、self.bn3 = BatchNorm(128)
2.13 最后resnet.maxpool
调用resnet.py中的self.maxpool = nn.MaxPool2d(kernel_size=3, stride=2, padding=1)
最大值池化,尺寸3,步长2,填充1
PS:torch.nn.MaxPool2d
我们先来看一下基本参数,一共六个:
- kernel_size :表示做最大池化的窗口大小,可以是单个值,也可以是tuple元组
- stride :步长,可以是单个值,也可以是tuple元组
- padding :填充,可以是单个值,也可以是tuple元组
- dilation :控制窗口中元素步幅
- return_indices :布尔类型,返回最大值位置索引
- ceil_mode :布尔类型,为True,用向上取整的方法,计算输出形状;默认是向下取整。
关于 kernel_size 的详解:
注意这里的 kernel_size 跟卷积核不是一个东西。 kernel_size 可以看做是一个滑动窗口,这个窗口的大小由自己指定,如果输入是单个值,例如 3 33 ,那么窗口的大小就是 3 × 3 3 \times 33×3 ,还可以输入元组,例如 (3, 2) ,那么窗口大小就是 3 × 2 3 \times 23×2 。
最大池化的方法就是取这个窗口覆盖元素中的最大值。
关于 stride 的详解:
上一个参数我们确定了滑动窗口的大小,现在我们来确定这个窗口如何进行滑动。 如 果 不 指 定 这 个 参 数 , 那 么 默 认 步 长 跟 最 大 池 化 窗 口 大 小 一 致 \color{red}{如果不指定这个参数,那么默认步长跟最大池化窗口大小一致} 如果不指定这个参数,那么默认步长跟最大池化窗口大小一致。如果指定了参数,那么将按照我们指定的参数进行滑动。例如 stride=(2,3) , 那么窗口将每次向右滑动三个元素位置,或者向下滑动两个元素位置。
关于 padding 的详解:
这参数控制如何进行填充,填充值默认为0。如果是单个值,例如 1,那么将在周围填充一圈0。还可以用元组指定如何填充,例如 p a d d i n g = ( 2 , 1 ) padding=(2, 1)padding=(2,1) ,表示在上下两个方向个填充两行0,在左右两个方向各填充一列0。
参考:torch.nn.MaxPool2d详解
关于dilation = 1:
这个参数决定了是否采用空洞卷积,默认为1(不采用)。从中文上来讲,这个参数的意义从卷积核上的一个参数到另一个参数需要走过的距离,那当然默认是1了,毕竟不可能两个不同的参数占同一个地方吧(为0)。
参考:Pytorch的nn.Conv2d()详解
2.2 forward函数layer1、layer2、layer3、layer4
asgnet.py中有:
self.layer1, self.layer2, self.layer3, self.layer4 = resnet.layer1, resnet.layer2, resnet.layer3, resnet.layer4
选择一个resnet.layer1

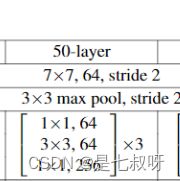
这里我们使用resnet50
model = ResNet(Bottleneck, [3, 4, 6, 3], **kwargs)
可以看到参数传给ResNet的__init__:block=Bottleneck、layers=[3, 4, 6, 3];num_classes=1000, deep_base=True

调用_make_layer函数传入参数,其中layers[0]=3
self.layer1 = self._make_layer(block, 64, layers[0])
2.21 _make_layer函数完整代码如下:参数为block=Bottleneck、planes=64、blocks=3、stride=1
# block:基础块的类型,是BasicBlock,还是Bottleneck
# planes:当前块的输入输入通道数
# blocks:块的数目
def _make_layer(self, block, planes, blocks, stride=1):
    downsample = None
    # downSample的作用于在残差连接时 将输入的图像的通道数变成和卷积操作的尺寸一致
    # 根据ResNet的结构特点,一般只在每层开始时进行判断
    if stride != 1 or self.inplanes != planes * block.expansion:
    	# 通道数恢复成一致
        downsample = nn.Sequential(
            nn.Conv2d(self.inplanes, planes * block.expansion,
                      kernel_size=1, stride=stride, bias=False),
            BatchNorm(planes * block.expansion),
        )

    layers = []
    layers.append(block(self.inplanes, planes, stride, downsample))
    self.inplanes = planes * block.expansion
    for i in range(1, blocks):
        layers.append(block(self.inplanes, planes))

    return nn.Sequential(*layers)
在使用Bottleneck构造时,self.inplanes = 128、block.expansion=4
所以128 != 64*4,这时将会定义一个downsample:通过一个卷积和批归一化将通道数恢复成一致


将参数downsample传递给layers.append(block(self.inplanes, planes, stride, downsample))
四个参数为:inplanes=128、planes=64、stride=1、downsample
接下来转到block类中,resnet50为Bottleneck
2.22 Bottleneck类(downsample下采样)
其完整代码如下:
class Bottleneck(nn.Module):
    expansion = 4

    def __init__(self, inplanes, planes, stride=1, downsample=None):
        super(Bottleneck, self).__init__()
        self.conv1 = nn.Conv2d(inplanes, planes, kernel_size=1, bias=False)
        self.bn1 = BatchNorm(planes)
        self.conv2 = nn.Conv2d(planes, planes, kernel_size=3, stride=stride,
                               padding=1, bias=False)
        self.bn2 = BatchNorm(planes)
        self.conv3 = nn.Conv2d(planes, planes * self.expansion, kernel_size=1, bias=False)
        self.bn3 = BatchNorm(planes * self.expansion)
        self.relu = nn.ReLU(inplace=True)
        self.downsample = downsample
        self.stride = stride

    def forward(self, x):
        residual = x

        out = self.conv1(x)
        out = self.bn1(out)
        out = self.relu(out)

        out = self.conv2(out)
        out = self.bn2(out)
        out = self.relu(out)

        out = self.conv3(out)
        out = self.bn3(out)

        if self.downsample is not None:
            residual = self.downsample(x)

        out += residual
        out = self.relu(out)

        return out
__init__中:def __init__(self, inplanes, planes, stride=1, downsample=None):
四个参数为:inplanes=128、planes=64、stride=1、downsample
__init__中定义了一些卷积、归一化和激活函数,然后forward中

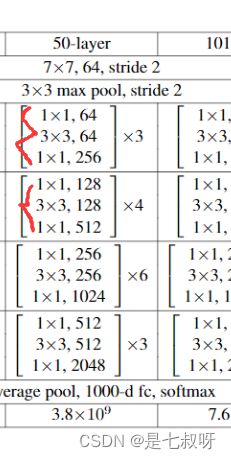
对照resnet50,out = self.conv1(x) out = self.bn1(out) out = self.relu(out)
- self.conv1 = nn.Conv2d(inplanes, planes, kernel_size=1, bias=False) # 128-64
- self.bn1 = BatchNorm(planes)
out = self.conv2(out) out = self.bn2(out) out = self.relu(out)
- self.conv2 = nn.Conv2d(planes, planes, kernel_size=3, stride=stride,padding=1, bias=False) # 64-64
- self.bn2 = BatchNorm(planes)
out = self.conv3(out) out = self.bn3(out)
- self.conv3 = nn.Conv2d(planes, planes * self.expansion, kernel_size=1, bias=False) # 64-64*4(256)
之后downsample 【将最开始的x=64通道卷积为256】,与得到的out相加,relu激活:return 激活后的总out

        if self.downsample is not None:
            residual = self.downsample(x)

        out += residual
        out = self.relu(out)

        return out
最后改变输入self.inplanes = planes * block.expansion=256,blocks=3,循环1-2两次,加上上一次正好构造了三次网络(只有第一次有downsample):
self.inplanes = planes * block.expansion
        for i in range(1, blocks):
            layers.append(block(self.inplanes, planes))
PS:resnet.layer1, resnet.layer2, resnet.layer3, resnet.layer4都是同理,都是通过_make_layer得到的
2.3 asgnet.py的__init__
2.31 layer0、layer1、layer2、layer3、layer4 2.2小节有讲解,在定义好每一个layer之后:
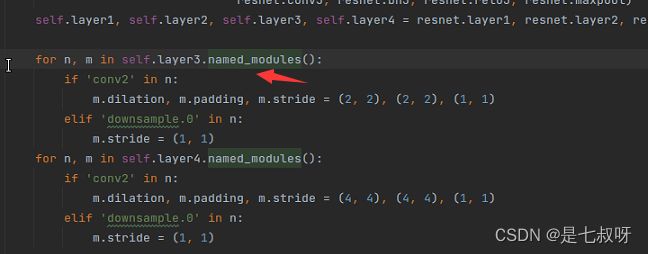
PS:Pytorch中named_children()和named_modules()的区别
从定义上讲:
named_children( ):返回包含子模块的迭代器,同时产生模块的名称以及模块本身。named_modules( ):返回网络中所有模块的迭代器,同时产生模块的名称以及模块本身。
二者返回的都是模型的迭代器,只不过一个返回的是子模块的迭代器,另一个返回的是所有模块的迭代器。
写个程序测试一下:
import torch
import torch.nn as nn

class TestModule(nn.Module):
    def __init__(self):
        super(TestModule,self).__init__()
        self.layer1 = nn.Sequential(
            nn.Conv2d(16,32,3,1),
            nn.ReLU(inplace=True)
        )
        self.layer2 = nn.Sequential(
            nn.Linear(32,10)
        )

    def forward(self,x):
        x = self.layer1(x)
        x = self.layer2(x)

model = TestModule()

for name, module in model.named_children():
    print('children module:', name)

for name, module in model.named_modules():
    print('modules:', name)
输出:
>>out:
children module: layer1
children module: layer2
modules:
modules: layer1
modules: layer1.0
modules: layer1.1
modules: layer2
modules: layer2.0
可以看到named_children只输出了layer1和layer2两个子module,而named_modules输出了包括layer1和layer2下面所有的modolue。
layer1.0和layer1.1分别是layer1下面的一些组成部分,比如我这个里面layer1.0是conv2d,layer1.1是relu
2.4 回归forward(因为卷积核尺寸和resnet50中使用的_make_layer函数都是一样的,所以每一layer输出的特征图尺度都是一样的,可以直接按照1维度(channel)来cat)
2.41 首先查询集特征图Query Feature
查询集数据处理后的图像矩阵通道数变化: 3 − 1024 \color{red}{3-1024} 3−1024
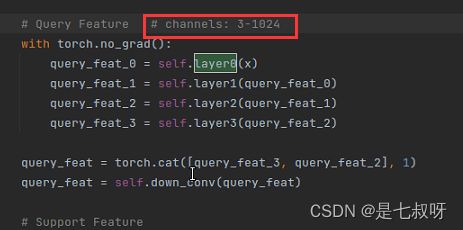
然后按照第一个维度channel拼接query_feat_3和query_feat_2:query_feat = torch.cat([query_feat_3, query_feat_2], 1)
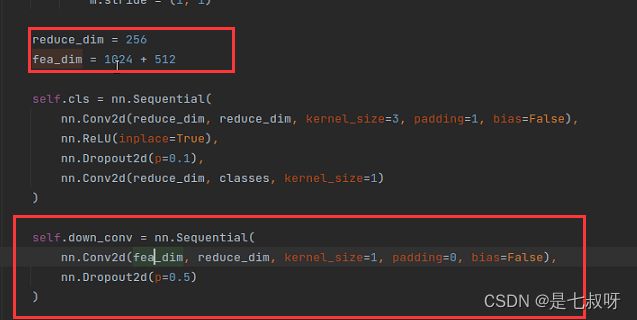
之后进行:query_feat = self.down_conv(query_feat),卷积和dropout2d。
- 卷积输入通道:fea_dim = 1024 + 512
- 卷积输出通道:reduce_dim = 256
PS:torch.nn.Dropout2d (Python class, in Dropout2d)
参考:PyTorch 中的 dropout Dropout2d Dropout3d
Dropout2d 的赋值对象是PyTorch 中的 dropout Dropout2d Dropout3d彩色的图像数据(batch N,通道 C,高度 H,宽 W)的一个通道里的每一个数据,即输入为 Input: (N, C, H, W) 时,对每一个通道维度 C 按概率赋值为 0。
定义:
def run_2d():
	input_ = torch.randn(2, 3, 2, 4)
	m = nn.Dropout2d(p=0.5, inplace=False)
	output = m(input_)
	print("input_ = \n", input_)
	print("output = \n", output)
输出结果如下(对每一个通道维度 C 按概率赋值为 0。):
input_ =
 tensor([[[[ 0.4218, -0.6617,  1.0745,  1.2412],
          [ 0.2484,  0.6037,  0.3462, -0.4551]],

         [[-0.9153,  0.8769, -0.7610, -0.7405],
          [ 0.1170, -0.8503, -1.0089, -0.5192]],

         [[-0.6971, -0.9892,  0.1342,  0.1211],
          [-0.3756,  1.9225, -1.0594,  0.1419]]],


        [[[-1.2856, -0.3241,  0.2331, -1.5565],
          [ 0.6961,  1.0746, -0.9719,  0.5585]],

         [[-0.1059, -0.7259, -0.4028,  0.1968],
          [ 0.8201, -0.0833, -1.2811,  0.1915]],

         [[-0.2207,  0.3850,  1.4132,  0.8216],
          [-0.1313,  0.2915,  0.1996,  0.0021]]]])
output =
 tensor([[[[ 0.8436, -1.3234,  2.1489,  2.4825],
          [ 0.4968,  1.2073,  0.6924, -0.9101]],

         [[-1.8305,  1.7537, -1.5219, -1.4810],
          [ 0.2340, -1.7006, -2.0178, -1.0385]],

         [[-0.0000, -0.0000,  0.0000,  0.0000],
          [-0.0000,  0.0000, -0.0000,  0.0000]]],


        [[[-0.0000, -0.0000,  0.0000, -0.0000],
          [ 0.0000,  0.0000, -0.0000,  0.0000]],

         [[-0.2118, -1.4518, -0.8056,  0.3935],
          [ 1.6401, -0.1667, -2.5622,  0.3830]],

         [[-0.0000,  0.0000,  0.0000,  0.0000],
          [-0.0000,  0.0000,  0.0000,  0.0000]]]])
2.42 接着提取支撑集特征
P F E N e t 中 : \color{red}{PFENet中:} PFENet中:
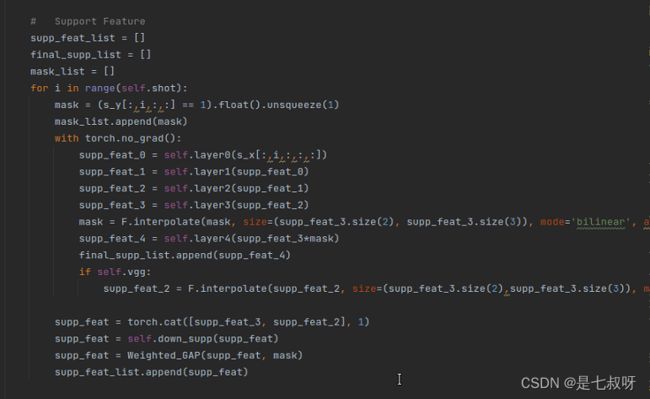
对于每一个shot:for i in range(self.shot)
接着对于s_y中下标为 i shot的mask进行插值和采样:mask = F.interpolate(mask, size=(supp_feat_3.size(2), supp_feat_3.size(3)), mode='bilinear', align_corners=True)
PS:pytorch torch.nn.functional.interpolate实现插值和上采样(代码中输出[size(2),size(3)])
参考:Pytorch上下采样函数–interpolate()
什么是上采样:
上采样,在深度学习框架中,可以简单的理解为任何可以让你的图像变成更高分辨率的技术。 最简单的方式是重采样和插值:将输入图片input image进行rescale到一个想要的尺寸,而且计算每个点的像素点,使用如双线性插值bilinear等插值方法对其余点进行插值。
Unpooling是在CNN中常用的来表示max pooling的逆操作。这是从2013年纽约大学Matthew D. Zeiler和Rob Fergus发表的《Visualizing and Understanding Convolutional Networks》中引用的:因为max pooling不可逆,因此使用近似的方式来反转得到max pooling操作之前的原始情况;
interpolate()
torch.nn.functional.interpolate(input, size=None, scale_factor=None, mode='nearest', align_corners=None)
参数:
- input (Tensor) – 输入张量
- size (int or Tuple[int] or Tuple[int, int] or Tuple[int, int, int]) – 输出大小.
- scale_factor (float or Tuple[float]) – 指定输出为输入的多少倍数。如果输入为tuple,其也要制定为tuple类型
- mode (str) – 可使用的上采样算法,有’nearest’, ‘linear’, ‘bilinear’, ‘bicubic’ , ‘trilinear’和’area’. 默认使用’nearest’
注:使用mode='bicubic’时,可能会导致overshoot问题,即它可以为图像生成负值或大于255的值。如果你想在显示图像时减少overshoot问题,可以显式地调用result.clamp(min=0,max=255)。
- align_corners (bool, optional) – 几何上,我们认为输入和输出的像素是正方形,而不是点。如果设置为True,则输入和输出张量由其角像素的中心点对齐,从而保留角像素处的值。如果设置为False,则输入和输出张量由它们的角像素的角点对齐,插值使用边界外值的边值填充;当scale_factor保持不变时,使该操作独立于输入大小。仅当使用的算法为’linear’, ‘bilinear’, 'bilinear’or 'trilinear’时可以使用。默认设置为False
如果 align_corners=True,则对齐 input 和 output 的角点像素(corner pixels),保持在角点像素的值. 只会对 mode=linear, bilinear 和 trilinear 有作用. 默认是 False.
A S G N e t 中 : \color{red}{ASGNet中:} ASGNet中:

三、resnet.py
参考:ResNet _make_layer代码理解
参考:pytorch中残差网络resnet的源码解读
四、Debug模型的forward(Way-Shot:支撑集图片和mask有shot张,但是查询集图片和mask只有1张)
输入进forward函数的参数:
- s_x:支撑集归一化后图像矩阵,[B, Shot, C, H, W]
- s_y:支撑集mask,[B, Shot, H, W]
- x:查询集图片,(一张,和shot无关)[B, C, H, W]
- y:查询集mask,(一张,和shot无关)[B, H, W]

此处zoom_factor在yaml配置文件中是8,所以h正好是473

4.1 处理查询集特征(没有使用到layer4即conv5_x):
PS:with torch.no_grad的作用
参考:【pytorch系列】 with torch.no_grad():用法详解
首先从requires_grad讲起:
requires_grad
在pytorch中,tensor有一个requires_grad参数,如果设置为True,则反向传播时,该tensor就会自动求导。tensor的requires_grad的属性默认为False,若一个节点(叶子变量:自己创建的tensor)requires_grad被设置为True,那么所有依赖它的节点requires_grad都为True(即使其他相依赖的tensor的requires_grad = False)
当requires_grad设置为False时,反向传播时就不会自动求导了,因此大大节约了显存或者说内存。
with torch.no_grad的作用
在该模块下,所有计算得出的tensor的requires_grad都自动设置为False。
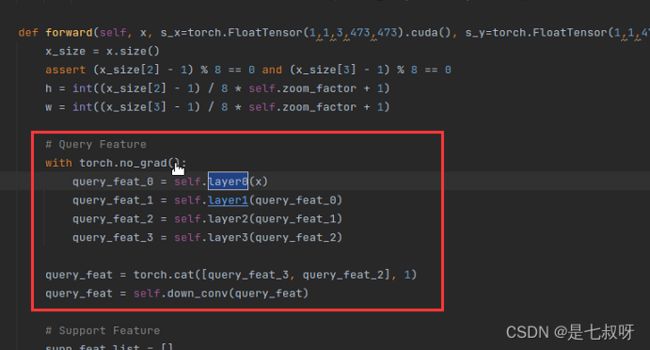
处 理 查 询 集 特 征 代 码 如 下 : \color{red}{处理查询集特征代码如下:} 处理查询集特征代码如下:

得到的特征图尺寸如下:(因为卷积的blocks是不一样的,所以输出的特征图后两个维度也可能不一样)

可以看出3和2特征图[60, 60]是一样的,所以可以按照通道数拼接:

调用self.down_conv函数进行通道数1024+512 ----- 256卷积和dropout:
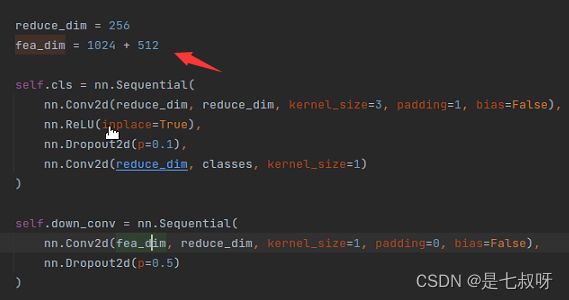
self.down_conv = nn.Sequential(
            nn.Conv2d(fea_dim, reduce_dim, kernel_size=1, padding=0, bias=False),
            nn.Dropout2d(p=0.5)
        )
4.2 处理支撑集特征(也没有使用到layer4即conv5_x):
处 理 支 撑 集 特 征 代 码 如 下 : \color{red}{处理支撑集特征代码如下:} 处理支撑集特征代码如下:
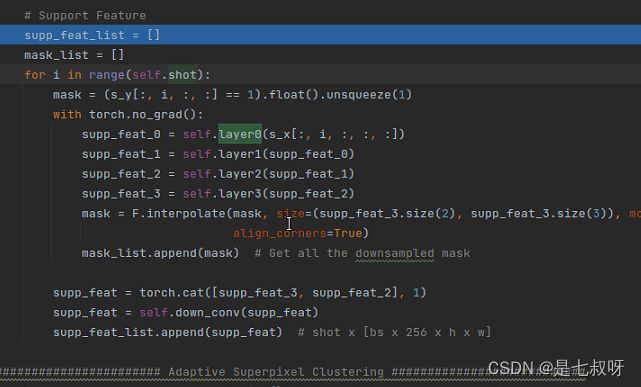
使用np.unique(s_y.cpu().numpy()).tolist()查看s_y中数值:

尺度变化:

里面只有0.0和1.0(存在目标的地方,即原来为1的地方变为1.0;原来为255自动变为0):

最后mask = (s_y[:, i, :, :] == 1).float().unsqueeze(1)得到的mask只包含0.0和1.0,它的尺度如下:

PS:【学习笔记】pytorch中squeeze()和unsqueeze()函数介绍
参考:pytorch中squeeze()和unsqueeze()函数介绍
一、unsqueeze()函数
- 首先初始化一个a

可以看出a的维度为(2,3) - 在第二维增加一个维度,使其维度变为(2,1,3)

可以看出a的维度已经变为(2,1,3)了,同样如果需要在倒数第二个维度上增加一个维度,那么使用b.unsqueeze(-2)
二、squeeze()函数介绍
1.首先得到一个维度为(1,2,3)的tensor(张量)

由图中可以看出c的维度为(1,2,3)
2.下面使用squeeze()函数将第一维去掉

可见,维度已经变为(2,3)
3.另外如果squeeze倒数第二个维度2就不行了

可以看出维度并没有变化,仍然为(1,2,3),这是因为只有维度为1时才会去掉。
下一步输入到layer0:尺度由原来[16, Shot, c, h, w]变为[16, c, h, w]

支撑集特征经过resnet网络后:和支撑集一样最后都变成了[16, 1024, 60, 60],无layer4

然后经过双线性插值:将mask的尺度变为和图像特征一样的【60,60】
添加到mask_list中(主要针对shot>1的情况,可以加到list中)。

支撑集特征supp_feat_3和supp_feat_2按照通道数cat,再下采样为256通道
添加到supp_feat_list中(主要针对shot>1的情况)
![]()

4.3 SGC自适应超像素引导聚类模块
S G C 代 码 如 下 : \color{red}{SGC代码如下:} SGC代码如下:

![]()
其中s_seed.size()尺度如下:
![]()
查看s_seed中的元素:[0, 1, 5, 9,10, 11, 12, 13, 14, 17,18,19, 20, 21, 23, 24, 25, 26, 27, 28, 29, 30,
31, 32, 33, 34, 35, 36, 37, 38, 39, 40, 41, 42, 43, 45, 46, 47, 50, 51, 52, 53, 54, 57, 59]


