安全运维-Nginx服务器就该这么玩~
目录
- 认识Nginx
-
- Nginx简介
- Nginx的功能
-
- 正向代理&&反向代理
- 动静分离
- 负载均衡
- Nginx的安装
-
- Linux
- Docker
- Nginx的目录
- Nginx的命令
- Nginx配置文件
-
- Nginx配置文件结构
- 全局块
- events块
- http全局块
- server全局块
- location块
- 自带配置文件解读
-
- default.conf
- nginx.conf
- 反向代理与负载均衡实战
- 参考
认识Nginx
Nginx简介
Nginx (发音Engine-x) 是一个高性能的HTTP和反向代理web服务器,同时也提供了IMAP/POP3/SMTP服务,代码完全用C语言写成,已经移植到许多体系结构和操作系统。在连接高并发的情况下,Nginx是Apache服务不错的替代品。

官网的Title是Advancced Load Balancer, Web Server, & Reverse Proxy。 也就是说主打负载均衡、Web服务器和反向代理。
Nginx的功能
正向代理&&反向代理

正向代理:Nginx作为客户端。我们平时使用的"科学上网"软件就是一种正向代理,你的电脑不能访问外网,就由代理替你访问后回传。
反向代理:Nginx作为服务端。客户端对于代理是无感的。只需要将请求发送到反向代理服务器,由反向代理服务器去选择目标服务器获取数据后,再返回给客户端,此时反向代理服务器和目标服务器对外就是一个服务器,暴露的是代理服务器地址,隐藏了真实服务器 IP 地址。
动静分离
为了加快网站的解析速度,可以把动态页面和静态页面由不同的服务器来解析,加快解析速度,降低原来单个服务器的压力。
负载均衡
负载均衡一般通过轮询,加权轮询,ip hash三种方式。

轮询如图左所示,第1个请求给服务器1,第2个请求给服务器2,第3个请求给服务器3。当请求数量与服务器数量一致时达到最佳的均衡状态。
加权轮询如图右所示,根据权重去轮询,权重大的分配更多请求。可以根据服务器的CPU、内存等来设计权重。

IP Hash算法,对客户端请求的IP进行hash操作,然后根据hash结果将同一个客户端IP的请求分发给同一台服务器进行处理,可以解决session不共享的问题。之前文章说过cookie是存在客户端(如,浏览器)的,session是存在服务器的。
Nginx的安装
Linux
官方文档:Linux Packages
博主这里就不做了,编译出错什么的还要解决,比较麻烦,博主采用了下面的方法学习。
Docker
镜像下载
docker pull nginx
查看镜像
docker images
可以看到结果:
nginx latest 12766a6745ee 4 days ago 142MB
就说明下载成功了
使用命令:
docker run -d --name nginx_test -p 80:80 nginx
开启容器,之后访问http://ip:80即可

看到上面的图说明没有问题。
Nginx的目录
上图为当前版本nginx的主要目录
- /usr/sbin/nginx:nginx执行命令
- /usr/lib/nginx:各个模块,http、js等相关的
- /usr/share/nginx:含html目录,网站代码放在里面即可
- /etc/nginx:配置文件,下面详细讲述
- /var/log/nginx:nginx的日志
一般会挂载日志、配置文件和代码目录
在当前目录下生成nginx目录,里面有src conf logs三个目录,之后我们查看日志、替换网站代码就不必进容器了。
cd nginx
docker cp nginx_test:/etc/nginx/ ./conf/
注意:需要将conf里面的nginx里面的文件及目录拷贝到conf下,并删除空的nginx目录。若不拷贝,挂载后可能会失败,显示找不到配置文件。
停止并删除之前启动的容器,启动新的容器(在nginx目录下)
docker run -d -p 80:80 -v $PWD/src:/usr/share/nginx/html -v $PWD/conf:/etc/nginx -v $PWD/logs:/var/log/nginx nginx
Nginx的命令
进入容器(替换container_id)
docker exec -it container_id bash
使用
nginx -h
查看命令帮助
nginx version: nginx/1.21.6
Usage: nginx [-?hvVtTq] [-s signal] [-p prefix]
             [-e filename] [-c filename] [-g directives]

Options:
  -?,-h         : this help
  -v            : show version and exit
  -V            : show version and configure options then exit
  -t            : test configuration and exit
  -T            : test configuration, dump it and exit
  -q            : suppress non-error messages during configuration testing
  -s signal     : send signal to a master process: stop, quit, reopen, reload
  -p prefix     : set prefix path (default: /etc/nginx/)
  -e filename   : set error log file (default: /var/log/nginx/error.log)
  -c filename   : set configuration file (default: /etc/nginx/nginx.conf)
  -g directives : set global directives out of configuration file
常用关闭 检查配置文件 重载配置文件
nginx -s stop
nginx -t
nginx -s reload
Nginx配置文件
nginx.conf和default.conf,一般default.conf是写全局配置,nginx.conf会include一下conf.d目录下的default.conf
Nginx配置文件结构
...              #全局块

events {         #events块
   ...
}

http      #http块
{
    ...   #http全局块
    server        #server块
    {
        ...       #server全局块
        location [PATTERN]   #location块
        {
            ...
        }
        location [PATTERN]
        {
            ...
        }
    }
    server
    {
      ...
    }
    ...     #http全局块
}
1、全局块:配置影响nginx全局的指令。一般有运行nginx服务器的用户组,nginx进程pid存放路径,日志存放路径,配置文件引入,允许生成worker process数等。
2、events块:配置影响nginx服务器或与用户的网络连接。有每个进程的最大连接数,选取哪种事件驱动模型处理连接请求,是否允许同时接受多个网路连接,开启多个网络连接序列化等。
3、http块:可以嵌套多个server,配置代理,缓存,日志定义等绝大多数功能和第三方模块的配置。如文件引入,mime-type定义,日志自定义,是否使用sendfile传输文件,连接超时时间,单连接请求数等。
4、server块:配置虚拟主机的相关参数,一个http中可以有多个server。
5、location块:配置请求的路由,以及各种页面的处理情况。
全局块
user:配置用户或者组
worker_processes:允许生成的进程数,默认auto
error_log:指定错误日志路径,级别。这个设置可以放入全局块,http块,server块,级别为:
- debug
- info
- notice
- warn
- error
- crit
- alert
- emerg
pid:指定nginx进程运行文件存放地址
events块
accept_mutex:设置网路连接序列化,防止惊群现象发生,默认为on
multi_accept :设置一个进程是否同时接受多个网络连接,默认为off
use:事件驱动模型,
9. select
10. poll
11. kqueue
12. epoll resig
13. dev
14. poll
15. eventport
worker_connections :最大连接数,默认为1024
http全局块
include:文件扩展名与文件类型映射表,默认/etc/nginx/mime.types
default_type:默认文件类型,默认为application/octet-stream
sendfile:允许sendfile方式传输文件,默认为on,可以在http块,server块,location块。
sendfile_max_chunk :每个进程每次调用传输数量不能大于设定的值,默认为0,即不设上限。
keepalive_timeout:连接超时时间,默认为65s,可以在http,server,location块。
log_format:日志格式,常见的有:
- 1.$remote_addr 与 $http_x_forwarded_for 用来记录nginx反向代理的ip地址和真实的客户端的ip地址;
- 2.$remote_user :用来记录客户端用户名称;
- 3.$time_local : 用来记录访问时间与时区;
- 4.$request : 用来记录请求的url与http协议;
- 5.$status : 用来记录请求状态,例如,成功是200;
- 6.$body_bytes_sent :记录发送给客户端文件主体内容大小;
- 7.$http_referer :用来记录从那个页面链接访问过来的;
- 8.$http_user_agent :记录客户端浏览器的相关信息;
access_log:访问日志设置**
server全局块
keepalive_requests:单连接请求上限次数。
listen:监听端口,默认80
server_name:监听地址。默认localhost
error_page:错误页
location块
root:网站根目录,默认/usr/share/nginx/html
index:设置默认页 index.html
deny:拒绝的ip
allow:允许的ip
proxy_pass:请求转向mysvr 定义的服务器列表
proxy_redirect off;
proxy_set_header Host $host;
proxy_set_header X-Real-IP $remote_addr;
proxy_set_header X-Forwarded-For $proxy_add_x_forwarded_for;
proxy_next_upstream error timeout invalid_header http_500 http_502 http_503 http_504;
proxy_connect_timeout 60:nginx跟后端服务器连接超时时间(代理连接超时)
proxy_read_timeout 60:连接成功后,与后端服务器两个成功的响应操作之间超时时间(代理接收超时)
proxy_buffer_size 4k:设置代理服务器(nginx)从后端realserver读取并保存用户头信息的缓冲区大小,默认与proxy_buffers大小相同,其实可以将这个指令值设的小一点
proxy_buffers 4 32k:proxy_buffers缓冲区,nginx针对单个连接缓存来自后端realserver的响应,网页平均在32k以下的话,这样设置
proxy_busy_buffers_size 64k:高负荷下缓冲大小(proxy_buffers*2)
proxy_max_temp_file_size:当 proxy_buffers 放不下后端服务器的响应内容时,会将一部分保存到硬盘的临时文件中,这个值用来设置最大临时文件大小,默认1024M,它与 proxy_cache 没有关系。大于这个值,将从upstream服务器传回。设置为0禁用。
proxy_temp_file_write_size 64k:当缓存被代理的服务器响应到临时文件时,这个选项限制每次写临时文件的大小。
proxy_temp_path(可以在编译的时候)指定写到哪那个目录。
自带配置文件解读
default.conf
server {
    listen       80;
    listen  [::]:80;
    server_name  localhost;

    #access_log  /var/log/nginx/host.access.log  main;

    location / {
        root   /usr/share/nginx/html;
        index  index.html index.htm;
    }

    #error_page  404              /404.html;

    # redirect server error pages to the static page /50x.html
    #
    error_page   500 502 503 504  /50x.html;
    location = /50x.html {
        root   /usr/share/nginx/html;
    }

    # proxy the PHP scripts to Apache listening on 127.0.0.1:80
    #
    #location ~ \.php$ {
    #    proxy_pass   http://127.0.0.1;
    #}

    # pass the PHP scripts to FastCGI server listening on 127.0.0.1:9000
    #
    #location ~ \.php$ {
    #    root           html;
    #    fastcgi_pass   127.0.0.1:9000;
    #    fastcgi_index  index.php;
    #    fastcgi_param  SCRIPT_FILENAME  /scripts$fastcgi_script_name;
    #    include        fastcgi_params;
    #}

    # deny access to .htaccess files, if Apache's document root
    # concurs with nginx's one
    #
    #location ~ /\.ht {
    #    deny  all;
    #}
}
监听端口80,服务器为localhost,这也是为什么我前面让各位读者打开80端口访问Nginx
网站根目录为:/usr/share/nginx/html,主页为index.html或index.htm,错误页类似
nginx.conf
user  nginx;
worker_processes  auto;

error_log  /var/log/nginx/error.log notice;
pid        /var/run/nginx.pid;

events {
    worker_connections  1024;
}

http {
    include       /etc/nginx/mime.types;
    default_type  application/octet-stream;

    log_format  main  '$remote_addr - $remote_user [$time_local] "$request" '
                      '$status $body_bytes_sent "$http_referer" '
                      '"$http_user_agent" "$http_x_forwarded_for"';

    access_log  /var/log/nginx/access.log  main;

    sendfile        on;
    #tcp_nopush     on;

    keepalive_timeout  65;

    #gzip  on;

    include /etc/nginx/conf.d/*.conf;
}
用户为nginx,worker进程数自动
错误日志默认目录为/var/log/nginx/error.log,级别为notice
nginx运行文件存储位置:/var/run/nginx.pid
最大连接数为1024
包含MIME类型:/etc/nginx/mime.types
默认类型为:application/octet-stream
log日志格式为:请查看前面http全局块
json格式比较方便,现在常用,Nginx日志也可以设置为json格式,例如
    log_format log_json '{"@timestamp": "$time_local", '
                        '"remote_addr": "$remote_addr", '
                        '"referer": "$http_referer", '
                        '"request": "$request", '
                        '"status": $status, '
                        '"bytes": $body_bytes_sent, '
                        '"agent": "$http_user_agent", '
                        '"x_forwarded": "$http_x_forwarded_for", '
                        '"up_addr": "$upstream_addr",'
                        '"up_host": "$upstream_http_host",'
                        '"up_resp_time": "$upstream_response_time",'
                        '"request_time": "$request_time"'
                        ' }';

    access_log  logs/access.log log_json; # 引用日志格式名称
反向代理与负载均衡实战
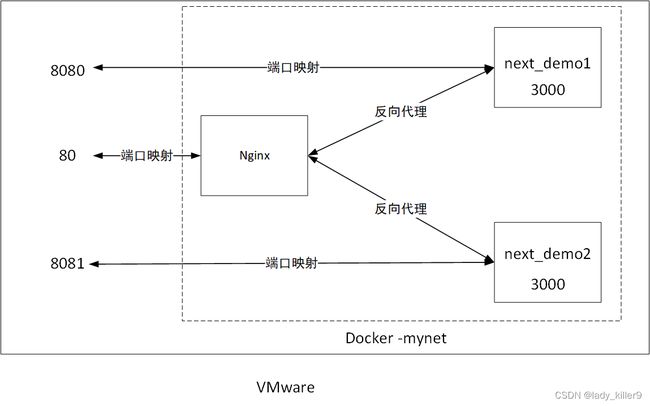
熟悉我的朋友都知道,我讲完理论是要实践的,这里就来实践一下反向代理与负载均衡。整个环境如下:

80端口可以访问到两个服务器,8080端口和8081端口分别能访问next_demo1和next_demo2
nginx.conf 如下:
user  nginx;
worker_processes  auto;

error_log  /var/log/nginx/error.log notice;
pid        /var/run/nginx.pid;

events {
    worker_connections  1024;
}

http {
    include       /etc/nginx/mime.types;
    default_type  application/octet-stream;

    log_format  main  '$remote_addr - $remote_user [$time_local] "$request" '
                      '$status $body_bytes_sent "$http_referer" '
                      '"$http_user_agent" "$http_x_forwarded_for"';

    access_log  /var/log/nginx/access.log  main;

    sendfile        on;

    keepalive_timeout  65;

    # 负载均衡
    upstream next_demo{
        server next_demo1:3000 weight=2;
        server next_demo2:3000 weight=1;
    }

    server {
    listen       80;
    listen  [::]:80;
    server_name  localhost;

    # 反向代理
    location / {
        root   /usr/share/nginx/html;
        index  index.html index.htm;
        proxy_pass   http://next_demo;
    }

    location = /50x.html {
        root   /usr/share/nginx/html;
    }

    }
}
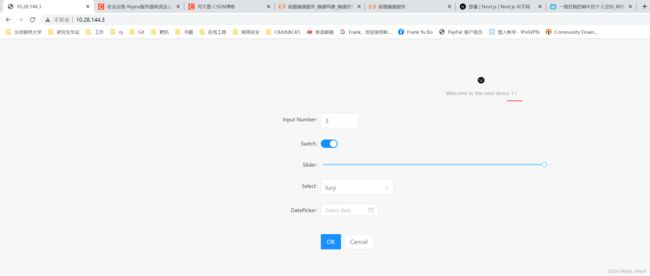
访问结果如下:


这里只是演示哈,实际应该不暴露后面服务器的端口,两个服务器内容一致。
访问80端口,刷新几次,可以看到 1 2的比例差不多是2:1,也就是负载均衡。查看Nginx日志也能看到。

由于涉及到了docker-compose,搭建的的内容放到了这篇文章:Docker-docker-compose学习笔记(yaml,实战)
留个作业,设置下动静分离、正向代理,可以把你的博客放到评论区。
参考
nginx.com
nginx.org
菜鸟教程-Nginx配置详解


