项目1在线交流平台-8.项目总结与部署-3.项目上线部署-linux部署tomcat项目
文章目录
-
- 功能需求
- 一、Xshell与Xftp安装与使用
-
- 1. Xhsell认识与安装使用
-
- 1.1 认识Xshell
- 1.2 为何使用Xshell
- 1.3 Xshell安装与使用
- 2. Xftp认识与安装
-
- 2.1 Xftp认识
- 2.2 Xftp安装与使用
- 二、linux部署JDK
-
- 1. 使用yum库对JDK卸载与安装
-
- `java -version`-检查版本
- `rpm -qa|grep xxx`-查看软件包名
- `rpm -ql 包名`-查看软件存放位置
-
- `find / -name 'java'`
- `yum remove -y xxx` - 卸载软件
- `yum list java*`-查看yum库
- `yum install -y xxx`-安装软件
- 2. 测试jdk
-
- `touch HelloWorld.java`-创建文件
- `vim HelloWorld.java`-使用vim编辑文件
- `javac HelloWorld.java`
- 三、linux部署Maven
-
- 1. 下载tag二进制文件
-
- `wget命名`-linux下载工具
-
- `使用 -c 选项断点续传`
- `使用 -i 选项下载多个文件`
- 2. 安装maven
-
- 1. `tar -zxvf xxx` -解压压缩包
- 2. 设置maven的阿里云镜像
- 3. 配置maven的环境变量
-
- `vim /etc/profile`-配置文件中添加
- `source /etc/profile`-配置文件生效
- `echo $PATH`-打印出路径
- 4. 验证maven是否安装成功
-
- `mvn -version`-查看maven信息
- 四、linux部署MySql
-
- 1. 使用rpm库文件安装
-
- `问题:显示尚未安装gpg密钥`
- 2. 启动mysql,修改密码
-
- 2.1 启动linux部署的mysql
-
- `systemctl start mysqld`-yum安装程序的启动
- `systemctl status mysqld`-查看启动状态
- 2.2 修改mysql密码和配置
-
- `grep指令`-搜索指令
- `mysql -u root -p`-先登录root用户,再修改密码
- `ulter alter user root@localhost identified by 'xxx' -重置密码
- 3. 导入初始数据
-
- 3.1 下载`unzip`工具
- 3.2 解压并加载sql初始文件
-
- `unzip -d /opt init_sql.zip `- 解压到指定路径下
- `create database xxx`-创建库
- `use xxx`-切换到指定库
- `source 全路径/文件`-使用文件初始化数据表
- `show tables`-查看表单
- 4. 测试检查安装的mysql版本
-
- `mysql -V`
- 五、linux部署Redis、Kafak
-
- 1. Redis
-
- 1.1 查看reidis版本
-
- `redis-server -v`
- 1.2 redis启动、关闭等基本操作
-
- `redis-server myredis/redis.conf`
- `清空redis缓存`
- 2. Kafka
-
- 2.1 修改配置文件
-
- `vim zookeeper.properties`
- `vim server.properties`
- 2.2 启动与关闭
-
- `1. 启动/停止Zookeeper`
- `2. 启动/停止Kafka`
- 2.3 测试
-
- `查看所有主题`
- `查看特定主题`
- 六、linux部署ElasticSearch
-
- 1. tag压缩包下载
- 2. 解压安装
- 3. 配置
-
- `vim elasticsearch.yml`
- `vim jvm.options`
- 4.更改用户进行启动和关闭
-
- 4.1 组管理和权限管理
-
- `groupadd 组 名`-创建组
- `useradd 用户名 -p 密码 -g 组名`-创建指定组内的用户
- `chown -R 用户名:组名 文件/目录`-为指定路径创建访问权限
- `su - 要切换的用户名`-切换用户
- 4.2 启动ElasticSearch
- 4.3 测试是否启动成功
- 4.4 关闭ES
- 七、linux部署wkhtltopdf
-
- 1. 下载安装
-
- `rpm -ivh rpm文件名称`
- 2. 安装虚拟GUI工具
- 3. 测试
-
- `xvfb工具使用`
- `封装脚本文件`
- `chmod`-修改权限
-
- `权限说明`
- `+ 、-、= 变更权限`
- `使用脚本文件执行生成图片`
- 八、linux部署Tomcat
-
- 1. 下载tar包
- 2. 解压安装
- 3. 配置环境变量
-
- `pws`-查询路径
- `vim /etc/profile`-配置文件
- `source /etc/profile`-配置文件生效
- `echo`-打印到控制台
- 4. 测试
-
- `startup.sh`-启动tomcat
- `访问linux的ip:tomcat端口`
- 九、linux部署Nginx
-
- 1. 使用yum安装Nginx
-
-
- `epel-release`-安装epel源
-
- 2. 配置Nginx
-
- `vim /etc/nginx/nginx.conf`-配置文件
- 3. 启动Nginx
-
- `systemctl start nginx`-出现错误
-
- `nginx -t`-检查配置文件错误
- 4. 测试
-
- `502错误`
- 十、linux部署上线项目
-
- 1. 项目部署原理
- 2. 删除tomcat内置的项目
- 3. 更新访问路径
- 4. web项目打包
- 5. 多套配置文件方案
-
- 5.1 配置文件命名规则
- 5.2 默认配置文件开关设置
- 5.3 生产环境配置修改
- 6. 设置tomcat启动入口程序
- 7. 将项目压缩后部署到tomcat上
-
- 7.1 先将项目文件压缩成zip
- 7.2 使用maven打包,并忽略测试
- 7.4 打包后的将ROOT.war包移动到tomcate的webapp内
- 8.启动测试
-
- `startup.sh`-启动
- `访问nginx服务器`
参考牛客网高级项目教程
尚硅谷Linux教程笔记
功能需求
- 之前工作均是项目开发阶段,在本地操作测试即可
- 系统上线,需要将项目部署到远程服务器,例如linux服务器,以便线上用户可以访问
- 因此,需要将项目中用到的工具和项目web包均部署到linux服务器中
- 使用第三方客户端Putty或Xshell远程操作linux系统
一、Xshell与Xftp安装与使用
1. Xhsell认识与安装使用
登录linux终端软件putty和xshell的区别
1.1 认识Xshell
-
Xshell 是目前最好的远程登录到 Linux 操作的软件,流畅的速度并且完美解决了中文乱码的问题, 是目前程序员首选的软件。
-
Xshell 是一个强大的安全终端模拟软件,它支持
SSH1, SSH2, 以及 Microsoft Windows 平台的 TELNET 协议。 -
Xshell 可以在 Windows 界面下用来访问远端不同系统下的服务器,从而比较好的达到远程控制终端的目的。
-
相比较于Putty,操作界面更加友好,因此,本项目使用xshell
特别说明:如果希望安装好 XShell 5 就可以远程访问 Linux 系统的话,需要有一个前提,就是Linux 启用了 SSHD 服务,该服务会监听 22 号端口。
1.2 为何使用Xshell
说明: 公司开发时候, 具体的情况是这样的
-
linux 服务器是开发小组共享的.
-
正式上线的项目是运行在公网的.
-
因此程序员需要远程登录到 centos 进行项目管理或者开发.
1.3 Xshell安装与使用
xshell6免费版下载安装教程
2. Xftp认识与安装
2.1 Xftp认识
- 是一个基于 windows 平台的功能强大的 SFTP、FTP 文件传输软件。使用了 Xftp 以后,windows 用户能安全地在 UNIX/Linux 和 Windows PC 之间传输文件。
2.2 Xftp安装与使用
Xftp6免费版下载安装
- 怎么简单使用Xftp6
二、linux部署JDK
1. 使用yum库对JDK卸载与安装
Yum(全称为 Yellow dog Updater, Modified)是一个在Fedora和RedHat以及CentOS中的Shell前端软件包管理器。
基于RPM包管理,能够从指定的服务器自动下载RPM包并且安装,可以自动处理依赖性关系,并且一次安装所有依赖的软件包,无须繁琐地一次次下载、安装。
java -version-检查版本
- 查看java版本
[root@lsEdu01 ~]# java -version
openjdk version "1.8.0_181"
OpenJDK Runtime Environment (build 1.8.0_181-b13)
OpenJDK 64-Bit Server VM (build 25.181-b13, mixed mode)
rpm -qa|grep xxx-查看软件包名
-
检查jdk的版本
[root@lsEdu01 ~]# rpm -qa|grep jdk
java-1.8.0-openjdk-headless-1.8.0.181-7.b13.el7.x86_64
copy-jdk-configs-3.3-10.el7_5.noarch
java-1.8.0-openjdk-1.8.0.181-7.b13.el7.x86_64
java-1.7.0-openjdk-headless-1.7.0.191-2.6.15.5.el7.x86_64
java-1.7.0-openjdk-1.7.0.191-2.6.15.5.el7.x86_64
rpm -ql 包名-查看软件存放位置
rpm -ql java-1.8.0-openjdk-1.8.0.322.b06-1.el7_9.x86_64
find / -name 'java'
[root@lsEdu01 ~]# find / -name 'java'
/var/lib/alternatives/java
/etc/pki/ca-trust/extracted/java
/etc/pki/java
/etc/alternatives/java
/etc/java
/usr/share/swig/2.0.10/java
/usr/share/java
/usr/lib/jvm/java-1.8.0-openjdk-1.8.0.322.b06-1.el7_9.x86_64/jre/bin/java
/usr/lib/java
/usr/bin/java
yum remove -y xxx - 卸载软件
- 卸载软件
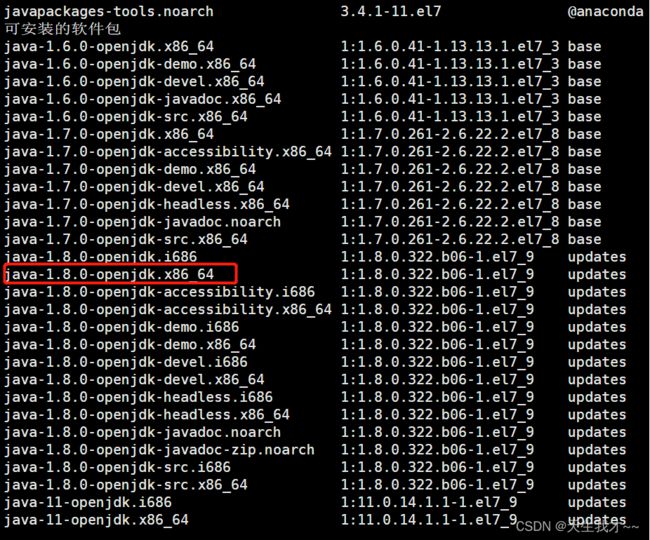
yum list java*-查看yum库
yum install -y xxx-安装软件
-
-y,表明判断的部分,默认是yes
# yum install -y java-1.8.0-openjdk.x86_64 -
yum安装后的地址默认在 /usr/lib/jvm
-
yum安装后的jdk,依赖自动生成,有了软连接,无需配置环境变量
若当前环境没有编译需求,一般安装第一个即可
若当前环境有编译需求,安装devel版本
yum安装后的地址默认在 /usr/lib/jvm
2. 测试jdk
touch HelloWorld.java-创建文件
vim HelloWorld.java-使用vim编辑文件
ESC退出:wq保存后退出:q!不保存后强制退出
[root@lsEdu01 ~]# vim HelloWorld.java

public class HelloWorld {
    public static void main(String[] args) {
        System.out.println("Hello, World! This is a test");
    }
}
javac HelloWorld.java
[root@lsEdu01 ~]# javac HelloWorld.java
[root@lsEdu01 ~]# java HelloWorld
Hello, World! This is a test
三、linux部署Maven
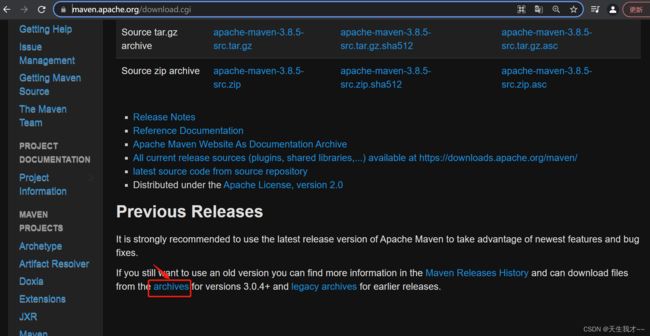
- 由于yum中没有maven库文件,因此,需要在官网下载安装包解压安装
在Linux系统中安装并配置maven详细教程
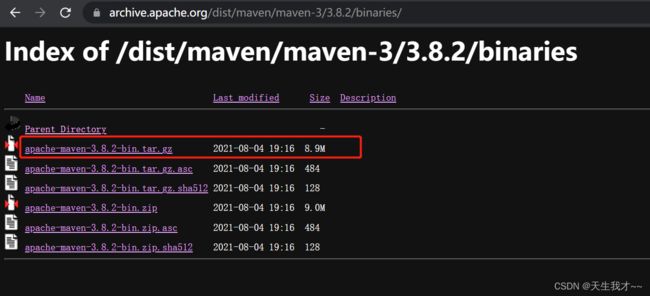
1. 下载tag二进制文件
Maven官网
wget命名-linux下载工具
wget命令是Linux系统用于从Web下载文件的命令行工具,支持 HTTP、HTTPS及FTP协议下载文件,而且wget还提供了很多选项,例如下载多个文件、后台下载,使用代理等等,使用非常方便。接下来就介绍一下wget的使用方法。
Linux下wget命令详解
使用 -c 选项断点续传
当我们下载一个大文件时,如果中途网络断开导致没有下载完成,我们就可以使用命令的-c选项恢复下载,让下载从断点续传,无需从头下载。
使用 -i 选项下载多个文件
如果先要一次下载多个文件,首先需要创建一个文本文件,并将所有的url添加到该文件中,每个url都必须是单独的一行。
vim download_list.txt然后使用-i选项,后跟该文本文件:
wget -i download_list.txt
- 也可以下载到本机,再使用xftp拖到Linux系统文件夹里
2. 安装maven
在Linux系统中安装并配置maven详细教程
1. tar -zxvf xxx -解压压缩包
- 解压到指定文件夹内
tar -zxvf apache-maven-3.8.2-bin.tar.gz -C /opt
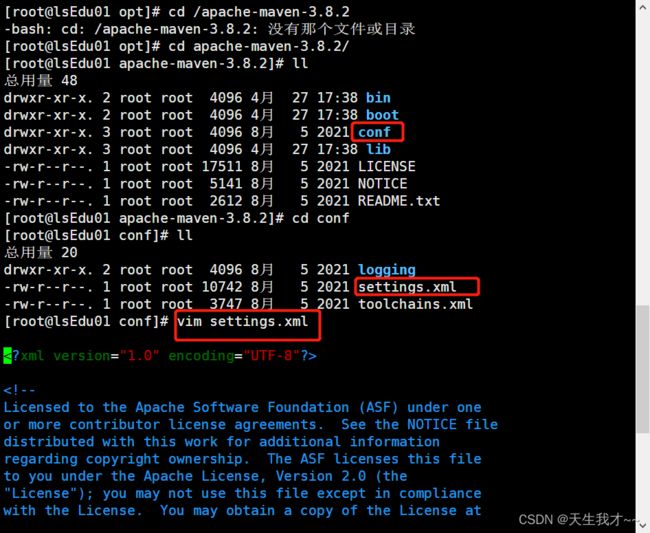
2. 设置maven的阿里云镜像
-
配置文件为
conf下的setting.xml -
在镜像位置,插入阿里云镜像-增加下载速度
	<mirror>
      <id>alimavenid>
      <mirrorOf>centralmirrorOf>
      <name>aliyun mavenname>
      <url>https://maven.aliyun.com/repository/centralurl>
    mirror>
3. 配置maven的环境变量
vim /etc/profile-配置文件中添加
注意,路径与之前的路径拼接:${PATH}
export PATH USER LOGNAME MAIL HOSTNAME HISTSIZE HISTCONTROL
export MAVEN_HOME=/opt/apache-maven-3.8.2
# path是累加的,表明在之前的path配置前插入一个变量,相当于windows中的新建
export PATH=${MAVEN_HOME}/bin:${PATH}
source /etc/profile-配置文件生效
echo $PATH-打印出路径
[root@lsEdu01 /]# source /etc/profile
[root@lsEdu01 /]# echo $PATH
/opt/apache-maven-3.8.2/bin:/usr/local/bin:/usr/local/sbin:/usr/bin:/usr/sbin:/bin:/sbin:/root/bin
4. 验证maven是否安装成功
mvn -version-查看maven信息
[root@lsEdu01 ~]# mvn -version
Apache Maven 3.8.2 (ea98e05a04480131370aa0c110b8c54cf726c06f)
Maven home: /opt/apache-maven-3.8.2
Java version: 1.8.0_322, vendor: Red Hat, Inc., runtime: /usr/lib/jvm/java-1.8.0-openjdk-1.8.0.322.b06-1.el7_9.x86_64/jre
Default locale: zh_CN, platform encoding: UTF-8
OS name: "linux", version: "3.10.0-957.el7.x86_64", arch: "amd64", family: "unix"
四、linux部署MySql
1. 使用rpm库文件安装
-
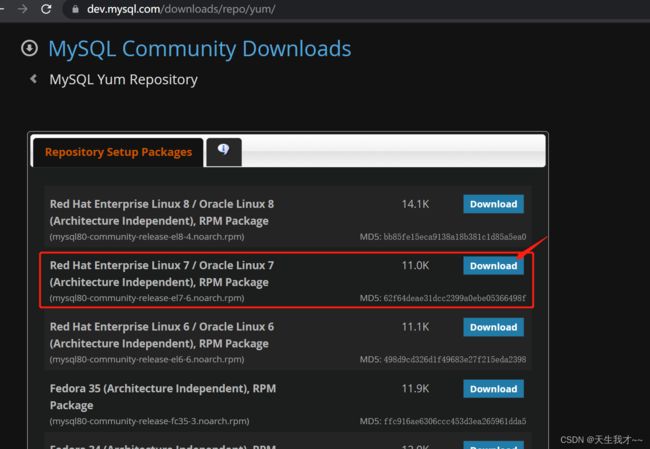
经查询,yum库没有较新版本的安装包,因此,从官网上下载rpm库文件
-
官网上的yum仓库下载
-
用yum安装库文件,再从yum仓库中查找需要的较新版本
[root@lsEdu01 package]# yum install -y mysql80-community-release-el7-6.noarch.rpm -
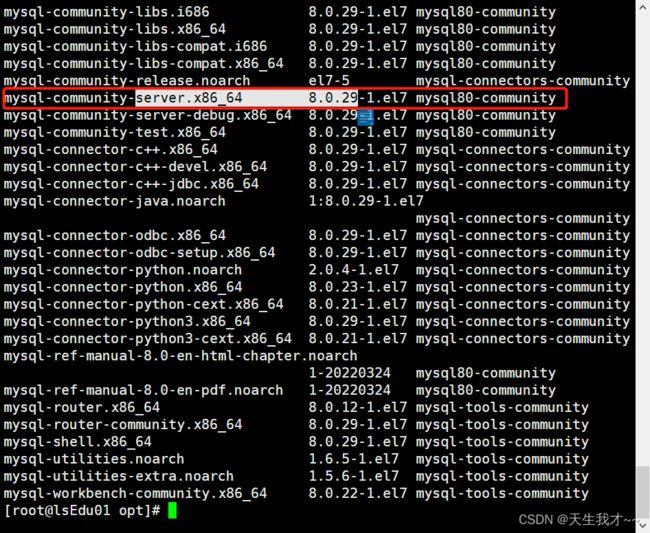
再次查询yum仓库,需要安装mysql服务器
问题:显示尚未安装gpg密钥
linux安装mysql,显示尚未安装gpg密钥
总计                                                                       5.7 MB/s | 203 MB  00:00:35
从 file:///etc/pki/rpm-gpg/RPM-GPG-KEY-mysql 检索密钥
导入 GPG key 0x5072E1F5:
 用户ID     : "MySQL Release Engineering "
 指纹       : a4a9 4068 76fc bd3c 4567 70c8 8c71 8d3b 5072 e1f5
 软件包     : mysql57-community-release-el7-7.noarch (@/mysql57-community-release-el7-7.noarch)
 来自       : /etc/pki/rpm-gpg/RPM-GPG-KEY-mysql


mysql-community-libs-compat-5.7.37-1.el7.x86_64.rpm 的公钥尚未安装


 失败的软件包是:mysql-community-libs-compat-5.7.37-1.el7.x86_64
 GPG  密钥配置为:file:///etc/pki/rpm-gpg/RPM-GPG-KEY-mysql
-
解决:在安装命令后加上
--nogpgcheck-忽略参数,强制安装yum install -y mysql-community-server--nogpgcheck
2. 启动mysql,修改密码
2.1 启动linux部署的mysql
systemctl start mysqld-yum安装程序的启动
-
mysqld:表明是mysql后台启动[root@lsEdu01 ~]# systemctl start mysqld [root@lsEdu01 ~]#
systemctl status mysqld-查看启动状态
[root@lsEdu01 ~]# systemctl status mysqld
● mysqld.service - MySQL Server
   Loaded: loaded (/usr/lib/systemd/system/mysqld.service; enabled; vendor preset: disabled)
   Active: active (running) since 四 2022-04-28 09:03:14 CST; 31min ago
     Docs: man:mysqld(8)
           http://dev.mysql.com/doc/refman/en/using-systemd.html
  Process: 52273 ExecStartPre=/usr/bin/mysqld_pre_systemd (code=exited, status=0/SUCCESS)
 Main PID: 52358 (mysqld)
   Status: "Server is operational"
    Tasks: 37
   CGroup: /system.slice/mysqld.service
           └─52358 /usr/sbin/mysqld
4月 28 09:03:06 lsEdu01 systemd[1]: Starting MySQL Server...
4月 28 09:03:14 lsEdu01 systemd[1]: Started MySQL Server.
2.2 修改mysql密码和配置
grep指令-搜索指令
-
先搜索mysql日志文件中的原生随机密码
[root@lsEdu01 ~]# grep 'password' /var/log/mysqld.log
2022-04-28T01:03:09.910938Z 6 [Note] [MY-010454] [Server] A temporary password is generated for root@localhost: +tEe>TJig4k#
mysql -u root -p-先登录root用户,再修改密码
`ulter alter user root@localhost identified by ‘xxx’ -重置密码
- 注意,linux下密码设置强度有一定要求,否则不能通过
- 要有大小写字母、数字、特殊符号,长度不能太短
mysql> alter user root@localhost identified by
    -> 'Dd_0909';
ERROR 1819 (HY000): Your password does not satisfy the current policy requirements
3. 导入初始数据
3.1 下载unzip工具
- 因为需要解压zip压缩文件,需要在yum库中下载解压工具
3.2 解压并加载sql初始文件
unzip -d /opt init_sql.zip - 解压到指定路径下
[root@lsEdu01 package]# unzip -d /opt init_sql.zip
Archive:  init_sql.zip
  inflating: /opt/init_data.sql
  inflating: /opt/init_schema.sql
  inflating: /opt/tables_mysql_innodb.sql
[root@lsEdu01 package]# cd ..
create database xxx-创建库
mysql> create database community;
Query OK, 1 row affected (0.02 sec)
use xxx-切换到指定库
mysql> use community;
Database changed
source 全路径/文件-使用文件初始化数据表
source /opt/init_sql/init_schema.sql
show tables-查看表单
mysql> show tables;
+--------------------------+
| Tables_in_community      |
+--------------------------+
| QRTZ_BLOB_TRIGGERS       |
| QRTZ_CALENDARS           |
| QRTZ_CRON_TRIGGERS       |
| QRTZ_FIRED_TRIGGERS      |
| QRTZ_JOB_DETAILS         |
| QRTZ_LOCKS               |
| QRTZ_PAUSED_TRIGGER_GRPS |
| QRTZ_SCHEDULER_STATE     |
| QRTZ_SIMPLE_TRIGGERS     |
| QRTZ_SIMPROP_TRIGGERS    |
| QRTZ_TRIGGERS            |
| comment                  |
| discuss_post             |
| login_ticket             |
| message                  |
| user                     |
+--------------------------+
16 rows in set (0.01 sec)
4. 测试检查安装的mysql版本
mysql -V
- 注意,V要大写
[root@lsEdu01 opt]# mysql -V
mysql  Ver 8.0.29 for Linux on x86_64 (MySQL Community Server - GPL)
五、linux部署Redis、Kafak
- 之前项目使用redis、kafak已经部署在linux,只需检查,更新下配置文件即可
1. Redis
1.1 查看reidis版本
redis-server -v
[root@lsEdu01 opt]# redis-server -v
Redis server v=5.0.8 sha=00000000:0 malloc=jemalloc-5.1.0 bits=64 build=f997657d0030e6f1
1.2 redis启动、关闭等基本操作
redis-server myredis/redis.conf
[root@lsEdu01 bin]# redis-server myredis/redis.conf
...
[root@lsEdu01 bin]# redis-cli -p 6379
127.0.0.1:6379> ping
PONG
127.0.0.1:6379> select 11
OK
127.0.0.1:6379[11]> dbsize #查看库中key的数量
(integer) 61
127.0.0.1:6379[11]> shutdown
not connected> exit
[root@lsEdu01 bin]#
清空redis缓存
- 注意,mysql数据库重置,redis的缓存也需要重置,否则,会出现问题
127.0.0.1:6379[11]> flushdb
OK
127.0.0.1:6379[11]> keys *
(empty list or set)
127.0.0.1:6379[11]>
2. Kafka
2.1 修改配置文件
vim zookeeper.properties
vim server.properties
- 临时数据data文件放到
/tmp/data中即可
2.2 启动与关闭
1. 启动/停止Zookeeper
- -daemon参数的目的,可以在后台启动Zookeeper,输出的信息在保存在执行目录的logs/zookeeper.out文件中。
- 这样主控制台可以继续使用,无需另开控制台
bin/zookeeper-server-start.sh -daemon config/zookeeper.properties
bin/zookeeper-server-stop.sh -daemon config/zookeeper.properties
2. 启动/停止Kafka
bin/kafka-server-start.sh -daemon config/server.properties
bin/kafka-server-stop.sh config/server.properties
2.3 测试
查看所有主题
bin/kafka-topics.sh --list --zookeeper localhost:2181
查看特定主题
bin/kafka-topics.sh --zookeeper localhost:2181 --describe --topic test
六、linux部署ElasticSearch
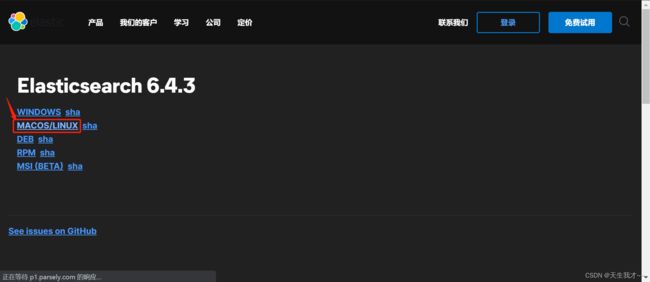
1. tag压缩包下载
官方网址
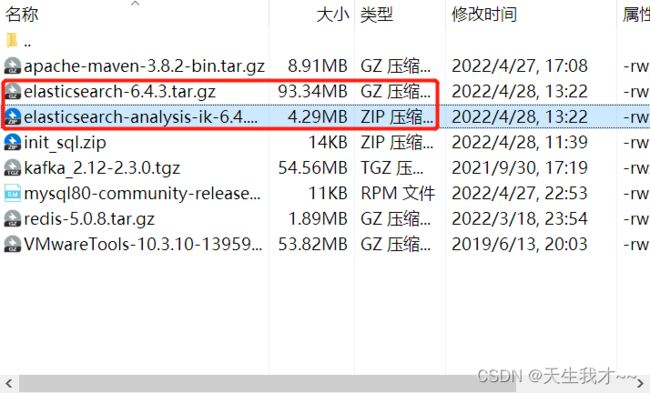
2. 解压安装
- 将ES解压到指定文件夹
tar -zxvf elasticsearch-6.4.3.tar.gz -C /opt
- 将分词插件解压到ES的
/plugins装插件的目录里
[root@lsEdu01 package]# unzip -d /opt/elasticsearch-6.4.3/plugins/ik elasticsearch-analysis-ik-6.4.3.zip
3. 配置
[root@lsEdu01 config]# ll
总用量 24
-rw-rw----. 1 root root 2853 10月 31 2018 elasticsearch.yml
-rw-rw----. 1 root root 2937 10月 31 2018 jvm.options
-rw-rw----. 1 root root 6380 10月 31 2018 log4j2.properties
-rw-rw----. 1 root root  473 10月 31 2018 role_mapping.yml
-rw-rw----. 1 root root  197 10月 31 2018 roles.yml
-rw-rw----. 1 root root    0 10月 31 2018 users
-rw-rw----. 1 root root    0 10月 31 2018 users_roles
[root@lsEdu01 config]# vim elasticsearch.yml
vim elasticsearch.yml
- 设置名称-数据存放位置,与kafka存放位置放一块
vim jvm.options
-
启动时内存开销,默认1G,太大,需要改小些
# Xms represents the initial size of total heap space
# Xmx represents the maximum size of total heap space
-Xms256m
-Xmx512m
4.更改用户进行启动和关闭
- 因ES必须以普通用户启动,因此,需要在linux新建和切换普通用户
4.1 组管理和权限管理
Linux 系统是一个多用户多任务的操作系统,任何一个要使用系统资源的用户,都必须首先向系统管理员申请一个账号,然后以这个账号的身份进入系统。
Linux 的用户需要至少要属于一个组。不能独立于组外。在 linux 中每个文件有所有者、所在组、其它组的概念。
\1) 所有者
\2) 所在组
\3) 其它组
\4) 改变用户所在的组
[外链图片转存失败,源站可能有防盗链机制,建议将图片保存下来直接上传(img-6YfFKBvs-1651250373713)(file:///C:/Users/ls2690069470/AppData/Local/Packages/microsoft.office.desktop_8wekyb3d8bbwe/AC/%23!oice_16_974fa576_32c1d314_2db7/Temp/msohtmlclip1/01/clip_image003.gif)]
groupadd 组 名-创建组
[root@lsEdu01 ~]# groupadd community
useradd 用户名 -p 密码 -g 组名-创建指定组内的用户
[root@lsEdu01 ~]# useradd community1 -p 123456 -g community
[root@lsEdu01 ~]# id community1
uid=1001(community1) gid=1001(community) 组=1001(community)
chown -R 用户名:组名 文件/目录-为指定路径创建访问权限
chown 用户名 文件/目录改变文件的所有者
chown 用户名:组名 文件/目录改变所有者和所有组
-R如果是目录 则使其下所有子文件或目录递归生效
[root@lsEdu01 ~]# cd /opt
[root@lsEdu01 opt]# chown -R community1:community *
[root@lsEdu01 opt]# cd /tmp
[root@lsEdu01 tmp]# chown -R community1:community *
su - 要切换的用户名-切换用户
1)从权限高的用户切换到权限低的用户,不需要输入密码,反之需要。
2)当需要返回到原来用户时,使用
exit /logout指令
[root@lsEdu01 tmp]# su - community1
[community1@lsEdu01 ~]$
4.2 启动ElasticSearch
- cd到ES的/bin路径下,-d,后台启动
[community1@lsEdu01 elasticsearch-6.4.3]$ bin/elasticsearch -d
4.3 测试是否启动成功
-
切换回root用户进行访问,注意,需要填写密码
[community1@lsEdu01 elasticsearch-6.4.3]$ su - 密码: 上一次登录:四 4月 28 23:14:45 CST 2022从 192.168.184.1pts/2 上 [root@lsEdu01 ~]# -
查看ES运行状况
[root@lsEdu01 ~]# curl -X GET "localhost:9200/_cat/health?v"
epoch      timestamp cluster   status node.total node.data shards pri relo init unassign pending_tasks max_task_wait_time active_shards_percent
1651161326 23:55:26  community green           1         1      0   0    0    0        0             0                  -                100.0%
[root@lsEdu01 ~]#
4.4 关闭ES
使用ps aux|grep elasticsearch可以查看是否启动
并且可以看到elasticsearch的进程号
执行kill -9 8514就可以关闭elasticsearch了
七、linux部署wkhtltopdf
1. 下载安装
Linux上安装wkhtmltopdf
wkhtmltopdf 下载地址
-然后把rpm文件传输到linux,在rpm文件目录使用rpm安装:
rpm -ivh rpm文件名称
[root@lsEdu01 package]# rpm -ivh wkhtmltox-0.12.6-1.centos7.x86_64.rpm
准备中...                          ################################# [100%]
	软件包 wkhtmltox-1:0.12.6-1.centos7.x86_64 已经安装
-
或直接用yum安装也可以
[root@lsEdu01 package]# yum install -y wkhtmltox-0.12.6-1.centos7.x86_64.rpm
2. 安装虚拟GUI工具
-
因为在linux系统上,wk没有显示工具,因此,需要安装一个GUI工具
Xvfb[root@lsEdu01 ~]# yum list *xvfb* 已加载插件:fastestmirror, langpacks Loading mirror speeds from cached hostfile * base: mirrors.aliyun.com * extras: mirrors.ustc.edu.cn * updates: mirrors.aliyun.com 可安装的软件包 xorg-x11-server-Xvfb.x86_64 1.20.4-17.el7_9 updates -
使用yum安装
[root@lsEdu01 ~]# yum install -y xorg-x11-server-Xvfb.x86_64
3. 测试
xvfb工具使用
- xvfb工具,要设置分辨率参数
[root@lsEdu01 test]# xvfb-run --server-args="-screen 0, 1024x768x24" wkhtmltoimage https://www.baidu.com 1.png
封装脚本文件
- 可以将xvbf指令封装成一个脚本
"$@"-此符号表示传参
[root@lsEdu01 opt]# vim wkhtmltoimage.sh

xvfb-run --server-args="-screen 0, 1024x768x24" wkhtmltoimage "$@"
chmod-修改权限
权限说明
- 新建的脚本文件
.sh只有读写权限,没有执行权限,因此,需要增加此权限
[ r ]代表可读(read): 可以读取,查看
[ w ]代表可写(write): 可以修改,但是不代表可以删除该文件,删除一个文件的前提条件是对该文件所在的目录有写权限,才能删除该文件.
[ x ]代表可执行(execute):可以被执行
+ 、-、= 变更权限
u:所有者 g:所有组 o:其他人 a:所有人(u、g、o 的总和)
chmod u=rwx,g=rx,o=x 文件目录名 赋予权限
chmod o+w 文件目录名 增加权限
chmod a-x 文件目录名 去除权限
使用脚本文件执行生成图片
[root@lsEdu01 test]# /opt/wkhtmltoimage.sh https://www.baidu.com 2.png
...
[root@lsEdu01 test]# ll
总用量 5904
-rw-r--r--. 1 root root 3019976 4月  29 09:58 1.png
-rw-r--r--. 1 root root 3019976 4月  29 10:30 2.png
八、linux部署Tomcat
1. 下载tar包
tomcat官网
2. 解压安装
[root@lsEdu01 package]# tar -zxvf apache-tomcat-9.0.62.tar.gz -C /opt
3. 配置环境变量
pws-查询路径
[root@lsEdu01 bin]# pwd
/opt/apache-tomcat-9.0.62/bin
vim /etc/profile-配置文件
export PATH USER LOGNAME MAIL HOSTNAME HISTSIZE HISTCONTROL

export MAVEN_HOME=/opt/apache-maven-3.8.2

export PATH=${MAVEN_HOME}/bin:${PATH}

export PATH=/opt/apache-tomcat-9.0.62/bin:$PATH
source /etc/profile-配置文件生效
echo-打印到控制台
[root@lsEdu01 bin]# vim /etc/profile
[root@lsEdu01 bin]# source /etc/profile
[root@lsEdu01 bin]# echo $PATH
/opt/apache-tomcat-9.0.62/bin:/opt/apache-maven-3.8.2/bin:/opt/apache-maven-3.8.2/bin:/usr/local/sbin:/usr/local/bin:/usr/sbin:/usr/bin:/root/bin
[root@lsEdu01 bin]#
4. 测试
startup.sh-启动tomcat
[root@lsEdu01 bin]# startup.sh
Using CATALINA_BASE:   /opt/apache-tomcat-9.0.62
Using CATALINA_HOME:   /opt/apache-tomcat-9.0.62
Using CATALINA_TMPDIR: /opt/apache-tomcat-9.0.62/temp
Using JRE_HOME:        /usr
Using CLASSPATH:       /opt/apache-tomcat-9.0.62/bin/bootstrap.jar:/opt/apache-tomcat-9.0.62/bin/tomcat-juli.jar
Using CATALINA_OPTS:
Tomcat started.
访问linux的ip:tomcat端口
- 成功访问tomcat初始的web的root项目首页,即安装成功
九、linux部署Nginx
1. 使用yum安装Nginx
epel-release-安装epel源
-
也可以下载epel源,使用yum安装,免去配置
通过
yum list可以看到很多软件包在yum里面没有的。我们可以使用epel源(EPEL : Extra Packages for Enterprise Linux是基于Fedora的一个项目,为“红帽系”的操作系统提供额外的软件包,适用于RHEL、CentOS和Scientific Linux.)。[root@lsEdu01 ~]# yum install -y epel-release -
再搜索yum库,安装包就存在了
-
进行yum安装即可
[root@lsEdu01 ~]# yum install -y nginx.x86_64
2. 配置Nginx
- 配置Nginx分发给tomcat的请求
vim /etc/nginx/nginx.conf-配置文件
- 配置Ngin虚拟服务器和真实服务器之间的关系
- 请求分发-负载均衡,也可以说是反向代理
- 代理服务器的叫反向代理
- 代理浏览器的叫正向代理
[root@lsEdu01 ~]# vim /etc/nginx/nginx.conf
    # 配置真实服务器-本机tomcat服务器
    # max_fails=3 最多分发次数,3次分发都不成功,就移除
    # fall_timeout=30s 30s后,再次查看服务器是否存活
    upstream myserver {
             server 127.0.0.1:8080 	max_fails=3 fail_timeout=30s;
	}
	# 配置虚拟服务器
     server {
        listen 80;	# 监听的端口
        server name 192.168.xxx;	# 访问的域名/ip-可以监听到访问的请求url
        location / {	# 处理监听的请求url分发给真实服务器
        	proxy_pass http://myserver
        }
	 }
3. 启动Nginx
systemctl start nginx-出现错误
- 如果启动有错误,一般是配置文件写错了,要检查
[root@lsEdu01 bin]# systemctl start nginx
Job for nginx.service failed because the control process exited with error code. See "systemctl status nginx.service" and "journalctl -xe" for details.
nginx -t-检查配置文件错误
[root@lsEdu01 bin]# nginx -t
nginx: [emerg] "server" directive is not allowed here in /etc/nginx/nginx.conf:62
nginx: configuration file /etc/nginx/nginx.conf test failed
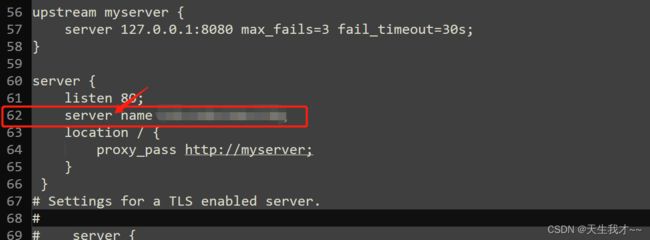
- 即62行书写错误-
server_name
4. 测试
502错误
-
查看错误日志:
2022/04/29 17:18:51 [crit] 106475#106475: *1 connect() to 127.0.0.1:8080 failed (13: Permission denied) while connecting to upstream, -
查询资料知,可能是
Selinux的作用一、是什么
它叫做“安全增强型 Linux(Security-Enhanced Linux)”,简称 SELinux,它是 Linux 的一个安全子系统二、有什么用
其主要作用就是最大限度地减小系统中服务进程可访问的资源(根据的是最小权限原则)。避免权限过大的角色给系统带来灾难性的结果。
————————————————
版权声明:本文为CSDN博主「darkdragonking」的原创文章,遵循CC 4.0 BY-SA版权协议,转载请附上原文出处链接及本声明。
原文链接:https://blog.csdn.net/darkdragonking/article/details/123199655#查看selinux状态 [root@vm01]# getenforce #临时关闭selinux [root@vm01]# setenforce 0 #永久关闭 [root@vm01]# vim /etc/selinux/config # SELINUX=enforcing改为SELINUX=disabled -
关闭Sellinux后,重新访问ip
十、linux部署上线项目
1. 项目部署原理
- 1.客户端访问域名或ip地址,会被Nginx监听
- 2.Nginx会分发一个tomcat服务器处理
- 3.tomcat服务器默认访问Root项目,为了能之间访问自定义的项目
- 将Tomcat原有Root项目删除
- 将自己的community项目打包成Root.war,这样就能直接访问自定义项目
- 处理自定义项目的根路径Controller请求,采用转发到/index的方式,这样,直接访问主页
2. 删除tomcat内置的项目
rm 指令移除【删除】文件或目录
• 基本语法
rm [选项] 要删除的文件或目录
• 常用选项
-r :递归删除整个文件夹
-f : 强制删除不提示
• 使用细节
强制删除不提示的方法:带上 -f 参数即可
[root@lsEdu01 webapps]# ll
总用量 20
drwxr-x---. 15 root root 4096 4月  29 11:47 docs
drwxr-x---.  7 root root 4096 4月  29 11:47 examples
drwxr-x---.  6 root root 4096 4月  29 11:47 host-manager
drwxr-x---.  6 root root 4096 4月  29 11:47 manager
drwxr-x---.  3 root root 4096 4月  29 11:47 ROOT
[root@lsEdu01 webapps]# rm -rf *
[root@lsEdu01 webapps]# ll
总用量 0
3. 更新访问路径
-
为保证输入域名或ip,直接访问到主页,将下级community去除
- 配置文件修改
# url中的项目名 server.servlet.context-path=- 全局js文件修改
var CONTEXT_PATH = ""; -
同时访问默认根目录,自动转发到定义的/index首页请求
@RequestMapping(path = "/", method = RequestMethod.GET)
public String root() {
    return "forward:/index";
}
4. web项目打包
-
之前
pom.xml文件没有声明,默认打包成jar包,现在是web项目,要打包成war包- 并命名包为ROOT.war
<packaging>warpackaging>
...
<build>
		<finalName>ROOTfinalName>
		<plugins>
			<plugin>
				<groupId>org.springframework.bootgroupId>
				<artifactId>spring-boot-maven-pluginartifactId>
				<version>2.1.5.RELEASEversion>
			plugin>
		plugins>
	build>
5. 多套配置文件方案
- 因在linux上部署项目,配置文件中的地址等要修改为linux服务器目录
- 但在本地开发时的配置文件也要保留
- Spring提供了多套配置文件的方案,只需设置好开关即可
5.1 配置文件命名规则
注意:配置文件的命名规范
-
开发环境:
- 核心配置文件:
application-develop.properties - 日志配置文件:
logback-spring-develop.xml
- 核心配置文件:
-
生产环境:
- 核心配置文件:
application-produce.properties - 日志配置文件:
logback-spring-produce.xml
- 核心配置文件:
5.2 默认配置文件开关设置
active给哪个配置文件名赋值,表明哪个配置文件生效
# profile
spring.profiles.active=produce  # 此时生产配置文件起效

# logback
logging.config=classpath:logback-spring-${spring.profiles.active}.xml
5.3 生产环境配置修改
-
Thymeleaf缓存启用
# ThymeleafProperties配置类 spring.thymeleaf.cache=true -
mysql配置-密码要更改
# DataSourceProperties spring.datasource.driver-class-name=com.mysql.cj.jdbc.Driver spring.datasource.url=jdbc:mysql://localhost:3306/community?characterEncoding=utf-8&useSSL=false&serverTimezone=Hongkong spring.datasource.username=root spring.datasource.password=xxx -
访问的域名修改-ip地址
# community,域名 community.path.domain=http://192.xxx.xxx.xxx -
文件上传到本地的地址
# 上传文件保存的位置 community.path.upload=/tmp/uploads -
wk命令和文件存放位置
# wk wk.image.command=/opt/wkhtmltoimage.sh wk.image.storage=/tmp/data/wk-image -
日志配置文件的存放路径更改
<property name="LOG_PATH" value="/tmp"/>
<property name="APPDIR" value="community2"/>
6. 设置tomcat启动入口程序
- tomcat启动后,会有一个入口方法
- SpringBoot项目也有一个主启动main方法,因此,要将两个方法整合
/**
 * tomcat启动类,会调用CommunityApplication.class核心启动类
 */
public class CommunityServletInitializer extends SpringBootServletInitializer {

    @Override
    protected SpringApplicationBuilder configure(SpringApplicationBuilder builder) {
        return builder.sources(CommunityApplication.class);
    }
}
7. 将项目压缩后部署到tomcat上
7.1 先将项目文件压缩成zip
- 压缩后,传到linux服务器上
- 解压
[root@lsEdu01 package]# unzip -d /opt community2.zip
7.2 使用maven打包,并忽略测试
- 因之前测试不规范,不将测试类打包
[root@lsEdu01 community]# mvn clean package -Dmaven.test.skip=true
- 打包后的结果:
[root@lsEdu01 community]# ll
总用量 60
-rw-r--r--. 1 root root 20665 4月  29 23:25 community.iml
-rw-r--r--. 1 root root  9114 9月   8 2021 mvnw
-rw-r--r--. 1 root root  5811 9月   8 2021 mvnw.cmd
-rw-r--r--. 1 root root  4722 4月  29 22:52 pom.xml
drwxr-xr-x. 4 root root  4096 2月   2 20:22 src
drwxr-xr-x. 7 root root  4096 4月  30 00:10 target
[root@lsEdu01 community]# cd target/
[root@lsEdu01 target]# ll
总用量 134708
drwxr-xr-x. 6 root root     4096 4月  30 00:10 classes
drwxr-xr-x. 3 root root     4096 4月  30 00:10 generated-sources
drwxr-xr-x. 2 root root     4096 4月  30 00:10 maven-archiver
drwxr-xr-x. 3 root root     4096 4月  30 00:10 maven-status
drwxr-xr-x. 4 root root     4096 4月  30 00:10 ROOT
-rw-r--r--. 1 root root 72434693 4月  30 00:10 ROOT.war
-rw-r--r--. 1 root root 65482375 4月  30 00:10 ROOT.war.original
7.4 打包后的将ROOT.war包移动到tomcate的webapp内
# 移动文件
[root@lsEdu01 target]# mv ROOT.war /opt/apache-tomcat-9.0.62/webapps/
# 查看文件
[root@lsEdu01 target]# cd /opt/apache-tomcat-9.0.62/webapps/
[root@lsEdu01 webapps]# ll
总用量 70740
-rw-r--r--. 1 root root 72434693 4月  30 00:10 ROOT.war
8.启动测试
startup.sh-启动
- 查看日志,可以查看启动状态
[root@lsEdu01 logs]# ll
总用量 112
-rw-r-----. 1 root root 15446 4月  29 22:30 catalina.2022-04-29.log
-rw-r-----. 1 root root  4747 4月  30 00:17 catalina.2022-04-30.log
访问nginx服务器
- 成功上线项目


