【前端三剑客】CSS 层叠样式表
更新日期:2022/04/05
 只要我们一起大笑,可怕的东西就会跑光光了。
目録
-
- 1. CSS 简介
- 2. CSS 选择器
-
- 2.1 基本选择器
- 2.2 关系选择器
- 2.3 伪类选择器
- 2.4 伪元素选择器
- 2.5 属性选择器
- 3. CSS 盒子模型
-
- 3.1 border 边框属性
- 3.2 outline 轮廓属性
- 4. CSS 提示工具(Tooltip)
- 5. CSS 相对定位和绝对定位
-
- 5.1 relative
- 5.2 absolute
-
- 5.2.1 absolute 偏移
- 5.3 static
- 5.4 fixed
- 5.5 sticky
- 6. CSS 计数器
-
- 6.1 嵌套计数器
- 6.2 列表计数器
- 【每日一面】
-
-
-
-
- CSS 中单位有哪些?rem 布局的优缺点。
-
-
-
1. CSS 简介
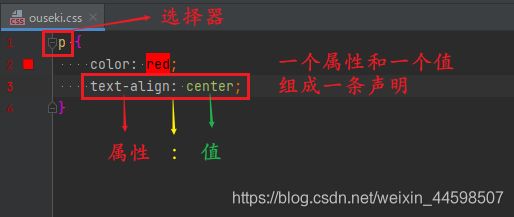
CSS(Cascading Style Sheets)层叠样式表,是一种用来表现 HTML 或 XML 等文件样式的计算机语言。CSS 不仅可以静态地修饰网页,还可以配合各种脚本语言动态地对网页各元素进行格式化。CSS 规则由两个主要的部分构成:选择器,以及一条或多条声明(每条声明由一个属性和一个值组成)。
更多内容 → 菜鸟教程 - CSS教程

2. CSS 选择器
伪类(Pseudo Classes)它的功能和 class 有些类似,能够找到那些不存在于 DOM 树中的信息以及不能被常规 CSS 选择器获取到的信息,所以叫伪类。用于定义元素的特殊状态。
伪类由一个冒号":"开头,冒号后面是伪类的名称和包含在圆括号中的可选参数。伪类语法不区别大小写。
注意:a:hover 必须被置于 a:link 和 a:visited 之后,才是有效的。
a:active 必须被置于 a:hover 之后,才是有效的。
伪元素(Pseudo Elements)在 DOM 树中创建了一些抽象元素,这些抽象元素是不存在于文档语言里的(本质上是创建了一个有内容的虚拟容器,可以理解为 html 源码)。比如:document 接口不提供访问元素内容的第一个字或者第一行的机制,而伪元素可以使开发者可以提取到这些信息。并且,一些伪元素可以使开发者获取到不存在于源文档中的内容(比如常见的 ::before, ::after)。
伪元素由双冒号"::"开头,冒号后面是伪元素的名称。使用两个冒号是为了区别伪类和伪元素。
注意:一个选择器只能使用一个伪元素,并且伪元素必须处于选择器语句的最后。
- 样式优先级
内联样式 > id 选择器 > 类选择器 = 伪类选择器 = 属性选择器 > 标签选择器 = 伪元素选择器
2.1 基本选择器
根据名称、id、类来选取元素
/* 元素选择器:选择所有 和 元素,指定多个用逗号分隔 */
div, p {
color: red;
}
/* id选择器:选择id="id"的元素 */
#id {
color: red;
}
/* 类选择器:选择所有class="class"的元素 */
.class {
color: red;
}
/* 通用选择器:选择所有元素 */
* {
color: red;
}
2.2 关系选择器
根据它们之间的特定关系来选取元素
/* 包含选择器:选择指定 元素内的所有指定 元素 */
div p {
color: red;
}
/* 相邻选择器:选择所有紧跟在 元素之后的第一个 元素 */
div + p {
color: red;
}
/* 子选择器:选择所有父级是 元素的 元素 */
div > p {
color: red;
}
/* 兄弟选择器:选择 元素之后的每一个 元素 */
div ~ p {
color: red;
}
2.3 伪类选择器
根据特定状态选取元素
/* 伪类选择器:选择所有未访问链接 */
a:link {
color: red;
}
/* 伪类选择器:选择所有访问过的链接 */
a:visited {
color: red;
}
/* 伪类选择器:选择活动链接 */
a:active {
color: red;
}
/* 伪类选择器:选择鼠标在链接上面时 */
a:hover {
color: red;
}
/* 伪类选择器:指定只有当元素是其父级的第一个子级的样式 */
p:first-child {
color: red;
}
/* 伪类选择器:选择一个lang属性的值="en"的所有元素,伪类允许您为不同的语言定义特殊的规则 */
p:lang(en) {
color: red;
}
/* 伪类选择器:选择每个p元素是其父级的第一个p元素 */
p:first-of-type {
color: red;
}
/* 伪类选择器:选择每个p元素是其父级的最后一个p元素 */
p:last-of-type {
color: red;
}
/* 伪类选择器:选择每个p元素是其父级的唯一p元素 */
p:only-of-type {
color: red;
}
/* 伪类选择器:选择每个p元素是其父级的第二个p元素 */
p:nth-of-type(2) {
color: red;
}
/* 伪类选择器:选择每个p元素的是其父级的第二个p元素,从最后一个子项计数 */
p:nth-last-of-type(2) {
color: red;
}
/* 伪类选择器:选择每个p元素是其父级的唯一子元素 */
p:only-child {
color: red;
}
/* 伪类选择器:选择每个p元素是其父级的最后一个子级 */
p:last-child {
color: red;
}
/* 伪类选择器:选择每个p元素是其父级的第二个子元素 */
p:nth-child(2) {
color: red;
}
/* 伪类选择器:选择每个p元素的是其父级的第二个子元素,从最后一个子项计数 */
p:nth-last-child(2) {
color: red;
}
/* 伪类选择器:选择每个没有任何子级的p元素(包括文本节点) */
p:empty {
color: red;
}
/* 伪类选择器:选择当前活动的#news元素(包含该锚名称的点击的URL) */
#news:target {
color: red;
}
/* 伪类选择器:选择每一个已启用的输入元素 */
input:enabled {
color: red;
}
/* 伪类选择器:选择每一个禁用的输入元素 */
input:disabled {
color: red;
}
/* 伪类选择器:选择具有焦点的输入元素 */
input:focus {
color: red;
}
/* 伪类选择器:选择每个选中的输入元素 */
input:checked {
color: red;
}
/* 伪类选择器:匹配值在指定区间之外的input元素 */
:out-of-range {
color: red;
}
/* 伪类选择器:匹配值在指定区间之内的input元素 */
:in-range {
color: red;
}
/* 伪类选择器:用于匹配可读及可写的元素 */
:read-write {
color: red;
}
/* 伪类选择器:用于匹配设置 "readonly"(只读) 属性的元素 */
:read-only {
color: red;
}
/* 伪类选择器:用于匹配可选的输入元素 */
:optional {
color: red;
}
/* 伪类选择器:用于匹配设置了 "required" 属性的元素 */
:required {
color: red;
}
/* 伪类选择器:用于匹配输入值为合法的元素 */
:valid {
color: red;
}
/* 伪类选择器:用于匹配输入值为非法的元素 */
:invalid {
color: red;
}
/* 伪类选择器:选择每个非p元素的元素 */
:not(p) {
color: red;
}
/* 伪类选择器:选择文档的根元素 */
:root {
color: red;
}
2.4 伪元素选择器
选取元素的一部分并设置其样式
/* 伪元素选择器:选择每一个元素的第一个字母 */
p::first-letter {
color: red;
}
/* 伪元素选择器:选择每一个元素的第一行 */
p::first-line {
color: red;
}
/* 伪元素选择器:在每个元素之前插入内容 */
p::before {
color: red;
}
/* 伪元素选择器:在每个元素之后插入内容 */
p::after {
color: red;
}
/* 伪元素选择器:匹配元素中被用户选中或处于高亮状态的部分 */
::selection {
color: red;
}
2.5 属性选择器
根据属性或属性值来选取元素
/* 属性选择器:选择所有带有target属性的元素 */
[target] {
color: red;
}
/* 属性选择器:选择所有使用target="-blank"的元素 */
[target=-blank] {
color: red;
}
/* 属性选择器:选择标题属性包含单词"flower"的所有元素 */
[title~=flower] {
color: red;
}
/* 属性选择器:选择 lang 属性以 en 为开头的所有元素 */
[lang|=en] {
color: red;
}
/* 属性选择器:选择每一个src属性的值以"https"开头的元素 */
a[src^="https"] {
color: red;
}
/* 属性选择器:选择每一个src属性的值以".pdf"结尾的元素 */
a[src$=".pdf"] {
color: red;
}
/* 属性选择器:选择每一个src属性的值包含子字符串"ITGodRoad"的元素 */
a[src*="ITGodRoad"] {
color: red;
}

3. CSS 盒子模型
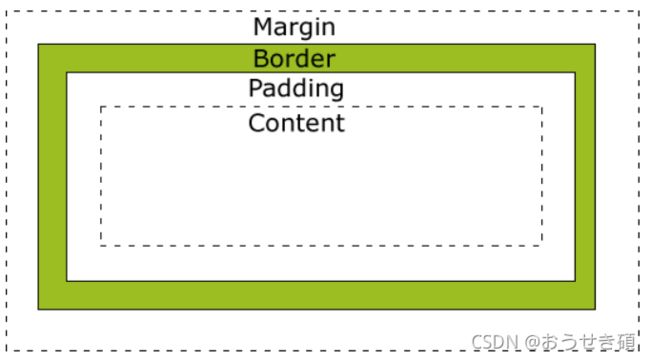
Box Model CSS 中所有 HTML 元素都可以看作为盒子,封装周围的 HTML 元素,它包括:边距,边框,填充,和实际内容。盒模型允许我们在其它元素和周围元素边框之间的空间放置元素。
当指定一个 CSS 元素的宽度和高度属性时,只是设置内容区域的宽度和高度。完整大小的元素,还必须添加内边距,边框和外边距。
- Margin(外边距) - 清除边框外的区域,外边距是透明的。
- Border(边框) - 围绕在内边距和内容外的边框。
- Padding(内边距) - 清除内容周围的区域,内边距是透明的。
- Content(内容) - 盒子的内容,显示文本和图像。
3.1 border 边框属性
- CSS 样式源码
border-style:属性1,属性2,属性3,属性4
上->右->下->左(顺时针)
border-style:属性1,属性2,属性3
上->左右->下
border-style:属性1,属性2
上下->左右
border-style:属性1
上下左右属性相同
div {
width: 500px;
height: 25px;
margin: 50px;
padding-left: 5px;
font-family: "Microsoft YaHei UI Light";
}
#base {
border: solid;
}
#red-bottom {
border-bottom: solid red;
}
#radius {
border: solid;
border-radius: 25px;
}
#csdn {
border-left: solid 6px rgb(221, 223, 228);
background: rgb(238, 240, 244);
}
3.2 outline 轮廓属性
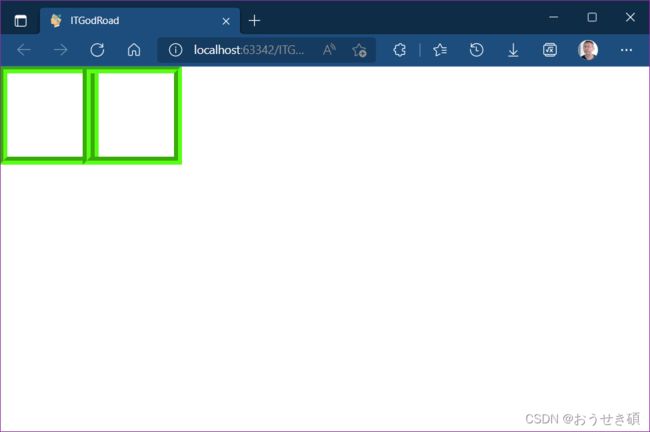
轮廓(outline)是绘制于元素周围的一条线,位于边框边缘的外围,可起到突出元素的作用。
outline 是不占空间的,不会增加额外的 width 或者 height 。
DOCTYPE html>
<html lang="zh-cn">
<head>
<meta charset="UTF-8"/>
<link rel="icon" href="../../../static/image/icon/icon/icon_ITGodRoad.png">
<title>ITGodRoadtitle>
<style>
.outline
{
width: 100px;
height: 100px;
float: left;
outline: lime groove 10px;
}
style>
head>
<body>
<div class="outline">div>
<div class="outline">div>
body>
html>

4. CSS 提示工具(Tooltip)
Tooltip 提示工具。HTML 使用容器元素添加class="tooltip"类,提示文本放在内联元素上使用class="tooltiptext"。在鼠标移动到容器元素上时显示提示信息。tooltip 类设置定位值 position:relative;提示文本设置定位值 position:absolute。
- CSS 样式源码
提示框显示位置 .tooltip .tooltiptext:
显示在右侧: top: -5px; left: 105%;
显示在左侧: top: -5px; right: 105%;
显示在头部: width: 120px; bottom: 100%; left: 50%; margin-left: -60px; 使用一半宽度 (120/2 = 60) 来居中提示工具
显示在底部: width: 120px; top: 100%; left: 50%; margin-left: -60px; 使用一半宽度 (120/2 = 60) 来居中提示工具
* 使用数字 5 因为提示文本的顶部和底部的内边距(padding)是 5px。如果修改 padding 的值,top 值也要对应修改,这样才可以确保它是居中对齐的。
提示框添加箭头 .tooltip .tooltiptext::after:
content: " ";
position: absolute;
top: 100%;
left: 50%;
margin-left: -5px;
border-width: 5px;
border-style: solid;
border-color: black transparent transparent transparent;
提示框淡入 .tooltip .tooltiptext:
opacity: 0; transition: opacity 1s;
提示框淡出 .tooltip:hover .tooltiptext:
opacity: 1;
/* Tooltip 容器 */
.tooltip {
position: relative;
display: inline-block;
border-bottom: 1px dotted black; /* 悬停元素上显示点线 */
}
/* Tooltip 文本 */
.tooltip .tooltiptext {
visibility: hidden;
width: 120px;
background-color: black;
color: #fff;
text-align: center;
padding: 5px 0;
border-radius: 6px;
/* 定位 */
position: absolute;
z-index: 1;
}
/* 鼠标移动上去后显示提示框 */
.tooltip:hover .tooltiptext {
visibility: visible;
}

5. CSS 相对定位和绝对定位
Position 在文档流中,任何一个元素都被文档流所限制了自身的位置,但是通过CSS我们依然使得这些元素可以改变自己的位置,我们可以通过float来让元素浮动,我们也可以通过margin来让元素产生位置移动。元素其实是使用 top、bottom、left 和 right 属性定位的。但是,除非首先设置了 position 属性,否则这些属性将不起作用。根据不同的 position 值,它们的工作方式也不同。
CSS 定位分为静态定位,相对定位,绝对定位,固定定位这四种。一般的标签元素不加任何定位属性都属于静态定位(默认为static),在页面的最底层属于标准流。没有特别的设定,遵循基本的定位规定,不能通过z-index进行层次分级。
- 相对定位(position: relative):定位是相对于自身位置定位(设置偏移量的时候,会相对于自身所在的位置偏移)。注意:元素仍然处在文档流中,元素的宽高不变,设置偏移量也不会影响其他元素的位置,它原本所占的空间仍保留。最外层容器设置为relative定位,在没有设置宽度的情况下,宽度是整个浏览器的宽度。相对定位元素不可层叠,(子元素的z-index无论多大,父元素者居上)但可通过
z-index 属性控制,z-index值为无单位的整数,大的在上面,可以有负值。
- 绝对定位(position: absolute):定位是相对于离元素最近的设置了绝对或相对定位的父元素决定的,如果没有父元素设置绝对或相对定位,则元素相对于根元素即html元素定位。设置了absolute的元素脱离了文档流,元素在没有设置宽度的情况下,宽度由元素里面的内容决定。脱离后原来的位置相当于是空的,下面的元素会来占据位置。绝对定位元素可层叠,层叠顺序可通过
z-index 属性控制,z-index值为无单位的整数,大的在上面,可以有负值。
5.1 relative
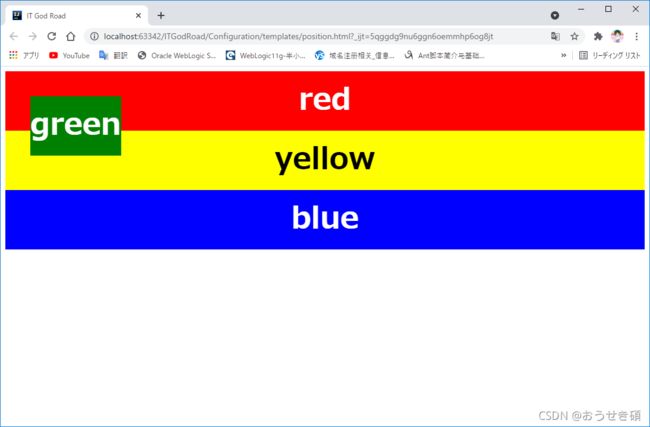
绿色div设置了position: relative,元素仍然处在文档流中,元素的宽高不变,原本所占的空间仍保留。
DOCTYPE html>
<html lang="en">
<head>
<meta charset="UTF-8">
<title>IT God Roadtitle>
<style>
div {
height: 100px;
font-weight: bold;
font-size: 50px;
text-align: center;
line-height: 100px;
color: white;
}
#red {
background-color: red;
}
#green {
background-color: green;
position: relative;
left: 50px;
top: 50px;
}
#yellow {
color: black;
background-color: yellow;
}
#blue {
background-color: blue;
}
style>
head>
<body>
<div id="red">reddiv>
<div id="green">greendiv>
<div id="yellow">yellowdiv>
<div id="blue">bluediv>
body>
html>
5.2 absolute
绿色div设置了position: absolute,脱离了文档流,元素在没有设置宽度的情况下,宽度由元素里面的内容决定。
<style>
#green {
background-color: green;
position: absolute;
}
style>
5.2.1 absolute 偏移
绿色div设置了position: absolute,脱离了文档流,元素在没有设置宽度的情况下,宽度由元素里面的内容决定。定位是相对于离元素最近的设置了绝对或相对定位的父元素决定的,如果没有父元素设置绝对或相对定位,则元素相对于根元素即html元素定位。
<style>
#green {
background-color: green;
position: absolute;
left: 50px;
top: 50px;
}
style>
5.3 static
默认定位为static,在页面的最底层属于标准流。没有特别的设定,遵循基本的定位规定,不能通过z-index进行层次分级,设置的偏移也不起作用。
<style>
#green {
background-color: green;
left: 50px;
top: 50px;
}
style>
5.4 fixed
元素的位置相对于浏览器窗口是固定位置,即使窗口是滚动的它也不会移动。
<style>
#green {
background-color: green;
position: fixed;
left: 50px;
top: 50px;
}
style>
5.5 sticky
基于用户的滚动位置来定位,元素定位表现为在跨越特定阈值前为相对定位,之后为固定定位。粘性定位的元素是依赖于用户的滚动,在 position:relative 与 position:fixed 定位之间切换。当页面滚动超出目标区域时,它的表现就像 position:fixed 它会固定在目标位置。
<style>
#green {
width: 600px;
background-color: green;
position: sticky;
/* 阈值 */
left: 50px;
top: 50px;
}
style>

6. CSS 计数器
CSS 计数器通过一个变量来设置,根据规则递增变量。使用到以下几个属性:
· counter-reset - 创建或者重置计数器
· ounter-increment - 递增变量
· content - 插入生成的内容
· counter() 或 counters() 函数 - 将计数器的值添加到元素
- 快速开始
DOCTYPE html>
<html lang="zh-cn">
<head>
<meta charset="UTF-8"/>
<link rel="icon" href="../../../static/image/icon/icon/icon_ITGodRoad.png">
<title>ITGodRoadtitle>
<style>
body {
counter-reset: section;
}
h2::before {
counter-increment: section;
content: "Section " counter(section) ": ";
}
style>
head>
<body>
<h1>使用 CSS 计数器:h1>
<h2>HTML 教程h2>
<h2>CSS 教程h2>
<h2>JavaScript 教程h2>
body>
html>
6.1 嵌套计数器
DOCTYPE html>
<html lang="zh-cn">
<head>
<meta charset="UTF-8"/>
<link rel="icon" href="../../../static/image/icon/icon/icon_ITGodRoad.png">
<title>ITGodRoadtitle>
<style>
body {
counter-reset: section;
}
h1 {
counter-reset: subsection;
}
h1::before {
counter-increment: section;
content: "Section " counter(section) ". ";
}
h2::before {
counter-increment: subsection;
content: counter(section) "." counter(subsection) " ";
}
style>
head>
<body>
<h1>HTML 教程h1>
<h2>HTML 简介h2>
<h2>HTML5 新特性h2>
<h1>CSS 教程h1>
<h2>CSS 简介h2>
<h2>CSS3 新特性h2>
<h1>JavaScript 教程h1>
<h2>JavaScript 简介h2>
<h2>JavaScript 事件h2>
body>
html>
6.2 列表计数器
使用了 counters() 函数在不同的嵌套层级中插入字符串。
DOCTYPE html>
<html lang="zh-cn">
<head>
<meta charset="UTF-8"/>
<link rel="icon" href="../../../static/image/icon/icon/icon_ITGodRoad.png">
<title>ITGodRoadtitle>
<style>
ol {
counter-reset: section;
list-style-type: none;
}
li::before {
counter-increment: section;
content: counters(section, ".") " ";
}
style>
head>
<body>
<ol>
<li>itemli>
<li>item
<ol>
<li>itemli>
<li>itemli>
<li>item
<ol>
<li>itemli>
<li>itemli>
<li>itemli>
ol>
li>
<li>itemli>
ol>
li>
<li>itemli>
<li>itemli>
ol>
<ol>
<li>itemli>
<li>itemli>
ol>
body>
html>

【每日一面】
CSS 中单位有哪些?rem 布局的优缺点。
CSS中有两种类型的长度单位:相对长度单位和绝对长度单位。
相对长度 单位指定了一个长度相对于另一个长度的属性。对于不同的设备更适用。
绝对长度 单位是一个固定的值,它反应一个真实的物理尺寸。绝对长度单位视输出介质而定,不依赖于环境(显示器、分辨率、操作系统等)。
- 相对长度单位
1. em 相对于应用在当前元素的字体尺寸,会继承父级元素的字体大小。一般浏览器字体大小默认为16px。
2. ex 依赖于英文字母小 x 的高度。
3. ch 数字 0 的宽度。
4. rem root em 的缩写,相对的只是HTML根元素。
5. vw viewpoint width,视窗宽度,1vw=视窗宽度的1%。
6. vh viewpoint height,视窗高度,1vh=视窗高度的1%。
7. vmin vw和vh中较小的那个。
8. vmax vw和vh中较大的那个。
9. % 百分比。
- 绝对长度单位
1. cm 厘米。
2. mm 毫米。
3. in 英寸 (1in = 2.54cm)。
4. px 像素,是画面中最小的点(单位色块)没有实际的物理尺寸大小。
5. pt 点(1pt = 1/72 in)是排版印刷中常用的文字大小单位。
6. pc 派卡(1pc = 12pt)相当于我国新四号铅字的尺寸。它是印刷行业使用的长度单位。
- rem 布局的优缺点
优点:em是相对于其父元素来设置字体大小的,这样就会存在一个问题,进行任何元素设置,都需要知道他父元素的大小。而rem是相对于根元素
缺点:屏幕变化的时候不是很好控制,可能会导致布局错位。一般只用于移动端。且数据量大,图片和盒子都需要我们给准确的值。
使用rem时,一般将根元素(html)的字体大小设置为font-size:62.5%(10÷16=62.5%)方便换算px

