pytorch-求导
可以结合这篇文章,更好地了解理论知识:https://blog.csdn.net/weixin_42468475/article/details/108369795
方法1 tensor.backward()
Central to all neural networks in PyTorch is the autograd package.
Tensor
torch.Tensor is the central class of the package. If you set its attribute .requires_grad as True, it starts to track all operations on it. When you finish your computation you can call .backward() and have all the gradients computed automatically. The gradient for this tensor will be accumulated into .grad attribute.
To stop a tensor from tracking history, you can call .detach() to detach it from the computation history, and to prevent future computation from being tracked.
To prevent tracking history (and using memory), you can also wrap the code block in with torch.no_grad():. This can be particularly helpful when evaluating a model because the model may have trainable parameters with requires_grad=True, but for which we don’t need the gradients.
There’s one more class which is very important for autograd implementation - a Function.
Tensor and Function are interconnected and build up an acyclic graph, that encodes a complete history of computation. Each tensor has a .grad_fn attribute that references a Function that has created the Tensor (except for Tensors created by the user - their grad_fn is None).
If you want to compute the derivatives, you can call .backward() on a Tensor. If Tensor is a scalar (i.e. it holds a one element data), you don’t need to specify any arguments to backward(), however if it has more elements, you need to specify a gradient argument that is a tensor of matching shape.
开启 requires_grad 属性,获得梯度计算能力
大概就是说如果要计算梯度,得把自变量关于梯度计算的一个属性打开,打开的方式有3种:
import torch
x = torch.ones(2, 2, requires_grad=True)
#或者 x = torch.ones(2, 2)
#     x.requires_grad=True

#再或者 x.requires_grad_(True)
print(x)
out:
tensor([[1., 1.],
        [1., 1.]], requires_grad=True)
之后定义的所有以x为自变量的函数都可以对x求导了,并且打印出来自带grad_fn这个属性:
y = x + 2
print(y)
Out:
tensor([[3., 3.],
        [3., 3.]], grad_fn=<AddBackward0>)
进一步查看 y 的grad_fn这个属性:
print(y.grad_fn)
out:
<AddBackward0 at 0x18f02842f08>
查看一个tensor变量是否支持grad:
a = torch.tensor(5.0,requires_grad=True)
print(a.requires_grad)
Out:
True
导数清零
因为每一次计算后的梯度都保存在了 a.grad 里,如果进行二次计算,则会变成a前一次的导数+第二次的导数所以要通过以下函数清理 a.grad.zero_()
>>>m.grad
>>>tensor([[ 4., 27.]])

>>>m.grad.zero_()
>>>tensor([[0., 0.]])

>>>m.grad
>>>tensor([[0., 0.]])
保留图像
每次在调用tensor.backward()计算梯度后原来的计算图(新函数和自变量的关系)都会消失,这样就没办法进行第二次反向传播了,在该函数内加入参数 retain_graph=True,可以保留计算图,进行多次运算。
以上是标量对矩阵的求导,下面是矩阵对矩阵的求导~
1.2 矩阵对矩阵的求导
在pytorch中,矩阵对矩阵的求导得转化成矩阵中每一个元素对矩阵的求导,依据是 jacobian矩阵(这篇文章的3.3.2节)。注意的是,矩阵对矩阵求导得到的其实是3维的矩阵,也可以说是4维的,第一维是F(n)每个元素(如果分成4维则第一第二维度是F(n)的行和列),第二维是自变量矩阵的行,第三维是自变量矩阵的列。
a = torch.tensor([[1,2,],[3,4.0]],requires_grad=True)
b = torch.ones(2,3,requires_grad=True)
c = torch.mm(a,b)
for i in range(2*3):
    x = torch.zeros(6)
    x[i] = 1
    x = x.view(2,3)
    c.backward(x,retain_graph=True)
    print("矩阵c的第"+str(i)+"个元素对 矩阵a 的jacobian矩阵是")
    print(a.grad)
    print("矩阵c的第"+str(i)+"个元素对 矩阵b 的jacobian矩阵是")
    print(b.grad)
    a.grad.zero_()
    b.grad.zero_()
out:
矩阵c的第0个元素对 矩阵a 的jacobian矩阵是
tensor([[1., 1.],
        [0., 0.]])
矩阵c的第0个元素对 矩阵b 的jacobian矩阵是
tensor([[1., 0., 0.],
        [2., 0., 0.]])
矩阵c的第1个元素对 矩阵a 的jacobian矩阵是
tensor([[1., 1.],
        [0., 0.]])
矩阵c的第1个元素对 矩阵b 的jacobian矩阵是
tensor([[0., 1., 0.],
        [0., 2., 0.]])
矩阵c的第2个元素对 矩阵a 的jacobian矩阵是
tensor([[1., 1.],
        [0., 0.]])
矩阵c的第2个元素对 矩阵b 的jacobian矩阵是
tensor([[0., 0., 1.],
        [0., 0., 2.]])
矩阵c的第3个元素对 矩阵a 的jacobian矩阵是
tensor([[0., 0.],
        [1., 1.]])
矩阵c的第3个元素对 矩阵b 的jacobian矩阵是
tensor([[3., 0., 0.],
        [4., 0., 0.]])
矩阵c的第4个元素对 矩阵a 的jacobian矩阵是
tensor([[0., 0.],
        [1., 1.]])
矩阵c的第4个元素对 矩阵b 的jacobian矩阵是
tensor([[0., 3., 0.],
        [0., 4., 0.]])
矩阵c的第5个元素对 矩阵a 的jacobian矩阵是
tensor([[0., 0.],
        [1., 1.]])
矩阵c的第5个元素对 矩阵b 的jacobian矩阵是
tensor([[0., 0., 3.],
        [0., 0., 4.]])
x.backward()中的参数
y.backward() 中的参数,表示 函数矩阵y每一个元素 对 自变量矩阵x 的权重参数,其大小必须和 矩阵y 一致。
下面的例子可以很好地解释在矩阵对矩阵求导时,backward中必须的参数的作用:矩阵y中,第一个元素 y[0,0] 对矩阵x 的导数是【1,2,3】,第二个元素 y[1,0] 对矩阵x 的导数是【6,3,2】,根据 两个元素对应的梯度矩阵权重都为1可得,最终累计到x上的grad=【11+61,21+31,31+21】=【7,5,5】。
x = torch.tensor([1.0,2.0,3.0], requires_grad=True)
y = torch.zeros(2,1)
y[0,0]=x[0]*1+x[1]*2+x[2]*3
y[1,0]=x[0]*x[1]*x[2]

y.backward(torch.ones(2,1),retain_graph=True)
x.grad
out:
tensor([7., 5., 5.])
1.3 pytorch实现反向传播中求导的方法
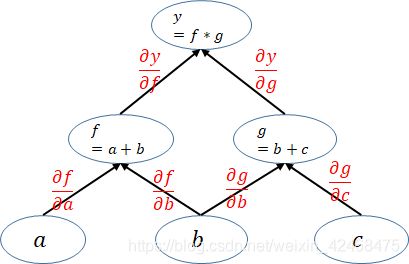
pytorch是动态图机制,所以在训练模型时候,每迭代一次都会构建一个新的计算图。而计算图其实就是代表程序中变量之间的关系。举个列子: [公式] 在这个运算过程就会建立一个如下的计算图:

下面的计算图中每一个叶子节点都是一个用户自己创建的变量,在网络backward时候,需要用链式求导法则求出网络最后输出的梯度,然后再对网络进行优化,如下就是网络的求导过程。
pytorch在利用计算图求导的过程中根节点都是一个标量,即一个数。当根节点即函数的因变量为一个向量的时候,会构建多个计算图对该向量中的每一个元素分别进行求导,这也就引出了下一节的内容
pytoch构建的计算图是动态图,为了节约内存,所以每次一轮迭代完之后计算图就被在内存释放,所以当你想要多次backward时候就会报如下错:
net = nn.Linear(3, 4)  # 一层的网络,也可以算是一个计算图就构建好了
input = Variable(torch.randn(2, 3), requires_grad=True)  # 定义一个图的输入变量
output = net(input)  # 最后的输出
loss = torch.sum(output)  # 这边加了一个sum() ,因为被backward只能是标量
loss.backward() # 到这计算图已经结束,计算图被释放了
上面这个程序是能够正常运行的,但是下面就会报错
net = nn.Linear(3, 4)
input = Variable(torch.randn(2, 3), requires_grad=True)
output = net(input)
loss = torch.sum(output)

loss.backward()
loss.backward()

RuntimeError: Trying to backward through the graph a second time, but the buffers have already been freed.
所以得再调用函数添加一条retain_graph=True,就可以计算无数次反向传播了:
loss.backward(retain_graph=True)
方法2 torch.autograd.backward(z)
先来看一下他的定义:
torch.autograd.backward(
		tensors,
		grad_tensors=None,
		retain_graph=None,
		create_graph=False,
		grad_variables=None)
参数具体可以这样说:
- tensor: 用于计算梯度的tensor。也就是说这两种方式是等价的:torch.autograd.backward(z) == z.backward()
- grad_tensors: 在计算矩阵的梯度时会用到。他其实也是一个tensor,shape一般需要和前面的tensor保持一致。
- retain_graph: 通常在调用一次backward后,pytorch会自动把计算图销毁,所以要想对某个变量重复调用backward,则需要将该参数设置为True
- create_graph: 当设置为True的时候可以用来计算更高阶的梯度
- grad_variables: 这个官方说法是grad_variables’ is deprecated. Use ‘grad_tensors’ instead.也就是说这个参数后面版本中应该会丢弃,直接使用grad_tensors就好了。
注:
这种方法用的比较少,但是效果和方法1是可以等价的:
torch.autograd.backward(z) == z.backward()
方法3 torch.autograd.grad
定义:
torch.autograd.grad(
		outputs,
		inputs,
		grad_outputs=None,
		retain_graph=None,
		create_graph=False,
		only_inputs=True,
		allow_unused=False)
看了前面的内容后在看这个函数就很好理解了,各参数作用如下:
- outputs: 结果节点,即被求导数
- inputs: 叶子节点
- grad_outputs: 类似于backward方法中的grad_tensors
- retain_graph: 同上
- create_graph: 同上
- only_inputs: 默认为True, 如果为True, 则只会返回指定input的梯度值。 若为False,则会计算所有叶子节点的梯度,并且将计算得到的梯度累加到各自的.grad属性上去。
- allow_unused: 默认为False, 即必须要指定input,如果没有指定的话则报错。
Important!
和方法1、方法2不同,这种求导方式不会使得自变量的梯度呈现出来,即:
a = torch.randn((3,2),requires_grad=True)
b = torch.randn((3,2),requires_grad=True)
c = torch.mul(a,b)
grads = torch.autograd.grad(outputs=c, inputs=a,
                            grad_outputs=torch.ones_like(c))[0]
这里,你可以通过grads查看c对a的导数,但是如果你尝试用
print(a.grad, b.grad)
会发现结果都是空的,意味着 torch.autograd.grad 在计算梯度时并不会生成 自变量.grad,这个值永远都是空。
3 二次求导
了解了一次求导以后,那么问题来了,在机器学习的很多优化问题中,我们需要求得 例如 损失函数对参数的二次导(涉及牛顿迭代法的Hessian Matrix),那么,如何在pytorch框架下求二次导呢?
代码如下:
import torch as torch
import numpy as np


m, n = 3, 2
x0 = np.random.rand(m,n)
x = torch.tensor(x0,dtype=tc.float,requires_grad=True).cuda()
z = torch.ones_like(x)
y = x**8
print(y)
dy = torch.autograd.grad(y, x, grad_outputs=z, create_graph=True)[0]
print(dy)
d2y = torch.autograd.grad(dy, x, grad_outputs=z, create_graph=True)[0]
print(d2y)
3.1 证明链式法则(计算结果节点对中间节点的导数)
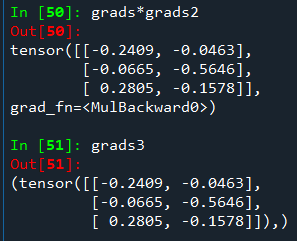
若有 c 是 a,b 的函数,d 又是 c 的函数,下面我们来用程序验证导数的链式法则,即 ∂ d ∂ a = ∂ d ∂ c ∗ ∂ c ∂ a \frac{\partial d}{\partial a}=\frac{\partial d}{\partial c}*\frac{\partial c}{\partial a} ∂a∂d=∂c∂d∗∂a∂c
a = torch.randn((3,2),requires_grad=True)
b = torch.randn((3,2),requires_grad=True)
c = torch.mul(a,b)
d = c.sum().abs().sqrt()


grads = torch.autograd.grad(outputs=d, inputs=c,
                            grad_outputs=torch.ones_like(d),
                            retain_graph=True,
                            create_graph=True)[0]

grads2 = torch.autograd.grad(outputs=c, inputs=a,
                             retain_graph=True,
                            grad_outputs=torch.ones_like(c))[0]
grads3 = torch.autograd.grad(outputs=d, inputs=a,
                             grad_outputs=torch.ones_like(d))
参考:
https://zhuanlan.zhihu.com/p/33378444
https://pytorch.org/tutorials/beginner/blitz/autograd_tutorial.html
https://zhuanlan.zhihu.com/p/83172023


