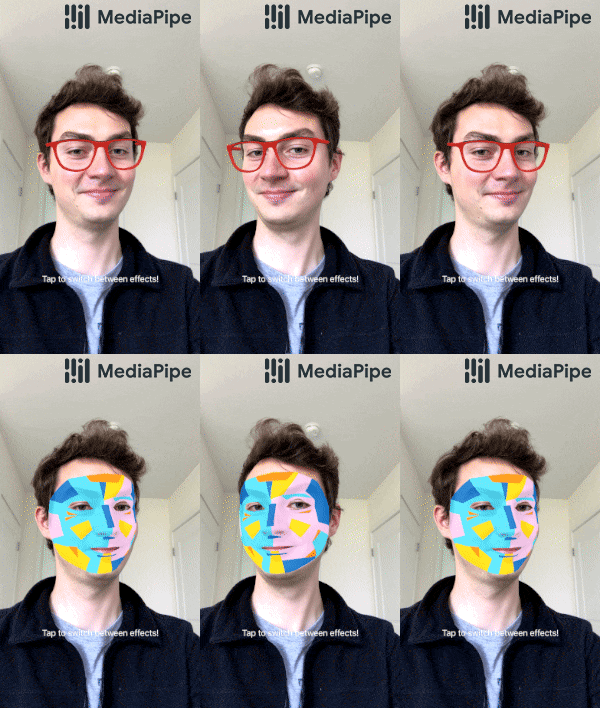
使用Mediapipe制作抖音特效
demo_vid
1. 介绍
既然抖音提供的特性可以让你在几秒钟内随心所欲地变得狂野或美丽,为什么还要花钱买化妆品、时髦的衣服和眼镜呢?
只要在你的脸上添加一个特效就变成一个可爱的头像,或者你最喜欢的虚构人物。这样的特性有数百种,都是由增强现实(AR)驱动的。
在这篇文章中,我们将利用Mediapipe框架创建我们自己的特效!
2.增强现实AR
增强现实(AR)是一种与现实世界的互动体验,它是现实世界和虚拟世界的结合,而虚拟现实(virtual Reality, VR)则完全用虚拟的环境取代了真实的世界。
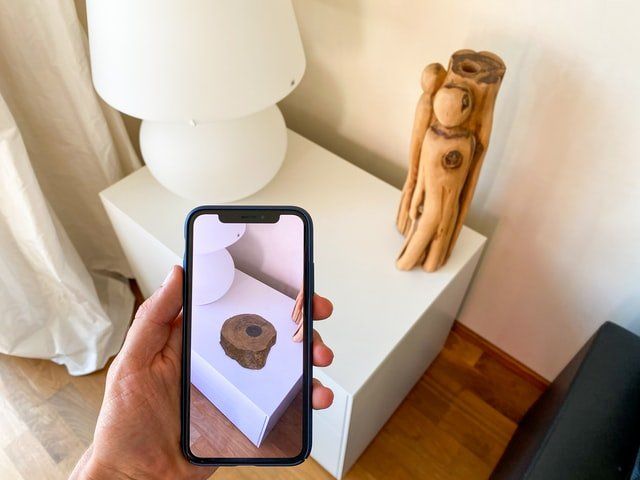
由于人工智能的进步,你可以构建这些看似神奇的增强现实效果,并在合适的硬件上运行。
增强现实在不同的领域有很多应用,比如
- 游戏:我们都听说过《PokemonGo》。这个游戏让你捕捉和收集虚拟卡通人物。
- 零售:想象一下,如果你只需点击一个按钮就可以试穿衣服,那么购物体验将是多么完美。
- 营销:企业可以创造新的体验来吸引消费者的眼球。
- 教育:可以设计新的交互式AR体验来帮助学习
3 AR特效的工作原理
通过多种技术共同作用,在你的脸上产生一个简单的特效。特效的制作主要分为以下几个步骤:
- 1.人脸检测:
首先也是最重要的是,你的脸会被摄像头检测到。在过去,通过传统的检测方法实现的,如Viola-Jones算法,梯度直方图(HOG)等。在当今时代,随着AI和移动硬件越来越强大,越来越多的通过深度学习的方式进行人脸检测。 - 2.特征关键点检测:
一旦人脸被检测出来,下一步就是识别你面部特征的关键点。 - 3.应用滤镜:最后,检测到的关键点网格可以变形,或者可以应用滤镜来改变面部外观。
了解了它的工作原理后,通过使用MediaPipe框架来实现两个人脸特效。
4. MediaPipe

MediaPipe是一个开源的、跨平台的机器学习框架,由谷歌研究人员开发。它提供了可定制的ML解决方案。
4.1 为什么选择MediaPipe ?
除了轻量级和惊人的快速性能外,MediaPipe还支持跨平台兼容性。其思想是一次性构建一个ML模型,然后将其部署到不同的平台和设备上,得到可复用的结果。
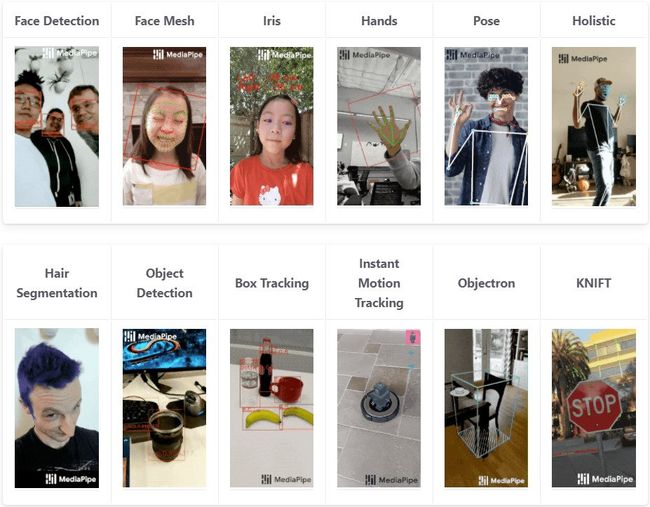
支持Python、C、Javascript、Android和IOS平台,具有人脸检测、人脸网格或人脸关键点检测、人的分割、对象检测、人体姿态估计等功能。
4.2 MediaPipe Face Mesh概述
MediaPipe Face Mesh实时提供468个3d人脸关键点,甚至在移动设备上。它支持IOS和Android两种操作系统,所以你可以用它来开发这些移动应用,。在这篇博客文章中,我们将使用Python和MediaPipe,以及OpenCV来实现AR特效。
与任何面部关键点检测模型一样,Mediapipe从面部检测开始,并检测人脸的关键点。对于人脸检测,它使用了Blazfast,顾名思义,它是非常快速和轻量级的,并为手机GPU推理进行了优化。人脸检测器从视频帧输出裁剪区域,然后我们在裁剪的区域上运行3D-Landmark模型(基于paper)。
5.实现
5.1 环境
- Python环境
- Python模块:opencv numpy
5.2 安装MediaPipe
使用以下pip命令安装MediaPipe Python包
pip install mediapipe
5.3 Pipeline 概述
在进入细节之前,让我们讨论一下使用Mediapipe和OpenCV实现AR特效的pipeline:
使用Mediapipe Face Mesh检测468个面部关键点。
- 选择相关的地标,因为我们不需要468个地标。
- 用选定的关键点标注特效。
- 加载标注。
- 检测面部的关键点
- 固定关键点
- 使用关键点对脸部进行滤镜变换。
5.4 利用Face Mesh识别脸部关键点
们从导入MediaPipe开始。接下来,我们创建一个Face Mesh实例,其中有两个可配置参数,用于检测和跟踪关键点信息。
min_detection_confidence=0.5
min_tracking_confidence=0.5
最后,我们传入一个输入图像并接收一个人脸对象列表。
import cv2
import numpy as np
import mediapipe as mp

# Configuration Face Mesh.
mp_face_mesh = mp.solutions.face_mesh
face_mesh =  mp_face_mesh.FaceMesh(min_detection_confidence=0.5, min_tracking_confidence=0.5)

img = cv2.imread('filters/face.jpg', cv2.IMREAD_UNCHANGED)
image = cv2.cvtColor(cv2.flip(img, 1), cv2.COLOR_BGR2RGB)
# To improve performance.
image.flags.writeable = False
results =  face_mesh.process(image)
每张脸都包含468个关键点
注意:关键点的坐标被标准化为位于0和1之间。在使用它们之前,我们需要分别将x和y坐标与图像的宽度和高度相乘。
(results.multi_face_landmarks[0].landmark[205].x * image.shape[1], results.multi_face_landmarks[0].landmark[205].y * image.shape[0])
上面的代码块给出了图像中检测到的第一个人脸的第205个地标点的x和y坐标。

5.5 选择相应的关键点
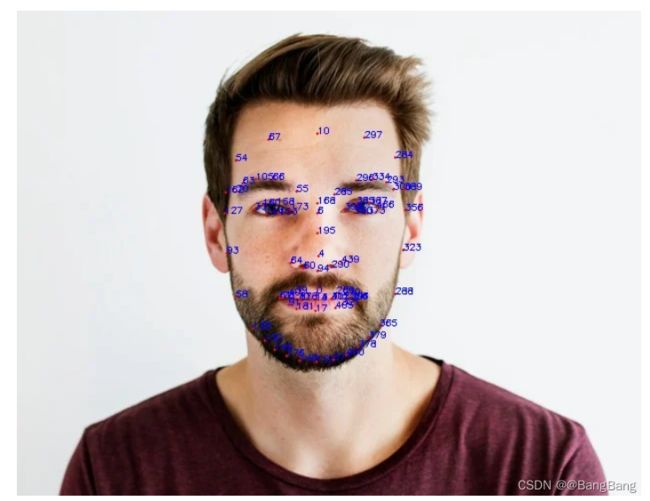
对于我们的应用程序,我们选择了脸的关键特征点,即,眼睛,鼻子,嘴唇,眉毛和下巴线。这些75个关键点类似于 Dlib 68 points face landmark detector,不同的是我们在额头上加了几个点
5.6 选择特效模板
已经有了人脸关键点的坐标,我们将使用它们并通过特效模板来覆盖脸部。
下面是精选的特效模板:
5.7 通过关键点标注特效
为了用选中的点来标注脸部特效,我们使用了一个简单的标注工具Makesense,它可以在浏览器上运行
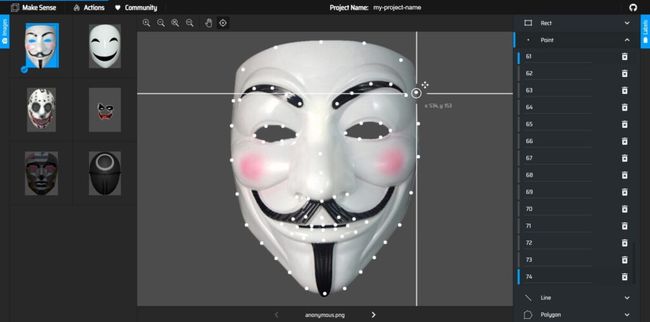
需要注意点的顺序,下面是我们将要使用的点的标签。
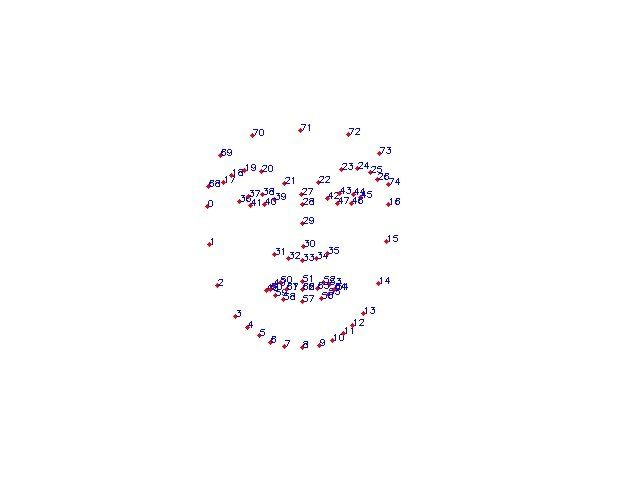
一旦标注了所有关键点,就可以导出标注,我们将拥有一个包含所有点坐标的CSV文件。

5.8 代码
导入所需的模块
我们将使用一个faceBlendCommon.py文件,它包含了一些函数定义的“Delaunay三角测量”和“三角形变形”。当我们在代码中调用它们时,我们会知道它们是什么意思。
import mediapipe as mp
import cv2
import math
import numpy as np
import faceBlendCommon as fbc
import csv
定义特效图像和标注文件的路径
VISUALIZE_FACE_POINTS = False

filters_config = {
    'anonymous':
        [{'path': "filters/anonymous.png",
         'anno_path': "filters/anonymous_annotations.csv",
         'morph': True, 'animated': False, 'has_alpha': True}],
    'anime':
        [{'path': "filters/anime.png",
         'anno_path': "filters/anime_annotations.csv",
         'morph': True, 'animated': False, 'has_alpha': True}],
    'dog':
        [{'path': "filters/dog-ears.png",
         'anno_path': "filters/dog-ears_annotations.csv",
         'morph': False, 'animated': False, 'has_alpha': True},
         {'path': "filters/dog-nose.png",
          'anno_path': "filters/dog-nose_annotations.csv",
          'morph': False, 'animated': False, 'has_alpha': True}],
    'cat':
        [{'path': "filters/cat-ears.png",
         'anno_path': "filters/cat-ears_annotations.csv",
         'morph': False, 'animated': False, 'has_alpha': True},
         {'path': "filters/cat-nose.png",
          'anno_path': "filters/cat-nose_annotations.csv",
          'morph': False, 'animated': False, 'has_alpha': True}],
}
定义从medipipe获取人脸关键点的函数
def getLandmarks(img):
    mp_face_mesh = mp.solutions.face_mesh
    selected_keypoint_indices = [127, 93, 58, 136, 150, 149, 176, 148, 152, 377, 400, 378, 379, 365, 288, 323, 356, 70, 63, 105, 66, 55,
                 285, 296, 334, 293, 300, 168, 6, 195, 4, 64, 60, 94, 290, 439, 33, 160, 158, 173, 153, 144, 398, 385,
                 387, 466, 373, 380, 61, 40, 39, 0, 269, 270, 291, 321, 405, 17, 181, 91, 78, 81, 13, 311, 306, 402, 14,
                 178, 162, 54, 67, 10, 297, 284, 389]

    height, width = img.shape[:-1]

    with mp_face_mesh.FaceMesh(max_num_faces=1, static_image_mode=True, min_detection_confidence=0.5) as face_mesh:

        results = face_mesh.process(cv2.cvtColor(img, cv2.COLOR_BGR2RGB))

        if not results.multi_face_landmarks:
            print('Face not detected!!!')
            return 0

        for face_landmarks in results.multi_face_landmarks:
            values = np.array(face_landmarks.landmark)
            face_keypnts = np.zeros((len(values), 2))

            for idx,value in enumerate(values):
                face_keypnts[idx][0] = value.x
                face_keypnts[idx][1] = value.y

            # Convert normalized points to image coordinates
            face_keypnts = face_keypnts * (width, height)
            face_keypnts = face_keypnts.astype('int')

            relevant_keypnts = []

            for i in selected_keypoint_indices:
                relevant_keypnts.append(face_keypnts[i])
            return relevant_keypnts
    return 0
加载特效图片
从特效图片中获取alpha通道供以后使用,并将图像转换为BGR
def load_filter(img_path, has_alpha):
    # Read the image
    img = cv2.imread(img_path, cv2.IMREAD_UNCHANGED)

    alpha = None
    if has_alpha:
        b, g, r, alpha = cv2.split(img)
        img = cv2.merge((b, g, r))

    return img, alpha
从标注文件中加载关键点
def load_landmarks(annotation_file):
    with open(annotation_file) as csv_file:
        csv_reader = csv.reader(csv_file, delimiter=",")
        points = {}
        for i, row in enumerate(csv_reader):
            # skip head or empty line if it's there
            try:
                x, y = int(row[1]), int(row[2])
                points[row[0]] = (x, y)
            except ValueError:
                continue
        return points
使用关键点找到凸包。
然后,在凸包点阵列上,我们添加位于包内部的面部特征点,即嘴唇,眼睛,鼻子。我们添加这些点,这样特效就能更好地匹配,并且可以随着我们脸上表情的变化而变化。
def find_convex_hull(points):
    hull = []
    hullIndex = cv2.convexHull(np.array(list(points.values())), clockwise=False, returnPoints=False)
    addPoints = [
        [48], [49], [50], [51], [52], [53], [54], [55], [56], [57], [58], [59],  # Outer lips
        [60], [61], [62], [63], [64], [65], [66], [67],  # Inner lips
        [27], [28], [29], [30], [31], [32], [33], [34], [35],  # Nose
        [36], [37], [38], [39], [40], [41], [42], [43], [44], [45], [46], [47],  # Eyes
        [17], [18], [19], [20], [21], [22], [23], [24], [25], [26]  # Eyebrows
    ]
    hullIndex = np.concatenate((hullIndex, addPoints))
    for i in range(0, len(hullIndex)):
        hull.append(points[str(hullIndex[i][0])])

    return hull, hullIndex
加载特效,特效需要贴到脸上的denaulay三角部分
def load_filter(filter_name="dog"):

    filters = filters_config[filter_name]

    multi_filter_runtime = []

    for filter in filters:
        temp_dict = {}

        img1, img1_alpha = load_filter_img(filter['path'], filter['has_alpha'])

        temp_dict['img'] = img1
        temp_dict['img_a'] = img1_alpha

        points = load_landmarks(filter['anno_path'])

        temp_dict['points'] = points

        if filter['morph']:
            # Find convex hull for delaunay triangulation using the landmark points
            hull, hullIndex = find_convex_hull(points)

            # Find Delaunay triangulation for convex hull points
            sizeImg1 = img1.shape
            rect = (0, 0, sizeImg1[1], sizeImg1[0])
            dt = fbc.calculateDelaunayTriangles(rect, hull)

            temp_dict['hull'] = hull
            temp_dict['hullIndex'] = hullIndex
            temp_dict['dt'] = dt

            if len(dt) == 0:
                continue

        if filter['animated']:
            filter_cap = cv2.VideoCapture(filter['path'])
            temp_dict['cap'] = filter_cap

        multi_filter_runtime.append(temp_dict)

    return filters, multi_filter_runtime
什么是denaulay三角呢?
给定平面上的一组点,三角剖分是指将平面细分成三角形,这些点作为顶点。但是denaulay三角法很突出因为它有一些很好的特性。在denaulay三角剖分中,三角形的选择使任何点都不在三角形的外圆内。
下面的图中,我们在左边的图像中看到一组人脸关键点,在右边的图像中看到denaulay三角。

通过特效图片的denaulay三角剖分之后我们可以找到相同的人脸三角剖分。
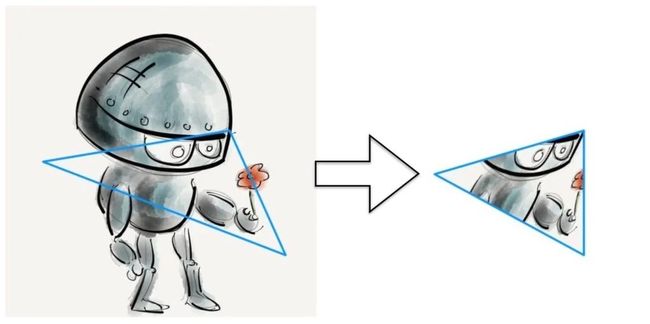
一旦我们有了两个图像的三角形,我们可以将一个图像(特效)的三角形转换到另一个图像(人的脸)。我们通过使用Affine变换来实现这一点,它需要图像上的3个点来进行变换。
创建cap对象来处理来自来自摄像头或视频文件的输入。
# Process input from webcam or video file
cap = cv2.VideoCapture(0)

# Some variables we will need later
count = 0
isFirstFrame = True
sigma = 50

# Load an initial filter
iter_filter_keys = iter(filters_config.keys())
filters, multi_filter_runtime = load_filter(next(iter_filter_keys))
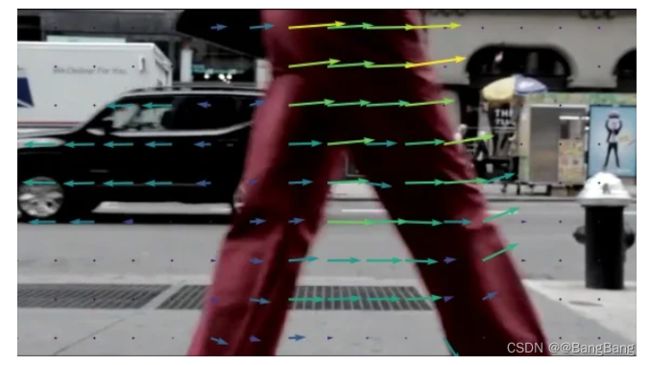
我们还使用光流算法来跟踪视频的每一帧的关键点。
什么是光流?
光流的主要思想是估计物体运动或摄像机运动引起的位移变化。利用这一点,我们可以在下一帧中预测关键点的位置并跟踪它们。
在视频中应用特效:
# The main loop
while True:

    ret, frame = cap.read()
    if not ret:
        break
    else:

        points2 = getLandmarks(cv2.cvtColor(frame, cv2.COLOR_BGR2RGB))

        # if face is partially detected
        if not points2 or (len(points2) != 75):
            continue

        ################ Optical Flow and Stabilization Code #####################
        img2Gray = cv2.cvtColor(frame, cv2.COLOR_BGR2GRAY)

        if isFirstFrame:
            points2Prev = np.array(points2, np.float32)
            img2GrayPrev = np.copy(img2Gray)
            isFirstFrame = False

        lk_params = dict(winSize=(101, 101), maxLevel=15,
                         criteria=(cv2.TERM_CRITERIA_EPS | cv2.TERM_CRITERIA_COUNT, 20, 0.001))
        points2Next, st, err = cv2.calcOpticalFlowPyrLK(img2GrayPrev, img2Gray, points2Prev,
                                                        np.array(points2, np.float32),
                                                        **lk_params)

        # Final landmark points are a weighted average of detected landmarks and tracked landmarks

        for k in range(0, len(points2)):
            d = cv2.norm(np.array(points2[k]) - points2Next[k])
            alpha = math.exp(-d * d / sigma)
            points2[k] = (1 - alpha) * np.array(points2[k]) + alpha * points2Next[k]
            points2[k] = fbc.constrainPoint(points2[k], frame.shape[1], frame.shape[0])
            points2[k] = (int(points2[k][0]), int(points2[k][1]))

        # Update variables for next pass
        points2Prev = np.array(points2, np.float32)
        img2GrayPrev = img2Gray
        ################ End of Optical Flow and Stabilization Code ###############

        if VISUALIZE_FACE_POINTS:
            for idx, point in enumerate(points2):
                cv2.circle(frame, point, 2, (255, 0, 0), -1)
                cv2.putText(frame, str(idx), point, cv2.FONT_HERSHEY_SIMPLEX, .3, (255, 255, 255), 1)
            cv2.imshow("landmarks", frame)

        for idx, filter in enumerate(filters):

            filter_runtime = multi_filter_runtime[idx]
            img1 = filter_runtime['img']
            points1 = filter_runtime['points']
            img1_alpha = filter_runtime['img_a']

            if filter['morph']:

                hullIndex = filter_runtime['hullIndex']
                dt = filter_runtime['dt']
                hull1 = filter_runtime['hull']

                # create copy of frame
                warped_img = np.copy(frame)

                # Find convex hull
                hull2 = []
                for i in range(0, len(hullIndex)):
                    hull2.append(points2[hullIndex[i][0]])

                mask1 = np.zeros((warped_img.shape[0], warped_img.shape[1]), dtype=np.float32)
                mask1 = cv2.merge((mask1, mask1, mask1))
                img1_alpha_mask = cv2.merge((img1_alpha, img1_alpha, img1_alpha))

                # Warp the triangles
                for i in range(0, len(dt)):
                    t1 = []
                    t2 = []

                    for j in range(0, 3):
                        t1.append(hull1[dt[i][j]])
                        t2.append(hull2[dt[i][j]])

                    fbc.warpTriangle(img1, warped_img, t1, t2)
                    fbc.warpTriangle(img1_alpha_mask, mask1, t1, t2)

                # Blur the mask before blending
                mask1 = cv2.GaussianBlur(mask1, (3, 3), 10)

                mask2 = (255.0, 255.0, 255.0) - mask1

                # Perform alpha blending of the two images
                temp1 = np.multiply(warped_img, (mask1 * (1.0 / 255)))
                temp2 = np.multiply(frame, (mask2 * (1.0 / 255)))
                output = temp1 + temp2
            else:
                dst_points = [points2[int(list(points1.keys())[0])], points2[int(list(points1.keys())[1])]]
                tform = fbc.similarityTransform(list(points1.values()), dst_points)
                # Apply similarity transform to input image
                trans_img = cv2.warpAffine(img1, tform, (frame.shape[1], frame.shape[0]))
                trans_alpha = cv2.warpAffine(img1_alpha, tform, (frame.shape[1], frame.shape[0]))
                mask1 = cv2.merge((trans_alpha, trans_alpha, trans_alpha))

                # Blur the mask before blending
                mask1 = cv2.GaussianBlur(mask1, (3, 3), 10)

                mask2 = (255.0, 255.0, 255.0) - mask1

                # Perform alpha blending of the two images
                temp1 = np.multiply(trans_img, (mask1 * (1.0 / 255)))
                temp2 = np.multiply(frame, (mask2 * (1.0 / 255)))
                output = temp1 + temp2

            frame = output = np.uint8(output)

        cv2.putText(frame, "Press F to change filters", (10, 20), cv2.FONT_HERSHEY_SIMPLEX, .5, (255, 0, 0), 1)

        cv2.imshow("Face Filter", output)

        keypressed = cv2.waitKey(1) & 0xFF
        if keypressed == 27:
            break
        # Put next filter if 'f' is pressed
        elif keypressed == ord('f'):
            try:
                filters, multi_filter_runtime = load_filter(next(iter_filter_keys))
            except:
                iter_filter_keys = iter(filters_config.keys())
                filters, multi_filter_runtime = load_filter(next(iter_filter_keys))

        count += 1

cap.release()
cv2.destroyAllWindows()
结果
检查看我们的代码的输出结果:
代码下载

