Python 通过ffmpeg实现视频跟摄像头推流(ubuntu16+ffmpeg+nginx)
目录
前言:
摄像头实时推流
视频推流:
前言:
最近在做一个搞项目,前端只要求展示原始画面,只需要在接入摄像机的时候,把视频流推送到一个服务器地址上,前端可根据地址获取视频流,前端借助的是一个视频流插件video.js,可拉取rtmp格式的视频流。nginx+rtmp 具体的安装配置可参考:
Ubuntu16.04下配置nginx + RTMP流媒体服务器
代码参考:
摄像头实时推流
import cv2
import queue
import os
import numpy as np
from threading import Thread
import datetime, _thread
import subprocess as sp
from time import  *

# 使用线程锁,防止线程死锁
mutex = _thread.allocate_lock()
# 存图片的队列
frame_queue = queue.Queue()
# 推流的地址,前端通过这个地址拉流,主机的IP,2019是ffmpeg在nginx中设置的端口号
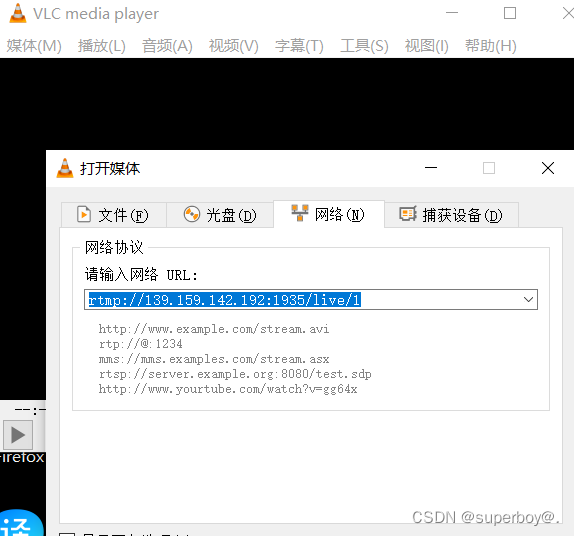
rtmpUrl = "rtmp://139.159.142.192:1935/live/1"

# 用于推流的配置,参数比较多,可网上查询理解
command = ['ffmpeg',
           '-y',
           '-f', 'rawvideo',
           '-vcodec', 'rawvideo',
           '-pix_fmt', 'bgr24',
           '-s', "{}x{}".format(640, 480),  # 图片分辨率
           '-r', str(25.0),  # 视频帧率
           '-i', '-',
           '-c:v', 'libx264',
           '-pix_fmt', 'yuv420p',
           '-preset', 'ultrafast',
           '-f', 'flv',
           rtmpUrl]


def Video():
    # 调用相机拍图的函数
    vid = cv2.VideoCapture(r"/usr/local/web/studey/mysite/chat/video/4.mp4")
    if not vid.isOpened():
        raise IOError("Couldn't open webcam or video")
    while (vid.isOpened()):
        return_value, frame = vid.read()
        # 原始图片推入队列中
        frame_queue.put(frame)


def push_frame():
    # 推流函数
    accum_time = 0
    curr_fps = 0
    fps = "FPS: ??"
    prev_time = time()

    # 防止多线程时 command 未被设置
    while True:
        if len(command) > 0:
            # 管道配置,其中用到管道
            p = sp.Popen(command, stdin=sp.PIPE)
            break

    while True:
        if frame_queue.empty() != True:
            # 从队列中取出图片
            frame = frame_queue.get()
            # curr_time = timer()
            # exec_time = curr_time - prev_time
            # prev_time = curr_time
            # accum_time = accum_time + exec_time
            # curr_fps = curr_fps + 1

            # process frame
            # 你处理图片的代码
            # 将图片从队列中取出来做处理,然后再通过管道推送到服务器上
            # 增加画面帧率
            # if accum_time > 1:
            # accum_time = accum_time - 1
            # fps = "FPS: " + str(curr_fps)
            # curr_fps = 0

            # write to pipe
            # 将处理后的图片通过管道推送到服务器上,image是处理后的图片
            p.stdin.write(frame.tostring())


def run():
    # 使用两个线程处理
    thread1 = Thread(target=Video, )
    thread1.start()
    thread2 = Thread(target=push_frame, )
    thread2.start()

if __name__ == '__main__':
    run()
视频推流:
import cv2
import subprocess

src = "/usr/local/web/studey/mysite/chat/video/4.mp4"
rtmp = 'rtmp://127.0.0.1:1935/live/1'
cap = cv2.VideoCapture(src)
size = (int(cap.get(cv2.CAP_PROP_FRAME_WIDTH)), int(cap.get(cv2.CAP_PROP_FRAME_HEIGHT)))
size = (int(640), int(480))
sizeStr = str(size[0]) + 'x' + str(size[1])

command = ['ffmpeg',
           '-y', '-an',
           '-f', 'rawvideo',
           '-vcodec', 'rawvideo',
           '-pix_fmt', 'bgr24',
           '-s', sizeStr,
           '-r', '25',
           '-i', '-',
           '-c:v', 'libx264',
           '-pix_fmt', 'yuv420p',
           '-preset', 'ultrafast',
           '-f', 'flv',
           rtmp]

pipe = subprocess.Popen(command
                        , shell=False
                        , stdin=subprocess.PIPE
                        )

while cap.isOpened():
    success, frame = cap.read()
    if success == False:
        print("Err")
        break
    img = cv2.resize(frame, size)
    pipe.stdin.write(img.tostring())
cap.release()
pipe.terminate()
确保自己已经安装了ffmpeg ,而且ffmpeg已经和nginx配置好。
在处理图像的时候,最好是将原图存到队列中,再从队列中取出来做处理,之前试过将处理后的图片存到队列中,然后直接推送,发现推送的进程占用了所有的资源,导致处理图像的进程无法执行。所以顺序不对,很容易产生资源占用的情况。
怎样查看推流是否成功,可借助VLC软件
将图片以流的形式放到容器中,容器可以做到均衡负载,高访问量。当然与服务器的通信协议
要以UDP的形式,不容易丢包,ffmpeg内部就封装好了UDP协议,不需要自己额外的实现。


