Python进行Excel操作-格式处理和数据排序
Python进行Excel操作-格式处理和数据排序
- 前言
- 实现
-
- 1 格式处理
- 2 数据排序
- 结果
- 代码
前言
紧接上一篇博客[1]。需求:进一步对整理后的数据进行排序,并且输出格式化的表格。
实现
1 格式处理
excel表格的格式处理参考[2],实现单元格字体设置、边框设置、颜色填充,以及整体列宽的设置。
2 数据排序
想要进行数据排序,由于上一篇博客使用的是字典类型,而字典类型一般无法进行数据的排序处理。在此需要对把相应的内容放到表格或者元组中,使用sorted函数实现排序操作。对于排序需要注意的是,要分清主次,比如主要按某一条目进行排序,需要考虑其他条目在当前排序约束下的排序结果。
结果
(1)按“累计合同总价”排序

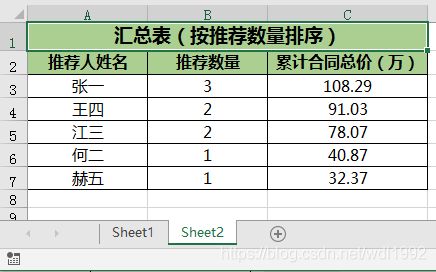
(2) 按“推荐数量”排序

两个排序结果是一样的,有点巧合,大家可以使用更多的数据进行验证。
代码
# By WDL 2020-4-7
from openpyxl import Workbook, load_workbook
from openpyxl.styles import Alignment
from openpyxl.styles import PatternFill, colors, Color
from openpyxl.styles import NamedStyle, Font, Border, Side

wb= load_workbook("XXX公司推荐成交明细.xlsx")
ws=wb["Sheet1"]#也可以使用wb.get_sheet_by_name("Sheet1") 获取工作表
# 读取数据,把excel中的一个table按行读取出来,存入一个二维的list
total_list=[]
for row in ws.rows:
    row_list=[]
    for cell in row:
        row_list.append(cell.value)
    total_list.append(row_list)

namedict={}
valuedict={}
for term in total_list:
    if term[1] == None or len(term[1]) > 3:# 员工姓名列
        continue
    else:
        namedict[term[1]]=namedict.get(term[1],0)+1
        valuedict.setdefault(term[1],[]).append(term[-1]) #一键 对多值的字典
#排序前的数据处理操作
moneydict={} #金额汇总后的字典
for name in namedict:
    moneydict[name]=round(sum(valuedict[name])/(10000.0),2) #单位为万,保留两位小数
#最后的数据使用二维数组表示 ["姓名",数量,金额]
result=[]
for name in namedict:
    term=[name,namedict[name],moneydict[name]]
    result.append(term)
#print(result[0][1])

# 格式设置居中 字体 边框设置
alignmentCenter = Alignment(horizontal='center', vertical='center')
fontYahei12 = Font(name=u'微软雅黑', bold=False, size=12)
fontYahei14 = Font(name=u'微软雅黑', bold=True, size=14) #字体
thinSide = Side(style='thin', color=colors.BLACK)
allBlackThinBorder = Border(left=thinSide, top=thinSide, right=thinSide, bottom=thinSide) #边框
commonBkgColorHex = "AACF91" #aRGB Hex value
commonFill = PatternFill(start_color=commonBkgColorHex, end_color=commonBkgColorHex, fill_type="solid") #颜色填充

# 保存写操作
newwb = Workbook()
newsheet=newwb.active #第一个表格
#表头
newsheet.title="Sheet1"
newsheet.column_dimensions["A"].width=15 #列宽设置
newsheet.column_dimensions["B"].width=15
newsheet.column_dimensions["C"].width=20
newsheet["A1"]="汇总表(按累计合同总价排序)"#total_list[0][0]
newsheet.merge_cells("A1:C1")
newsheet.append(["推荐人姓名","推荐数量","累计合同总价(万)"]) #追加一行
#排序操作
xterm=sorted(result,key=lambda x:x[1],reverse=True) # 按列表的第二个元素排序
xnumber=sorted(xterm,key=lambda x:x[2],reverse=True) # 按列表的第三个元素排序
for ls in xnumber:
    newsheet.append(ls)#表格中写入行
i=1
#对每个单元格进行格式设置
for eachCommonRow in newsheet.iter_rows(min_row=1,min_col=1,max_row=7,max_col=3):#
    for eachCellInCol in eachCommonRow:
        if i==1:
            eachCellInCol.font = fontYahei14  # 字体设置
            eachCellInCol.fill = commonFill #颜色填充
        elif i==2:
            eachCellInCol.font = Font(name=u'微软雅黑', bold=True, size=12)  # 字体设置
            eachCellInCol.fill = commonFill
        else:
            eachCellInCol.font = fontYahei12  # 字体设置
        eachCellInCol.alignment = alignmentCenter #居中
        eachCellInCol.border=allBlackThinBorder #边框设置
    i=i+1

######
#第二个表格
sheet2=newwb.create_sheet(title="Sheet2", index=1)
#表头
sheet2.column_dimensions["A"].width=15 #列宽设置
sheet2.column_dimensions["B"].width=15
sheet2.column_dimensions["C"].width=20

sheet2["A1"]="汇总表(按推荐数量排序)"#total_list[0][0]
sheet2.merge_cells("A1:C1")
sheet2["A2"]="推荐人姓名"
sheet2["B2"]="推荐数量"
sheet2["C2"]="累计合同总价(万)"
yterm=sorted(result,key=lambda x:x[2],reverse=True) # 按列表的第3个元素排序
ymoney=sorted(yterm,key=lambda x:x[1],reverse=True) # 按列表的第二个元素排序
for ls in ymoney:
    sheet2.append(ls)
i=1
#对每个单元格进行格式设置
for eachCommonRow in sheet2.iter_rows(min_row=1,min_col=1,max_row=7,max_col=3):#
    for eachCellInCol in eachCommonRow:
        if i==1:
            eachCellInCol.font = fontYahei14  # 字体设置
            eachCellInCol.fill=commonFill
        elif i==2:
            eachCellInCol.font = Font(name=u'微软雅黑', bold=True, size=12)  # 字体设置
            eachCellInCol.fill = commonFill
        else:
            eachCellInCol.font = fontYahei12  # 字体设置
        eachCellInCol.alignment = alignmentCenter #居中
        eachCellInCol.border=allBlackThinBorder #边框设置
    i=i+1
newwb.save("XXX公司推荐成交明细_final.xlsx")
注意以上代码,格式处理部分参考文献[2],对于自动列宽和行高的处理,目前还没找到办法。
参考文献:
[1] Python进行Excel数据处理. https://blog.csdn.net/wdl1992/article/details/105294976
[2] 用openpyxl去新建excel文件并保存数据和设置单元格样式. https://www.crifan.com/openpyxl_create_excel_file_then_save_data_set_table_cell_style/