深度学习之CNN卷积神经网络详解以及猫狗识别实战
文章目录
- CNN 解决了什么问题?
-
- 需要处理的数据量太大
- 图像简单数字化无法保留图像特征
- 卷积神经网络-CNN 的基本原理
-
- 卷积——提取特征
- 池化层(下采样)——数据降维,避免过拟合
- 全连接层——输出结果
- CNN卷积神经网络学习导图
- 卷积神经网络实战--猫狗识别
-
- 第一步:数据准备
- 第二步:创建训练数据
- 第三步:搭建网络
- 第四步:创建模型
- 第五步:训练模型
- 第六步:测试模型
- 猫狗识别模型训练存储
CNN 解决了什么问题?
在 CNN 出现之前,图像对于人工智能来说是一个难题,有2个原因:
- 图像需要处理的数据量太大,导致成本很高,效率很低
- 图像在数字化的过程中很难保留原有的特征,导致图像处理的准确率不高
下面就详细说明一下这2个问题:
需要处理的数据量太大
图像是由像素构成的,每个像素又是由颜色构成的

现在随随便便一张图片都是 1000×1000 像素以上的, 每个像素都有RGB 3个参数来表示颜色信息。
假如我们处理一张 1000×1000 像素的图片,我们就需要处理3百万个参数!
1000×1000×3=3,000,000
这么大量的数据处理起来是非常消耗资源的,而且这只是一张不算太大的图片!
卷积神经网络 – CNN 解决的第一个问题就是「将复杂问题简化」,把大量参数降维成少量参数,再做处理。
更重要的是:我们在大部分场景下,降维并不会影响结果。比如1000像素的图片缩小成200像素,并不影响肉眼认出来图片中是一只猫还是一只狗,机器也是如此。
保留图像特征
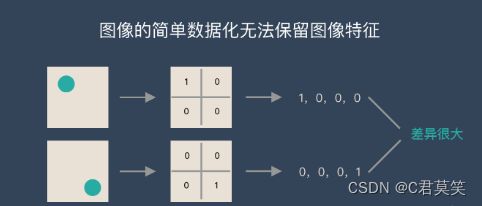
图片数字化的传统方式我们简化一下,就类似下图的过程:
图像简单数字化无法保留图像特征
假如有圆形是1,没有圆形是0,那么圆形的位置不同就会产生完全不同的数据表达。但是从视觉的角度来看,图像的内容(本质)并没有发生变化,只是位置发生了变化。
所以当我们移动图像中的物体,用传统的方式的得出来的参数会差异很大!这是不符合图像处理的要求的。
而 CNN 解决了这个问题,他用类似视觉的方式保留了图像的特征,当图像做翻转,旋转或者变换位置时,它也能有效的识别出来是类似的图像。
卷积神经网络-CNN 的基本原理
典型的 CNN 由3个部分构成:
- 卷积层
- 池化层
- 全连接层
如果简单来描述的话
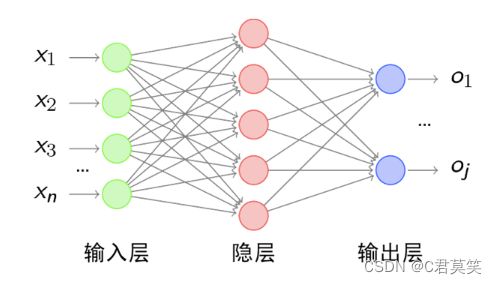
卷积层负责提取图像中的局部特征;池化层用来大幅降低参数量级(降维);全连接层类似传统神经网络的部分,用来输出想要的结果。

卷积——提取特征
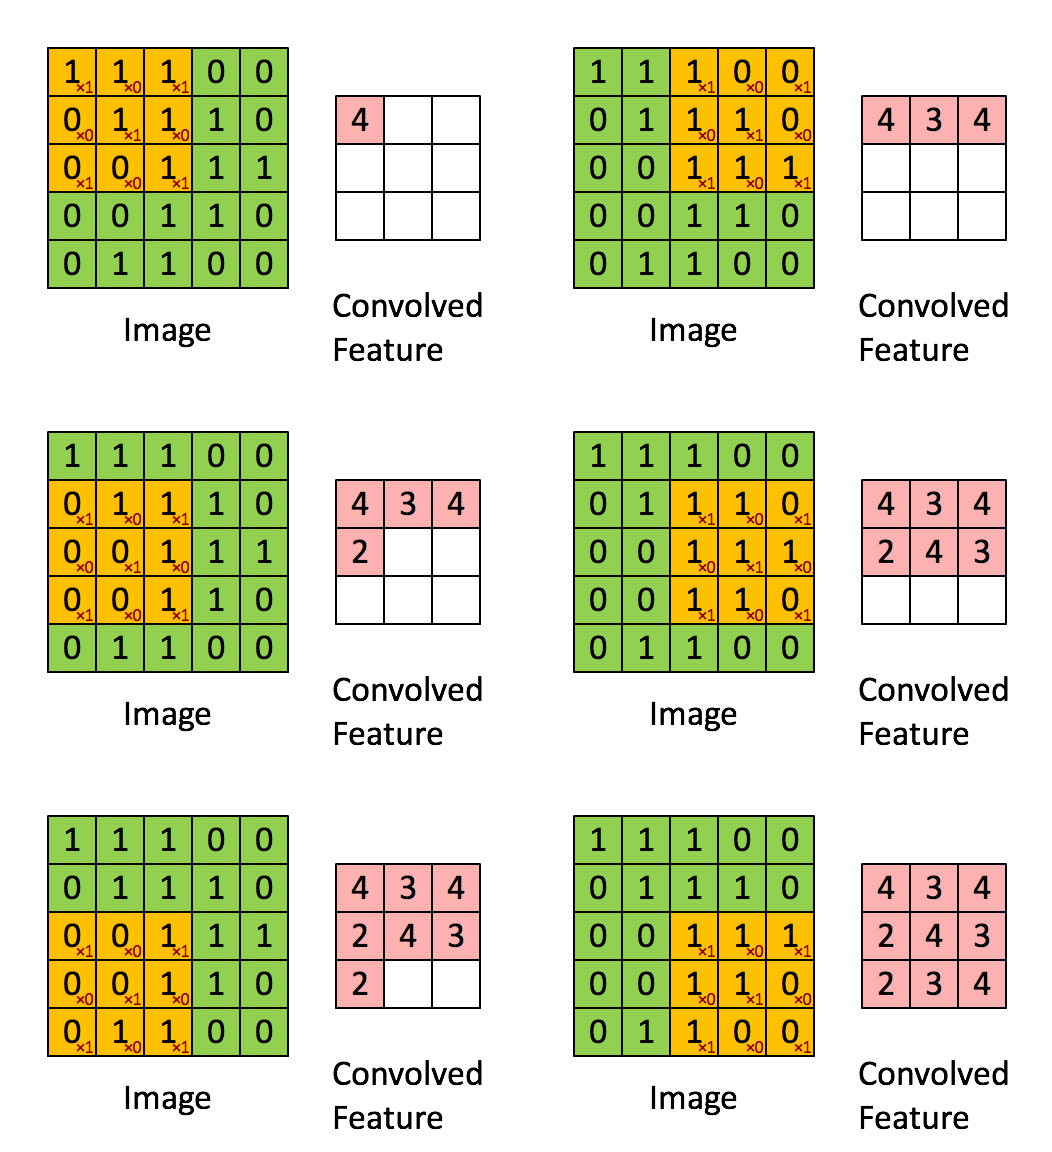
卷积层的运算过程如下图,用一个卷积核扫完整张图片:

这个过程我们可以理解为我们使用一个过滤器(卷积核)来过滤图像的各个小区域,从而得到这些小区域的特征值。
总结:卷积层的通过卷积核的过滤提取出图片中局部的特征
池化层(下采样)——数据降维,避免过拟合
池化层简单说就是下采样,他可以大大降低数据的维度。其过程如下

上图中,我们可以看到,原始图片是20×20的,我们对其进行下采样,采样窗口为10×10,最终将其下采样成为一个2×2大小的特征图。
之所以这么做的原因,是因为即使做完了卷积,图像仍然很大(因为卷积核比较小),所以为了降低数据维度,就进行下采样。
总结:池化层相比卷积层可以更有效的降低数据维度,这么做不但可以大大减少运算量,还可以有效的避免过拟合。
全连接层——输出结果
这个部分就是最后一步了,经过卷积层和池化层处理过的数据输入到全连接层,得到最终想要的结果。
经过卷积层和池化层降维过的数据,全连接层才能”跑得动”,不然数据量太大,计算成本高,效率低下。

典型的 CNN 并非只是上面提到的3层结构,而是多层结构,例如 LeNet-5 的结构就如下图所示:
卷积层 – 池化层- 卷积层 – 池化层 – 卷积层 – 全连接层

CNN卷积神经网络学习导图
卷积神经网络实战–猫狗识别
第一步:数据准备
第二步:创建训练数据
标记猫狗数据,如果是多类数据根据实际分类数量进行区分 [1,0,0,…],[0,1,0,…]
def label_img(img):
    word_lable = img.split('.')[0]
    if word_lable == "cat":
        return [1, 0]
    elif word_lable == "dog":
        return [0, 1]
对猫狗图片进行处理,图片进行统一裁剪标记,数据数据导出到mark_train_data.npy文件中,方便后期进行训练学习。
# 创建训练数据
def create_train_data():
    training_data = []
    for img_path in tqdm(os.listdir(TRAIN_DIR)):
        label = label_img(img_path)
        path = os.path.join(TRAIN_DIR, img_path)
        # 单通道
        img = cv2.imread(path, cv2.IMREAD_GRAYSCALE)
        if img is not None:
            img = cv2.resize(img, (IMAGE_SIZE, IMAGE_SIZE))
            training_data.append([np.array(img), np.array(label)])
    shuffle(training_data)
    np.save('mark_train_data.npy', training_data)
    return training_data
第三步:搭建网络
如需提高模型精度,可以增加输入层层数
# 搭建网络
# 输入层
conv_input = input_data([None, IMAGE_SIZE, IMAGE_SIZE, 1], name="input")
# 第一层神经网络 输入数据,输出高度,卷积核大小,
conv1 = conv_2d(conv_input, 32, 5, activation="relu")
pool1 = max_pool_2d(conv1, 2)
# 第二层神经网络 输入数据,输出高度,卷积核大小,
conv2 = conv_2d(pool1, 64, 5, activation="relu")
pool2 = max_pool_2d(conv2, 2)
# 第三层神经网络 输入数据,输出高度,卷积核大小,
conv3 = conv_2d(pool2, 1024, 5, activation="relu")
pool3 = max_pool_2d(conv3, 2)

# 全连接层 输入  输出  激活 主要特征提取
fully1 = fully_connected(pool3, 1024, activation="relu")
fully1_drop = dropout(fully1, 0.6)
# 全连接层 分类   猫狗--2类
fully2 = fully_connected(fully1_drop, 2, activation="softmax")

# 构建损失函数 梯度下降算法

model_net = regression(fully2, optimizer='adam',
                       loss='categorical_crossentropy',
                       learning_rate=0.00001,
                       name="model_net")
第四步:创建模型
# 创建模型
model = tflearn.DNN(model_net, tensorboard_dir='log')
第五步:训练模型
进行加载训练数据,划分测试集,训练集,训练保存猫狗模型。
train_data = np.load('mark_train_data.npy', allow_pickle=True)
train = train_data[:-30]
test = train_data[-30:]

X = np.array([i[0] for i in train]).reshape((-1, IMAGE_SIZE, IMAGE_SIZE, 1))
Y = [i[1] for i in train]

test_x = np.array([i[0] for i in test]).reshape((-1, IMAGE_SIZE, IMAGE_SIZE, 1))
test_y = [i[1] for i in test]


# 训练模型
model.fit({'input': X},
          {'model_net': Y},
          n_epoch=2,
          validation_set=({'input': test_x},
                          {'model_net': test_y}),
          snapshot_step=10,
          show_metric=True,
          run_id="model_class"
          )

model.save(MODEL_NAME)
第六步:测试模型
加载训练好的猫狗模型,进行猫狗图片预测
from tflearn.layers.conv import conv_2d,max_pool_2d
from tflearn.layers.core import input_data, fully_connected,dropout
from tflearn.layers.estimator import regression
import tflearn
import cv2
from tqdm import tqdm
import os
import numpy as np
from random import shuffle

IMG_SIZE = 50
TRAIN_DIR = 'train'
MODEL_NAME = 'model/cat-dog.model'

# 搭建网络
# 输入层
conv_input = input_data([None,IMG_SIZE,IMG_SIZE,1], name='input')

# 输入数据,输出高度,卷积核大小,
conv1 = conv_2d(conv_input, 32, 5, activation='relu')
conv1 = max_pool_2d(conv1,2)

# 第二层神经网络
conv2 = conv_2d(conv1, 64, 5, activation='relu')
conv2 = max_pool_2d(conv2,2)

# 第三层神经网络 输入数据,输出高度,卷积核大小,
conv3 = conv_2d(conv2, 1024, 5, activation="relu")
conv3 = max_pool_2d(conv3, 2)


# 全连接层
full_layer1 = fully_connected(conv3,1024, activation='relu')
full_layer1 = dropout(full_layer1,0.6)

full_layer2 = fully_connected(full_layer1,2,activation='softmax')

lr = 1e-4
# 设置损失函数和优化器
model_net = regression(full_layer2,
                       optimizer='adam',
                       learning_rate=lr,
                       loss='categorical_crossentropy',
                       name='model_net')
# 创建模型
model = tflearn.DNN(model_net,tensorboard_dir='log')

# 加载模型
model.load(MODEL_NAME)

def classify(img_path):
    img = cv2.imread(img_path, cv2.IMREAD_GRAYSCALE)
    if img is not None:
        img = cv2.resize(img, (IMG_SIZE, IMG_SIZE))
    data = img.reshape(-1,IMG_SIZE, IMG_SIZE, 1)
    return data

prect = model.predict(classify('train/cat.1.jpg'))[0]
prect = np.argmax(prect)
if prect==0:
    print("cat")
elif prect==1:
    print("dog")
猫狗识别模型训练存储
import os
from random import shuffle

from tqdm import tqdm
import tflearn
from tflearn.layers.conv import conv_2d, max_pool_2d
from tflearn.layers.core import input_data, dropout, fully_connected
from tflearn.layers.estimator import regression
import numpy as np
import cv2

IMAGE_SIZE = 50
TRAIN_DIR = "train"
MODEL_NAME = "model/cat-dog.model"

# 搭建网络
# 输入层
conv_input = input_data([None, IMAGE_SIZE, IMAGE_SIZE, 1], name="input")
# 第一层神经网络 输入数据,输出高度,卷积核大小,
conv1 = conv_2d(conv_input, 32, 5, activation="relu")
pool1 = max_pool_2d(conv1, 2)
# 第二层神经网络 输入数据,输出高度,卷积核大小,
conv2 = conv_2d(pool1, 64, 5, activation="relu")
pool2 = max_pool_2d(conv2, 2)
# 第三层神经网络 输入数据,输出高度,卷积核大小,
conv3 = conv_2d(pool2, 1024, 5, activation="relu")
pool3 = max_pool_2d(conv3, 2)
# 全连接层 输入  输出  激活 主要特征提取
fully1 = fully_connected(pool3, 1024, activation="relu")
fully1_drop = dropout(fully1, 0.6)
# 全连接层 分类   猫狗--2类
fully2 = fully_connected(fully1_drop, 2, activation="softmax")
# 构建损失函数 梯度下降算法
model_net = regression(fully2, optimizer='adam',
                       loss='categorical_crossentropy',
                       learning_rate=0.00001,
                       name="model_net")
# 创建模型
model = tflearn.DNN(model_net, tensorboard_dir='log')

def label_img(img):
    word_lable = img.split('.')[0]
    if word_lable == "cat":
        return [1, 0]
    elif word_lable == "dog":
        return [0, 1]
# 创建训练数据
def create_train_data():
    training_data = []
    for img_path in tqdm(os.listdir(TRAIN_DIR)):
        label = label_img(img_path)
        path = os.path.join(TRAIN_DIR, img_path)
        # 单通道
        img = cv2.imread(path, cv2.IMREAD_GRAYSCALE)
        if img is not None:
            img = cv2.resize(img, (IMAGE_SIZE, IMAGE_SIZE))
            training_data.append([np.array(img), np.array(label)])
    shuffle(training_data)
    np.save('mark_train_data.npy', training_data)
    return training_data
# train = create_train_data()

train_data = np.load('mark_train_data.npy', allow_pickle=True)

train = train_data[:-30]
test = train_data[-30:]

X = np.array([i[0] for i in train]).reshape((-1, IMAGE_SIZE, IMAGE_SIZE, 1))
Y = [i[1] for i in train]

test_x = np.array([i[0] for i in test]).reshape((-1, IMAGE_SIZE, IMAGE_SIZE, 1))
test_y = [i[1] for i in test]

# 训练模型
model.fit({'input': X},
          {'model_net': Y},
          n_epoch=2,
          validation_set=({'input': test_x},
                          {'model_net': test_y}),
          snapshot_step=10,
          show_metric=True,
          run_id="model_class"
          )

model.save(MODEL_NAME)


