Python爬虫 之 破解 cookie 代理 验证码 实战
破解 cookie 代理 验证码
-
- cookie
-
- cookie简介
- 破解cookie方法
- 代理(了解即可)
-
- 认识代理
- 封ip展示
- 代理代码实现
-
- 封装代理池
- 代理proxies参数
- 破解验证码1(超级鹰)
- 破解验证码2(免费库)
- 模拟登陆(三种反反爬机制应用)
-
- 目的和界面存在的请求反爬说明
-
- 目的
- 请求界面
- 简单的思路
- 代码实现
- 讲解下下
-
- 讲解【1】【2】
- 讲解【3】
- 讲解【4】
- 讲解【5】【6】
完整版!!!!!!
完整版!!!!!!
完整版!!!!!!
完整版
cookie
cookie简介
Cookie:
类型为“小型文本文件”,是某些网站为了辨别用户身份,进行Session跟踪而储存在用户本地终端上的数据(通常经过加密),由用户客户端计算机暂时或永久保存的信息
cookie和爬虫关系
- cookie不仅可以用于为服务器的用户身份信息储存和状态保持,还能够用于在爬虫大部分的反爬,在默认情况下爬虫只能请求 html文本资源,这意味着他们并不会主动完成浏览器保存cookie的操作,cookie反爬正是利用了这个特点。
- sometimes,对一张页面进行数据请求的时候,如果请求的过程中不携带cookie的话,那么我们将无法请求正确的页面数据
破解cookie方法
- 手动破解
- 自动破解
cookie实验雪球网站
先进行页面的分析:
- 相关的更多资讯数据是动态下载,滑轮滚动到底部的时候,会动态加载出更多的资讯信息。
- 定位到ajax的数据包,提取出其请求的url,响应数据为json的资讯信息。(我们仅仅存储不解析用text)
先进行常规化运行:
#我想这段代码对现在的你来说非常简单了
import requests
header = {
    "User-Agent": "Mozilla/5.0 (Windows NT 10.0; WOW64) AppleWebKit/537.36 (KHTML, like Gecko) Chrome/84.0.4147.89 Safari/537.36 SLBrowser/7.0.0.5211 SLBChan/25"
}
url='https://stock.xueqiu.com/v5/stock/batch/quote.json?symbol=SH000001,SZ399001,SZ399006,SH000688,HKHSI,HKHSCEI,HKHSCCI,.DJI,.IXIC,.INX'
data=requests.get(url=url,headers=header).text
fp=open('test_1.html',mode="w+",encoding='utf-8')
fp.write(data)
fp.close()
结果:
![]()
说明我们请求数据失败?
这是为什么呢?就是因为cookie反爬机制,导致没有完全按照浏览器的模式发起请求

破解cookie方法
- 手动添加(将cookie粘贴到header中,但是由于cookie是动态变化的,所以在以后运行中要时常修改,所以不推荐)
header = {
    "User-Agent": "Mozilla/5.0 (Windows NT 10.0; WOW64) AppleWebKit/537.36 (KHTML, like Gecko) Chrome/84.0.4147.89 Safari/537.36 SLBrowser/7.0.0.5211 SLBChan/25"
    ,"cookie":'xq_a_token=f257b9741beeb7f05f6296e58041e56c810c8ef8; xqat=f257b9741beeb7f05f6296e58041e56c810c8ef8; xq_r_token=2e05f6c50e316248a8a08ab6a47bc781da7fddfb; xq_id_token=eyJ0eXAiOiJKV1QiLCJhbGciOiJSUzI1NiJ9.eyJ1aWQiOi0xLCJpc3MiOiJ1YyIsImV4cCI6MTYyNjQwMzgwNSwiY3RtIjoxNjI0NjgyNTExNTU2LCJjaWQiOiJkOWQwbjRBWnVwIn0.ZcR2iu9_EQY9BS39IaJ7BKWuzw5yXfBah5qcJjgS0jXdtxa6zMpY3iyl-Zm4hWuGaUpmLEae-0w3PyNly2tFQcG68pblyk7cDcD35gBTfoGs0X2xiNIvkgllqmiSh4-0jCxxdUJaFHGNFccXbWv7vKcfJyEB0TeADXU_v-tF3thqO6m3TRX5EyI8fiFyK-lFc97qhbVHXc2qG5YSYH08eRg1vP2wkRt3r9UeJ9ueYWaajR2YUu7nFFj04Wh2yhBnRj8tMy_2LWOrAvVwNaPJTGA1aH0BQhBCDbxn2foIMiR6w0agM2abgQ2YVNcUNjftIDH0H6Q_-iuDDE-sHMOqSg; u=201624682553499; device_id=24700f9f1986800ab4fcc880530dd0ed; Hm_lvt_1db88642e346389874251b5a1eded6e3=1624682555; Hm_lpvt_1db88642e346389874251b5a1eded6e3=1624683253'
}
- 自动添加cookie(基于Session实现)
Session可以向requests一样调用get,post发起指令,只不过如果在使用它的时候,发起请求的过程中如果存在cookie,cookie就会被自动存储在Session的对象中,那么下次再出现的时候就会自动发起,则就相当于自动携带当前cookie
Session在调用时至少被调用两次:
第一次是使用Session是为了将cookie捕获且储存在Session中
第二次是用携带者cookie的Session发起get,post请求
import requests
header = {
    "User-Agent": "Mozilla/5.0 (Windows NT 10.0; WOW64) AppleWebKit/537.36 (KHTML, like Gecko) Chrome/84.0.4147.89 Safari/537.36 SLBrowser/7.0.0.5211 SLBChan/25"
   }
#关于url_1和url_2后面说明
url_1='https://xueqiu.com/'
url_2='https://stock.xueqiu.com/v5/stock/batch/quote.json?symbol=SH000001,SZ399001,SZ399006,SH000688,HKHSI,HKHSCEI,HKHSCCI,.DJI,.IXIC,.INX'

#Session创建对象
session=requests.Session()
#将cookie存储在Session中
session.get(url=url_1,headers=header)
#用存储cookie后的Session进行get请求
data=session.get(url=url_2,headers=header).text
fp=open('test_1.html',mode="w+",encoding='utf-8')
fp.write(data)
fp.close()
对于url_1和url_2为什么是这样的?

对于url_1:
是总界面网址
对于url_2:
是阿贾克斯数据包的url
代理(了解即可)
认识代理
所谓的代理就是指代理服务器,代理服务器就可以用来转发请求和响应数据
一般流程:
用户(用自己的IP地址)—>服务器
代理后:
用户—>代理(用别人的IP)—>服务器
代理作用
- 如果我们的爬虫在短时间内对于服务器发起了高频的请求,那么服务器就会检测到这样的一个异常的行为请求,就会将该请求对应的设备的IP地址禁掉,那么这个用户设备就无法对于服务器端再一次发起请求。
- 如果IP地址被禁用后,我们就可以使用代理服务器进行请求转发,破解IP被禁的反爬机制,因为使用代理的服务器端发起请求对应的IP地址就是代理服务器,而不是我们真正的客户的IP地址
代理服务器的分类
- 透明代理:如果使用了该形式的代理服务器端知道你使用的代理机制,也知道你的真实IP
- 匿名代理:知道你是代理,但不知道真实IP
- 高匿代理:不知道你使用的代理,也不知道你的真实IP
代理类型
- https:代理只能转发https协议的请求
- http:代理http的请求
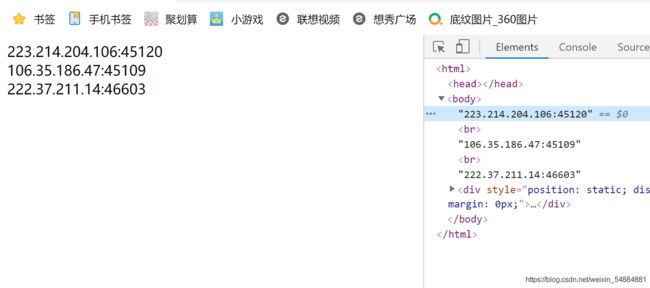
封ip展示
代理代码实现
封装代理池
from lxml import etree
import requests

header = {
    "User-Agent": "Mozilla/5.0 (Windows NT 10.0; WOW64) AppleWebKit/537.36 (KHTML, like Gecko) Chrome/84.0.4147.89 Safari/537.36 SLBrowser/7.0.0.5211 SLBChan/25"
}
# 生成ip的地址位置
url = 'http://t.ipjldl.com/index.php/api/entry?method=proxyServer.generate_api_url&packid=1&fa=0&fetch_key=&groupid=0&qty=3&time=1&pro=&city=&port=1&format=html&ss=5&css=&dt=1&specialTxt=3&specialJson=&usertype=14'
# 页面数据读取
IP_text = requests.get(url=url, headers=header).text
# 解析ip
IP_tree = etree.HTML(IP_text)
# xpath不要有body或者tbody的标签
IP_list = IP_tree.xpath('/html//text()')
# 封装的结果要求为字典,因为后续使用需要用字典
IP_https_list = []  # 代理池(存储ip字典的列表)
for i in IP_list:
    dic = {
        "https//": i
    }
    IP_https_list.append(dic)

IP_https_list就是我们分装的IP结果:
[{'https//': '14.134.200.213:21515'},
 {'https//': '183.165.193.232:38033'},
 {'https//': '115.219.1.64:45141'}]
代理proxies参数
(主要看get那句代码,实际上就一个参数罢了,跟cookie无关)
from lxml import etree
import requests
import random
header = {
    "User-Agent": "Mozilla/5.0 (Windows NT 10.0; WOW64) AppleWebKit/537.36 (KHTML, like Gecko) Chrome/84.0.4147.89 Safari/537.36 SLBrowser/7.0.0.5211 SLBChan/25"
}
# 生成ip的地址位置
url = 'http://ip.ipjldl.com/index.php/api/entry?method=proxyServer.generate_api_url&packid=1&fa=0&fetch_key=&groupid=0&qty=3&time=1&pro=&city=&port=1&format=html&ss=5&css=&dt=1&specialTxt=3&specialJson=&usertype=14'
# 页面数据读取
IP_text = requests.get(url=url, headers=header).text
# 解析ip
IP_tree = etree.HTML(IP_text)
IP_list = IP_tree.xpath('/html//text()')
# 封装的结果要求为字典,因为后续使用需要用字典
IP_https_list = []  # 存储ip字典的列表
for i in IP_list:
    dic = {
        "https//": i
    }
    IP_https_list.append(dic)


url_1 = 'https://xueqiu.com/'
url_2 = 'https://stock.xueqiu.com/v5/stock/batch/quote.json?symbol=SH000001,SZ399001,SZ399006,SH000688,HKHSI,HKHSCEI,HKHSCCI,.DJI,.IXIC,.INX'

session = requests.Session()
session.get(url=url_1, headers=header)

# 代理池的使用
data = session.get(url=url_2
                   , headers=header
                   , proxies=random.choice(IP_https_list)
                   #由于代码的运行速度较快,
                   #为了防止浏览器察觉短时间内同一个IP大量访问
                   #那么我们就要在我们所申请的所有IP中随机选择进行爬取数据
                   # 注意proxies指IP地址格式为字典
                   #这也正是为什么要在生成代理池的时候列表元素为字典
                   #{'https//': '139.213.1.43:45139'}
                   # 或者{'http//': '139.213.1.43:45139'}
                   #根据网址类型确定
                   ).text  # .encode('iso-8859-1')

fp = open('test_1.html', mode="w+", encoding='utf-8')
fp.write(data)
fp.close()
print('over')
破解验证码1(超级鹰)
在我们以后爬取数据需要模拟登陆的时候,由于一些网站设置了一些验证码,所以我们要通过一些算法来对于验证码自动识别,但是由于需要用到机器学习的卷积神经网络,那方面的知识比较难理解,所以在这里我们暂时用基于线上的打码平台来识别验证码。
超级鹰打卡平台
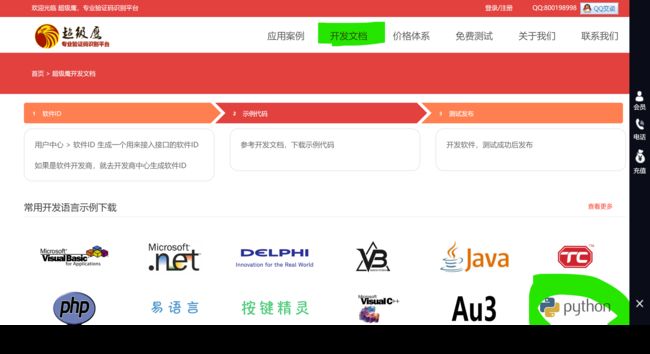
- 注册
- 创建软件ID
- 下载示例代码
- 讲代码封装成函数
#该段代码不能直接运行,要申请后才能够使用。
import requests
from hashlib import md5

class Chaojiying_Client(object):

    def __init__(self, username, password, soft_id):
        self.username = username
        password =  password.encode('utf8')
        self.password = md5(password).hexdigest()
        self.soft_id = soft_id
        self.base_params = {
            'user': self.username,
            'pass2': self.password,
            'softid': self.soft_id,
        }
        self.headers = {
            'Connection': 'Keep-Alive',
            'User-Agent': 'Mozilla/4.0 (compatible; MSIE 8.0; Windows NT 5.1; Trident/4.0)',
        }

    def PostPic(self, im, codetype):
        """
        im: 图片字节
        codetype: 题目类型 参考 http://www.chaojiying.com/price.html
        """
        params = {
            'codetype': codetype,
        }
        params.update(self.base_params)
        files = {'userfile': ('ccc.jpg', im)}
        r = requests.post('http://upload.chaojiying.net/Upload/Processing.php', data=params, files=files, headers=self.headers)
        return r.json()

    def ReportError(self, im_id):
        """
        im_id:报错题目的图片ID
        """
        params = {
            'id': im_id,
        }
        params.update(self.base_params)
        r = requests.post('http://upload.chaojiying.net/Upload/ReportError.php', data=params, headers=self.headers)
        return r.json()


def transform_image(img_path,img_type):
    chaojiying = Chaojiying_Client('*********'#账号
    								,'**********'#密码
    								, '*****'#软件ID
    								)
    im = open(img_path, 'rb').read()
    print(chaojiying.PostPic(im,img_type))
    return chaojiying.PostPic(im,img_type)


#调用
transform_image("a.jpg"# 图片地址
				,'1902'# 验证码内容类型
				)
transform_image("a.jpg",'1902')
#返回:
{'err_no': 0, 'err_str': 'OK', 'pic_id': '9145318376569800001', 'pic_str': '7261', 'md5': '93f225ee9896b4b8bd23ff17fbba481e'}

#即
transform_image("a.jpg",'1902')['pic_str']
#就是我们所想要的验证码结果
破解验证码2(免费库)
详见:
反爬总结的简单文本图片化
关于如何自行精准实现训练识别模型,近期博主也在学习机器学习和深度学习,等到完成了卷积神经网络算法模型,再来补充关于独自完成验证码识别的卷积算法。
模拟登陆(三种反反爬机制应用)
古诗文网址
目的和界面存在的请求反爬说明
目的
在古诗文原始网址界面,通过模拟登录的方式进入到界面中并爬取我的收藏中的《木兰花·拟古决绝词柬友 - 纳兰性德》这首诗文的文字内容。
请求界面
1.登录前的界面:

2.登录后的界面:

由于在没有登录的情况下,我们不能看到网址界面登录的参数,所以在进行模拟登录之前,我们要先进入到网站之中,看一下他的请求方式以及请求参数。这里我们发现前两个我们不知道的参数,第3个是网址,第4个为ID账号,第5个为账号密码,第6个为验证码,第7个为状态。并且在这一栏中,也可以看到存在cookie(并未截屏展示)
简单的思路
首先我们通过get的请求爬取到验证码数据,然后对于验证码进行识别,再通过post的请求模拟登录,然后再从登录的界面中解析出我们想要诗文的网址,最后在诗文中解析我们想要的数据即诗文内容。
代码实现
# 该段代码基于第三方工具,所以需要申请后才能运行
# 我你没有公开我的超级鹰账号,孩子钱不多,一分也心疼

from lxml import etree
import requests
from hashlib import md5

class Chaojiying_Client(object):

    def __init__(self, username, password, soft_id):
        self.username = username
        password = password.encode('utf8')
        self.password = md5(password).hexdigest()
        self.soft_id = soft_id
        self.base_params = {
            'user': self.username,
            'pass2': self.password,
            'softid': self.soft_id,
        }
        self.headers = {
            'Connection': 'Keep-Alive',
            'User-Agent': 'Mozilla/4.0 (compatible; MSIE 8.0; Windows NT 5.1; Trident/4.0)',
        }

    def PostPic(self, im, codetype):
        """
        im: 图片字节
        codetype: 题目类型 参考 http://www.chaojiying.com/price.html
        """
        params = {
            'codetype': codetype,
        }
        params.update(self.base_params)
        files = {'userfile': ('ccc.jpg', im)}
        r = requests.post('http://upload.chaojiying.net/Upload/Processing.php', data=params, files=files,
                          headers=self.headers)
        return r.json()

    def ReportError(self, im_id):
        """
        im_id:报错题目的图片ID
        """
        params = {
            'id': im_id,
        }
        params.update(self.base_params)
        r = requests.post('http://upload.chaojiying.net/Upload/ReportError.php', data=params, headers=self.headers)
        return r.json()


def transform_image(img_path, img_type):
    chaojiying = Chaojiying_Client('*********'#账号
    								,'**********'#密码
    								, '*****'#软件ID
    								)
    im = open(img_path, 'rb').read()  # 本地图片文件路径 来替换 a.jpg 有时WIN系统须要//
    # print(chaojiying.PostPic(im, img_type))
    return chaojiying.PostPic(im, img_type)


header = {
    "User-Agent": "Mozilla/5.0 (Windows NT 10.0; WOW64) AppleWebKit/537.36 (KHTML, like Gecko) Chrome/84.0.4147.89 Safari/537.36 SLBrowser/7.0.0.5211 SLBChan/25"
}

# 登录界面的URL,用来获取cookie  讲解【1】
url_1 = 'https://so.gushiwen.cn/user/login.aspx?from=http://so.gushiwen.cn/user/collect.aspx'
# 破解登录后界面cookie实例化的Session
session = requests.Session()
# 获取cookie
session.post(url=url_1, headers=header)
# 爬取页面数据,为了获得验证码的图片来进行识别。
data_text = session.get(url=url_1, headers=header).text
# 解析出图片的地址  讲解【2】
verification_code_loc = etree.HTML(data_text).xpath('//*[@id="imgCode"]/@src')[0]

# 解析出"__VIEWSTATEGENERATOR"值  讲解【3】
value_2=etree.HTML(data_text).xpath('//*[@id="__VIEWSTATEGENERATOR"]/@value')[0]

# 解析出'__VIEWSTATE'的值在抓包工具中  讲解【3】
url='https://so.gushiwen.cn/user/login.aspx?from=http://so.gushiwen.cn/user/collect.aspx'
data_value_1=session.get(url=url,headers=header).text
value_1=etree.HTML(data_value_1).xpath('//input[@type="hidden"]/@value')[0]

# 使图片的地址完整化
url_picture = 'https://so.gushiwen.cn' + verification_code_loc
# 获取地址并保存,以便后续的识别
picture_data = session.get(url=url_picture, headers=header).content
fp = open('verification_code.jpg', mode='wb')
fp.write(picture_data)
fp.close()


# 识别验证码
verification_code = transform_image("verification_code.jpg", '1902')['pic_str']

# post请求参数 讲解【3】
data = {
    '__VIEWSTATE': value_1#'H6CNx6yKkOz0Nj0aTjCbJ+U7TJhFODuwSEoxWvQpLEUjPo1hy2A5584SXJ/zHte2WKaA7R9KfvN6s9QXVDrRlIi+5I7WTOGrXulP7pbp4w4AGR9GsKb2HiXuB8Q='
    , '__VIEWSTATEGENERATOR': value_2#'C93BE1AE'
    , 'from': 'http://so.gushiwen.cn/user/collect.aspx'
    , 'email': "19544578749"
    , "pwd": 'dfx237874'
    , 'code': verification_code
    , 'denglu': '登录'
}
# 这这句代码表示登录界面后,直接爬取登录界面的数据。
intend_data = session.post(url=url_1, data=data, headers=header).text
# 解析出《木兰花·拟古决绝词柬友》地址为进一步爬取  讲解【4】
content_loc = etree.HTML(intend_data).xpath('//*[@id="mainSearch"]/div[2]/div/div/a/@href')[0]
# 到这里我们已经拿到了我们想要文本的地址
# 但是我们发现该地址也有一个cookie
# 并不同于session那个cookie
# 所以在这里我们要重新实例化Session命名session_1


session_1 = requests.Session()
# 获取cookie的地址  讲解【5】
url_2 = 'https://so.gushiwen.cn/shiwenv_85e93138ed65.aspx'
# 获取cookie
session_1.get(url=url_2, headers=header)
# 获取诗文网址的数据。
content_data = session_1.get(url=url_2, headers=header).text
# 解析出《木兰花·拟古决绝词柬友》文本内容   讲解【6】
data = etree.HTML(content_data).xpath(
    '//*[@id="sonsyuanwen"]/div[1]/h1/text() | //*[@id="contson85e93138ed65"]//text()')
# 打印结果
print(data[0] + data[1] + '\n' + data[2])

"""
结果:

木兰花·拟古决绝词柬友
人生若只如初见,何事秋风悲画扇。等闲变却故人心,却道故人心易变。(一作:却道故心人易变)
骊山语罢清宵半,泪雨霖铃终不怨。何如薄幸锦衣郎,比翼连枝当日愿。(一作:泪雨零 / 夜雨霖)
"""
讲解下下
讲解【1】【2】
讲解【3】
除了前两个参数,刚才都已经解释过了,还有前两个我们简单说明一下
这两个参数对于我们来说并没有太大的意义。可以当成两个简单的反爬参数。通过两次或者多次登录,就会发现这两个参数第一个会发生变化,第二个没有变化,也就是说对于第2个参数不一定就必须需要写成动态加载的样子,也可以直接写定,但是还是建议写成动态。
那么问题来了:
写成动态的,在哪去找这些参数呢?
1.一般来说的话,动态变化的请求参数会被隐藏在前台的页面中,那么我们就可以去前台页面源码中去寻找
2.如果前台页面源码中不存在,那么我们就要去包中搜索
这是参数’__VIEWSTATEGENERATOR’即value_2位置(在前台源码中)

但是在前台源码中不存在’__VIEWSTATE’即value_1,那就在包里面搜索并请求数据

注:实际上’__VIEWSTATE’ 和’__VIEWSTATEGENERATOR’两个的值都写成静态也能运行过去,但是我发现确实变化,也不知道这两个值真正代表什么含义。反正动态绝对不会错
讲解【4】
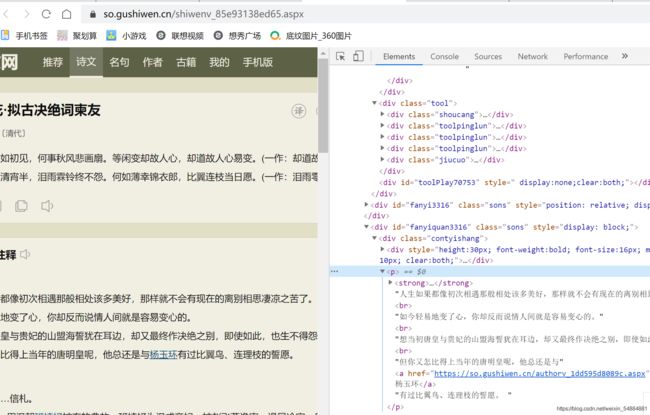
讲解【5】【6】
over again


