基于表情识别的智能灯控-树莓派实现
文章目录
- 前言
- 一、项目简介
-
- 项目思路
- 软硬件清单
- 原理图
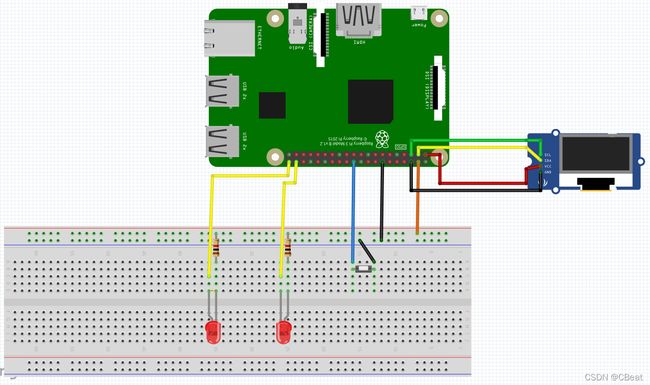
- 接线图
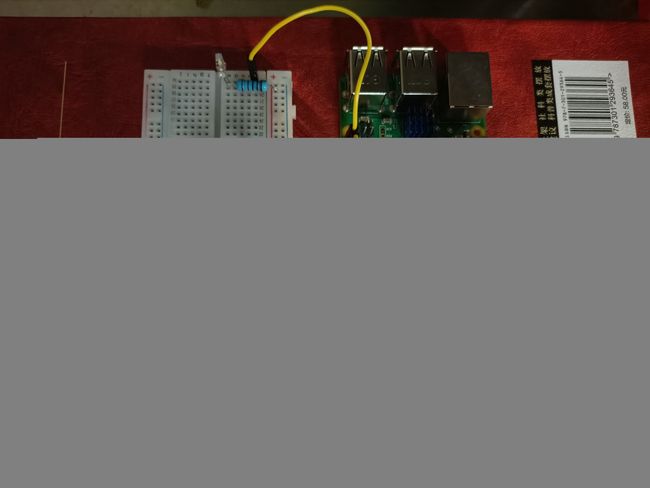
- 实物图
- 二、代码与详解
-
- 1.获取天气、IP模块
- 2.gpio控制模块
- 3.表情识别模块
- 4.oled控制模块
- 5.主程序
- 三、总结
前言
这是我之前做的一个嵌入式课设项目,主要功能就是识别人的表情控制灯具的亮度,表情变化越激烈灯具亮度就越高
依赖的项目有:
- python爬虫综合实战(动态+静态),爬取国内天气
- 深度学习项目,使用python进行表情识别,pytorch应用
依赖的库
- requests
- pytorch
- pandas
- adafruit_ssd1306
- RPi.GPIO(树莓派自带)
- PIL
一、项目简介
项目思路
面部表情识别是深度学习的一种应用,通过这种技术,可以使得机器判断出当前使用者的大致心理状态,以此做出合理的决策。
使用摄像头捕捉面部图片,通过神经网络来对表情进行分类(共7类),将预测结果乘以正规矩阵,可以得到一个0-100的值,以此作为灯具的亮度。
灯具的亮度使用PWM控制
软硬件清单
- Raspberry Pi 3B+(OS:Ubuntu For PI aarch64架构)
- Raspberry Camera Rev1.3
- I2C SSD1306 OLED屏幕(128*64)
- 面包板、电阻、LED若干
原理图
接线图
实物图
二、代码与详解
1.获取天气、IP模块
文件名 data_source.py
"""
获取信息的库
"""
from typing import Union
import subprocess
import json
from typing import Union
import requests
import time

city_weather_url = 'http://www.weatherol.cn/api/home/getCurrAnd15dAnd24h'
user_agent = 'Mozilla/5.0 (Windows NT 10.0; Win64; x64) AppleWebKit/537.36 (KHTML, like Gecko) Chrome/90.0.4430.212 Safari/537.36'


def get_ip() -> Union[None, str]:
    """
    获得IP
    """
    IP = None
    cmd = "hostname -I | cut -d' ' -f1"
    IP = subprocess.check_output(cmd, shell=True).decode("utf-8")
    return IP

# 上一次请求的时间
last_time = 0
# 储存天气
last_weather = None
# 重新请求的时间间隔
recall_time = 60 * 10


def get_weather() -> Union[None, dict]:
    global last_time, last_weather, recall_time
    city_id = '101180301'
    params = {
        'cityid': city_id
    }
    now_time = time.time()

    # 达到重新请求的时间
    if now_time - last_time > recall_time:
        try:
            print('调用了天气接口')
            response = requests.get(url=city_weather_url, headers=get_headers(), params=params, timeout=5)
            weather_json = response.text
            weather_data = json.loads(weather_json)
            weather_dict = parse_data(weather_data)
            # 有网络,调用成功
            last_weather = weather_dict
            recall_time = 60 * 10 # 10分钟后再次请求
        except:
            # 无网络调用失败
            last_weather = None

        last_time = now_time  # 更新时间

        if last_weather == None:
            recall_time = 45 # 请求失败,45秒后再次请求

    return last_weather


def get_headers():
    headers = {
        'user_agent': user_agent
    }
    return headers

def parse_data(weather_data):
    ret_dict = {}
    weather = weather_data['data']['current']['current']['weather']
    ret_dict['temperature'] = weather_data['data']['current']['current']['temperature']
    ret_dict['humidity'] = weather_data['data']['current']['current']['humidity'] + '%'
    ret_dict['air'] = weather_data['data']['current']['air']['AQI']
    # print(weather)
    mapping = {
        '雨': 'rain',
        '阴': 'cloudy',
        '云': 'cloudy',
        '晴': 'fine',
        '雾': 'fog',
        '冰': 'ice',
        '尘': 'sand',
    }
    # 对应出英文
    for key in mapping.keys():
        if key in weather:
            weather = mapping[key]
    ret_dict['weather'] = weather
    return ret_dict


def test():
    print(get_weather())

# test()
该模块可以获取当地的天气
get_weather()函数会返回当地的天气、气温、湿度、温度
该模块在有网络的情况下10分钟刷新一次,无网络则每隔45秒重新请求
在没有达到更新时间的情况下,该模块会返回缓存中的数据
2.gpio控制模块
文件名gpio.py
"""
操作硬件GPIO的库
"""
import RPi.GPIO as GPIO
import time

GPIO.setmode(GPIO.BCM)
LIGHT = 21
ONILEN = 20
LIGHT_PWM = None
ONILEN_PWM = None

def init_gpio():
    """
    初始化使用的GPIO
    """
    global LIGHT_PWM, ONILEN_PWM

    GPIO.setup(LIGHT, GPIO.OUT)
    GPIO.output(LIGHT, GPIO.LOW)
    GPIO.setup(ONILEN, GPIO.OUT)
    GPIO.output(ONILEN, GPIO.HIGH)

    LIGHT_PWM = GPIO.PWM(LIGHT, 100)
    ONILEN_PWM = GPIO.PWM(ONILEN, 0.5)
    ONILEN_PWM.start(80)
    LIGHT_PWM.start(0)


def set_online_led(flag):
    """
    设置网络指示灯亮灭
    """
    # 无网络
    if flag is None:
        # 闪烁指示灯
        ONILEN_PWM.ChangeFrequency(0.5)
    else:
        # 指示灯常亮
        ONILEN_PWM.ChangeFrequency(50)


def set_light_led(level):
    """
    设置灯具亮度
    """
    dc = 100 - level
    LIGHT_PWM.ChangeDutyCycle(dc)


def colse_all():
    """
    清除所有接口设置
    """
    # print('close!!!')
    GPIO.cleanup()
    ONILEN_PWM.stop()
    LIGHT_PWM.stop()
硬件共有两个灯具,主灯具light_led和指示网络状态的灯具online_led,该模块设计的目的就是控制这两个led灯
当网络连接时,online_led常亮,否则闪烁
3.表情识别模块
文件名:
- my_face.py
- my_utils.py
- train_model.py
代码与略,详细见:深度学习项目,使用python进行表情识别,pytorch应用
my_utils中的函数cvt_R2N(result)将神经网络输出的(1*7)的结果加权相加,得出一个在1-100之间的数,以此来决定PWM模块的功率,控制灯具亮度
4.oled控制模块
文件名oled.py
"""
设置OLED显示的库
"""
from board import SCL, SDA
import busio
from PIL import Image, ImageDraw, ImageFont
import adafruit_ssd1306


width = 128
height = 32
i2c = busio.I2C(SCL, SDA)
disp = adafruit_ssd1306.SSD1306_I2C(width, height, i2c)

image = Image.new("1", (width, height))
draw = ImageDraw.Draw(image)
draw.rectangle((0, 0, width, height), outline=0, fill=0)
# font_ch = ImageFont.truetype('./font.ttf', size=10)
font_en = ImageFont.load_default()


x = 0
top = -2


def init_oled():
    """
    初始化OLED
    """
    disp.fill(0)
    init_text = 'loading'
    init_x = (width - len(init_text)) / 2
    init_y = top + height / 2
    draw.text((init_x, init_y), init_text, font=font_en, fill=255)
    disp.image(image)
    disp.show()


def set_status(ip, emotion, level, weather):
    """
    设置显示内容
    """
    # 清空图像
    draw.rectangle((0, 0, width, height), outline=0, fill=0)

    # 设置ip
    ip_status = '>--<'
    ip_body = 'IP:{}'.format(ip)
    # 设置网络显示格式
    if ip is None or weather is None:
        ip_status = '>  <'
        if ip is None:
            ip_body = 'None Ip'

    draw.text((0, top + 0), ip_status + ip_body, font=font_en, fill=255)

    # 设置等级显示
    draw.text((0, top + 8), f'{emotion}', font=font_en, fill=255)
    # draw.text((0, top + 14), '--  ' * level, font=font_en, fill=255)

    # 设置天气显示
    if weather is not None:
        first_line = f"we:{weather['weather']}   tem:{weather['temperature']}"
        second_line = f"hum:{weather['humidity']}   air:{weather['air']}"
        draw.text((0, top + 17), first_line, font=font_en, fill=255)
        draw.text((0, top + 25), second_line, font=font_en, fill=255)

    disp.image(image)
    disp.show()


def quit_oled():
    # 清空图像
    draw.rectangle((0, 0, width, height), outline=0, fill=0)
    draw.text((59, top + 12), 'QUIT', font=font_en, fill=255)
    disp.image(image)
    disp.show()
该模块用来显示设备IP、识别的结果与天气
5.主程序
文件名main.py
from gpio import *
from oled import *
from data_source import *
from my_face import EmotionIdentify
import time
import RPi.GPIO as GPIO
from my_utils import labels, cvt_R2N
import numpy as np
from train_model import FaceCNN
import warnings
warnings.filterwarnings("ignore")


try:

    init_gpio()
    init_oled()
    ei = EmotionIdentify()

    while True:
        # 获得IP
        ip = get_ip()
        # 获得天气
        weather = get_weather()
        # 拍摄图片并预测结果
        result = ei.get_img_and_predict()[1]
        # 将结果转化为数值表示
        level = cvt_R2N(result)
        # 将结果转化为字符串表示
        emotion = labels[np.argmax(result)]
        # 设置网络指示灯
        set_online_led(weather)
        # 设置led亮度
        set_light_led(level)
        # 设置lcd显示
        set_status(ip, emotion, level, weather)

        print(f'{level}:::{emotion}')
        time.sleep(0.5)
except:
    colse_all()
    quit_oled()

colse_all()
quit_oled()
运行结果
三、总结
项目树:
- modles
-
- train_35.pkl
- data_source.py
- gpio.py
- main.py
- my_face.py
- my_utils.py
- oled.py
- train_model.py
我的树莓派用的是ubuntu系统,因为源生的系统装pytorch太麻烦了
装pytorch的时候去官网装,直接pip安装会报错,因为找不到指定的版本
pandas可装可不装,如果你不想装,把train_model.py里train函数给删了,因为用不到
在安装这些库先,保证你的树莓派最少有2G的虚拟分区,如果内存太小无法完成编译


