SpringCloud微服务项目下的权限校验
1.以前的单体架构权限验证
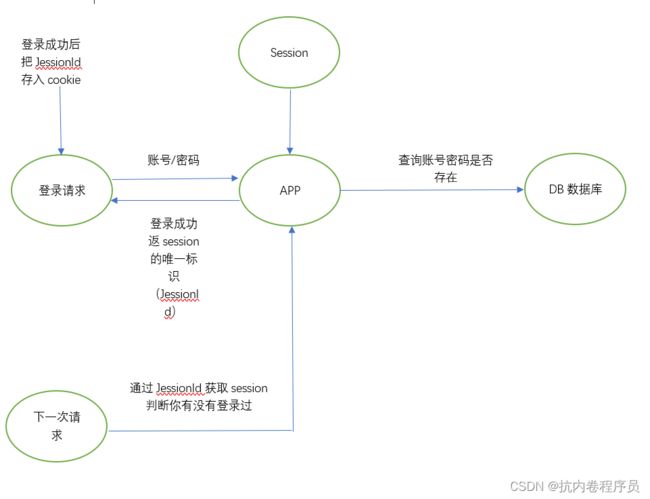
用户登录操作传入用户名和密码,传到后端,后端到DB里查询,如果查到就返回登录成功并把session信息存到内存中并把session的唯一标识(JessionId)返回给我们的浏览器,浏览器就会把我们的JessionId存到cookie里面,当我们下一次请求的时候,一样会被我们的登录拦截器拦截到,然后通过JessionId获取session判断你有没有登录过,如果有就说明你已经登录了,这是我们最传统的基于session的登录校验和登录,参考下图:
传统项目的问题:
1.保存信息到内存,会话保持(session会存储在内存里,如果用户量比较大呢?内存就会被沾满)
2.JessionId存到浏览器cookie里面,如果cookie被拦截就有可能发生CSRF攻击(跨站攻击)
2.单体架构演变分布式架构权限验证
session就不能存在一台主机上了,就会存在第三方存储工具(redis/mongodb/db)
这种架构的缺点:
JessionId和用户信息是绑定的,拿到JessionId就能拿到用户信息,一旦JessionId泄露了,别人就有可能CSRF跨域攻击你服务器
3.OAuth2.0框架为我们提供了4种授权方式
OAuth 引入了一个授权层,用来分离两种不同的角色:客户端和资源所有者。资源所有者同意以后,资源服务器可以向客户端颁发令牌。客户端通过令牌,去请求数据
这段话的意思就是,OAuth 的核心就是向第三方应用颁发令牌。然后,RFC 6749 接着写道:
(由于互联网有多种场景,)本标准定义了获得令牌的四种授权方式(authorization grant )。
也就是说,OAuth 2.0 规定了四种获得令牌的流程。你可以选择最适合自己的那一种,向第三方应用颁发令牌。下面就是这四种授权方式。
- 授权码(authorization-code):指的是第三方应用先申请一个授权码,然后再用该码获取令牌。
- 隐藏式(implicit):有些 Web 应用是纯前端应用,没有后端。这时就不能用上面的方式了,必须将令牌储存在前端。RFC 6749 就规定了第二种方式,允许直接向前端颁发令牌。这种方式没有授权码这个中间步骤,所以称为(授权码)"隐藏式"(implicit)。
- 密码式(password):如果你高度信任某个应用,RFC 6749 也允许用户把用户名和密码,直接告诉该应用。该应用就使用你的密码,申请令牌,这种方式称为"密码式"(password)。
- 客户端凭证(client credentials): 适用于没有前端的命令行应用,即在命令行下请求令牌。
客户端模式(client credentials):
是和客户端绑定的,比如说客户端有PC客户端,IOS客户端,安卓客户端,认证服务器就会颁布3个token,当用户请求zuul,zuul路由到服务端时会带上token,服务端拿到token后会去认证服务器进行token验证(只有token在有效期内并且没有被篡改,那么才会允许zuul请求下游接口)
token只是用户权限访问的字符串,与用户信息无关
个人认为Zuul是没有必要做权限校验的,因为Zuul里是没有接口没有资源信息的,也就是说Zuul里面没有要保护的东西,下游系统必须要做权限校验。
当然也有Zuul做权限校验,下游系统没有做权限校验的系统,那是因为改了网络架构,Zuul是外网,下游系统设置在内网,然后下游系统设置了防火墙白名单(但是有种极端情况,内网网络被别人攻破,比如说同一个机房内的主机,有的主机能连外网,别人攻破了这台主机,就以这台主机为跳板机访问其他主机(因为你下游系统没有权限验证,那么别人就能随意访问了)),所以网络隔离并不可取。
所以综上两点:Zuul只做路由,下游系统设置在内网并且做权限校验和防火墙白名单,保证整个系统的安全性。
3.1 使用
3.1.1 jar包导入
  4.0.0

  com.micro.security
  micro-security
  1.0-SNAPSHOT

  micro-security

  http://www.example.com


    UTF-8
    1.7
    1.7
    Finchley.RELEASE


    org.springframework.boot
    spring-boot-starter-parent
    2.0.3.RELEASE


      org.springframework.boot
      spring-boot-starter-web


      org.springframework.cloud
      spring-cloud-starter-oauth2


      org.springframework.cloud
      spring-cloud-starter-security


      org.springframework.security
      spring-security-data


      redis.clients
      jedis
      2.9.0


      com.google.code.gson
      gson
      2.8.2


      org.springframework.boot
      spring-boot-starter-data-redis


          redis.clients
          jedis


          io.lettuce
          lettuce-core


      org.springframework.boot
      spring-boot-starter-test


      org.springframework.cloud
      spring-cloud-starter-netflix-eureka-client


      org.projectlombok
      lombok
      true


      mysql
      mysql-connector-java


      org.mybatis.spring.boot
      mybatis-spring-boot-starter
      1.0.0


        org.springframework.cloud
        spring-cloud-dependencies
        ${spring-cloud.version}
        pom
        import


          maven-clean-plugin
          3.1.0


          maven-resources-plugin
          3.0.2


          maven-compiler-plugin
          3.8.0


          maven-surefire-plugin
          2.22.1


          maven-jar-plugin
          3.0.2


          maven-install-plugin
          2.5.2


          maven-deploy-plugin
          2.8.2


          maven-site-plugin
          3.7.1


          maven-project-info-reports-plugin
          3.0.0
3.1.2启动类
package com.micro.security;

import org.springframework.boot.SpringApplication;
import org.springframework.boot.autoconfigure.SpringBootApplication;
import org.springframework.cloud.netflix.eureka.EnableEurekaClient;
import org.springframework.security.oauth2.config.annotation.web.configuration.EnableResourceServer;

@SpringBootApplication
@EnableEurekaClient
/*
* EnableResourceServer注解开启资源服务,因为程序需要对外暴露获取token的API和验证token的API所以该程序也是一个资源服务器
* */
@EnableResourceServer
public class MicroSecurityApplication {
    public static void main(String[] args) {
        SpringApplication.run(MicroSecurityApplication.class,args);
    }
}
3.1.3配置文件
spring.application.name=micro-security
server.port=3030
eureka.client.serviceUrl.defaultZone=http://admin:admin@localhost:8763/eureka/

#spring.data.mongodb.uri=mongodb://192.168.67.139:27017/micro_security

#security.oauth2.resource.filter-order=3

spring.datasource.driver-class-name=com.mysql.jdbc.Driver
spring.datasource.url=jdbc:mysql://127.0.0.1:3306/consult?serverTimezone=UTC
spring.datasource.username=root
spring.datasource.password=

spring.jpa.hibernate.ddl-auto:update
spring.jpa.show-sql:true

#sql日志
logging.level.com.xiangxue.jack.dao=debug

# Redis数据库索引(默认为0)
spring.redis.database=0
# Redis服务器地址
spring.redis.host=127.0.0.1
# Redis服务器连接端口
spring.redis.port=6379
# Redis服务器连接密码(默认为空)
spring.redis.password=
# 连接池最大连接数(使用负值表示没有限制)
spring.redis.pool.max-active=8
# 连接池最大阻塞等待时间(使用负值表示没有限制)
spring.redis.pool.max-wait=-1
# 连接池中的最大空闲连接
spring.redis.pool.max-idle=8
# 连接池中的最小空闲连接
spring.redis.pool.min-idle=0
# 连接超时时间(毫秒)
spring.redis.timeout=0

logging.level.org.springframework.security=debug
3.1.4 config
3.1.4 AuthorizationServerConfig
package com.micro.security.config;

import org.springframework.beans.factory.annotation.Autowired;
import org.springframework.context.annotation.Bean;
import org.springframework.context.annotation.Configuration;
import org.springframework.data.redis.connection.RedisConnectionFactory;
import org.springframework.http.HttpMethod;
import org.springframework.security.authentication.AuthenticationManager;
import org.springframework.security.core.userdetails.UserDetailsService;
import org.springframework.security.crypto.bcrypt.BCryptPasswordEncoder;
import org.springframework.security.oauth2.config.annotation.configurers.ClientDetailsServiceConfigurer;
import org.springframework.security.oauth2.config.annotation.web.configuration.AuthorizationServerConfigurerAdapter;
import org.springframework.security.oauth2.config.annotation.web.configuration.EnableAuthorizationServer;
import org.springframework.security.oauth2.config.annotation.web.configurers.AuthorizationServerEndpointsConfigurer;
import org.springframework.security.oauth2.config.annotation.web.configurers.AuthorizationServerSecurityConfigurer;
import org.springframework.security.oauth2.provider.token.TokenStore;

@Configuration
@EnableAuthorizationServer
public class AuthorizationServerConfig extends AuthorizationServerConfigurerAdapter {

    @Autowired
    private AuthenticationManager authenticationManager;

    @Autowired
    private RedisConnectionFactory connectionFactory;

    @Autowired
    private UserDetailsService userDetailsService;

    @Bean
    public TokenStore tokenStore() {
        return new MyRedisTokenStore(connectionFactory);
    }

    /*
    * AuthorizationServerEndpointsConfigurer:用来配置授权(authorization)以及令牌(token)的访问端点和令牌服务(token services)。
    * */
    @Override
    public void configure(AuthorizationServerEndpointsConfigurer endpoints) throws Exception {
        endpoints
                .authenticationManager(authenticationManager)
                .userDetailsService(userDetailsService)//若无,refresh_token会有UserDetailsService is required错误
                .tokenStore(tokenStore()).
                allowedTokenEndpointRequestMethods(HttpMethod.GET,HttpMethod.POST);
    }

    /*
    * AuthorizationServerSecurityConfigurer 用来配置令牌端点(Token Endpoint)的安全约束
    * */
    @Override
    public void configure(AuthorizationServerSecurityConfigurer security) throws Exception {
        // 允许表单认证
        security.allowFormAuthenticationForClients().tokenKeyAccess("permitAll()")
                .checkTokenAccess("isAuthenticated()");
    }

    /*

        ClientDetailsServiceConfigurer:用来配置客户端详情服务(ClientDetailsService),客户端详情信息在这里进行初始化,你能够把客户端详情信息写死在这里或者是通过数据库来存储调取详情信息
    *   1.授权码模式(authorization code)
        2.简化模式(implicit)
        3.密码模式(resource owner password credentials)
        4.客户端模式(client credentials)
    * */
    @Override
    public void configure(ClientDetailsServiceConfigurer clients) throws Exception {
        String finalSecret = "{bcrypt}" + new BCryptPasswordEncoder().encode("123456");

        clients.
//                jdbc(dataSource).
                inMemory().
                withClient("micro-web")//客户端id
                .resourceIds("micro-web")
                .authorizedGrantTypes("client_credentials", "refresh_token")//鉴权模式
                .scopes("all","read", "write","aa")//匹配字符串
                .authorities("client_credentials")
                .secret(finalSecret)//平台密码
                .accessTokenValiditySeconds(1200)
                .refreshTokenValiditySeconds(50000)
                .and()
                .withClient("micro-zuul")
                .resourceIds("micro-zuul")
                .authorizedGrantTypes("password", "refresh_token")
                .scopes("server")
                .authorities("password")
                .secret(finalSecret)
                .accessTokenValiditySeconds(1200)
                .refreshTokenValiditySeconds(50000);
    }
}
3.1.5 MyRedisTokenStore
package com.micro.security.config;
import org.springframework.data.redis.connection.RedisConnection;
import org.springframework.data.redis.connection.RedisConnectionFactory;
import org.springframework.security.oauth2.common.ExpiringOAuth2RefreshToken;
import org.springframework.security.oauth2.common.OAuth2AccessToken;
import org.springframework.security.oauth2.common.OAuth2RefreshToken;
import org.springframework.security.oauth2.provider.OAuth2Authentication;
import org.springframework.security.oauth2.provider.token.AuthenticationKeyGenerator;
import org.springframework.security.oauth2.provider.token.DefaultAuthenticationKeyGenerator;
import org.springframework.security.oauth2.provider.token.TokenStore;
import org.springframework.security.oauth2.provider.token.store.redis.JdkSerializationStrategy;
import org.springframework.security.oauth2.provider.token.store.redis.RedisTokenStoreSerializationStrategy;
import java.util.*;
public class MyRedisTokenStore implements TokenStore {
private static final String ACCESS = "access:";
private static final String AUTH_TO_ACCESS = "auth_to_access:";
private static final String AUTH = "auth:";
private static final String REFRESH_AUTH = "refresh_auth:";
private static final String ACCESS_TO_REFRESH = "access_to_refresh:";
private static final String REFRESH = "refresh:";
private static final String REFRESH_TO_ACCESS = "refresh_to_access:";
private static final String CLIENT_ID_TO_ACCESS = "client_id_to_access:";
private static final String UNAME_TO_ACCESS = "uname_to_access:";
private final RedisConnectionFactory connectionFactory;
private AuthenticationKeyGenerator authenticationKeyGenerator = new DefaultAuthenticationKeyGenerator();
private RedisTokenStoreSerializationStrategy serializationStrategy = new JdkSerializationStrategy();
private String prefix = "";
public MyRedisTokenStore(RedisConnectionFactory connectionFactory) {
this.connectionFactory = connectionFactory;
}
public void setAuthenticationKeyGenerator(AuthenticationKeyGenerator authenticationKeyGenerator) {
this.authenticationKeyGenerator = authenticationKeyGenerator;
}
public void setSerializationStrategy(RedisTokenStoreSerializationStrategy serializationStrategy) {
this.serializationStrategy = serializationStrategy;
}
public void setPrefix(String prefix) {
this.prefix = prefix;
}
private RedisConnection getConnection() {
return connectionFactory.getConnection();
}
private byte[] serialize(Object object) {
return serializationStrategy.serialize(object);
}
private byte[] serializeKey(String object) {
return serialize(prefix + object);
}
private OAuth2AccessToken deserializeAccessToken(byte[] bytes) {
return serializationStrategy.deserialize(bytes, OAuth2AccessToken.class);
}
private OAuth2Authentication deserializeAuthentication(byte[] bytes) {
return serializationStrategy.deserialize(bytes, OAuth2Authentication.class);
}
private OAuth2RefreshToken deserializeRefreshToken(byte[] bytes) {
return serializationStrategy.deserialize(bytes, OAuth2RefreshToken.class);
}
private byte[] serialize(String string) {
return serializationStrategy.serialize(string);
}
private String deserializeString(byte[] bytes) {
return serializationStrategy.deserializeString(bytes);
}
@Override
public OAuth2AccessToken getAccessToken(OAuth2Authentication authentication) {
String key = authenticationKeyGenerator.extractKey(authentication);
byte[] serializedKey = serializeKey(AUTH_TO_ACCESS + key);
byte[] bytes = null;
RedisConnection conn = getConnection();
try {
bytes = conn.get(serializedKey);
} finally {
conn.close();
}
OAuth2AccessToken accessToken = deserializeAccessToken(bytes);
if (accessToken != null) {
OAuth2Authentication storedAuthentication = readAuthentication(accessToken.getValue());
if ((storedAuthentication == null || !key.equals(authenticationKeyGenerator.extractKey(storedAuthentication)))) {
// Keep the stores consistent (maybe the same user is
// represented by this authentication but the details have
// changed)
storeAccessToken(accessToken, authentication);
}
}
return accessToken;
}
@Override
public OAuth2Authentication readAuthentication(OAuth2AccessToken token) {
return readAuthentication(token.getValue());
}
@Override
public OAuth2Authentication readAuthentication(String token) {
byte[] bytes = null;
RedisConnection conn = getConnection();
try {
bytes = conn.get(serializeKey(AUTH + token));
} finally {
conn.close();
}
OAuth2Authentication auth = deserializeAuthentication(bytes);
return auth;
}
@Override
public OAuth2Authentication readAuthenticationForRefreshToken(OAuth2RefreshToken token) {
return readAuthenticationForRefreshToken(token.getValue());
}
public OAuth2Authentication readAuthenticationForRefreshToken(String token) {
RedisConnection conn = getConnection();
try {
byte[] bytes = conn.get(serializeKey(REFRESH_AUTH + token));
OAuth2Authentication auth = deserializeAuthentication(bytes);
return auth;
} finally {
conn.close();
}
}
@Override
public void storeAccessToken(OAuth2AccessToken token, OAuth2Authentication authentication) {
byte[] serializedAccessToken = serialize(token);
byte[] serializedAuth = serialize(authentication);
byte[] accessKey = serializeKey(ACCESS + token.getValue());
byte[] authKey = serializeKey(AUTH + token.getValue());
byte[] authToAccessKey = serializeKey(AUTH_TO_ACCESS + authenticationKeyGenerator.extractKey(authentication));
byte[] approvalKey = serializeKey(UNAME_TO_ACCESS + getApprovalKey(authentication));
byte[] clientId = serializeKey(CLIENT_ID_TO_ACCESS + authentication.getOAuth2Request().getClientId());
RedisConnection conn = getConnection();
try {
conn.openPipeline();
conn.stringCommands().set(accessKey, serializedAccessToken);
conn.set(authKey, serializedAuth);
conn.set(authToAccessKey, serializedAccessToken);
if (!authentication.isClientOnly()) {
conn.rPush(approvalKey, serializedAccessToken);
}
conn.rPush(clientId, serializedAccessToken);
if (token.getExpiration() != null) {
int seconds = token.getExpiresIn();
conn.expire(accessKey, seconds);
conn.expire(authKey, seconds);
conn.expire(authToAccessKey, seconds);
conn.expire(clientId, seconds);
conn.expire(approvalKey, seconds);
}
OAuth2RefreshToken refreshToken = token.getRefreshToken();
if (refreshToken != null && refreshToken.getValue() != null) {
byte[] refresh = serialize(token.getRefreshToken().getValue());
byte[] auth = serialize(token.getValue());
byte[] refreshToAccessKey = serializeKey(REFRESH_TO_ACCESS + token.getRefreshToken().getValue());
conn.set(refreshToAccessKey, auth);
byte[] accessToRefreshKey = serializeKey(ACCESS_TO_REFRESH + token.getValue());
conn.set(accessToRefreshKey, refresh);
if (refreshToken instanceof ExpiringOAuth2RefreshToken) {
ExpiringOAuth2RefreshToken expiringRefreshToken = (ExpiringOAuth2RefreshToken) refreshToken;
Date expiration = expiringRefreshToken.getExpiration();
if (expiration != null) {
int seconds = Long.valueOf((expiration.getTime() - System.currentTimeMillis()) / 1000L)
.intValue();
conn.expire(refreshToAccessKey, seconds);
conn.expire(accessToRefreshKey, seconds);
}
}
}
conn.closePipeline();
} finally {
conn.close();
}
}
private static String getApprovalKey(OAuth2Authentication authentication) {
String userName = authentication.getUserAuthentication() == null ? ""
: authentication.getUserAuthentication().getName();
return getApprovalKey(authentication.getOAuth2Request().getClientId(), userName);
}
private static String getApprovalKey(String clientId, String userName) {
return clientId + (userName == null ? "" : ":" + userName);
}
@Override
public void removeAccessToken(OAuth2AccessToken accessToken) {
removeAccessToken(accessToken.getValue());
}
@Override
public OAuth2AccessToken readAccessToken(String tokenValue) {
byte[] key = serializeKey(ACCESS + tokenValue);
byte[] bytes = null;
RedisConnection conn = getConnection();
try {
bytes = conn.get(key);
} finally {
conn.close();
}
OAuth2AccessToken accessToken = deserializeAccessToken(bytes);
return accessToken;
}
public void removeAccessToken(String tokenValue) {
byte[] accessKey = serializeKey(ACCESS + tokenValue);
byte[] authKey = serializeKey(AUTH + tokenValue);
byte[] accessToRefreshKey = serializeKey(ACCESS_TO_REFRESH + tokenValue);
RedisConnection conn = getConnection();
try {
conn.openPipeline();
conn.get(accessKey);
conn.get(authKey);
conn.del(accessKey);
conn.del(accessToRefreshKey);
// Don't remove the refresh token - it's up to the caller to do that
conn.del(authKey);
List3.1.6 SecurityConfiguration
package com.micro.security.config;

import org.springframework.context.annotation.Bean;
import org.springframework.context.annotation.Configuration;
import org.springframework.security.authentication.AuthenticationManager;
import org.springframework.security.config.annotation.web.builders.HttpSecurity;
import org.springframework.security.config.annotation.web.configuration.EnableWebSecurity;
import org.springframework.security.config.annotation.web.configuration.WebSecurityConfigurerAdapter;
import org.springframework.security.core.userdetails.User;
import org.springframework.security.core.userdetails.UserDetailsService;
import org.springframework.security.crypto.bcrypt.BCryptPasswordEncoder;
import org.springframework.security.provisioning.InMemoryUserDetailsManager;

@Configuration
@EnableWebSecurity
public class SecurityConfiguration extends WebSecurityConfigurerAdapter {

    @Bean
    @Override
    protected UserDetailsService userDetailsService() {
        BCryptPasswordEncoder bCryptPasswordEncoder = new BCryptPasswordEncoder();

        String finalPassword = "{bcrypt}" + bCryptPasswordEncoder.encode("123456");
        InMemoryUserDetailsManager manager = new InMemoryUserDetailsManager();
        manager.createUser(User.withUsername("jack").password(finalPassword).authorities("USER").build());
        manager.createUser(User.withUsername("admin").password(finalPassword).authorities("USER").build());

        return manager;
    }

    /*@Override
    protected void configure(AuthenticationManagerBuilder auth) throws Exception {
        auth.userDetailsService(userDetailsService()).passwordEncoder(new BCryptPasswordEncoder());;
    }*/

    @Bean
    @Override
    public AuthenticationManager authenticationManagerBean() throws Exception {
        AuthenticationManager manager = super.authenticationManagerBean();
        return manager;
    }

    @Override
    protected void configure(HttpSecurity http) throws Exception {
        http.csrf().disable();
//        http.requestMatchers().anyRequest()
//                .and()
//                .authorizeRequests()
//                .antMatchers("/oauth/**").permitAll();

        http.authorizeRequests()
                .antMatchers("/oauth/**","/actuator/**").permitAll()
                .and()
                .httpBasic().disable();
    }
}
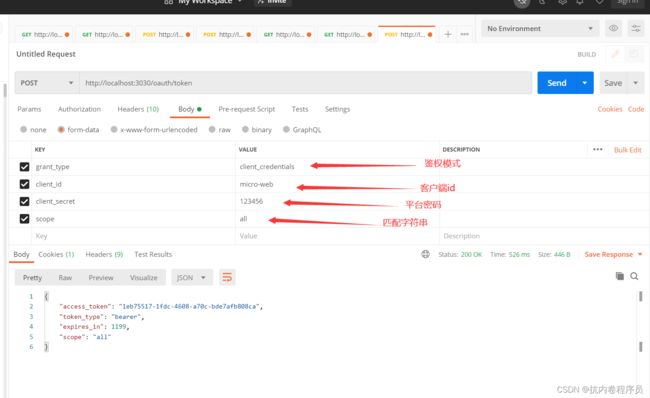
3.1.7 我们可以看到客户端模式申请 token,只要带上有平台资质的客户端 id、客户端密码、然后 带上授权类型是客户端授权模式,带上 scope 就可以了。这里要注意的是客户端必须是具有 资质的。
POST请求
http://localhost:3030/oauth/tokengrant_type:client_credentials
client_id:micro-web
client_secret:123456
scope:all3.1.8 客户端信息配置 参考3.1.4
3.1.9 配置 token 存储方式 参考3.1.4
Oauth2.0 权限校验认证服务器代码配置和客户端代码配置基本上是固定写法,这里知道如何 使用即可,关键是理解认证授权过程,oauth2.0 授权流程基本上是行业认证授权的标准了。
客户端请求
密码模式获取 token
密码模式获取 token,也就是说在获取 token 过程中必须带上用户的用户名和密码,获取到 的 token 是跟用户绑定的。
密码模式获取 token:
客户端 id 和客户端密码必须要经过 base64 算法加密,并且放到 header 中,加密模式为 Base64(clientId:clientPassword),如下:
其他参数:
1、密码模式认证服务器代码配置
加上注解,说明是认证服务器
1、客户端配置,客户端是存储在表中的
对应的客户端表为:oauth_client_details
对应的 token 存储表为:oauth_access_token
表中数据:
可以看到 token 是跟用户绑定的。
设置 token 的属性
3、认证服务器 token 校验和校验结果返回接口
1、properties 配置
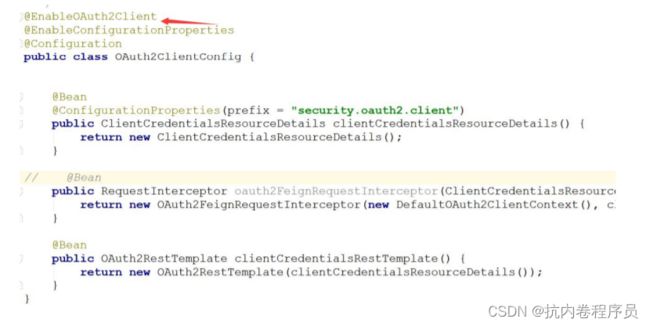
2、声明使用 oauth2.0 框架并说明这是一个客户
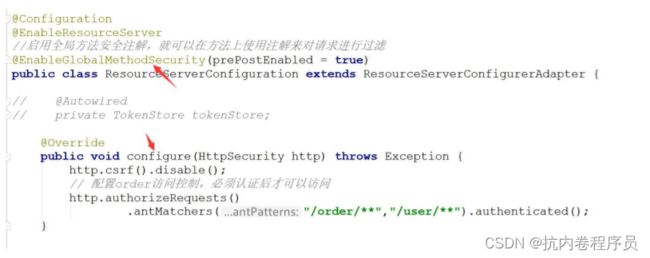
3、开启权限的方法级别注解和指定拦截路径
认证服务器和下游系统权限校验流程
1、zuul 携带 token 请求下游系统,被下游系统 filter 拦截
2、下游系统过滤器根据配置中的 user-info-uri 请求到认证服务器
3、请求到认证服务器被 filter 拦截进行 token 校验,把 token 对应的用户、和权限从数据库 查询出来封装到 Principal
4、认证服务器 token 校验通过后过滤器放行执行 security/check 接口,把 principal 对象返回 5、下游系统接收到 principal 对象后就知道该 token 具备的权限了,就可以进行相应用户对 应的 token 的权限执行
授权码模式获取 token
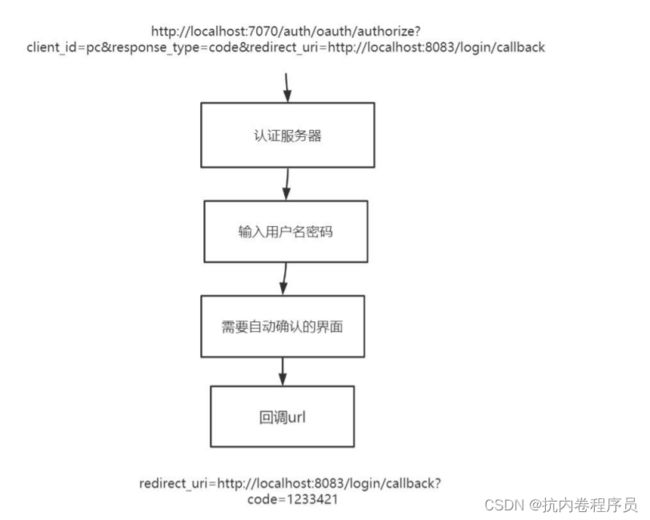
授权码模式获取 token,在获取 token 之前需要有一个获取 code 的过程。
1、获取 code 的流程如下:
1、用户请求获取 code 的链接 http://localhost:7070/auth/oauth/authorize?client_id=pc&response_type=code&redirect_uri=htt p://localhost:8083/login/callback
2、提示要输入用户名密码
3、用户名秘密成功则会弹出界面
4、点击 approve 则会回调 redirect_uri 对应的回调地址并且把 code 附带到该回调地址里面
2、根据获取到的 code 获取 token
这里必须带上 redirect_uri 和 code,其他就跟前面的类似
其他配置跟密码模式的是一样的,拿到 token 后就可以访问了。
1、客户端模式 一般用在无需用户登录的系统做接口的安全校验,因为 token 只需要跟客户端绑定,控制粒 度不够细
2、密码模式 密码模式,token 是跟用户绑定的,可以根据不同用户的角色和权限来控制不同用户的访问 权限,相对来说控制粒度更细
3、授权码模式 授权码模式更安全,因为前面的密码模式可能会存在密码泄露后,别人拿到密码也可以照样 的申请到 token 来进行接口访问,而授权码模式用户提供用户名和密码获取后,还需要有一 个回调过程,这个回调你可以想象成是用户的手机或者邮箱的回调,只有用户本人能收到这 个 code,即使用户名密码被盗也不会影响整个系统的安全。
JWT 模式
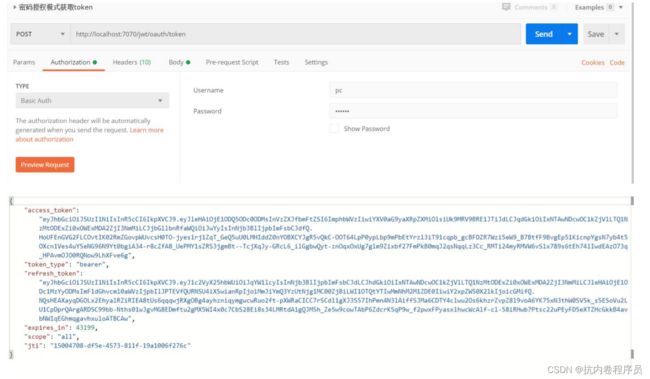
JWT:json web token 是一种无状态的权限认证方式,一般用于前后端分离,时效性比较端 的权限校验,jwt 模式获取 token 跟前面的,客户端,密码,授权码模式是一样的,只是需 要配置秘钥:
1、生成秘钥文件
cd 到 jdk 的 bin 目录执行该指令,会在 bin 目录下生成 micro-jwt.jks 文件,把该文件放到认 证服务工程里面的 resources 目录下:
keytool -genkeypair -alias micro-jwt
-validity 3650
-keyalg RSA
-dname "CN=jwt,OU=jtw,O=jwt,L=zurich,S=zurich, C=CH"
-keypass 123456
-keystore micro-jwt.jks
-storepass 123456
2、生成公钥
keytool -list -rfc --keystore micro-jwt.jks | openssl x509 -inform pem -pubkey
把生成的公钥内容放到 public.cert 文件中,内容如下:
把公钥文件放到客户端的 resources 目录下。
密码模式获取 jwt token:
eyJhbGciOiJSUzI1NiIsInR5cCI6IkpXVCJ9.eyJleHAiOjE1ODQ5ODc0ODMsInVzZXJfbmFtZSI6ImphbWVzIiwiYXV0aG9yaXRpZXMiOl siUk9MRV9BRE1JTiJdLCJqdGkiOiIxNTAwNDcwOC1kZjVlLTQ1NzMtODExZi0xOWExMDA2ZjI3NmMiLCJjbGllbnRfaWQiOiJwYyIsInNjb 3BlIjpbImFsbCJdfQ.HoUFEnGVG2FLCOvtIK02RmZGovpWUvcsH0TO-jyes1rj1ZqT_GeQ5uU0LMHIddZ0nYOBXCYJgR5vQkC-OOT64LpP0 ypLbp9mPbEtYrzl3iT91cqpb_gcBFDZR7Wzi5eW9_B7BtfF9BvgEp51KicnpYgsN7yb4t5OXcn1Ves4uYSeNG96N9Yt0bgiA34-r8cZfA8_ UePMY1sZRS3jgmBt--TcjXqJy-GRcL6_ilGgbwQyt-znOqxOxUg7glm9Zixbf27FmPkB0mqJ2qsNqqLz3Cc_RMTi24myRMVW6vSlx789s6t Eh74lIwdEAzO73q_HPAvmOJO0RQNow9LhXFve6gJwt 的 token 信息分成三个部分,用“.”号分割的
第一步部分:头信息,通过 base64 加密生成
第二部分:有效载荷,通过 base64 加密生成
第三部分:签名,根据头信息中的加密算法通过,RSA(base64(头信息) + “.” + base64(有效载 荷))生成的第三部分内容
可以到 jwt 的官网看看这三部分信息的具体内容:jwt 官网 jwt.io
