python实现opencv学习十七:hough变换检测直线
HoughLines
代码:
# -*- coding=GBK -*-
import cv2 as cv
import numpy as np
# hough变换检测直线与圆 :https://blog.csdn.net/on2way/article/details/47028969
def line_image(image):
gray = cv.cvtColor(image, cv.COLOR_BGR2GRAY)
edges = cv.Canny(gray, 50, 150, apertureSize=3) # 第四个输入参数是Sobel算子的大小,3的话就是3*3
cv.imshow("edges", edges)
lines = cv.HoughLines(edges, 1, np.pi / 180, 200) # 霍夫变换进行形状检测
# cv.HoughLines(edges, rho, theta, threshold)
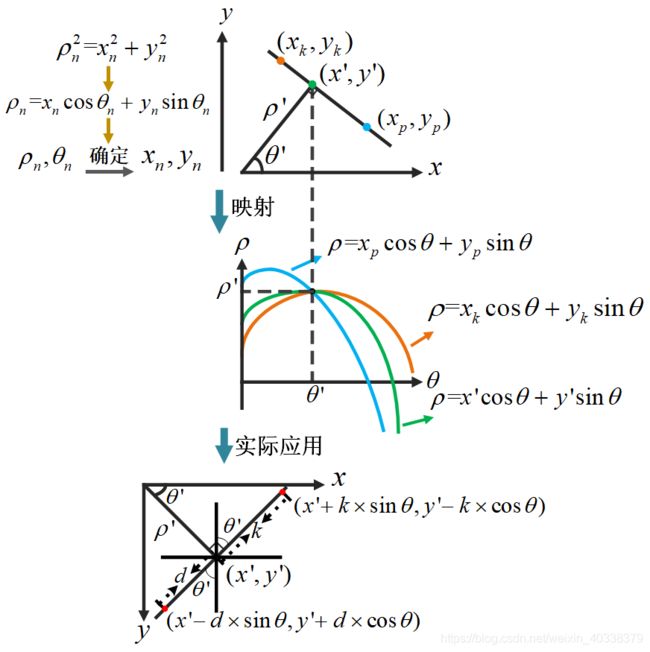
# img 为输入的图像,Canny提取后的边界数据;rho/ρ为距离精确度(理解为距离单位);theta/θ为角度精确度(理解为角度单位单位);threshold 为累加器阈值,当累加器中的值高于threshold时才认为是一条直线
# 返回值每段直线(ρ,θ)的的二维矩阵
for line in lines:
rho, theta = line[0]
a = np.cos(theta) # np.cos是便于计算数组所有theta的cos值,sin同理 ,而且三角函数是np库里面的
b = np.sin(theta)
x0 = a * rho
y0 = b * rho
x1 = int(x0 + 1000 * (-b))
y1 = int(y0 + 1000 * (a))
x2 = int(x0 - 1000 * (-b))
y2 = int(y0 - 1000 * (a))
cv.line(image, (x1, y1), (x2, y2), (0, 0, 255), 2) # 输入参数: img, 起始点, 终, 颜色, 宽度
cv.imshow("line", image)
src = cv.imread("Line.png")
cv.imshow("before", src)
line_image(src)
cv.waitKey(0)
cv.destroyAllWindows()结果:

备注:
hough变换检测直线与圆参考资料:https://blog.csdn.net/on2way/article/details/47028969
HoughLinesP
代码:
# -*- coding=GBK -*-
import cv2 as cv
import numpy as np


def line_image(image):
   gray = cv.cvtColor(image, cv.COLOR_BGR2GRAY) # 灰度图像
   edges = cv.Canny(gray, 50, 200)
   lines = cv.HoughLinesP(edges, 1, np.pi/180, 30, minLineLength=60, maxLineGap=10)
   lines1 = lines[:, 0, :]  # 提取为二维

   for x1, y1, x2, y2 in lines1[:]:
     cv.line(image, (x1, y1), (x2, y2), (255, 0, 0), 1)
   cv.imshow("line", image)


src = cv.imread("Line.png")
cv.imshow("before", src)
line_image(src)
cv.waitKey(0)
cv.destroyAllWindows()
结果:

备注:
hough变换检测直线与圆参考资料:https://blog.csdn.net/on2way/article/details/47028969