图像处理一百题(1-10)
题来自于
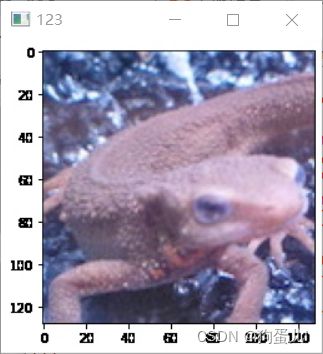
读取图片:「画像処理100本ノック」中文版本!为图像处理初学者设计的 100 个问题。
问题一:通道交换
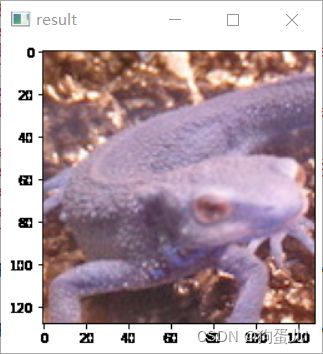
读取图像,然后将通道替换成通道。
下面的代码用于提取图像的红色通道。
注意,cv2.imread() 的系数是按顺序排列的!
其中的变量red表示的是仅有原图像红通道的imori.jpg。
答案:
import cv2

# function: BGR -> RGB


def BGR2RGB(img):
    b = img[:, :, 0].copy()
    g = img[:, :, 1].copy()
    r = img[:, :, 2].copy()

    # RGB > BGR
    img[:, :, 0] = r
    img[:, :, 1] = g
    img[:, :, 2] = b

    return img


# Read image
img = cv2.imread("imori.jpg")

# BGR -> RGB
img = BGR2RGB(img)

# Save result
cv2.imwrite("out.jpg", img)
cv2.imshow("result", img)
cv2.waitKey(0)
cv2.destroyAllWindows()
问题二:灰度化(Grayscale)
将图像灰度化吧!
灰度是一种图像亮度的表示方法,通过下式计算: Y = 0.2126 R + 0.7152 G + 0.0722 B Y = 0.2126\ R + 0.7152\ G + 0.0722\ B Y=0.2126 R+0.7152 G+0.0722 B
import cv2
import numpy as np

# Gray scale
def BGR2GRAY(img):
	b = img[:, :, 0].copy()
	g = img[:, :, 1].copy()
	r = img[:, :, 2].copy()

	# Gray scale
	out = 0.2126 * r + 0.7152 * g + 0.0722 * b
	out = out.astype(np.uint8)

	return out


# Read image
img = cv2.imread("imori.jpg").astype(np.float)

# Grayscale
out = BGR2GRAY(img)

# Save result
cv2.imwrite("out.jpg", out)
cv2.imshow("result", out)
cv2.waitKey(0)
cv2.destroyAllWindows()
问题三:二值化(Thresholding)
二值化是将图像使用黑和白两种颜色表示的方法。
先进行灰度化,然后以阈值为界限,大于阈值的=255,小于阈值的=0。
我们将灰度的阈值设置为128来进行二值化,即:
if (x>=128)x=255
else x=0
import cv2
import numpy as np

# Gray scale


def BGR2GRAY(img):
    b = img[:, :, 0].copy()
    g = img[:, :, 1].copy()
    r = img[:, :, 2].copy()

    # Gray scale
    out = 0.2126 * r + 0.7152 * g + 0.0722 * b
    out = out.astype(np.uint8)

    return out

# binalization


def binarization(img, th=128):
    img[img < th] = 0
    img[img >= th] = 255
    return img


# Read image
img = cv2.imread("imori.jpg").astype(np.float32)

# Grayscale
out = BGR2GRAY(img)

# Binarization
out = binarization(out)

# Save result
cv2.imwrite("out.jpg", out)
cv2.imshow("result", out)
cv2.waitKey(0)
cv2.destroyAllWindows()
问题四:大津二值化算法(Otsu’s Method)
简介
我们在最灰度图做二值化时,需要设定一个分割阈值,我们并没有一个万能的阈值。而Otsu大津算法则是根据灰度图本身的信息,自动确定最佳阈值,实现以最佳阈值对灰度图进行二值化。
需要注意的是,大津算法并不是直接进行二值化处理,而是得到一个整型数字,也即阈值,我们得到阈值再进行二值化。
原理
一般情况下,我们将我们感兴趣的部分称为前景,对于不感兴趣的称为背景。
大津算法的思想是比较简单的,我们认为分为的前景和背景之间差异是较大的,而前景部分中的像素是相似的,背景部分中的像素是相似的:同一类中差异小,不同类中差异大。那么如果存在一个阈值,使得图像分为了前景和背景,应当符合同一类中差异最小,不同类中差异最大,这个值就是最佳阈值。根据这个最佳阈值分割的图像效果应当是最好的(即将前景和背景彻底分割开)。
那么所谓的“差异”如何表示?其实就是用方差来表示:如果单个的数据其越偏离于中心,那么,其方差值也就越大。如果同一类中方差越小,那么表示同一类中差异也小;不同类之间方差越大,表示不同类中差异越大。
题
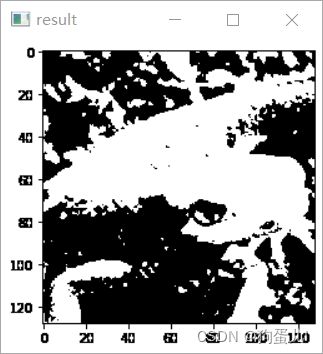
使用大津算法来二值化图像吧。
大津算法,也被称作最大类间方差法,是一种可以自动确定二值化中阈值的算法。
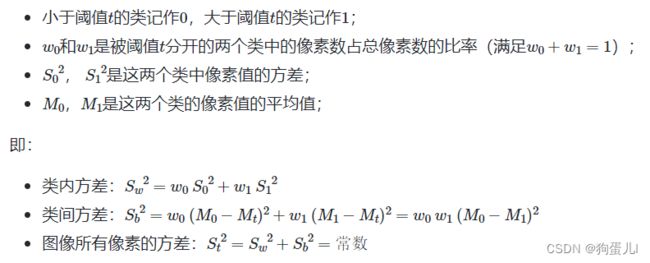
从类内方差和类间方差的比值计算得来:
import cv2
import numpy as np


# Gray scale
def BGR2GRAY(img):
	b = img[:, :, 0].copy()
	g = img[:, :, 1].copy()
	r = img[:, :, 2].copy()

	# Gray scale
	out = 0.2126 * r + 0.7152 * g + 0.0722 * b
	out = out.astype(np.uint8)

	return out

# Otsu Binarization
def otsu_binarization(img, th=128):
	max_sigma = 0
	max_t = 0

	# determine threshold
	for _t in range(1, 255):
		v0 = out[np.where(out < _t)]
		m0 = np.mean(v0) if len(v0) > 0 else 0.
		w0 = len(v0) / (H * W)
		v1 = out[np.where(out >= _t)]
		m1 = np.mean(v1) if len(v1) > 0 else 0.
		w1 = len(v1) / (H * W)
		sigma = w0 * w1 * ((m0 - m1) ** 2)
		if sigma > max_sigma:
			max_sigma = sigma
			max_t = _t

	# Binarization
	print("threshold >>", max_t)
	th = max_t
	out[out < th] = 0
	out[out >= th] = 255

	return out


# Read image
img = cv2.imread("imori.jpg").astype(np.float32)
H, W, C =img.shape


# Grayscale
out = BGR2GRAY(img)

# Otsu's binarization
out = otsu_binarization(out)

# Save result
cv2.imwrite("out.jpg", out)
cv2.imshow("result", out)
cv2.waitKey(0)
cv2.destroyAllWindows()
问题五: HSV \text{HSV} HSV变换
将使用表示色彩的图像的色相反转吧!
即使用 **色相(Hue)、饱和度(Saturation)、明度(Value)**来表示色彩的一种方式。
- 色相:将颜色使用到表示,就是平常所说的颜色名称,如红色、蓝色。色相与数值按下表对应:
| 红 | 黄 | 绿 | 青色 | 蓝色 | 品红 | 红 |
|---|---|---|---|---|---|---|
| 0° | 60° | 120° | 180° | 240° | 300° | 360° |
- 饱和度:是指色彩的纯度,饱和度越低则颜色越黯淡();
- 明度:即颜色的明暗程度。数值越高越接近白色,数值越低越接近黑色();
从色彩表示转换到色彩表示通过以下方式计算:
的取值范围为,令: Max = max ( R , G , B ) Min = min ( R , G , B ) \text{Max}=\max(R,G,B)\ \text{Min}=\min(R,G,B) Max=max(R,G,B) Min=min(R,G,B) 色相: H = { 0 ( if Min = Max ) 60 G − R Max − Min + 60 ( if Min = B ) 60 B − G Max − Min + 180 ( if Min = R ) 60 R − B Max − Min + 300 ( if Min = G ) H=\begin{cases} 0&(\text{if}\ \text{Min}=\text{Max})\ 60\ \frac{G-R}{\text{Max}-\text{Min}}+60&(\text{if}\ \text{Min}=B)\ 60\ \frac{B-G}{\text{Max}-\text{Min}}+180&(\text{if}\ \text{Min}=R)\ 60\ \frac{R-B}{\text{Max}-\text{Min}}+300&(\text{if}\ \text{Min}=G) \end{cases} H={0(if Min=Max) 60 Max−MinG−R+60(if Min=B) 60 Max−MinB−G+180(if Min=R) 60 Max−MinR−B+300(if Min=G) 饱和度: S = Max − Min S=\text{Max}-\text{Min} S=Max−Min 明度: V = Max V=\text{Max} V=Max 从色彩表示转换到色彩表示通过以下方式计算: C = S H ′ = H 60 X = C ( 1 − ∣ H ′ m o d 2 − 1 ∣ ) ( R , G , B ) = ( V − C ) ( 1 , 1 , 1 ) + { ( 0 , 0 , 0 ) ( if H is undefined ) ( C , X , 0 ) ( if 0 ≤ H ′ < 1 ) ( X , C , 0 ) ( if 1 ≤ H ′ < 2 ) ( 0 , C , X ) ( if 2 ≤ H ′ < 3 ) ( 0 , X , C ) ( if 3 ≤ H ′ < 4 ) ( X , 0 , C ) ( if 4 ≤ H ′ < 5 ) ( C , 0 , X ) ( if 5 ≤ H ′ < 6 ) C = S\ H' = \frac{H}{60}\ X = C\ (1 - |H' \mod 2 - 1|)\ (R,G,B)=(V-C)\ (1,1,1)+\begin{cases} (0, 0, 0)& (\text{if H is undefined})\ (C, X, 0)& (\text{if}\quad 0 \leq H' < 1)\ (X, C, 0)& (\text{if}\quad 1 \leq H' < 2)\ (0, C, X)& (\text{if}\quad 2 \leq H' < 3)\ (0, X, C)& (\text{if}\quad 3 \leq H' < 4)\ (X, 0, C)& (\text{if}\quad 4 \leq H' < 5)\ (C, 0, X)& (\text{if}\quad 5 \leq H' < 6) \end{cases} C=S H′=60H X=C (1−∣H′mod2−1∣) (R,G,B)=(V−C) (1,1,1)+{(0,0,0)(if H is undefined) (C,X,0)(if0≤H′<1) (X,C,0)(if1≤H′<2) (0,C,X)(if2≤H′<3) (0,X,C)(if3≤H′<4) (X,0,C)(if4≤H′<5) (C,0,X)(if5≤H′<6) 请将色相反转(色相值加),然后再用色彩空间表示图片。
import cv2
import numpy as np


# BGR -> HSV
def BGR2HSV(_img):
	img = _img.copy() / 255.

	hsv = np.zeros_like(img, dtype=np.float32)

	# get max and min
	max_v = np.max(img, axis=2).copy()
	min_v = np.min(img, axis=2).copy()
	min_arg = np.argmin(img, axis=2)

	# H
	hsv[..., 0][np.where(max_v == min_v)]= 0
	## if min == B
	ind = np.where(min_arg == 0)
	hsv[..., 0][ind] = 60 * (img[..., 1][ind] - img[..., 2][ind]) / (max_v[ind] - min_v[ind]) + 60
	## if min == R
	ind = np.where(min_arg == 2)
	hsv[..., 0][ind] = 60 * (img[..., 0][ind] - img[..., 1][ind]) / (max_v[ind] - min_v[ind]) + 180
	## if min == G
	ind = np.where(min_arg == 1)
	hsv[..., 0][ind] = 60 * (img[..., 2][ind] - img[..., 0][ind]) / (max_v[ind] - min_v[ind]) + 300

	# S
	hsv[..., 1] = max_v.copy() - min_v.copy()

	# V
	hsv[..., 2] = max_v.copy()

	return hsv


def HSV2BGR(_img, hsv):
	img = _img.copy() / 255.

	# get max and min
	max_v = np.max(img, axis=2).copy()
	min_v = np.min(img, axis=2).copy()

	out = np.zeros_like(img)

	H = hsv[..., 0]
	S = hsv[..., 1]
	V = hsv[..., 2]

	C = S
	H_ = H / 60.
	X = C * (1 - np.abs( H_ % 2 - 1))
	Z = np.zeros_like(H)

	vals = [[Z,X,C], [Z,C,X], [X,C,Z], [C,X,Z], [C,Z,X], [X,Z,C]]

	for i in range(6):
		ind = np.where((i <= H_) & (H_ < (i+1)))
		out[..., 0][ind] = (V - C)[ind] + vals[i][0][ind]
		out[..., 1][ind] = (V - C)[ind] + vals[i][1][ind]
		out[..., 2][ind] = (V - C)[ind] + vals[i][2][ind]

	out[np.where(max_v == min_v)] = 0
	out = np.clip(out, 0, 1)
	out = (out * 255).astype(np.uint8)

	return out


# Read image
img = cv2.imread("imori.jpg").astype(np.float32)

# RGB > HSV
hsv = BGR2HSV(img)

# Transpose Hue
hsv[..., 0] = (hsv[..., 0] + 180) % 360

# HSV > RGB
out = HSV2BGR(img, hsv)

# Save result
cv2.imwrite("out.jpg", out)
cv2.imshow("result", out)
cv2.waitKey(0)
cv2.destroyAllWindows()
问题六:减色处理
我们将图像的值由256^ 3压缩至4^ 3,即将的值只取32,96,160,224。这被称作色彩量化。色彩的值按照下面的方式定义: val = { 32 ( 0 ≤ var < 64 ) 96 ( 64 ≤ var < 128 ) 160 ( 128 ≤ var < 192 ) 224 ( 192 ≤ var < 256 ) \text{val}= \begin{cases} 32& (0 \leq \text{var} < 64)\ 96& (64\leq \text{var}<128)\ 160&(128\leq \text{var}<192)\ 224&(192\leq \text{var}<256) \end{cases} val={32(0≤var<64) 96(64≤var<128) 160(128≤var<192) 224(192≤var<256)
import cv2
import numpy as np


# Dicrease color
def dicrease_color(img):
	out = img.copy()

	out = out // 64 * 64 + 32

	return out


# Read image
img = cv2.imread("imori.jpg")

# Dicrease color
out = dicrease_color(img)

cv2.imwrite("out.jpg", out)
cv2.imshow("result", out)
cv2.waitKey(0)
cv2.destroyAllWindows()
问题七:平均池化(Average Pooling)
将图片按照固定大小网格分割,网格内的像素值取网格内所有像素的平均值。
我们将这种把图片使用均等大小网格分割,并求网格内代表值的操作称为池化(Pooling)。
池化操作是 卷积神经网络(Convolutional Neural Network)中重要的图像处理方式。平均池化按照下式定义: v = 1 ∣ R ∣ ∑ i = 1 R v i v=\frac{1}{|R|}\ \sum\limits_{i=1}^R\ v_i v=∣R∣1 i=1∑R vi 请把大小为128128的imori.jpg使用88的网格做平均池化。
import cv2
import numpy as np


# average pooling
def average_pooling(img, G=8):
    out = img.copy()

    H, W, C = img.shape
    Nh = int(H / G)
    Nw = int(W / G)

    for y in range(Nh):
        for x in range(Nw):
            for c in range(C):
                out[G*y:G*(y+1), G*x:G*(x+1), c] = np.mean(out[G*y:G*(y+1), G*x:G*(x+1), c]).astype(np.int)

    return out


# Read image
img = cv2.imread("imori.jpg")

# Average Pooling
out = average_pooling(img)

# Save result
cv2.imwrite("out.jpg", out)
cv2.imshow("result", out)
cv2.waitKey(0)
cv2.destroyAllWindows()
问题八:最大池化(Max Pooling)
网格内的值不取平均值,而是取网格内的最大值进行池化操作。
import cv2
import numpy as np

# max pooling
def max_pooling(img, G=8):
    # Max Pooling
    out = img.copy()

    H, W, C = img.shape
    Nh = int(H / G)
    Nw = int(W / G)

    for y in range(Nh):
        for x in range(Nw):
            for c in range(C):
                out[G*y:G*(y+1), G*x:G*(x+1), c] = np.max(out[G*y:G*(y+1), G*x:G*(x+1), c])

    return out


# Read image
img = cv2.imread("imori.jpg")

# Max pooling
out = max_pooling(img)

# Save result
cv2.imwrite("out.jpg", out)
cv2.imshow("result", out)
cv2.waitKey(0)
cv2.destroyAllWindows()
问题九:高斯滤波(Gaussian Filter)
使用高斯滤波器(3*3大小,标准差σ=1.3)来对imori_noise.jpg进行降噪处理吧!
高斯滤波器是一种可以使图像平滑的滤波器,用于去除噪声。可用于去除噪声的滤波器还有中值滤波器(参见问题十),平滑滤波器(参见问题十一)、LoG滤波器(参见问题十九)。
高斯滤波器将中心像素周围的像素按照高斯分布加权平均进行平滑化。这样的(二维)权值通常被称为卷积核(kernel)或者滤波器(filter)。
但是,由于图像的长宽可能不是滤波器大小的整数倍,因此我们需要在图像的边缘补0。这种方法称作Zero Padding。并且权值g(卷积核)要进行归一化操作。
按下面的高斯分布公式计算权值: g ( x , y , σ ) = 1 2 π σ 2 e − x 2 + y 2 2 σ 2 g(x,y,\sigma)=\frac{1}{2\ \pi\ \sigma^2}\ e^{-\frac{x^2+y^2}{2\ \sigma^2}} g(x,y,σ)=2 π σ21 e−2 σ2x2+y2
标准差σ=1.3的8-近邻高斯滤波器如下: K = 1 16 [ 1 2 1 2 4 2 1 2 1 ] K=\frac{1}{16}\ \left[ \begin{matrix} 1 & 2 & 1 \ 2 & 4 & 2 \ 1 & 2 & 1 \end{matrix} \right] K=161 [121 242 121]
import cv2
import numpy as np


# Gaussian filter
def gaussian_filter(img, K_size=3, sigma=1.3):
	if len(img.shape) == 3:
		H, W, C = img.shape
	else:
		img = np.expand_dims(img, axis=-1)
		H, W, C = img.shape


	## Zero padding
	pad = K_size // 2
	out = np.zeros((H + pad * 2, W + pad * 2, C), dtype=np.float)
	out[pad: pad + H, pad: pad + W] = img.copy().astype(np.float)

	## prepare Kernel
	K = np.zeros((K_size, K_size), dtype=np.float)
	for x in range(-pad, -pad + K_size):
		for y in range(-pad, -pad + K_size):
			K[y + pad, x + pad] = np.exp( -(x ** 2 + y ** 2) / (2 * (sigma ** 2)))
	K /= (2 * np.pi * sigma * sigma)
	K /= K.sum()

	tmp = out.copy()

	# filtering
	for y in range(H):
		for x in range(W):
			for c in range(C):
				out[pad + y, pad + x, c] = np.sum(K * tmp[y: y + K_size, x: x + K_size, c])

	out = np.clip(out, 0, 255)
	out = out[pad: pad + H, pad: pad + W].astype(np.uint8)

	return out


# Read image
img = cv2.imread("imori_noise.jpg")


# Gaussian Filter
out = gaussian_filter(img, K_size=3, sigma=1.3)


# Save result
cv2.imwrite("out.jpg", out)
cv2.imshow("result", out)
cv2.waitKey(0)
cv2.destroyAllWindows()
问题十:中值滤波(Median Filter)
使用中值滤波器(3*3大小)来对imori_noise.jpg进行降噪处理吧!
中值滤波器是一种可以使图像平滑的滤波器。这种滤波器用滤波器范围内(在这里是3*3)像素点的中值进行滤波,请在这里也采用Zero Padding。
import cv2
import numpy as np


# Median filter
def median_filter(img, K_size=3):
    H, W, C = img.shape

    ## Zero padding
    pad = K_size // 2
    out = np.zeros((H + pad*2, W + pad*2, C), dtype=np.float)
    out[pad:pad+H, pad:pad+W] = img.copy().astype(np.float)

    tmp = out.copy()

    # filtering
    for y in range(H):
        for x in range(W):
            for c in range(C):
                out[pad+y, pad+x, c] = np.median(tmp[y:y+K_size, x:x+K_size, c])

    out = out[pad:pad+H, pad:pad+W].astype(np.uint8)

    return out


# Read image
img = cv2.imread("imori_noise.jpg")


# Median Filter
out = median_filter(img, K_size=3)


# Save result
cv2.imwrite("out.jpg", out)
cv2.imshow("result", out)
cv2.waitKey(0)
cv2.destroyAllWindows()
