【MoveIt】入门教程-第一章(上)Move Group C++ Interface(官方教程翻译+个人补充)
环境:Ubuntu20.04 + ros-noetic + moveit1
安装教程:https://blog.csdn.net/qq_43557907/article/details/125081735
本文为我的个人笔记,是翻译的官方手册。因为我个人插入了图片和注释加以补充,所以不提倡转载。
我只是一个小白,文中肯定会有一些错误,欢迎指正。
本篇文章为 Move Group C++ Interface 的上半部分,下半部分过阵子会发,欢迎关注。
demo测试
分别在两个 shell 中依次运行 launch 文件,观看演示教程
roslaunch panda_moveit_config demo.launch
roslaunch moveit_tutorials move_group_interface_tutorial.launch
在第二个 launch 文件启动后,会提示
![]()
我们需要在RvizVisualToolsGui面板中点击 Next 按钮,开始执行演示动作
显示RvizVisualToolsGui面板的方法:
在 rviz 菜单栏中点击 pannels,勾选RvizVisualToolsGui即可。
演示动作大概分为轨迹规划和物体避障两个操作,具体内容如下,这里就不翻译了:
完整代码
完整的cpp代码在https://github.com/ros-planning/moveit_tutorials/blob/master/doc/move_group_interface/src/move_group_interface_tutorial.cpp中查看,接下来将会逐步分析各项代码的功能。
1.设置 Setup
moveit 操作一组称为 planning groups 的关节,将他们储存在 JointModelGroup 对象中。在 moveit 中,planning group 和 joint model group 可交换使用。
//定义 PLANNING_GROUP 名称为 panda_arm
static const std::string PLANNING_GROUP = "panda_arm";
使用想要控制或规划的 planning group 来设置 MoveGroupInterface 类。
moveit::planning_interface::MoveGroupInterface move_group_interface(PLANNING_GROUP);
在 virtual world 场景中,使用 PlanningSceneInterface 类来添加或移除碰撞(collision)对象
moveit::planning_interface::PlanningSceneInterface planning_scene_interface;
定义指针 joint_model_group ,经常用于指向 planning group 以提高性能。
const moveit::core::JointModelGroup* joint_model_group =
    move_group_interface.getCurrentState()->getJointModelGroup(PLANNING_GROUP);
2.可视化 Visualization
API手册:
http://docs.ros.org/en/kinetic/api/moveit_visual_tools/html/classmoveit__visual__tools_1_1MoveItVisualTools.html
http://docs.ros.org/en/kinetic/api/rviz_visual_tools/html/classrviz__visual__tools_1_1RvizVisualTools.html
MoveItVisualTools 包提供了很多在 rviz 中可视化物体、机器人和轨迹的的能力,并且提供了例如逐步检查脚本的 debug 工具(例如 Next 按钮)。
namespace rvt = rviz_visual_tools;
moveit_visual_tools::MoveItVisualTools visual_tools("panda_link0");
visual_tools.deleteAllMarkers();
注:上述的 visual_tools 是 rviz_visual_tools 类
遥控(Remote control)是一个检查工具,用户可以在 rviz 中通过按钮或快捷键去执行高级脚本。
//加载 rviz 中的遥控工具
visual_tools.loadRemoteControl();
rviz 提供了许多标记类型,在本 demo 中使用 text、cylinders 和 spheres
// 设置 text 的位置
Eigen::Isometry3d text_pose = Eigen::Isometry3d::Identity();
text_pose.translation().z() = 1.0;
// 发布 text 到 rviz
visual_tools.publishText(text_pose, "MoveGroupInterface Demo", rvt::WHITE, rvt::XLARGE);
批量发布,用于减少发送到 RViz 的大型可视化消息的数量
visual_tools.trigger();
3.得到基础信息
我们可以打印这个机器人参考坐标系的名称
ROS_INFO_NAMED("tutorial", "Planning frame: %s", move_group_interface.getPlanningFrame().c_str());
我们也可以打印出此 group 中末端执行器的名称
ROS_INFO_NAMED("tutorial", "End effector link: %s", move_group_interface.getEndEffectorLink().c_str());
![]()
我们可以得到机器人中所有 group 的列表:
ROS_INFO_NAMED("tutorial", "Available Planning Groups:");
std::copy(move_group_interface.getJointModelGroupNames().begin(),
          move_group_interface.getJointModelGroupNames().end(), std::ostream_iterator<std::string>(std::cout, ", "));
补充:使用std::copy以及ostream_iterator快速对数组操作
直接输出数组元素,例:
    int buf[10] = {0, 1, 2, 3, 4, 5, 6, 7, 8, 9};
    copy(buf, buf+10, ostream_iterator<int>(cout, " "));
4.开始 demo
visual_tools.prompt("Press 'next' in the RvizVisualToolsGui window to start the demo");
![]()
5.设定目标位姿
我们可以对此 group 设定一个动作,使其达到末端执行器的预期位姿。
geometry_msgs::Pose target_pose1;
target_pose1.orientation.w = 1.0;
target_pose1.position.x = 0.28;
target_pose1.position.y = -0.2;
target_pose1.position.z = 0.5;
move_group_interface.setPoseTarget(target_pose1);
注:四元数知识点复习
现在,我们呼叫 planner 去计算规划并使其可视化。注意,我们只是在规划,而不是让 move_group_interface 去移动实际的机械臂。
moveit::planning_interface::MoveGroupInterface::Plan my_plan;
// 判断是否成功规划
bool success = (move_group_interface.plan(my_plan) == moveit::planning_interface::MoveItErrorCode::SUCCESS);

ROS_INFO_NAMED("tutorial", "Visualizing plan 1 (pose goal) %s", success ? "" : "FAILED");
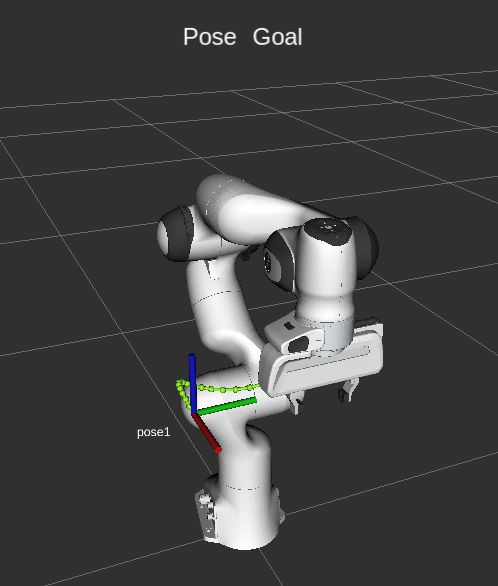
![]()
6.可视化规划轨迹
我们可以将 plan 可视化成 rviz 中带有标记的一条线
ROS_INFO_NAMED("tutorial", "Visualizing plan 1 as trajectory line");
visual_tools.publishAxisLabeled(target_pose1, "pose1");
visual_tools.publishText(text_pose, "Pose Goal", rvt::WHITE, rvt::XLARGE);
visual_tools.publishTrajectoryLine(my_plan.trajectory_, joint_model_group);
visual_tools.trigger();
visual_tools.prompt("Press 'next' in the RvizVisualToolsGui window to continue the demo");
最后,执行储存在 my_plan 中的轨迹,可以使用如下方法调用(可能会导致报错):
//move_group_interface.execute(my_plan);
7.移动到目标位姿
如果你不想检查规划的轨迹,可以执行如下所示的两步:plan+execute 模式(首选),机器人将尝试向那个目标移动。
//move_group_interface.move();
8.关节空间目标的规划
首先要创建一个 pointer,其参考机器人当前的状态。
RobotState 对象包括了当前所有的 位置(position)/速度(velocity)/加速度(acceleration) 数据。
// 声明一个指针 current_state
moveit::core::RobotStatePtr current_state = move_group_interface.getCurrentState();
下一步,取得 group 中当前关节值的集合。
// joint_group_positions ,用来储存各关节的角度
std::vector<double> joint_group_positions;
current_state->copyJointGroupPositions(joint_model_group, joint_group_positions);
现在,尝试修改其中的一个关节,规划到新的关节空间目标,并且可视化这个规划。
joint_group_positions[0] = -tau / 6;  // -1/6 turn in radians
// 设置成修改后的关节值
move_group_interface.setJointValueTarget(joint_group_positions);
我们将最大许用速度和加速度降低到最大值的5%。默认值是10%(0.1),如果你想要让机器人移动的更快,可以在机器人的 moveit_config 的 joint _ limits.yaml 文件中设置你想要的默认值,或者在代码中设定明显的因素。
move_group_interface.setMaxVelocityScalingFactor(0.05);
move_group_interface.setMaxAccelerationScalingFactor(0.05);

success = (move_group_interface.plan(my_plan) == moveit::planning_interface::MoveItErrorCode::SUCCESS);
ROS_INFO_NAMED("tutorial", "Visualizing plan 2 (joint space goal) %s", success ? "" : "FAILED");
在 rviz 中可视化 plan
visual_tools.deleteAllMarkers();
visual_tools.publishText(text_pose, "Joint Space Goal", rvt::WHITE, rvt::XLARGE);
visual_tools.publishTrajectoryLine(my_plan.trajectory_, joint_model_group);
visual_tools.trigger();
visual_tools.prompt("Press 'next' in the RvizVisualToolsGui window to continue the demo");


