SpringSecurity用户认证设置用户名和密码的三种方式
目录
-
- 方式一:配置文件
- 方式二:设置配置类
- 方式三:自定义实现类设置账号密码
- 自定义登录接口
-
- 基于token前后端分离的示例
温馨提示: 本章测试基本上都是使用的SpringSecurity提供的默认登录页和登录接口进行测试的
方式一:配置文件
spring.security.user.name=lisi
spring.security.user.password=12345
方式二:设置配置类
1)、编写一个类继承WebSecurityConfigurerAdapter抽象类
2)、重写configure(AuthenticationManagerBuilder auth) 方法设置用户名和密码
import org.springframework.context.annotation.Bean;
import org.springframework.context.annotation.Configuration;
import org.springframework.security.config.annotation.authentication.builders.AuthenticationManagerBuilder;
import org.springframework.security.config.annotation.web.configuration.WebSecurityConfigurerAdapter;
import org.springframework.security.crypto.bcrypt.BCryptPasswordEncoder;

@Configuration
public class SpringSecurityConfig extends WebSecurityConfigurerAdapter {

    @Override
    protected void configure(AuthenticationManagerBuilder auth) throws Exception {
        // 这段代码的意思就是将123密码进行加密
        BCryptPasswordEncoder password = password();
        String encode = password.encode("123");
        auth.inMemoryAuthentication().withUser("zhangsan").password(encode).roles("admin");
    }

    /**
     * 因为我们上面配置的密码是加密过后的
     * 所以我们一定要将BCryptPasswordEncoder注入到容器,让Security知道我们用了这个加密算法
     * (其次是只要用的上面设置用户名密码的方式,一定要注入一个加密算法,不然程序会报异常)
     * 意思就是,将登录页面收到的password参数进行加密,然后和我们配置的密码进行比较,看是否是匹配的
     *
     * @return
     */
    @Bean
    public BCryptPasswordEncoder password() {
        return new BCryptPasswordEncoder();
    }
}
方式三:自定义实现类设置账号密码
如果使用SpringSecurity基本都是使用这种方式。
UserDetailsService这个接口对于SpringSecurity来说非常重要,在我们开发当中项目当中只要使用了SpringSecurity,那么项目必然会存在UserDetailsService的实现类。
这个类究竟起到了什么作用?
正常我们写登录可能就是前端传过来账号密码,然后后端收到账号密码,直接通过账号密码两个条件去数据库查询,查到了就登录成功,查询不到就失败。SpringSecurity他不是这样的,流程如下:
- 前端将账号和密码给后端(这里直接以明文举例)
- 后端通过username获取用户信息(获取不到那证明连这个账号都没有)
- 获取到之后进行密码比对,看看是否正确(这个过程我们称之为身份认证)
- 假如数据库当中存入的密码存储的是BCryptPasswordEncoder加密的,那我们就需要将BCryptPasswordEncoder注入到容器,这样认证的时候Security会将前端传的明文进行使用该加密算法加密,然后和数据库当中的密文进行比较
UserDetailsService接口主要的作用就是流程的第二个步骤。
import org.springframework.security.core.GrantedAuthority;
import org.springframework.security.core.authority.AuthorityUtils;
import org.springframework.security.core.userdetails.User;
import org.springframework.security.core.userdetails.UserDetails;
import org.springframework.security.core.userdetails.UserDetailsService;
import org.springframework.security.core.userdetails.UsernameNotFoundException;
import org.springframework.security.crypto.bcrypt.BCryptPasswordEncoder;
import org.springframework.stereotype.Service;

import java.util.List;

@Service
public class MyUserDetailsService implements UserDetailsService {

    @Override
    public UserDetails loadUserByUsername(String username) throws UsernameNotFoundException {

    	// 实际开发当中,这里一定是写的通过username去数据库当中查有没有该账号的用户,这里我是写死的

        List<GrantedAuthority> role = AuthorityUtils.commaSeparatedStringToAuthorityList("role");
        String encode = new BCryptPasswordEncoder().encode("123");
        // 这里的user类一定不要导错包了,他是Security提供的UserDetails实现类
        return new User("zhangsan", encode, role);
    }
}
import com.gzl.cn.springsecuritypassword.service.MyUserDetailsService;
import org.springframework.beans.factory.annotation.Autowired;
import org.springframework.context.annotation.Bean;
import org.springframework.context.annotation.Configuration;
import org.springframework.security.config.annotation.authentication.builders.AuthenticationManagerBuilder;
import org.springframework.security.config.annotation.web.configuration.WebSecurityConfigurerAdapter;
import org.springframework.security.crypto.bcrypt.BCryptPasswordEncoder;

@Configuration
public class SpringSecurityConfig extends WebSecurityConfigurerAdapter {

    @Autowired
    private MyUserDetailsService userDetailsService;

    @Override
    protected void configure(AuthenticationManagerBuilder auth) throws Exception {
        auth.userDetailsService(userDetailsService).passwordEncoder(password());
    }

    @Bean
    public BCryptPasswordEncoder password() {
        return new BCryptPasswordEncoder();
    }
}
自定义登录接口
实际开发当中往往我们不可能去使用SpringSecurity给我们提供的登录接口的。原因就是我们登录接口往往会添加验证码,而SpringSecurity提供的只是一个简单的登录,这时候就需要自己来实现登录接口,那么我们一旦使用自己的登录接口,如何让他自动去走SpringSecurity正常的认证流程呢?
这里所说的正常流程就是通过UserDetailsService 实现类的loadUserByUsername方法来获取主体(主体就是登录者用户),以及去相应的做认证。
自定义登录接口有两种途径:
- 基于token的(前后端分离或者是微服务都会采用token)
- 基于session的 (一般前后端不分离的情况,会使用session)
基于token前后端分离的示例
- 自定义UserDetailsService实现类
import org.springframework.security.core.GrantedAuthority;
import org.springframework.security.core.authority.AuthorityUtils;
import org.springframework.security.core.userdetails.User;
import org.springframework.security.core.userdetails.UserDetails;
import org.springframework.security.core.userdetails.UserDetailsService;
import org.springframework.security.core.userdetails.UsernameNotFoundException;
import org.springframework.security.crypto.bcrypt.BCryptPasswordEncoder;
import org.springframework.stereotype.Service;

import java.util.List;

@Service
public class MyUserDetailsService implements UserDetailsService {

    @Override
    public UserDetails loadUserByUsername(String username) throws UsernameNotFoundException {
        List<GrantedAuthority> role = AuthorityUtils.commaSeparatedStringToAuthorityList("role");
        String encode = new BCryptPasswordEncoder().encode("123");
        return new User("zhangsan", encode, role);
    }
}
- SpringSecurity配置类
import com.gzl.cn.springsecuritypassword.service.MyUserDetailsService;
import org.springframework.beans.factory.annotation.Autowired;
import org.springframework.context.annotation.Bean;
import org.springframework.context.annotation.Configuration;
import org.springframework.http.HttpMethod;
import org.springframework.security.authentication.AuthenticationManager;
import org.springframework.security.config.annotation.authentication.builders.AuthenticationManagerBuilder;
import org.springframework.security.config.annotation.web.builders.HttpSecurity;
import org.springframework.security.config.annotation.web.configuration.WebSecurityConfigurerAdapter;
import org.springframework.security.config.http.SessionCreationPolicy;
import org.springframework.security.crypto.bcrypt.BCryptPasswordEncoder;

@Configuration
public class SpringSecurityConfig extends WebSecurityConfigurerAdapter {

    @Autowired
    private MyUserDetailsService userDetailsService;

    @Override
    protected void configure(AuthenticationManagerBuilder auth) throws Exception {
        auth.userDetailsService(userDetailsService).passwordEncoder(password());
    }

    @Bean
    public BCryptPasswordEncoder password() {
        return new BCryptPasswordEncoder();
    }

	// 这个一定要注入,不然登录那块用到了AuthenticationManager,是会报错的。
    @Override
    @Bean
    public AuthenticationManager authenticationManagerBean() throws Exception {
        return super.authenticationManagerBean();
    }

	/**
     * 下面配置很重要,如果不添加的话,我们就算写一个登录接口,
     * 访问登录接口也会跳到security默认提供的登录页
     *
     * @param http
     * @throws Exception
     */
    @Override
    protected void configure(HttpSecurity http) throws Exception {
        http
                // CSRF禁用,因为不使用session
                .csrf().disable()
                // 基于token,所以不需要session,一旦添加这个配置就意味着不再使用security提供的登录页,开始基于token做前后端校验
                .sessionManagement().sessionCreationPolicy(SessionCreationPolicy.STATELESS).and()
                // 过滤请求
                .authorizeRequests()
                // 对于登录login 注册register 验证码captchaImage 允许匿名访问
                .antMatchers("/login").anonymous()
                // 除上面外的所有请求全部需要鉴权认证
                .anyRequest().authenticated()
                .and()
                .headers().frameOptions().disable();
    }
}
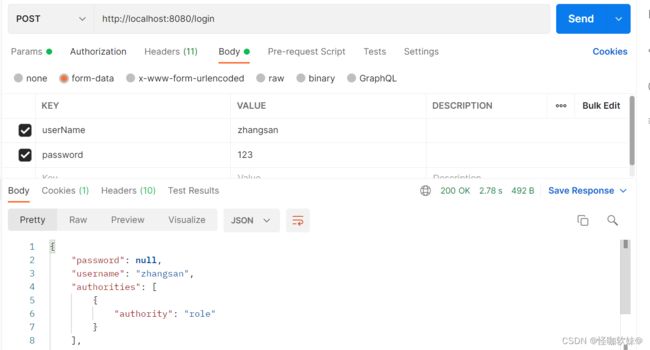
- 自定义登录接口
import org.springframework.security.authentication.AuthenticationManager;
import org.springframework.security.authentication.BadCredentialsException;
import org.springframework.security.authentication.UsernamePasswordAuthenticationToken;
import org.springframework.security.core.Authentication;
import org.springframework.security.core.userdetails.User;
import org.springframework.web.bind.annotation.PostMapping;
import org.springframework.web.bind.annotation.RestController;

import javax.annotation.Resource;

@RestController
public class LoginController {

    @Resource
    private AuthenticationManager authenticationManager;

    @PostMapping("/login")
    public User login(String userName, String password) throws Exception {
        // 1.校验验证码(这里我就省略了)

        // 2.用户验证
        Authentication authentication = null;
        try {
            // 该方法会去调用 MyUserDetailsService.loadUserByUsername
            authentication = authenticationManager.authenticate(new UsernamePasswordAuthenticationToken(userName, password));
        } catch (Exception e) {
            if (e instanceof BadCredentialsException) {
                throw new Exception("密码不正确");
            } else {
                // 处理UserDetailsService实现类当中抛出的自定义异常,以及系统异常
            }
        }
        User principal = (User) authentication.getPrincipal();

        // 3.一般走到这里肯定是登录成功的用户,所以这里会生成token,并接口返回token,和登录用户
        return principal;
    }
}
对于这个示例,实际上是不完整的,这个示例只是告诉我们通过这样配置,我们才能自定义登录接口,实际开发当中我们一般都是自定义登录接口,并且都是基于token校验所有的接口的,而上面示例当中并没有在登录的时候生成token,接口也没有token相关校验。
