springboot使用redis
springboot使用redis
redis-service.exe : 服务端,启动后不要关闭
redis-cli.exe : 客户端,访问redis中的数据
redisclient-win32.x86_64.2.0.jar : redis的图形界面客户端,执行方式是在这个文件的目录执行
java -jar redisclient-win32.x86_64.2.0.jar
或者在这个jar包的目录下点击即可直接执行
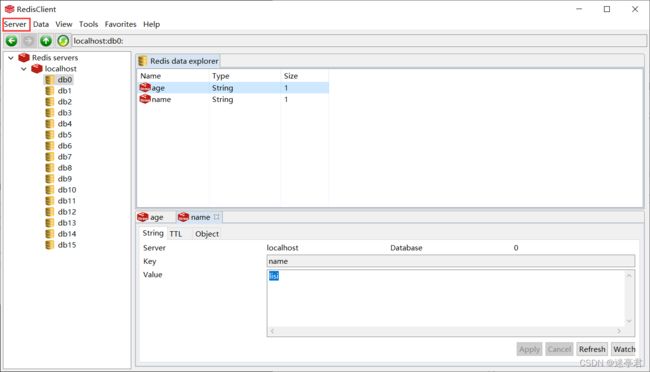
点击server,点击add,设置端口号就可以访问redis了
springboot使用redis步骤
-
添加依赖
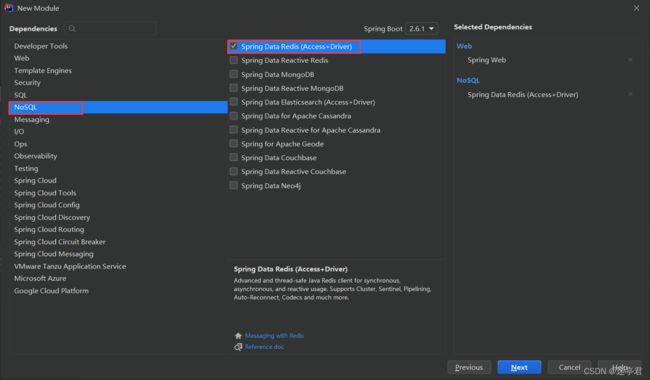
redis起步依赖,导入后可以直接使用RedisTemplate
RedisTemplate实际上使用的是lettuce客户端库org.springframework.boot spring-boot-starter-data-redis -
在application.properties中配置redis连接
#指定redis信息 (如 host, ip, password)
spring.redis.host=localhost
spring.redis.port=6379
#没有密码可以不用配置这个
#spring.redis.password=123456 -
使用redisTemplate来访问redis服务器
import org.springframework.data.redis.core.RedisTemplate;
import org.springframework.data.redis.core.StringRedisTemplate;
import org.springframework.data.redis.core.ValueOperations;
import org.springframework.web.bind.annotation.GetMapping;
import org.springframework.web.bind.annotation.PathVariable;
import org.springframework.web.bind.annotation.PostMapping;
import org.springframework.web.bind.annotation.RestController;import javax.annotation.Resource;
@RestController
public class RedisController {/** * 需要注入redis模板 * * 对于RedisTemplate的泛型情况, * 可以使用}
redisTemplate对象有好几种,上面代码中给了两种
一种为RedisTemplate,这种是有泛型的,泛型类型为
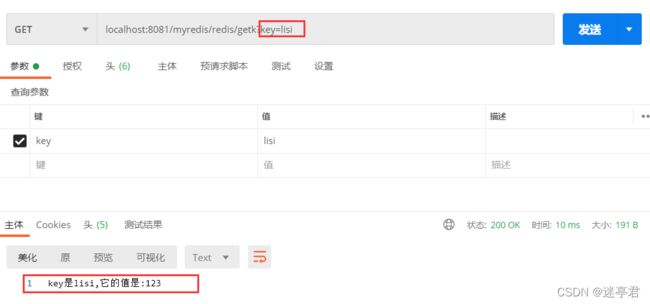
使用postman
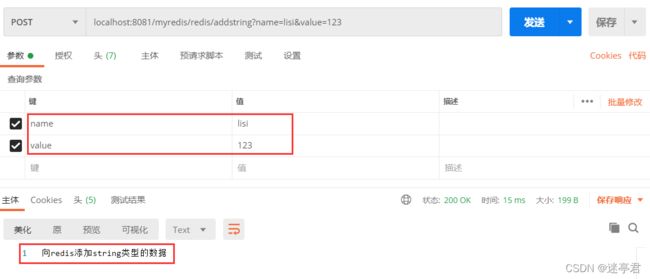
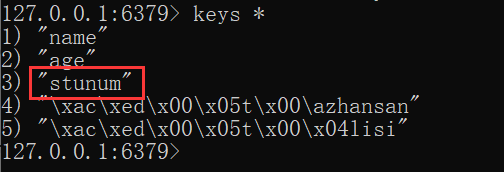
明明存入成功了,在redis中查询的时候是带有乱码前缀的
![]()
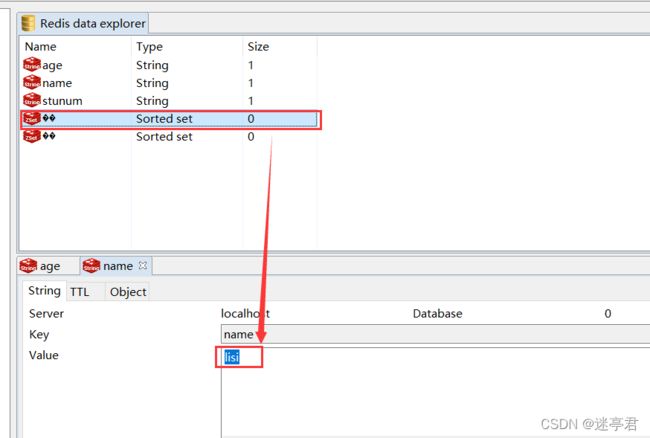
直接通过"lisi"它的值是可以取出的
可见在RedisTemplate在存取中做了手脚.
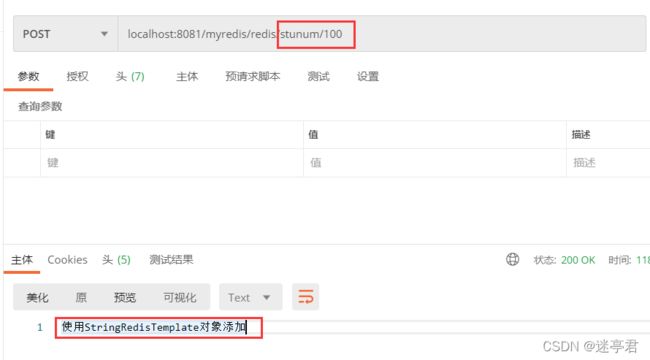
当我们使用StringRedisTemplate对象存取String类型的数据时,是没有乱码的
存
取
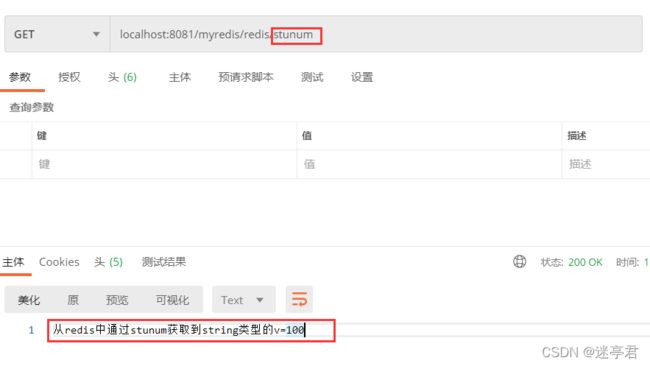
redis服务器中的数据
数据正常展示
StringRedisTemplate和RedisTemplate
上面说到了这两者在存取中的差异
- StringRedisTemplate : 这个类将key和value都做String处理,使用的是String的序列化,可读性好
- RedisTemplate : 把key和value经过了序列化,key和value都是序列化的内容,不能直接识别,默认使用的是JDK的序列化,可以修改为其他的序列化
序列化作用 :
序列化是将对象转换为可传输字节序列的过程,反序列化是将字节序列还原为原对象的过程.序列化最终的目的是为了对象可以跨平台存储和进行网络的传输
序列化的方式 :
序列化只是一种拆装对象的规则,那么这种规则也就多种多样,常见的有JDK(不支持跨语言),json,xml,Hessian等
我们上面的RedisTemplate类的存储就是JDK方式的
jdk方式的序列化

java的序列化 : 把java对象转换为byte[],二进制数据
json序列化 : json序列化功能将对象转换为json格式或者将其转换回对象,如Student对象转换为{“name”:“张三”,“age”:“20”}
序列化的方式可以改变
    /** 设置RedisTemplate序列化机制
     *  可以设置 key 的序列化,也可以设置 value 的序列化
     *  也可以同时设置
     */
    @PostMapping("/redis/addstr")
    public String addString(String k, String v) {

        // 设置RedisTemplate的序列化机制
        // 设置key为string类型的序列化
        redisTemplate.setKeySerializer(new StringRedisSerializer());
        // 设置value的序列化
        redisTemplate.setValueSerializer(new StringRedisSerializer());

        redisTemplate.opsForValue().set(k, v);
        return "添加了k和v";
    }
使用json方式的序列化
-
创建实体类,需要实现序列化接口,最好有序列化的UID
import java.io.Serializable;
public class Student implements Serializable {
private static final long serialVersionUID = -7839813688155519106L;
private Integer id;
private String name;
private Integer age;

public Integer getId() {
    return id;
}

public void setId(Integer id) {
    this.id = id;
}

public String getName() {
    return name;
}

public void setName(String name) {
    this.name = name;
}

public Integer getAge() {
    return age;
}

public void setAge(Integer age) {
    this.age = age;
}
}
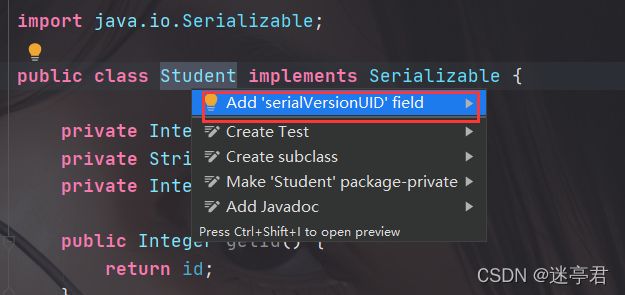
idea生成序列化UID的方式,需要先在setting中开启,如下
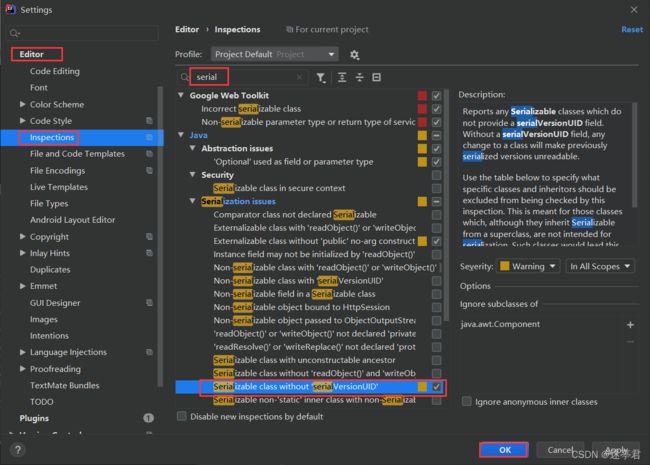
然后将光标放在类名上,alt+enter
-
在方法中设置序列化方式
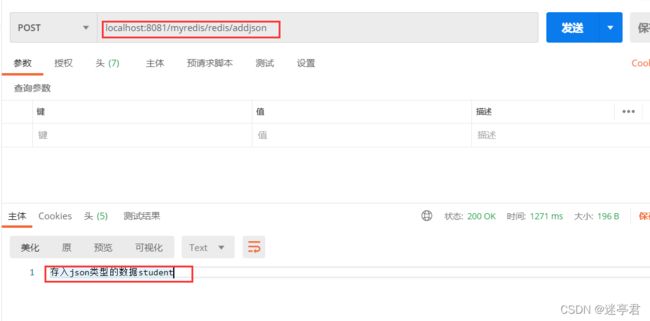
/** * 使用json序列化 */ @PostMapping("/redis/addjson") public String addJson() { Student student = new Student(); student.setName("zhangsan"); student.setAge(20); student.setId(1); // 设置key为string的序列化方式 redisTemplate.setKeySerializer(new StringRedisSerializer()); // 设置value为json的序列化方式,json为Student类型的方式组织,所以需要传入Student.class redisTemplate.setValueSerializer(new Jackson2JsonRedisSerializer(Student.class)); redisTemplate.opsForValue().set("myStudent", student); return "存入json类型的数据student"; } -
测试访问url
-
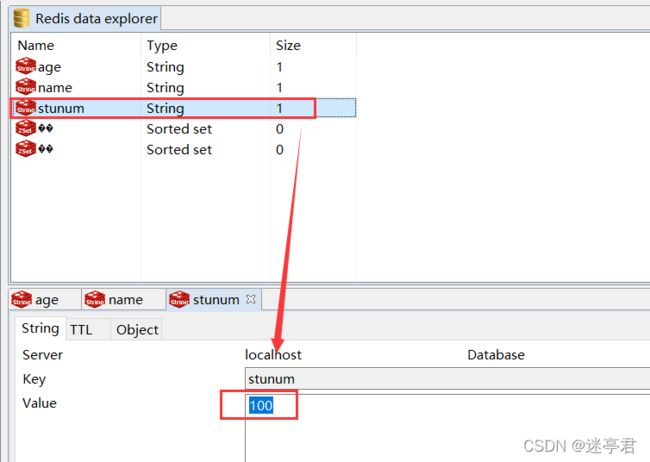
在redis服务端检查数据

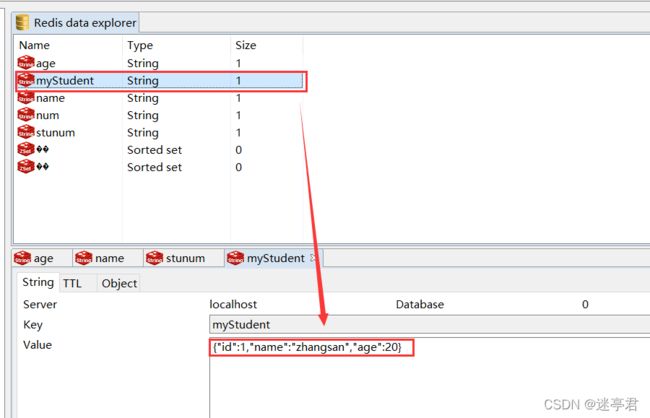 果然,数据的value已经以json的方式存入内存中了.
-
使用json的方式反序列化将数据取出
/**
* 使用json序列化
*/
@PostMapping(“/redis/addjson”)
public String addJson() {Student student = new Student(); student.setName("zhangsan"); student.setAge(20); student.setId(1); // 设置key为string的序列化方式 redisTemplate.setKeySerializer(new StringRedisSerializer()); // 设置value为json的序列化方式,json为Student类型的方式组织,所以需要传入Student.class redisTemplate.setValueSerializer(new Jackson2JsonRedisSerializer(Student.class)); redisTemplate.opsForValue().set("myStudent", student); return "存入json类型的数据student"; }
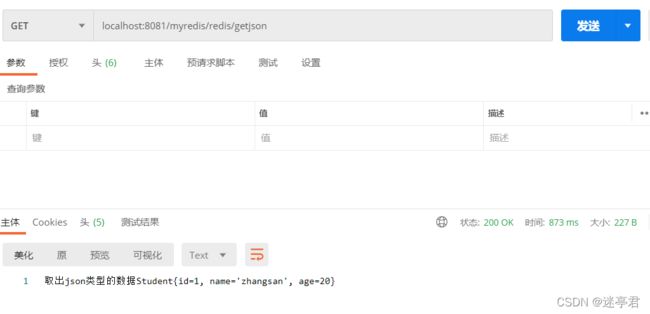
反序列化的时候必须得指定序列化的方式,要不然不能取出数据