springboot整合websocket推送消息
websocket推送消息
websocket是一种双向通信协议,HTTP是单向的。
直接上代码:
1.首先创建一个要整合websocket的springboot模块
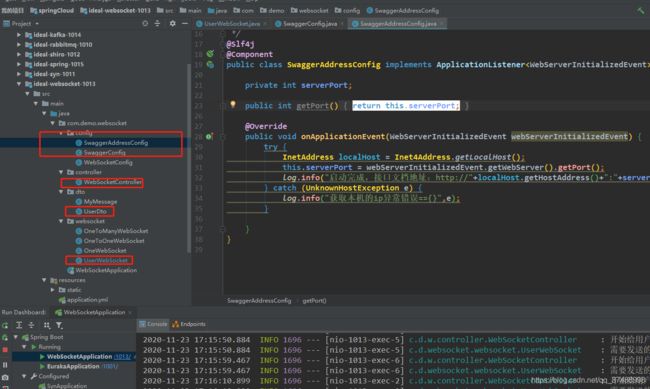
本文讲解主要使用的类:

配置文件:
server:
  port: 1013

spring:
  application:
    name: IDEAL-WEBSOCKET
2.添加依赖
推荐idea在线创建springboot模块或者https://start.spring.io/。
<?xml version="1.0" encoding="UTF-8"?>
<project xmlns="http://maven.apache.org/POM/4.0.0"
         xmlns:xsi="http://www.w3.org/2001/XMLSchema-instance"
         xsi:schemaLocation="http://maven.apache.org/POM/4.0.0 http://maven.apache.org/xsd/maven-4.0.0.xsd">
    <parent>
        <artifactId>demo</artifactId>
        <groupId>com.example</groupId>
        <version>0.0.1-SNAPSHOT</version>
    </parent>
    <modelVersion>4.0.0</modelVersion>

    <artifactId>ideal-websocket-1013</artifactId>

    <properties>
        <java.version>1.8</java.version>
    </properties>

    <dependencies>
        <dependency>
            <groupId>org.springframework.boot</groupId>
            <artifactId>spring-boot-starter-web</artifactId>
        </dependency>
        <!-- websocket的基本依赖-->
        <dependency>
            <groupId>org.springframework.boot</groupId>
            <artifactId>spring-boot-starter-websocket</artifactId>
        </dependency>
        <dependency>
            <groupId>com.alibaba</groupId>
            <artifactId>fastjson</artifactId>
            <version>1.2.73</version>
        </dependency>
        <dependency>
            <groupId>org.springframework.cloud</groupId>
            <artifactId>spring-cloud-commons</artifactId>
        </dependency>
    </dependencies>


    <build>
        <plugins>
            <plugin>
                <groupId>org.springframework.boot</groupId>
                <artifactId>spring-boot-maven-plugin</artifactId>
            </plugin>
        </plugins>
    </build>
</project>
3.本项目演示的是根据用户id推送给不同的客户端:实际场景中,一个账号可能支持多人同时登陆,每个登陆人员的客户端界面都要显示该用户的即时业务信息
创建一个用户DTO;
package com.demo.websocket.dto;

import com.alibaba.fastjson.JSONObject;
import lombok.Data;

@Data
public class UserDto {

    private String userId;

    private String userName;

    @Override
    public String toString () {
        return JSONObject.toJSONString(this);
    }
}
4.编写websocet服务:url是/show/user/peoples,这个是给前端调用的
前端调用时候可以用websocket在线测试网址:地址:ws://127.0.0.1:1013/show/user/peoples,具体的后面会截图演示。
package com.demo.websocket.websocket;

import com.alibaba.fastjson.JSON;
import com.demo.websocket.config.WebSocketConfig;
import com.demo.websocket.dto.UserDto;
import lombok.extern.slf4j.Slf4j;
import org.springframework.stereotype.Component;

import javax.websocket.*;
import javax.websocket.server.ServerEndpoint;
import java.io.IOException;
import java.util.List;
import java.util.Map;
import java.util.concurrent.ConcurrentHashMap;
import java.util.concurrent.CopyOnWriteArrayList;

@Slf4j
@Component
@ServerEndpoint(value = "/show/user/peoples")
public class UserWebSocket {

    private static Map<String, List<Session>> clients = new ConcurrentHashMap<>();

    @OnOpen
    public void onOpen(Session session) {
        log.info("有新的客户端上线: {}", session.getId());
        List<Session> list = new CopyOnWriteArrayList<>();
        list.add(session);
        clients.put(session.getId(), list);
    }

    @OnClose
    public void onClose(Session session) {
        String sessionId = session.getId();
        log.info("有客户端离线: {}", sessionId);
        clients.remove(sessionId);
    }

    @OnError
    public void onError(Session session, Throwable throwable) {
        throwable.printStackTrace();
        if (clients.get(session.getId()) != null) {
            clients.remove(session.getId());
        }
    }

    @OnMessage
    public void onMessage(String message, Session session){
       UserDto userDto = JSON.parseObject(message, UserDto.class);
        List<Session> list = clients.get(userDto.getUserId());
        if(null == list){
            list = new CopyOnWriteArrayList<Session>();
            list.add(session);
        }else {
            list.add(session);
        }
        clients.put(userDto.getUserId(),list);
        log.info("用户新的客户端加入成功");
    }

    /**
     * 发送消息
     *
     * @param userDto 消息对象
     */
    public void sendToUser(UserDto userDto) {
        List<Session> list = clients.get(userDto.getUserId());
        if(null != list){
            log.info("需要发送的消息个数==={}",list.size());
            for(Session  session : list){
                try {
                    session.getBasicRemote().sendText(userDto.toString());
                }catch (IOException e){
                    log.error("发送websocket消息失败:{}", e);
                }

            }
        }
    }
}
4.测试接口:WebSocketController
package com.demo.websocket.controller;

import com.alibaba.fastjson.JSONObject;
import com.demo.websocket.dto.UserDto;
import com.demo.websocket.websocket.OneToManyWebSocket;
import com.demo.websocket.websocket.OneToOneWebSocket;
import com.demo.websocket.websocket.UserWebSocket;
import lombok.extern.slf4j.Slf4j;
import org.springframework.beans.factory.annotation.Autowired;
import org.springframework.web.bind.annotation.*;

import java.util.HashMap;
import java.util.Map;

@RestController
@Slf4j
@RequestMapping("")
public class WebSocketController {
    @Autowired
    private UserWebSocket userWebSocket;

    /**
     * 模拟给同一个用户的不同客户段发送消息
     * @return
     */
    @PostMapping(value = "/send/user")
    String sendUser(@RequestBody UserDto userDto){
        log.info("开始给用户发送消息");
        userWebSocket.sendToUser(userDto);
        return "成功";
    }
}
5.为了方便测试,模块中引入了swagger2的配置
SwaggerConfig类:
package com.demo.websocket.config;

import org.springframework.context.annotation.Bean;
import org.springframework.context.annotation.Configuration;
import springfox.documentation.builders.ApiInfoBuilder;
import springfox.documentation.builders.PathSelectors;
import springfox.documentation.builders.RequestHandlerSelectors;
import springfox.documentation.service.ApiInfo;
import springfox.documentation.service.Contact;
import springfox.documentation.spi.DocumentationType;
import springfox.documentation.spring.web.plugins.Docket;

/**
 * Description:swagger2配置类
 * @Date 2019-04-29 00:05
 */
@Configuration
public class SwaggerConfig {

  @Bean
  public Docket myDocket() {
    Docket docket = new Docket(DocumentationType.SWAGGER_2);
    ApiInfo apiInfo = new ApiInfoBuilder()
        .title("websocket---Api接口文档") // 标题
        .description("websocket学习") // 描述
        .contact(new Contact("", "", ""))
        .version("1.0") // 版本号
        .build();
    docket.apiInfo(apiInfo);
    //设置只生成被Api这个注解注解过的Ctrl类中有ApiOperation注解的api接口的文档
    docket.select()
        .apis(RequestHandlerSelectors.basePackage("com.demo.websocket.controller"))
        .paths(PathSelectors.any())
        .build();
    return docket;
  }

}
SwaggerAddressConfig类:
package com.demo.websocket.config;

import lombok.extern.slf4j.Slf4j;
import org.springframework.boot.web.context.WebServerInitializedEvent;
import org.springframework.context.ApplicationListener;
import org.springframework.stereotype.Component;

import java.net.Inet4Address;
import java.net.InetAddress;
import java.net.UnknownHostException;

/**
 * @Date :2019/9/9 10:41
 * @Description:控制台输出 Swagger 接口文档地址
 */
@Slf4j
@Component
public class SwaggerAddressConfig implements ApplicationListener<WebServerInitializedEvent> {

    private int serverPort;

    public int getPort(){
        return this.serverPort;
    }

    @Override
    public void onApplicationEvent(WebServerInitializedEvent webServerInitializedEvent) {
        try {
            InetAddress localHost = Inet4Address.getLocalHost();
            this.serverPort = webServerInitializedEvent.getWebServer().getPort();
            log.info("启动完成,接口文档地址:http://"+localHost.getHostAddress()+":"+serverPort+"/swagger-ui.html");
        } catch (UnknownHostException e) {
            log.info("获取本机的ip异常错误=={}",e);
        }

    }
}
WebSocketApplication模块启动类:添加上@EnableSwagger2
package com.demo.websocket;

import org.springframework.boot.SpringApplication;
import org.springframework.boot.autoconfigure.SpringBootApplication;
import org.springframework.cloud.client.discovery.EnableDiscoveryClient;
import org.springframework.cloud.netflix.eureka.EnableEurekaClient;
import springfox.documentation.swagger2.annotations.EnableSwagger2;

@EnableDiscoveryClient // 除了eureka,还可以注册到其它的注册中心,如zookeeper上;
@SpringBootApplication
@EnableSwagger2
public class WebSocketApplication {
    public static void main(String[] args) {
        SpringApplication.run(WebSocketApplication.class,args);
    }
}
启动项目以后:访问图片中红圈内的地址就能打开swagger页面

6.效果展示
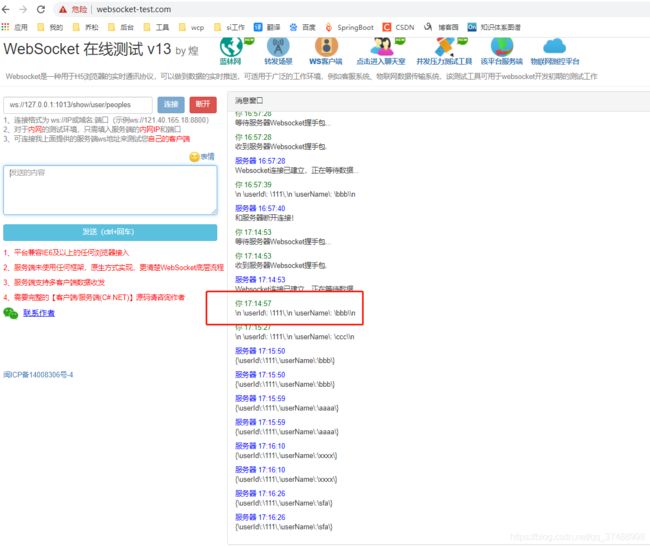
如下图:打开http://www.websocket-test.com/在线测试的网址,可能会被浏览器安全拦截,选择继续访问。
websocket连接地址:ws://127.0.0.1:1013/show/user/peoples
然后在发送的内容中发送一条用户body:表示用户111的某个客户端上线。
{
  "userId": "111",
  "userName": "bbb"
}
模拟用户111的客户端1:

模拟用户111的客户端2:

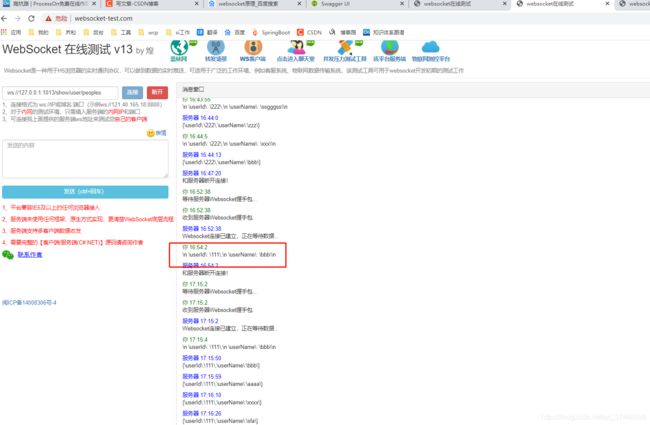
模拟用户222的客户端:

接下来模拟后台数据变动给前端推送消息:
测试接口的调用使用swagger进行,关于swagger的具体使用,可以自行百度;没有的直接用postman或者jmeter都行。
将userId的值在"111"和"222"间切换,就能看到在websocket线测试网页右边显示出对应的消息了。如果userId=“111”,就只在”111“的页面显示发送的消息,如果userId=“222”,就只在”222“的页面显示发送的消息。

到此就演示结束了
