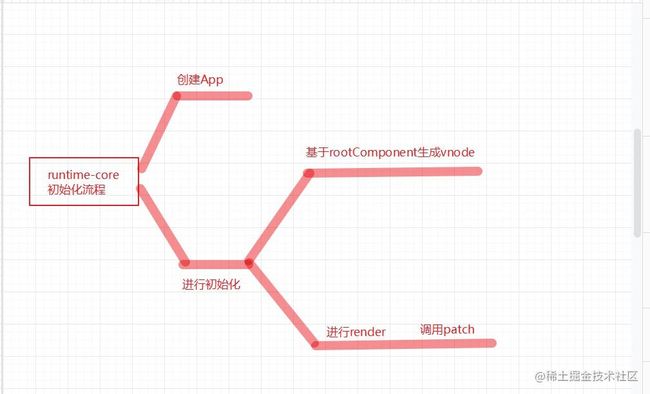
runtime-core初始化核心流程
首先从我们的main.js入手
// example文件夹  index.html main.js App.js
import {createApp} from '../../lib/guide-mini-vue.esm.js'
import {App} from './App.js'

const rootContainer = document.querySelector('#app')
createApp(App).mount(rootContainer)
App.js
import {h} from '../../lib/guide-mini-vue.esm.js'
export const App = {
name:"App",
render(){
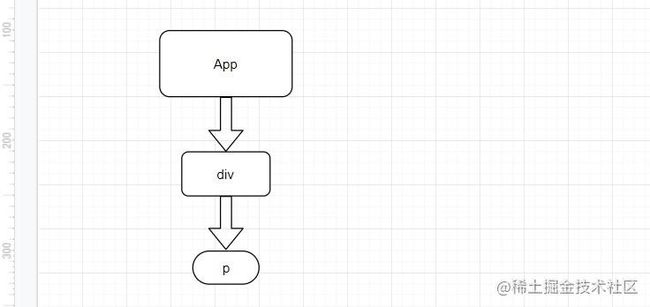
return h('div',{tId:1},[h("p",{},"主页")])
},
setup(){}
}
导入的createApp是利用rollup打包库中的代码生成的lib文件夹中引入的看看我们的createApp函数中做了什么
import { createVNode } from "./vnode";
// render
export function createAppAPI(render){
    return function createApp( rootComponent){
        return {
            // 接受一个根容器
            mount(rootContainer){
                // 在vue3都会将所有的元素转换成虚拟节点
                // 所有的逻辑操作都会基于vnode来执行
                const vnode = createVNode(rootComponent);
                render(vnode,rootContainer)
}}}}
首先会基于我们传入的App组件创建一个虚拟节点,可以先展示下生成的虚拟节点的结构
Object{
    children:undefined,
    component:null,
    el:null,
    key:null,
    props:{},
    shapeFlags:4,
    type:{name:'App',setup:fn,render:fn}
}
这个对象中的type其实就是我们在App传入的结构,最终会通过template编译成我们的渲染函数
h('div',{tId:1},[h("p",{},"主页")])
h函数主要是用来创建我们的虚拟节点,第一个参数是我们的type节点类型,第二个是props,第三个是children
 我们可以先了解vnode的创建函数,可以看到我们在vnode上挂载了我们常见的几个重要的属性,其中还涉及到了对我们的shapeFlag的操作
export function createVNode(type,props?,children?){

     const vnode = {
        type,
        props,
        children,
        component:null,
        key:props && props.key,
        shapeFlag:getShapeFlag(type),
        el:null
    }
    // children
    if(typeof children === 'string'){
        vnode.shapeFlag |= ShapeFlags.TEXT_CHILDREN
    }else if(Array.isArray(children)){
        vnode.shapeFlag |= ShapeFlags.ARRAY_CHILDREN
    }

    // 如何判定给定的参数是一个slot参数
    // 必须是一个组件节点 并且它的children必须是一个Object
    if(vnode.shapeFlag & ShapeFlags.STATEFUL_COMPONENT){
        if(typeof children === 'object'){
            vnode.shapeFlag |= ShapeFlags.SLOT_CHILDREN
        }
    }
    return vnode

}
进入render其实就是调用改了patch函数,通过从传入对象结构出来的type来根据不同的类型执行不同的流程
function render(vnode,container){
        // 构建patch方法 方便后续的递归
        patch(null,vnode,container,null,null)
}
// 改为接受 两个虚拟节点 n1 表示之前的虚拟节点 n2表示最新的虚拟节点
function patch(n1,n2,container,parentComponent,anchor){
    const {type,shapeFlag} = n2
    // 增加一种类型只渲染我们的children
    // Fragment => 只渲染我们的children
    switch (type) {
        case Fragment:
            processFragment(n1,n2,container,parentComponent,anchor)
            break;
        case Text:
            processText(n1,n2,container)
        break;
        default:     // vnode => flag 我们当前虚拟节点的类型都称之为我们的flag
        // 比如我们的字符串就作为元素来对待
        // if(typeof vnode.type === 'string'){
        if(shapeFlag & ShapeFlags.ELEMENT ){
            // 上面的判断可以使用位运算符来进行替换
            // 当虚拟节点的类型是一个字符串时,就作为一个元素节点
            processElement(n1,n2,container,parentComponent,anchor)
            // isObject(vnode.type) 同样进行替换
        }else if(shapeFlag & ShapeFlags.STATEFUL_COMPONENT){
            processComponent(n1,n2,container,parentComponent,anchor)
        }
            break;
    }
    // 去处理组件

    // 判断 是不是 element类型
    // 是element类型就处理element
    // processElement()
    // 是component就处理component
    // console.log(vnode.type,vnode)
    // shapeflags
}
其中的shapeFlag就是用来判断我们的组件类型,其中用到了TS的枚举类型以及位运算的|进行赋值,使用&来进行类型判断
export const enum ShapeFlags{
    // 利用位运算进行查和改  修改就使用我们的或.查找就使用我们的与
    ELEMENT = 1,  // 0001
    STATEFUL_COMPONENT = 1 << 1,  // 0010
    TEXT_CHILDREN = 1 << 2, // 0100
    ARRAY_CHILDREN = 1 << 3, // 1000
    SLOT_CHILDREN = 1 << 4
}
我们的App肯定会走向我们的组件类型,下面是我们的组件类型的主要执行流程
[外链图片转存失败,源站可能有防盗链机制,建议将图片保存下来直接上传(img-swaxCbOp-1655176682607)(https://p6-juejin.byteimg.com/tos-cn-i-k3u1fbpfcp/80114d59d0ff433d9372f3a233777714~tplv-k3u1fbpfcp-zoom-in-crop-mark:1956:0:0:0.image?)] 首先来到我们的创建componentInstance实例对象,同样挂载了一些常见的属性和方法,还可以看到我们之前创建的虚拟节点也挂载到了我们的组件实例对象上
export function creatComponentInstance(vnode,parent){
    const component = {
        vnode,
        type:vnode.type,
        setupState:{},
        props:{},
        next:null,
        slots:{},
        ctx:{},
        subTree:{},
        provides:parent?parent.provides:{},
        parent,
        isMounted:false,
        emit:()=>{}
    }
    component.emit = emit.bind(null,component) as any
    return component
}
以及我们的setup component和组件实例对象的创建
export function setupComponent(instance){
    // TODO
   initProps(instance,instance.vnode.props)
   initSlots(instance,instance.vnode.children)
    instance.proxy = new Proxy({_:instance},PublicInstanceProxyHandlers)
    setupStatefulComponent(instance)
}
这里的Slots处理和Props处理如下
import { ShapeFlags } from "../shared/Shapeflags"
// 再次用到了我们的类型判断
export function initSlots(instance,children){
    // slots
    const {vnode} = instance
    // 是SLOT组件才进行相应的处理
    if(vnode.shapeFlag & ShapeFlags.SLOT_CHILDREN){
        normalizeObjectSlots(children,instance.slots)
    }
}
function normalizeObjectSlots(children:any,slots:any){
    for (const key in children) {
        const value = children[key]
        // slot
        slots[key] = (props) => normalizeSlotValue(value(props))
    }
}
function normalizeSlotValue(value){
  return  Array.isArray(value)? value: [value]
}
<==============================================================>
export function initProps(instance,rawProps){
    instance.props = rawProps || {}
}
setup组件对象,在setupStatefulComponent流程内再次创建了我们的代理对象,把instance对象绑定到Proxy对象,我们的instance就是用来收集各种各样的信息.其实我们的程序归根到底就是数据结构和算法,我们在前面收集到的各种信息就是为了提供给我们的算法去处理问题
function setupStatefulComponent(instance) {
  // todo
  // 1. 先创建代理 proxy
  console.log("创建 proxy");

  // proxy 对象其实是代理了 instance.ctx 对象
  // 我们在使用的时候需要使用 instance.proxy 对象
  // 因为 instance.ctx 在 prod 和 dev 坏境下是不同的
  instance.proxy = new Proxy(instance.ctx, PublicInstanceProxyHandlers);
  // 用户声明的对象就是 instance.type
  // const Component = {setup(),render()} ....
  const Component = instance.type;
  // 2. 调用 setup

  // 调用 setup 的时候传入 props
  const { setup } = Component;
  if (setup) {
    // 设置当前 currentInstance 的值
    // 必须要在调用 setup 之前
    setCurrentInstance(instance);

    const setupContext = createSetupContext(instance);
    // 真实的处理场景里面应该是只在 dev 环境才会把 props 设置为只读的
    const setupResult =
      setup && setup(shallowReadonly(instance.props), setupContext);

    setCurrentInstance(null);

    // 3. 处理 setupResult
    handleSetupResult(instance, setupResult);
  } else {
    finishComponentSetup(instance);
  }
}
上面的instance.type其实就是我们传入的component,然后再从component中解构出我们的setup方法,在我们的setup中先判断是否是一个函数,然后设置它当前的组件实例对象,另外还会看到我们的熟悉的两个参数一个是props一个是context(上下文对象),这两个参数在经过一系列的判断后都传入了我们的setup方法中
function createSetupContext(instance) {
  console.log("初始化 setup context");
  return {
    attrs: instance.attrs,
    slots: instance.slots,
    emit: instance.emit,
    expose: () => {}, // TODO 实现 expose 函数逻辑
  };
}
function handleSetupResult(instance,setupResult:any){
  // setup 返回值不一样的话,会有不同的处理
  // 1. 看看 setupResult 是个什么
  if (typeof setupResult === "function") {
    // 如果返回的是 function 的话,那么绑定到 render 上
    // 认为是 render 逻辑
    // setup(){ return ()=>(h("div")) }
    instance.render = setupResult;
  } else if (typeof setupResult === "object") {
    // 返回的是一个对象的话
    // 先存到 setupState 上
    // 先使用 @vue/reactivity 里面的 proxyRefs
    // 后面我们自己构建
    // proxyRefs 的作用就是把 setupResult 对象做一层代理
    // 方便用户直接访问 ref 类型的值
    // 比如 setupResult 里面有个 count 是个 ref 类型的对象,用户使用的时候就可以直接使用 count 了,而不需要在 count.value
    // 这里也就是官网里面说到的自动结构 Ref 类型
    instance.setupState = proxyRefs(setupResult);
  }

  finishComponentSetup(instance);
}
在handleSetupResult中判断setupResult的类型如果是一个函数,其实就等效于我们的render函数, 在文档中也有提到当我们在setup中return一个函数时,就把等效于这个函数当成我们的render函数 当我们返回的是一个对象时,会把它用proxyRefs进行一个处理,在下面可以发现被我们的proxyRefs处理后当触发我们的get操作时会进入到unRef中,返回的就是我们.value值,省去了用户再去加一层点语法
export function proxyRefs(objectWithRefs){
    // 设法让我们得知调用了ref的get和set方法
    return new Proxy(objectWithRefs,{
        get(target,key){
        // get => age(ref)是ref对象就给他返回value值
        // not ref 返回他本身  这个逻辑实际上就是我们的unRef
        // 124 get逻辑实现完成
        return unRef(Reflect.get(target,key))
        },
        set(target,key,value){
            // 125 判断我们的对象是一个ref类型 并且它的值不是一个ref类型 这种情况才去修改它原先的值
            if(isRef(target[key]) && !isRef(value)){
               return target[key].value = value
            }else{
                // 当给定对象的值是一个ref对象时 我们直接让他替换原先的值
                return Reflect.set(target,key,value)
            }
        }
    })
}
export function unRef(ref){
    // 看看是不是ref => ref.value
    return isRef(ref)?ref.value:ref;
}
在finishComponentSetup中会去判断当前的实例对象是否有render函数,如果没有则会将组件的render函数赋值给他(这里省去了template的逻辑判断,暂时还未涉及到模板编译)总结来说我们的setup component主要为了初始化数据,确保有我们的render函数
function finishComponentSetup(instance:any){
     const Component = instance.type;
  if (!instance.render) {
    instance.render = Component.render;
  }
}
首先会调用我们的component,这里的n1代表的是之前的组件实例对象,n2代表的是当前的值.主要是用于之后的组件实例对象更新的处理,比如我们的地府算法干的就是这个活
function processComponent(n1,n2:any,container:any,parentComponent,anchor){
    // 当n1没有值肯定是进入到我们的初始化的流程
    if(!n1){
        mountComponent(n2,container,parentComponent,anchor)
    }else{
        // 有值就进行更新逻辑
        updateComponent(n1,n2)
    }
}
当n1没有值肯定是进入到我们的初始化的流程,回到了我们上面的setupComponent流程
function mountComponent(initialvnode:any,container,parentComponent,anchor){
    // throw new Error('Function not implementd')
   const instance = initialvnode.component = creatComponentInstance(initialvnode,parentComponent)

   setupComponent(instance)
    setupRenderEffect(instance,initialvnode,container,anchor)
}
处理完前面额逻辑后会进入到我们的setupRenderEffect中,这里又用到了我们的effect,把我们组件实例对象的更新用effect来进行包裹,并且会直接执行.在里面会判断我们实例化对象有没有被初始化过,明显一开始是没有初始化的,进入逻辑代码中,就会执行我们实例对象的render函数并赋值给我们的虚拟节点树.因为获取到的是虚拟节点,所以会再次递归调用我们的patch,这样再次进行类型判断时,就会走向我们的element类型的处理流程
function setupRenderEffect(instance:any,initialvnode,container,anchor){

  instance.update =  effect(()=>{
        if(!instance.isMounted){
            console.log('init')
            const {proxy} = instance
            const subTree = instance.subTree =  instance.render.call(proxy);
            // console.log(subTree)
        // vndoeTree => patch
        // vnode => element =>mountElement
        patch(null,subTree,container,instance,anchor)

        // 我们这里的subTree就是我们的根节点,我们所要赋值的el可以在subTree上找到
        // 传入我们的虚拟节点
        initialvnode.el = subTree.el
        instance.isMounted = true
    }else{
        console.log('update')
        // 需要一个更新之后的vnode
            const {next,vnode} = instance
            if(next){
                next.el = vnode.el

                updateComponentPreRender(instance,next)
            }
            const {proxy} = instance
            const subTree = instance.render.call(proxy);
            const prevSubTree = instance.subTree

            instance.subTree = subTree
            // console.log('current',subTree)
            // console.log('pre',prevSubTree)
        patch(prevSubTree,subTree,container,instance,anchor)
    }
    },{
        scheduler(){
            console.log('update -- scheduler')
            queueJobs(instance.update)
        }
    })
}
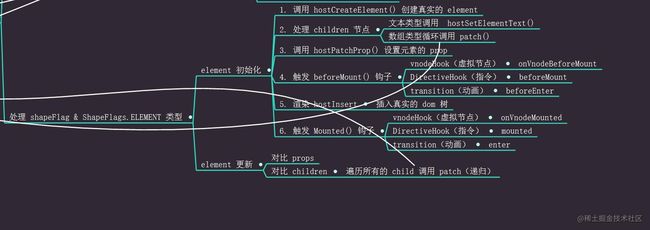
进入到我们的代码中,这里的重点就是把我们的虚拟节点转换为我们的真实DOM元素.这里的CreateElement其实是来自我们runtime-dom模块中的逻辑,为什么我们要把DOM操作进行抽离.因为在vue3中是可以允许用户去自定义渲染器的,比如我们想把这些视图渲染到canvas上,只需要调用这些公共的接口做一些特殊的处理即可
function createElement(type){
    // console.log('createElement------------')
    return document.createElement(type)

}
function mountElement(vnode:any,container:any,parentComponent,anchor){
    // canvas
    // new Element()

    // 作为元素的处理  基于vnode来创建元素
    // 我们所谓的虚拟节点中的内容主要由 type props children 这里的type一般有string和array
    // 还是按照我们正常创建元素的方式来创建虚拟DOM
    // 这里的el是属于我们的element类型也就是div的,并不是我们认为的初始化的虚拟节点
    const el = (vnode.el = hostCreateElement(vnode.type))
    // string array
    const {children,shapeFlag} = vnode
    // 字符串类型的处理方式
    // children
    if(shapeFlag & ShapeFlags.TEXT_CHILDREN){
    // if(typeof children === 'string'){
        // textchildren
        el.textContent = children;
        // arraychildren
        // Array.isArray(children)
    }else if(shapeFlag & ShapeFlags.ARRAY_CHILDREN){
        // 逻辑抽离 函数封装
        mountChildren(vnode.children,el,parentComponent,anchor)
        // children.forEach(v=>{
            // patch(v,el)
        // })
    }
    // props
    const {props} = vnode
    for (let key in props) {
        const val = props[key]
        // const isOn = key=> /^on[A-Z]/.test(key)
        // console.log(key)
        // // 如果我们的key是我们的onclick我们就可以给他添加一个点击事件
        // if(isOn(key)){
        //     el.addEventListener(key.slice(2).toLowerCase(),val)
        // }else{
        //     el.setAttribute(key,val)
        // }
        hostPatchProp(el,key,null,val)
    }
    // canvas
    // el.x = 10
    // addChild()
    // container.append(el)
    hostInsert(el,container,anchor)
}
在定义好我们的element时,就可以去做判断,是否有children的存在,如果有进行遍历依次继续递归的调用patch函数
function mountChildren(children,container,parentComponent,anchor){
    children.forEach(v=>{
        patch(null,v,container,parentComponent,anchor)
    })
}
现在就会进入到我们的processElement流程
function processElement(n1,n2:any,container:any,parentComponent,anchor){
    // console.log('processElement')
    if(!n1){
        // element 主要有初始化init和更新update
        mountElement(n2,container,parentComponent,anchor)
    }else{
        patchElement(n1,n2,container,parentComponent,anchor)
    }
}
如果不存在就进入我们的初始化流程
function mountElement(vnode:any,container:any,parentComponent,anchor){
    // canvas
    // new Element()

    // 作为元素的处理  基于vnode来创建元素
    // 我们所谓的虚拟节点中的内容主要由 type props children 这里的type一般有string和array
    // 还是按照我们正常创建元素的方式来创建虚拟DOM
    // 这里的el是属于我们的element类型也就是div的,并不是我们认为的初始化的虚拟节点
    const el = (vnode.el = hostCreat
    eElement(vnode.type))
    // string array
    const {children,shapeFlag} = vnode
    // 字符串类型的处理方式
    // children
    if(shapeFlag & ShapeFlags.TEXT_CHILDREN){
    // if(typeof children === 'string'){
        // textchildren
        el.textContent = children;
    }else if(shapeFlag & ShapeFlags.ARRAY_CHILDREN){
        // 逻辑抽离 函数封装
        mountChildren(vnode.children,el,parentComponent,anchor)
    }
    // props
    const {props} = vnode
    for (let key in props) {
        const val = props[key]
        hostPatchProp(el,key,null,val)
    }
    // canvas
    // el.x = 10
    // addChild()
    // container.append(el)
    hostInsert(el,container,anchor)
}
如果已经存在就会进入patchChildren流程,经过下面的流程我们的子节点就成功渲染出来了
function patchElement(n1,n2:any,container,parentComponent,anchor){
    const oldProps = n1.props || {}
    const newProps = n2.props || {}
    const el = (n2.el = n1.el)
    patchChildren(n1,n2,el,parentComponent,anchor)
    patchProps(el,oldProps,newProps)
}
function patchChildren(n1,n2,container,parentComponent,anchor){
    const prevShapeFlag = n1.shapeFlag
    const {shapeFlag} = n2
    const c1 = n1.children
    const c2 = n2.children
    if(shapeFlag & ShapeFlags.TEXT_CHILDREN){
        if(prevShapeFlag & ShapeFlags.ARRAY_CHILDREN){
            // 1.把n1的元素(children)清空
            unmountChildren(n1.children)
        }
        if(c1 !== c2){
               // 2.设置text
               hostSetElementText(container,c2)
           }
    }else{
        if(prevShapeFlag & ShapeFlags.TEXT_CHILDREN){
            // 清空原来的文本
            hostSetElementText(container,'')
            // 直接将children进行mount
            mountChildren(c2,container,parentComponent,anchor)
        }else{
            // diff array with array
            patchKeyedChildren(c1,c2,container,parentComponent,anchor)
        }
    }
}