windows系统+RTX3070+Anaconda+cuda+cudnn配置tensorflow-gpu
亲测有效
- 显卡RTX3070
- tensorflow使用tf-nightly2.6版本
- cuda使用cuda11.2
- cudnn使用8.1
资源百度网盘链接:
cuda 链接:https://pan.baidu.com/s/1KDzEgc5JiTYUy5Q0fzJUTg
提取码:1ncs
cudnn 链接:链接:https://pan.baidu.com/s/14SqQA_agvTuo3DGoWANMaw
提取码:fzbg
失效可以评论,补发
第一步:安装Anaconda,在不同项目中创建各自所需的虚拟环境
去anaconda官网直接下载即可,教程很多不再赘述。
打开anaconda终端,输入命令来查看、创建项目所需的环境
conda info --env  查看anaconda中所有的环境
conda activate xxx   进入名称为xxx的环境
conda list        列出该环境中安装的所有包
conda create -n  xxxx python==3.x   创建名称为xxxx的环境,python版本可以自己设置
第二步:安装cuda和cudnn
Nvidia官网下载即可,或者直接在百度网盘下载。
亲测有效的cuda和cudnn组合为cuda11.2+cudnn8.1
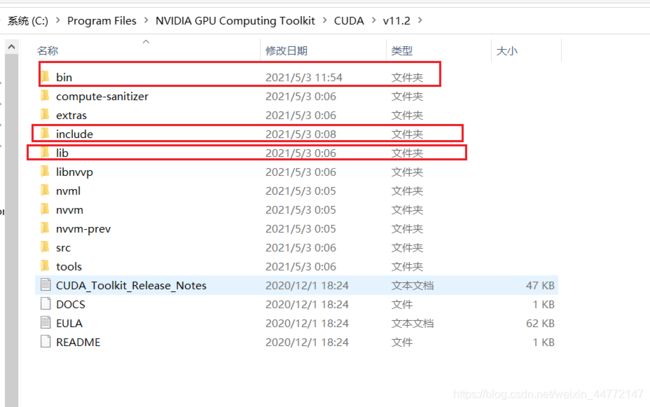
安装过程很简单,安装完成后将cudnn中的三个文件夹下的内容分别复制粘贴到cuda/v11.2下的同名文件夹下即可。
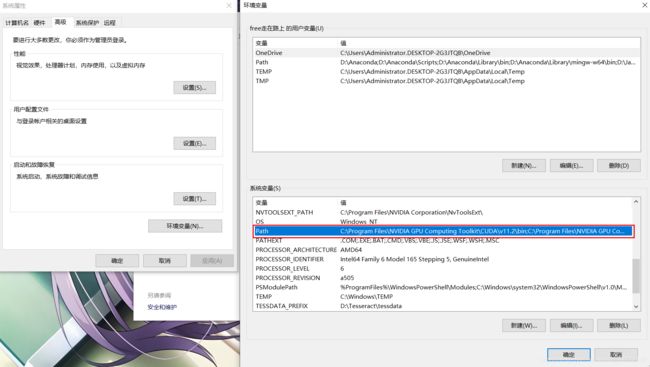
最后配置环境变量即可。

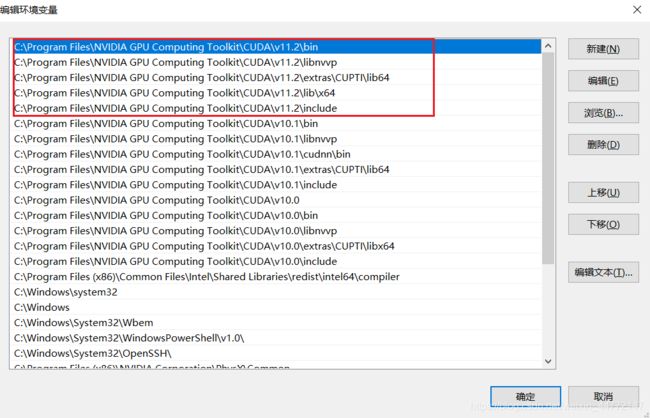
打开path,新建变量如下所示。

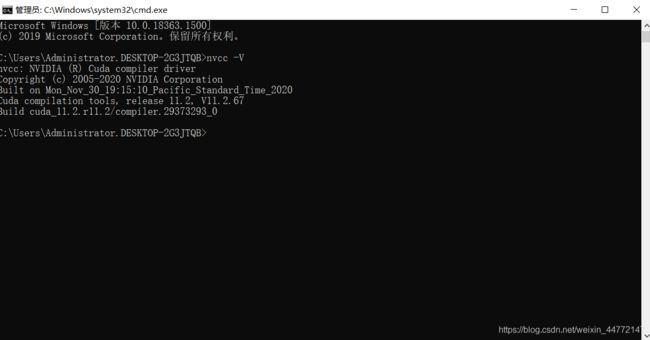
变量配置完成。win+r打开cmd终端,输入nvcc -V查看安装是否成功。
第三步:安装tf-nightly-2.6
去PyPI网站下载tf-nightly版本的tensoflow,复制安装命令,在你所创建的环境中安装即可。
第四步:测试安装是否成功。
测试代码一:
#查看tensorflow版本
print(tf.__version__)

print(tf.config.list_physical_devices('GPU'))

a = tf.constant(2.0)
b = tf.constant(4.0)
print(a + b)
测试代码二:
TensorFlow and tf.keras
import tensorflow as tf
# Helper libraries
import numpy as np
import matplotlib.pyplot as plt
from time import time

mnist = tf.keras.datasets.mnist
(x_train, y_train), (x_test, y_test) = mnist.load_data()
x_train, x_test = x_train / 255.0, x_test / 255.0

# CPU运行
startTime1 = time()

with tf.device('/cpu:0'):
    model = tf.keras.models.Sequential([
        tf.keras.layers.Flatten(input_shape=(28, 28)),
        tf.keras.layers.Dense(1000, activation='relu'),
        tf.keras.layers.Dropout(0.2),
        tf.keras.layers.Dense(1000, activation='relu'),
        tf.keras.layers.Dropout(0.2),
        tf.keras.layers.Dense(10, activation='softmax')
    ])
    model.compile(optimizer='adam',
                  loss='sparse_categorical_crossentropy',
                  metrics=['accuracy'])
    model.fit(x_train, y_train, epochs=10)
    model.evaluate(x_test, y_test)

t1 = time() - startTime1

# GPU运行
startTime2 = time()

with tf.device('/gpu:0'):
    model = tf.keras.models.Sequential([
        tf.keras.layers.Flatten(input_shape=(28, 28)),
        tf.keras.layers.Dense(1000, activation='relu'),
        tf.keras.layers.Dropout(0.2),
        tf.keras.layers.Dense(1000, activation='relu'),
        tf.keras.layers.Dropout(0.2),
        tf.keras.layers.Dense(10, activation='softmax')
    ])

    model.compile(optimizer='adam',
                  loss='sparse_categorical_crossentropy',
                  metrics=['accuracy'])

    model.fit(x_train, y_train, epochs=10)
    model.evaluate(x_test, y_test)

t2 = time() - startTime2

# 打印运行时间
print('使用cpu花的时间:', t1)
print('使用gpu花的时间:', t2)
最后就可以愉快的跑自己的项目啦~