一、文章概述
注意:本文只是人脸检测,人脸识别的实现请参见本人另一篇博客:基于OpenCV+TensorFlow+Keras实现人脸识别
本文将要讲述的是Python环境下如何用OpenCV检测人脸,本文的主要内容分为:
1、检测图片中的人脸
2、实时检测视频中出现的人脸
3、用运设备的摄像头实时检测人脸
二:准备工作
提前做的准备:
- 安装好Python3
- 下载安装OpenCV库,方法是
pip install opencv-python -i https://mirrors.aliyun.com/pypi/simple/ --trusted-host=mirrors.aliyun.com/pypi/simple
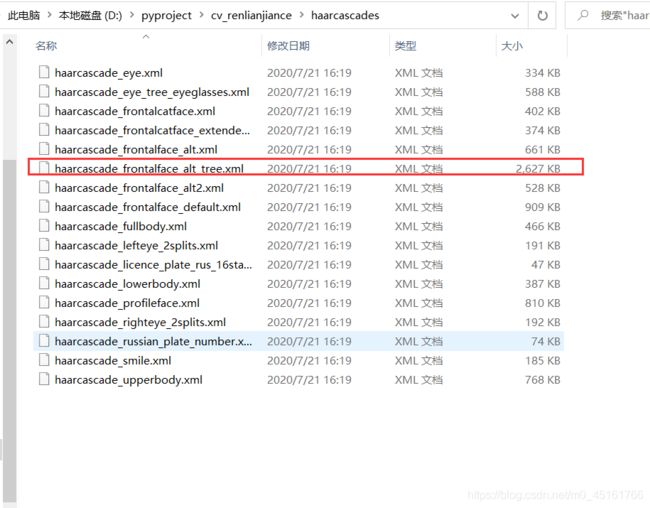
- 下载特征数据HAAR和LBP,这两种数据都能实现对人脸特征的提取,HAAR大多是小数计算所以运算速度较慢,LBP大多是整数计算运行速度较快。如图所示,本次实例用红框中的文本,其他的文本,比如第一个haarcascade_eye.xml是眼睛识别的文本,我们下次再用。
注意:点击下载HAAR和LBP的特征数据--------数据集下载

三、开始讲述
1、图片人脸检测
(1)代码和说明
import cv2 as cv
import numpy as np
def face_detect_demo():
gray = cv.cvtColor(src, cv.COLOR_BGR2GRAY)
face_detector = cv.CascadeClassifier(
“D:/pyproject/cv_renlianjiance/lbpcascades/lbpcascade_frontalcatface.xml”)
faces = face_detector.detectMultiScale(gray, 1.02, 5)
for x, y, w, h in faces:
cv.rectangle(src, (x, y), (x+w, y+h), (0, 0, 255), 2)
cv.imshow(“result”, src)
src = cv.imread(“D:/pyproject/cv_renlianjiance/cvrenxiangpic/1.jpg”)
cv.namedWindow(“input image”, cv.WINDOW_AUTOSIZE)
cv.namedWindow(“result”, cv.WINDOW_AUTOSIZE)
cv.imshow(“input image”, src)
face_detect_demo()
cv.waitKey(0)
cv.destroyAllWindows()
- 1
- 2
- 3
- 4
- 5
- 6
- 7
- 8
- 9
- 10
- 11
- 12
- 13
- 14
- 15
- 16
- 17
- 18
- 19
- 20
- 21
- 22
- 23
- 24
(2)结果展示
2、视频中的人脸检测
(1)代码和说明
import cv2 as cv
import numpy as np
def face_detect_demo(image):
gray = cv.cvtColor(image, cv.COLOR_BGR2GRAY)
face_detector = cv.CascadeClassifier(“D:/pyproject/cv_renlianjiance/lbpcascades/lbpcascade_frontalcatface.xml”)
faces = face_detector.detectMultiScale(gray, 1.02, 5)
for x, y, w, h in faces:
cv.rectangle(image, (x, y), (x+w, y+h), (0, 0, 255), 2)
cv.imshow(“result”, image)
capture = cv.VideoCapture(“D:/pyproject/cv_renlianjiance/video/1.mp4”)
cv.namedWindow(“result”, cv.WINDOW_AUTOSIZE)
while (True):
ret, frame = capture.read()
frame = cv.flip(frame, 1)
face_detect_demo(frame)
c = cv.waitKey(10)
if c == 27:
break
cv.waitKey(0)
cv.destroyAllWindows()
- 1
- 2
- 3
- 4
- 5
- 6
- 7
- 8
- 9
- 10
- 11
- 12
- 13
- 14
- 15
- 16
- 17
- 18
- 19
- 20
- 21
- 22
- 23
- 24
- 25
- 26
- 27
- 28
- 29
(2)结果展示

3、利用设备上的摄像头进行人脸检测,其实和2中的代码一样,只是打开摄像头,而不是读取视频文件
代码和说明
import cv2 as cv
import numpy as np
def face_detect_demo(image):
gray = cv.cvtColor(image, cv.COLOR_BGR2GRAY)
face_detector = cv.CascadeClassifier(“D:/pyproject/cv_renlianjiance/lbpcascades/lbpcascade_frontalcatface.xml”)
faces = face_detector.detectMultiScale(gray, 1.02, 5)
for x, y, w, h in faces:
cv.rectangle(image, (x, y), (x+w, y+h), (0, 0, 255), 2)
cv.imshow(“result”, image)
capture = cv.VideoCapture(0)
cv.namedWindow(“result”, cv.WINDOW_AUTOSIZE)
while (True):
ret, frame = capture.read()
frame = cv.flip(frame, 1)
face_detect_demo(frame)
c = cv.waitKey(10)
if c == 27:
break
cv.waitKey(0)
cv.destroyAllWindows()
- 1
- 2
- 3
- 4
- 5
- 6
- 7
- 8
- 9
- 10
- 11
- 12
- 13
- 14
- 15
- 16
- 17
- 18
- 19
- 20
- 21
- 22
- 23
- 24
- 25
- 26
- 27
- 28
- 29
以上就是本文所有内容,希望能帮到大家!!!
