迅为嵌入式linux驱动开发笔记(四)—设备树
一、设备树
一 、什么是设备树?
设备树是一种描述硬件资源的数据结构。 它通过 bootloader 将硬件资源传给内核, 使得内核和硬件资源描述相对独立。
二、设备树的基本概念
1、为什么叫设备树呢?
因为他的语法结构像树一样,所以管它叫设备树。
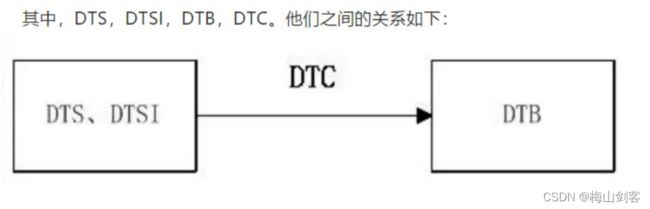
2、常用名词解释
<1>DT:Device Tree // 设备树
<2>FDT:Flattened Device Tree // 展开设备树 // 开放固件, 设备树起源于OF,所以我们在设备树中可以看到很多有 of 字母的函数
<3>device tree source(dts)// 设备树代码
<4>device tree source include(dtsi) // 更通用的设备树代码 ,也就是相同芯片但不能平台 都可以使用的代码
<5>device tree blob(dtb)//DTS 编译后得到的DTB文件
<6>device tree compiler(dtc)// 设备树编译器
二、设备树基本语法
一.设备树基本框架
<1> 设备树从根节点开始,每个设备都是一个节点。
<2> 节点和节点之间可以互相嵌套,形成父子关系。
<3> 设备的属性用 key-value 对 ( 键值对 ) 来描述,每个属性用分号结束。
二.设备树语法
2.1 节点
什么是节点呢?
节点就好比一颗大树,从树的主干开始,然后有一节一节的树枝,这个就叫节点。 在代码中的节点是什么样子的呢。 我们把上面模板中的根节点摘出来,如下图所 示,这个就是根节点。 相当于大树的树干。
/{
};// 分号
而树枝就相当于设备树的子节点,同样我们把子节点摘出来就是根节点里面的 node1 和 node2 , 如下图所示:
/{ // 根节点
		node1// 子节点 node1
		{
		};
		node2// 子节点 node2
		{
		};
 };// 分号
一个树枝是不是也可以继续分成好几个树枝呢,也就是说子节点里面可以包含子子节 点。 所以 child-node1 和 child-node2 是 node1 和 node1 的子节点,如下图所示:
/{ // 根节点
			node1// 子节点 node1
			{
				child-node1 // 子子节点
				 {
				 };
			};
				node2//子节点node2
				{
					child-node2 // 子子节点
					{
					};
			  };
};// 分号
2.2 节点名称
节点的命名有一个固定的格式。
格式: < 名称 >[@< 设备地址 >]
< 名称 > 节点的名称也不是任意起的,一般要体现设备的类型而不是特点的型号,比如网口, 应该命名为 ethernet , 而不是随意起一个,比如 111 。
< 设备地址 > 就是用来访问该设备的基地址。 但并不是说在操作过程中来描述一个地址,主要用来区分用。
注意事项:
<1> 同一级的节点只要地址不一样,名字是可以不唯一的。
<2> 设备地址是一个可选选项,可以不写。 但为了容易区分和理解,一般是都写的。
2.3节点别名
当我们找一个节点的时候,我们必须书写完整的节点路径,如果我们的节点名很长,那 么我们在引用的时候就十分不方便,所以,设备树允许我们用下面的形式为节点标注引用 ( 起 别名 ) 。 比如一个动漫人物的名字是蒙其· D · 路飞,他的小名是路飞,那是不是小名要比我们的全名更容易记忆了。这个就是别名。
举例:
uart8: serial@02288000
其中,uart8 就是这个节点名称的别名,serial@02288000 就是节点名称。
2.4 节点的引用
一般我往一个节点里面添加内容的时候,不会直接把添加的内容写到节点里面,而是通过节点的引用来添加。
举例:
&uart8 {
 pinctrl-names = "default";
 pinctrl-0 = <&pinctrl_uart8>;
 status = "okay";
 }
&uart8 表示引用节点别名为 uart8 的节点,并往这个节点里面添加以下内容:
pinctrl-names = "default";
pinctrl-0 = <&pinctrl_uart8>;
status = "okay"
注意事项: 编译设备树的时候,相同的节点的不同属性信息都会被合并,相同节点的相同的属性会被 重写,使用引用可以避免移植者四处找节点。 如 dts 和 dtsi 里面都有根节点,但最终会合并 成一个根节点。
2.5 属性
( 1 ) reg属性reg属性用来描述一个设备的地址范围。
格式:
reg=<add1 length1 [add2 length2]......>
举例:
  serial@02288000 {
  					reg = <101F2000 0x1000>;
  				 };
其中101F2000 就是起始地址,0x1000 就是长度。
( 2 )
#address-cells 和 #size-cells 属性
#address-cells 用来设置子节点中 reg 地址的数量
#size-cells 用来设置子节点中 reg 地址长度的数量。
举例:
 cpu{
  #address-cells = <1>;
   #size-cells = <1>;
    serial@101F2000{
    compatible = "serial";
     reg = <101F2000 0x1000>;
     };
};
其中 #address-cells 和 #size-cell 均为 1 ,也就是说子节点里面的 reg 属性里这个寄存器 组的起始地址只有一个,长度也只有一个。 所以101F2000是起始地址, 0x1000 是长度。
( 3 ) compatible 属性
compatible 是一个字符串列表,可以在代码中进行匹配。 举例:
compatible = "led" ;
( 4 ) status 属性
status 属性的值类型是字符串,这里我们只要记住俩个常用的即可,一个是 okay , 表示设备可以正常使用,一个是 disable,表示设备不能正常使用。
三、在设备树上添加自己的节点
如果环境没有 dtc 工具,需要安装 dtc工具
安装命令:
apt-get install device-tree-compiler
设备树的of函数
#include设备树下的platform总线
名称匹配:.of_match_table = of_match_table
const struct of_match_table[] =
{
    {.compatible = "test1234"},
    {},
}

struct platform_driver beep_driver = {
     .probe = beep_probe,
     .remove = beep_remove,
     .driver = {
         .owner = THIS_MODULE,
         .name = "beep_test",
         .of_match_table = of_match_table
     },
     .id_table = &beepid_table
 };
资源获取,匹配probe之后进入probe函数之后就可以获取资源了
方法1:直接获取
printk("node name is %s\n",pdev->dev.of_node->name);
方法2:
int beep_probe(struct platform_device *pdev){

    printk("beep_probe");

    //printk("node name is %s\n",pdev->dev.of_node->name);

    /*查找我们要查找的节点*/
    test_device_node = of_find_node_by_path("/test");
    if (test_device_node == NULL)
    {
        printk("of_find_by_path is erron\n");
        return -1;
    }
    printk("test_device_node is %s",test_device_node->name);

    /*获取reg属性内容*/
    ret = of_property_read_u32_array(test_device_node,"reg",out_value,2);
    if (ret<0)
    {
         printk("of_property_read_u32_array is error\n");
    }
    printk("out_value[0] is 0x%08x",out_value[0]);
    printk("out_value[1] is 0x%08x",out_value[1]);
    return 0;
}
of_iomap重映射函数:
  vir_gpio_dr = of_iomap(pdev->dev.of_node,0);
    if (vir_gpio_dr == NULL)
    {
        printk("of_iomap is error\n");
        return -1;
    }