Cartopy画地图第八天(冷空气南下,NCL色标使用)
Cartopy画地图第八天(冷空气南下,NCL色标使用)
相信很多朋友都看过这张漂亮的图吧
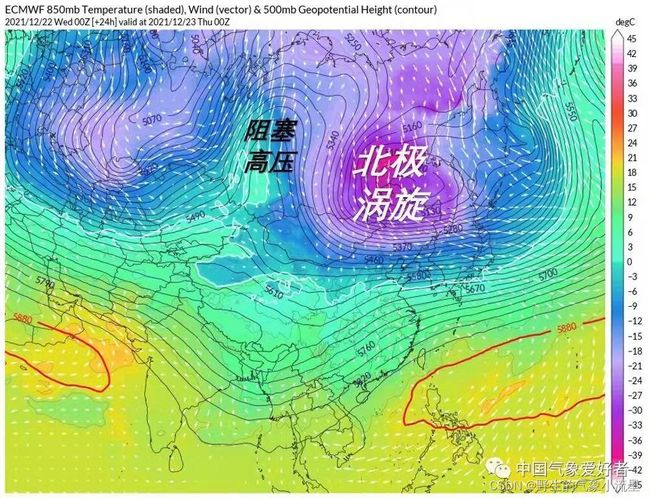
这是中国气象爱好者公众号画的一张反映冷空气的图片,当时就被惊艳到了,本帖就来复刻一下这张图。
本次的知识点大概总结一下就是:
1.画风的箭头流场
2.单画某一根等值线,比如588,0℃
3.引入NCL色标
4.制作gif图片
先上个效果图
一、分析图片
中国气象爱好者的图片拿到手以后开始分析
1.500的位势高度画等值线
2.850的温度填色
3.0℃等值线
4.588画等值线
5.850风场的箭头流场
6.注意投影方式
其实也不难,一个一个画就好了。
二、函数准备
(一)、使用NLC色标的函数
import re
import matplotlib.cm
from matplotlib import colors
import matplotlib.pyplot as plt
import numpy as np
class Colormap(colors.ListedColormap):
    def __init__(self, c, name='from_list', n=None):
        self.colors = c
        self.name = name
        self.N = n
        super(Colormap, self).__init__(self.colors, name=self.name, N=self.N)

    def __getitem__(self, item):
        return Colormap(self.colors[item], name='sliced_' + self.name)

    def show(self):
        a = np.outer(np.ones(10), np.arange(0, 1, 0.001))
        plt.figure(figsize=(2.5, 0.5))
        plt.subplots_adjust(top=0.95, bottom=0.05, left=0.01, right=0.99)
        plt.subplot(111)
        plt.axis('off')
        plt.imshow(a, aspect='auto', cmap=self, origin='lower')
        plt.text(0.5, 0.5, self._name,
                 verticalalignment='center', horizontalalignment='center',
                 fontsize=12, transform=plt.gca().transAxes)
        plt.show()
def coltbl(cmap_file):
        pattern = re.compile(r'(\d\.?\d*)\s+(\d\.?\d*)\s+(\d\.?\d*).*')
        with open(cmap_file) as cmap:
            cmap_buff = cmap.read()
        cmap_buff = re.compile('ncolors.*\n').sub('', cmap_buff)
        if re.search(r'\s*\d\.\d*', cmap_buff):
            return np.asarray(pattern.findall(cmap_buff), 'f4')
        else:
            return np.asarray(pattern.findall(cmap_buff), 'u1') / 255.
def get_my_cmaps(cname):
    try:
        if cname in matplotlib.cm._cmap_registry:
            return matplotlib.cm.get_cmap(cname)
    except:
        pass
    cmap_file = os.path.join( cname+ ".rgb")
    cmap = Colormap(coltbl(cmap_file), name=cname)
    matplotlib.cm.register_cmap(name=cname, cmap=cmap)
    return cmap
一个类,俩函数,大家可以研究一下怎么实现引入NCL色标的,这里因为篇幅的关系,就不介绍了,有兴趣的朋友可以留言,下次单独出一期来介绍引入NCL色标的原理。
(二)、数据读取的函数
本次数据使用的是Micaps导出的二进制欧细资料,读取函数如下
from read_mdfs import MDFS_Grid
from scipy.interpolate import interpolate
def get_lat_lon(filepath):#获取经纬度数据
    a = MDFS_Grid(filepath)
    lon = a.data['Lon']
    lat = a.data['Lat'][::-1]#翻了纬度
    lon_scipy = np.arange(lon.min(), lon.max(), 0.05)#插值
    lat_scipy = np.arange(lat.min(), lat.max(), 0.05)
    return lon,lat,lon_scipy,lat_scipy
def read_data_hgt_or_tmp(filepath,lon,lat,lon_scipy,lat_scipy):#读位势高度和温度
    a = MDFS_Grid(filepath)
    data = a.data['Grid'][::8,::8]#为了数据更平滑,降低了精度
    spline = interpolate.RectBivariateSpline(lat[::8], lon[::8],data,)
    data = spline(lat_scipy,lon_scipy)#插值
    return data[::-1,:]#翻了纬度
def read_data(filepath):#读取一般数据,这里是风
    a = MDFS_Grid(filepath)
    data = a.data['Grid']
    return data[::-1,:]#翻了纬度
(三)、地图数据读取
后面画图为了做gif图片,所以要画好几次地图,但是读取地图数据可以一次完成,想办法减少运行时间是个好习惯哦。
with open('CN-border-La.dat') as src:
    context = src.read()
    blocks = [cnt for cnt in context.split('>') if len(cnt) > 0]
    borders = [np.fromstring(block, dtype=float, sep=' ') for block in blocks]
(四)、其他准备
fig = plt.figure(figsize=(47, 30), dpi=30)#画布的设置,也是一次就够了,画完一张图清空一次就好了,减少运行内存。
frames = []#用来存放图片的列表,为的是制作gif
TIMES = ['000','003','006','009','012']#做循环用的时次
三、循环画图
(一)、读取数据
for TIME in TIMES:
    #读取经纬度、500位势高度
    file_path = r"ECMWF_HR\ECMWF_HR_HGT_500_21122420." + TIME
    lon ,lat,lon_scipy,lat_scipy = get_lat_lon(file_path)
    hgt_500 = read_data_hgt_or_tmp(file_path,lon ,lat,lon_scipy,lat_scipy)
    #读取850温度
    file_path = r"ECMWF_HR\ECMWF_HR_TMP_850_21122420." + TIME
    tem_850 = read_data_hgt_or_tmp(file_path,lon ,lat,lon_scipy,lat_scipy)
    #读取850U风
    file_path = r"ECMWF_HR\ECMWF_HR_UGRD_850_21122420." + TIME
    u_850 = read_data(file_path)
    #读取850V风
    file_path = r"ECMWF_HR\ECMWF_HR_VGRD_850_21122420." + TIME
    v_850 = read_data(file_path)
(二)、画图和地图设置
#加子图,做一些地图设置
    ax = fig.add_axes([0.02, 0.05, 0.9, 0.9], projection=ccrs.LambertConformal(central_latitude=90, central_longitude=105))
    extent = [80,130,20,55]
    ax.set_extent(extent,crs=ccrs.Geodetic())
    gl = ax.gridlines( draw_labels=True, linewidth=2, color='k', alpha=0.5, linestyle='--')
    gl.xformatter = LONGITUDE_FORMATTER  ##坐标刻度转换为经纬度样式
    gl.yformatter = LATITUDE_FORMATTER
    gl.xlabel_style = {'size': 30}
    gl.ylabel_style = {'size': 30}
    resolution_map = '50m'
    ax.add_feature(cfeature.OCEAN.with_scale(resolution_map))
    ax.add_feature(cfeature.LAND.with_scale(resolution_map))
    ax.add_feature(cfeature.RIVERS.with_scale(resolution_map))
    ax.add_feature(cfeature.LAKES.with_scale(resolution_map))

    for line in borders:
        ax.plot(line[0::2], line[1::2], '-', color='k',transform=ccrs.Geodetic())
这些也不介绍了,在之前的帖子有介绍,可以往前学习。
(三)、500位势高度和588、0℃线绘制
#画500位势高度
    ct = ax.contour(lon_scipy, lat_scipy, hgt_500, 20, colors='k',linewidths=3, transform=ccrs.PlateCarree())
    ax.clabel(ct, inline=True, fontsize=30, fmt='%d')
    #单画一遍588,红色
    clev = [588]
    ct = ax.contour(lon_scipy, lat_scipy, hgt_500, clev, colors='r',linewidths=3, transform=ccrs.PlateCarree())
    ax.clabel(ct, inline=True, fontsize=30, fmt='%d')
    #画0℃线,白色
    clev = [0.0]
    ct = ax.contour(lon_scipy, lat_scipy, tem_850, clev, colors='w',linewidths=5, transform=ccrs.PlateCarree())
    ax.clabel(ct, inline=True, fontsize=30, fmt='%d')
(四)、850温度绘制
#画850温度
    clevs = range(-45,46,3)
    #引入NCL色标
    my_cmap = get_my_cmaps("MPL_hsv")
    #翻转色标
    my_cmap = my_cmap.reversed()
    #填色
    cf = ax.contourf(lon_scipy, lat_scipy, tem_850, clevs, transform=ccrs.PlateCarree(), cmap=my_cmap)
    #设置色标
    position = fig.add_axes([0.92, 0.05, 0.02, 0.9])
    cb = fig.colorbar(cf, cax=position, orientation='vertical',ticks=range(-45,46,3))
    cb.set_label('Temperature ℃', fontdict={'size': 30})
    cb.ax.tick_params(which='major', direction='in', length=6, labelsize=30)
这里使用了 get_my_cmaps()函数,这是自己写的,在文章开头有说明,要使用他得到NCL的色标MPL_hsv,同时需要在文件夹中放入MPL_hsv.rgb文件,有需要的朋友可以留下邮箱,作者给你们发。
(五)、850风场箭头绘制
#画风流场
    step = 5#设置步长,防止箭头过密
    ax.quiver(lon[::step],lat[::step],u_850[::step,::step],v_850[::step,::step],color='w',scale=600, width=0.002, pivot='mid', transform=ccrs.PlateCarree())
(六)、其他设置,制作GIF
#显示预报时次
    ax.text(0.85, -0.03, '21122420+' + TIME,transform=ax.transAxes, fontsize=50)
    #设置图片标题
    ax.set_title('ECMWF 850mb Temperature(shaded),Wind(vector)&500mb Geopotential Height(contour)',color='k',fontsize= 60)

    #保存单张图片
    plt.savefig(TIME+'.png', dpi=30)
    #清理画布
    plt.clf()
    #将绘制gif需要的静态图片名放入列表
    frames.append(imageio.imread(TIME+'.png'))
#跳出循环,制作GIF并保存
imageio.mimsave('aa.gif', frames, 'GIF', duration=1.0)
三、完整代码
from read_mdfs import MDFS_Grid
import re
import matplotlib.cm
from matplotlib import colors
import matplotlib.pyplot as plt
import numpy as np
from scipy.interpolate import interpolate

import cartopy.crs as ccrs
from cartopy.mpl.gridliner import LATITUDE_FORMATTER, LONGITUDE_FORMATTER
import cartopy.feature as cfeature
import os
import imageio


class Colormap(colors.ListedColormap):
    def __init__(self, c, name='from_list', n=None):
        self.colors = c
        self.name = name
        self.N = n
        super(Colormap, self).__init__(self.colors, name=self.name, N=self.N)

    def __getitem__(self, item):
        return Colormap(self.colors[item], name='sliced_' + self.name)

    def show(self):
        a = np.outer(np.ones(10), np.arange(0, 1, 0.001))
        plt.figure(figsize=(2.5, 0.5))
        plt.subplots_adjust(top=0.95, bottom=0.05, left=0.01, right=0.99)
        plt.subplot(111)
        plt.axis('off')
        plt.imshow(a, aspect='auto', cmap=self, origin='lower')
        plt.text(0.5, 0.5, self._name,
                 verticalalignment='center', horizontalalignment='center',
                 fontsize=12, transform=plt.gca().transAxes)
        plt.show()
def coltbl(cmap_file):
        pattern = re.compile(r'(\d\.?\d*)\s+(\d\.?\d*)\s+(\d\.?\d*).*')
        with open(cmap_file) as cmap:
            cmap_buff = cmap.read()
        cmap_buff = re.compile('ncolors.*\n').sub('', cmap_buff)
        if re.search(r'\s*\d\.\d*', cmap_buff):
            return np.asarray(pattern.findall(cmap_buff), 'f4')
        else:
            return np.asarray(pattern.findall(cmap_buff), 'u1') / 255.
def get_my_cmaps(cname):
    try:
        if cname in matplotlib.cm._cmap_registry:
            return matplotlib.cm.get_cmap(cname)
    except:
        pass
    cmap_file = os.path.join( cname+ ".rgb")
    cmap = Colormap(coltbl(cmap_file), name=cname)
    matplotlib.cm.register_cmap(name=cname, cmap=cmap)
    return cmap

def get_lat_lon(filepath):#获取经纬度数据
    a = MDFS_Grid(filepath)
    lon = a.data['Lon']
    lat = a.data['Lat'][::-1]#翻了纬度
    lon_scipy = np.arange(lon.min(), lon.max(), 0.05)#插值
    lat_scipy = np.arange(lat.min(), lat.max(), 0.05)
    return lon,lat,lon_scipy,lat_scipy
def read_data_hgt_or_tmp(filepath,lon,lat,lon_scipy,lat_scipy):#读位势高度和温度
    a = MDFS_Grid(filepath)
    data = a.data['Grid'][::8,::8]#为了数据更平滑,降低了精度
    spline = interpolate.RectBivariateSpline(lat[::8], lon[::8],data,)
    data = spline(lat_scipy,lon_scipy)#插值
    return data[::-1,:]#翻了纬度
def read_data(filepath):#读取一般数据,这里是风
    a = MDFS_Grid(filepath)
    data = a.data['Grid']
    return data[::-1,:]#翻了纬度

with open('CN-border-La.dat') as src:
    context = src.read()
    blocks = [cnt for cnt in context.split('>') if len(cnt) > 0]
    borders = [np.fromstring(block, dtype=float, sep=' ') for block in blocks]
#画布的设置,也是一次就够了,画完一张图清空一次就好了,减少运行内存。
fig = plt.figure(figsize=(47, 30), dpi=30)
#用来存放图片的列表,为的是制作gif
frames = []
#做循环用的时次
TIMES = ['000','003','006','009','012']
#循环开始
for TIME in TIMES:
    #读取经纬度、500位势高度
    file_path = r"ECMWF_HR\ECMWF_HR_HGT_500_21122420." + TIME
    lon ,lat,lon_scipy,lat_scipy = get_lat_lon(file_path)
    hgt_500 = read_data_hgt_or_tmp(file_path,lon ,lat,lon_scipy,lat_scipy)
    #读取850温度
    file_path = r"ECMWF_HR\ECMWF_HR_TMP_850_21122420." + TIME
    tem_850 = read_data_hgt_or_tmp(file_path,lon ,lat,lon_scipy,lat_scipy)
    #读取850U风
    file_path = r"ECMWF_HR\ECMWF_HR_UGRD_850_21122420." + TIME
    u_850 = read_data(file_path)
    #读取850V风
    file_path = r"ECMWF_HR\ECMWF_HR_VGRD_850_21122420." + TIME
    v_850 = read_data(file_path)


    #加子图,做一些地图设置
    ax = fig.add_axes([0.02, 0.05, 0.9, 0.9], projection=ccrs.LambertConformal(central_latitude=90, central_longitude=105))
    extent = [80,130,20,55]
    ax.set_extent(extent,crs=ccrs.Geodetic())
    gl = ax.gridlines( draw_labels=True, linewidth=2, color='k', alpha=0.5, linestyle='--')
    gl.xformatter = LONGITUDE_FORMATTER  ##坐标刻度转换为经纬度样式
    gl.yformatter = LATITUDE_FORMATTER
    gl.xlabel_style = {'size': 30}
    gl.ylabel_style = {'size': 30}
    resolution_map = '50m'
    ax.add_feature(cfeature.OCEAN.with_scale(resolution_map))
    ax.add_feature(cfeature.LAND.with_scale(resolution_map))
    ax.add_feature(cfeature.RIVERS.with_scale(resolution_map))
    ax.add_feature(cfeature.LAKES.with_scale(resolution_map))

    for line in borders:
        ax.plot(line[0::2], line[1::2], '-', color='k',transform=ccrs.Geodetic())

    #画500位势高度
    ct = ax.contour(lon_scipy, lat_scipy, hgt_500, 20, colors='k',linewidths=3, transform=ccrs.PlateCarree())
    ax.clabel(ct, inline=True, fontsize=30, fmt='%d')
    #单画一遍588,红色
    clev = [588]
    ct = ax.contour(lon_scipy, lat_scipy, hgt_500, clev, colors='r',linewidths=3, transform=ccrs.PlateCarree())
    ax.clabel(ct, inline=True, fontsize=30, fmt='%d')
    #画0℃线,白色
    clev = [0.0]
    ct = ax.contour(lon_scipy, lat_scipy, tem_850, clev, colors='w',linewidths=5, transform=ccrs.PlateCarree())
    ax.clabel(ct, inline=True, fontsize=30, fmt='%d')

    #画850温度
    clevs = range(-45,46,3)
    #引入NCL色标
    my_cmap = get_my_cmaps("MPL_hsv")
    #翻转色标
    my_cmap = my_cmap.reversed()
    #填色
    cf = ax.contourf(lon_scipy, lat_scipy, tem_850, clevs, transform=ccrs.PlateCarree(), cmap=my_cmap)
    #设置色标
    position = fig.add_axes([0.92, 0.05, 0.02, 0.9])
    cb = fig.colorbar(cf, cax=position, orientation='vertical',ticks=range(-45,46,3))
    cb.set_label('Temperature ℃', fontdict={'size': 30})
    cb.ax.tick_params(which='major', direction='in', length=6, labelsize=30)


    #画风流场
    step = 5#设置步长,防止箭头过密
    ax.quiver(lon[::step],lat[::step],u_850[::step,::step],v_850[::step,::step],color='w',scale=600, width=0.002, pivot='mid', transform=ccrs.PlateCarree())

    #显示预报时次
    ax.text(0.85, -0.03, '21122420+' + TIME,transform=ax.transAxes, fontsize=50)
    #设置图片标题
    ax.set_title('ECMWF 850mb Temperature(shaded),Wind(vector)&500mb Geopotential Height(contour)',color='k',fontsize= 60)

    #保存单张图片
    plt.savefig(TIME+'.png', dpi=30)
    #清理画布
    plt.clf()
    #将绘制gif需要的静态图片名放入列表
    frames.append(imageio.imread(TIME+'.png'))
#跳出循环,制作GIF并保存
imageio.mimsave('aa.gif', frames, 'GIF', duration=1.0)
这样,图片就复刻成功了
需要数据文件和代码的请留言邮箱,作者给发