OpenCV计算机视觉实战 - 文档扫描OCR识别【项目实战】
#################################################################
【纸上得来终觉浅,绝知此事要躬行】
B站视频
新课件:https://pan.baidu.com/s/1frWHqCVGR2VTn5QBtW4lPA 提取码:xh02
老课件:https://pan.baidu.com/s/1Wi31FxSPBqWiuJX9quX-jA 提取码:bbfg
################################################################
检测流程:
边缘检测 -> 获得轮廓 -> 透视变换(即放平,包括平移旋转反转等) -> OCR识别
一、边缘检测
if __name__ == "__main__": # 读取输入 image = cv2.imread(args["image"]) # resize 坐标也会相同变化 ratio = image.shape[0] / 500.0 orig = image.copy()image = resize(orig, height = 500) # 同比例变化:h指定500,w也会跟着变化 # 预处理 gray = cv2.cvtColor(image, cv2.COLOR_BGR2GRAY) gray = cv2.GaussianBlur(gray, (5, 5), 0) edged = cv2.Canny(gray, 75, 200) # 边缘检测 # 展示预处理结果 print("STEP 1: 边缘检测") cv2.imshow("Image", image) cv2.imshow("Edged", edged) cv2.waitKey(0) cv2.destroyAllWindows()
- 1
- 2
- 3
- 4
- 5
- 6
- 7
- 8
- 9
- 10
- 11
- 12
- 13
- 14
- 15
- 16
- 17
- 18
- 19
- 20
![]()
注:
- Line 5:缩放比例 ratio 也可以resize后再计算,透视变换中还原到原始的原图上时,需要用到ratio
二、获得轮廓
在main函数下
# 轮廓检测 cnts = cv2.findContours(edged.copy(), cv2.RETR_LIST, cv2.CHAIN_APPROX_SIMPLE)[0] # cnts中可检测到许多个轮廓,取前5个最大面积的轮廓 cnts = sorted(cnts, key = cv2.contourArea, reverse = True)[:5]# 遍历轮廓 for c in cnts: # C表示输入的点集 # 计算轮廓近似 peri = cv2.arcLength(c, True) # epsilon表示从原始轮廓到近似轮廓的最大距离,它是一个准确度参数 # True表示封闭的 approx = cv2.approxPolyDP(c, 0.02 * peri, True) print(approx,approx.shape) # 4个点的时候就拿出来,screenCnt是这4个点的坐标 if len(approx) == 4: # 近似轮廓得到4个点,意味着可能得到的是矩形 screenCnt = approx # 并且最大的那个轮廓是很有可能图像的最大外围 break # 展示结果 print("STEP 2: 获取轮廓") cv2.drawContours(image, [screenCnt], -1, (0, 255, 0), 2) cv2.imshow("Outline", image) cv2.waitKey(0) cv2.destroyAllWindows()
- 1
- 2
- 3
- 4
- 5
- 6
- 7
- 8
- 9
- 10
- 11
- 12
- 13
- 14
- 15
- 16
- 17
- 18
- 19
- 20
- 21
- 22
- 23
- 24
![]()
三、透视变换
在main函数下
	# 透视变换
	# 4个点的坐标 即4个(x,y),故reshape(4,2)
	# 坐标是在变换后的图上得到,要还原到原始的原图上,需要用到ratio
	print(screenCnt.shape)
	warped = four_point_transform(orig, screenCnt.reshape(4, 2) * ratio)
- 1
- 2
- 3
- 4
- 5
- reshape 其实是获得一个新矩阵,不改变screenCnt的形状

同一个py文件中,在main函数前,透视变换函数 four_point_transform
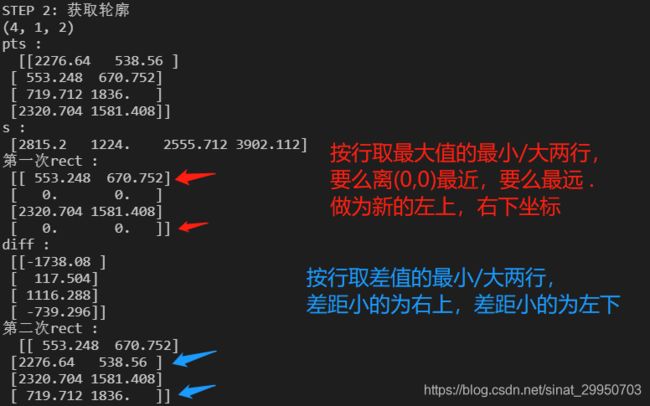
def order_points(pts): # 初始化4个坐标点的矩阵 rect = np.zeros((4, 2), dtype = "float32")# 按顺序找到对应坐标0123分别是 左上,右上,右下,左下 # 计算左上,右下 print("pts :\n ",pts) s = pts.sum(axis = 1) # 沿着指定轴计算第N维的总和 print("s : \n",s) rect[0] = pts[np.argmin(s)] # 即pts[1] rect[2] = pts[np.argmax(s)] # 即pts[3] print("第一次rect : \n",rect) # 计算右上和左下 diff = np.diff(pts, axis = 1) # 沿着指定轴计算第N维的离散差值 print("diff : \n",diff) rect[1] = pts[np.argmin(diff)] # 即pts[0] rect[3] = pts[np.argmax(diff)] # 即pts[2] print("第二次rect :\n ",rect) return rect
def four_point_transform(image, pts):
# 获取输入坐标点
rect = order_points(pts)
(A, B, C, D) = rect
# (tl, tr, br, bl) = rect
# 计算输入的w和h值
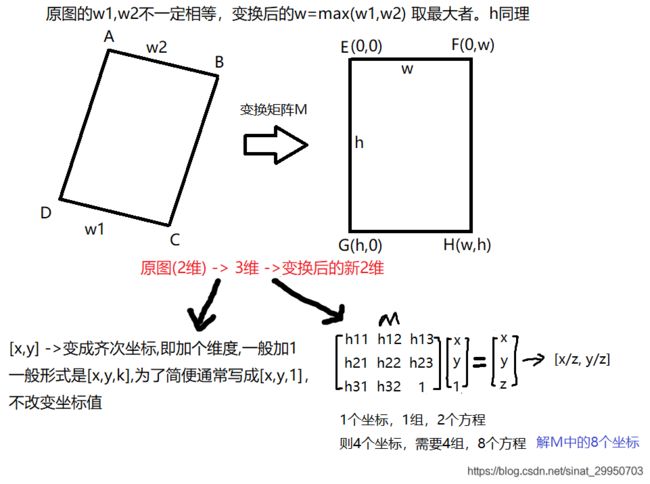
w1 = np.sqrt(((C[0] - D[0]) ** 2) + ((C[1] - D[1]) ** 2))
w2 = np.sqrt(((B[0] - A[0]) ** 2) + ((B[1] - A[1]) ** 2))
w = max(int(w1), int(w2))

h1 = np.sqrt(((B[0] - C[0]) ** 2) + ((B[1] - C[1]) ** 2))
h2 = np.sqrt(((A[0] - D[0]) ** 2) + ((A[1] - D[1]) ** 2))
h = max(int(h1), int(h2))

# 变换后对应坐标位置
dst = np.array([	# 目标点
	[0, 0],
	[w - 1, 0],	# 防止出错,-1
	[w - 1, h - 1],
	[0, h - 1]], dtype = "float32")

# 计算变换矩阵	(平移+旋转+翻转),其中
M = cv2.getPerspectiveTransform(rect, dst)	# (原坐标,目标坐标)
print(M,M.shape)
warped = cv2.warpPerspective(image, M, (w, h))

# 返回变换后结果
return warped
- 1
- 2
- 3
- 4
- 5
- 6
- 7
- 8
- 9
- 10
- 11
- 12
- 13
- 14
- 15
- 16
- 17
- 18
- 19
- 20
- 21
- 22
- 23
- 24
- 25
- 26
- 27
- 28
- 29
- 30
- 31
- 32
- 33
- 34
- 35
- 36
- 37
- 38
- 39
- 40
- 41
- 42
- 43
- 44
- 45
- 46
- 47
- 48
- 49
![]()
注:
-
Line 7-19:左上,右上,右下,左下的坐标顺序调整

-
Line 27-34,44:计算变换后的w和h,以及cv2.getPerspectiveTransform的原理如下

四、OCR识别
window上安装tesseract
# https://digi.bib.uni-mannheim.de/tesseract/
# 配置环境变量如E:\Program Files (x86)\Tesseract-OCR
# tesseract -v进行测试
# tesseract XXX.png 得到结果
- 1
- 2
- 3
- 4
在用户变量和系统变量的path中,都新增一个tesseract的路径,如D:\Program Files (x86)\Tesseract-OCR
![]()
![]()
设置完毕,测试成功
![]()
但 tesseract opencv.png cv 的时候,有可能出现以下错误
Error opening data file \Program Files (x86)\Tesseract-OCR\tessdata/eng.traineddata
Please make sure the TESSDATA_PREFIX environment variable is set to the parent directory of your "tessdata" directory.
Failed loading language 'eng'
Tesseract couldn't load any languages!
Could not initialize tesseract.
- 1
- 2
- 3
- 4
- 5
解决方法:
在系统变量中新增一个变量TESSDATA_PREFIX,使该变量的值为 D:\Program Files (x86)\Tesseract-OCR\tessdata 该路径值
再次测试 OK!
tesseract 测试图像 输出(自动输出到txt文件中,因此不用另加 .txt)
![]()
![]()
python中使用tesseract
安装
# pip install pytesseract
- 1
测试
python test.py
- 1
测试test.py中遇到以下两个错误
-
pytesseract.pytesseract.TesseractNotFoundError: tesseract is not installed or it’s not in your PATH. See README file for more information.
解决方法:
修改pytesseract.py中的tesseract_cmd指向的路径
tesseract_cmd = r’D:\Program Files (x86)\Tesseract-OCR\tesseract.exe’ -
pytesseract.pytesseract.TesseractError: (1, ‘Error opening data file \Program Files (x86)\Tesseract-OCR\eng.traineddata Please make sure the TESSDATA_PREFIX environment variable is set
to your “tessdata” directory. Failed loading language ‘eng’ Tesseract couldn’t load any languages! Could not initialize tesseract.’)
解决方法:
还是在系统变量中新增一个变量TESSDATA_PREFIX,使该变量的值为 D:\Program Files (x86)\Tesseract-OCR\tessdata 该路径值
重启后才OK
![]()
该段参考链接:https://blog.csdn.net/qq756684177/article/details/81518891
什么是OCR?
OCR (Optical Character Recognition,光学字符识别)是指电子设备(例如扫描仪或数码相机)检查纸上打印的字符,通过检测暗、亮的模式确定其形状,然后用字符识别方法将形状翻译成计算机文字的过程;即,针对印刷体字符,采用光学的方式将纸质文档中的文字转换成为黑白点阵的图像文件,并通过识别软件将图像中的文字转换成文本格式,供文字处理软件进一步编辑加工的技术。
如何除错或利用辅助信息提高识别正确率,是OCR最重要的课题,ICR(Intelligent Character Recognition)的名词也因此而产生。衡量一个OCR系统性能好坏的主要指标有:拒识率、误识率、识别速度、用户界面的友好性,产品的稳定性,易用性及可行性等。什么是Tesseract
Tesseract的OCR引擎最先由HP实验室于1985年开始研发,至1995年时已经成为OCR业内最准确的三款识别引擎之一。然而,HP不久便决定放弃OCR业务,Tesseract也从此尘封。数年以后,HP意识到,与其将Tesseract束之高阁,不如贡献给开源软件业,让其重焕新生-
2005年,Tesseract由美国内华达州信息技术研究所获得,并求诸于Google对Tesseract进行改进、消除Bug、优化工作。Tesseract目前已作为开源项目发布在Google Project,其项目主页在这里查看,其最新版本3.0已经支持中文OCR,并提供了一个命令行工具。