前言:
学习了SpringBoot分页查询的两种写法,一种是手动实现,另一种是使用框架实现。现在我将具体的实现流程分享一下。
首先是手动实现分页查询:
先复习一下,SQL中的limit关键字,下面一行sql语句的意思是从第二个数据开始查,查询出两条数据
SELECT * FROM sys_user limit 1,2;
使用limit前一个参数pageNum是从第几个数据开始查,后一个参数pageSize是查询多少条数据,
注意数据库查询pageNum=0代表第一个数据。
那么在Springboot中该如何写呢?
controller:
//    分页查询
//    接口路径:/user/page?pageNum=1&pageSize=10
//    @RequestParam接收
//    limit第一个参数= (pageNum-1)+pageSize
    @GetMapping("/page")
    public List findPage(@RequestParam Integer pageNum,@RequestParam Integer pageSize){
        pageNum = (pageNum-1);
        return userMapper.selectPage(pageNum,pageSize);
    }
}
mapper:
@Select("select * from sys_user limit #{pageNum},#{pageSize}")
    List selectPage(Integer pageNum, Integer pageSize);
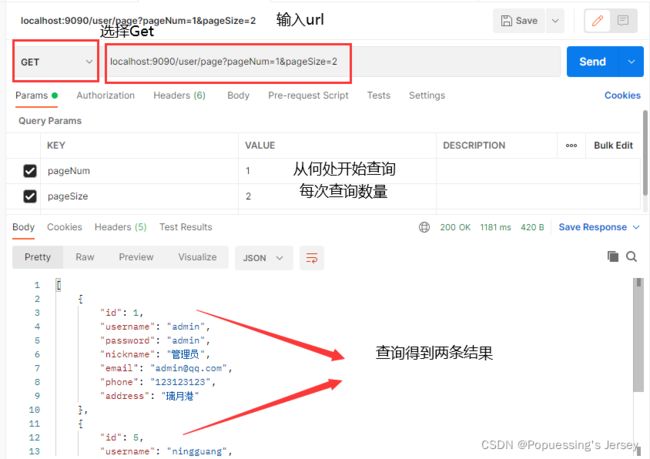
这样就写好了,测试一下:
完善一下controller,添加查询 总条数的方法:
//    分页查询
//    接口路径:/user/page?pageNum=1&pageSize=10
//    @RequestParam接收 前端url
//    limit第一个参数= (pageNum-1)*pageSize
    @GetMapping("/page")
    public Map findPage(@RequestParam Integer pageNum, @RequestParam Integer pageSize){
        pageNum = (pageNum-1)*pageSize;
        List data = userMapper.selectPage(pageNum,pageSize);
        Integer total = userMapper.selectTotal();
        Map res = new HashMap<>();
        res.put("data",data);
        res.put("total",total);
        return res;
    }
接下来是关联前端分页和后台数据:
修改分页页面homeView:
使用fetch()请求分页数据
created() {
    //请求分页数据
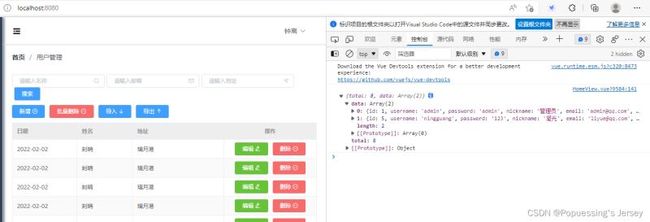
    fetch("localhost:9090/user/page?pageNum=1&pageSize=2").then(res =>res.json()).then(res =>{
      console.log(res)
    })
  },
fetch得到的是一个字符串数据,需要将其转换成Json格式,使用console.log()打印数据
@JsonIgnore忽略某一个属性的注解
修改前端页面表格数据:
表格数据对应数据库的属性
修改前端数据内容:
data() {
    return {
      tableData: [],  //表格的值默认为空数组
      total: 0,  //查询条数默认为0
      msg: "hello 阿晴",
      collapseBtnClass: 'el-icon-s-fold',
      isCollapse: false,
      sideWidth: 200,
      logoTextShow: true,
      headerBg: 'headerBg'
    }
  },
渲染页面:
created() {
    //请求分页数据
    fetch("http://localhost:9090/user/page?pageNum=1&pageSize=2").then(res =>res.json()).then(res =>{
      console.log(res)
      this.tableData = res.data
      this.total = res.total
    })
  },
分页函数:
load() {
      fetch("http://localhost:9090/user/page?pageNum="+this.pageNum+"&pageSize=" + this.pageSize)
          .then(res => res.json()).then(res => {
        console.log(res)
        this.tableData = res.data
        this.total = res.total
      })
    },
    handleSizeChange(pageSize){
      console.log(pageSize)
      this.pageSize = pageSize
      this.load()
    },
    handleCurrentChange(pageNum){
      console.log(pageNum)
      this.pageNum = pageNum
      this.load()
    }
  }
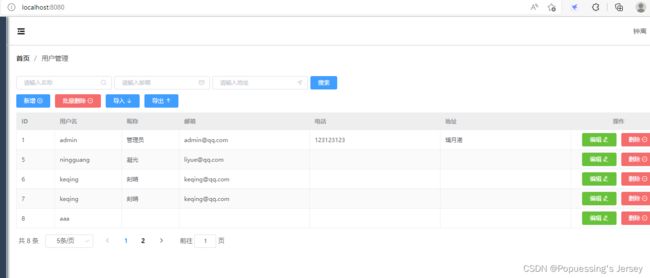
实现分页功能:
模糊查询:
controller:
@GetMapping("/page")
    public Map findPage(@RequestParam Integer pageNum, @RequestParam Integer pageSize,@RequestParam String username){
        pageNum = (pageNum-1)*pageSize;
        List data = userMapper.selectPage(pageNum,pageSize,username);
        Integer total = userMapper.selectTotal();
        Map res = new HashMap<>();
        res.put("data",data);
        res.put("total",total);
        return res;
    }
mapper:
@Select("select * from sys_user where username like concat('%', #{username}, '%') limit #{pageNum},#{pageSize}")
    List selectPage(Integer pageNum, Integer pageSize,String username);
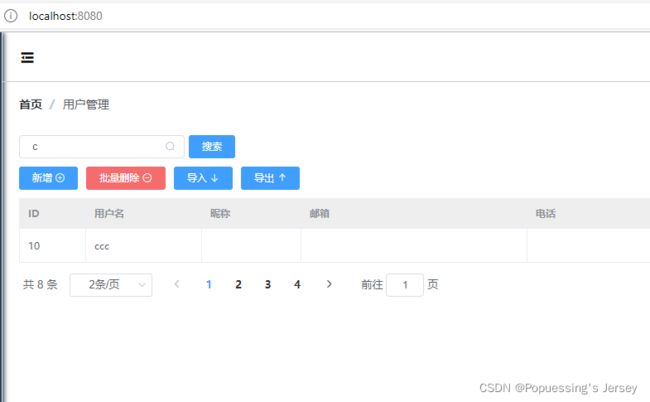
测试一下:
在前端绑定:
搜索
 data() {
    return {
      tableData: [],
      total: 0,
      pageNum: 1,
      pageSize: 2,
      username: "",
      msg: "hello 阿晴",
      collapseBtnClass: 'el-icon-s-fold',
      isCollapse: false,
      sideWidth: 200,
      logoTextShow: true,
      headerBg: 'headerBg'
    }
  },
load() {
      fetch("http://localhost:9090/user/page?pageNum="+this.pageNum+"&pageSize=" + this.pageSize+"&username="+this.username)
          .then(res => res.json()).then(res => {
        console.log(res)
        this.tableData = res.data
        this.total = res.total
      })
    },
总结
到此这篇关于SpringBoot分页查询功能实现的文章就介绍到这了,更多相关SpringBoot分页查询内容请搜索脚本之家以前的文章或继续浏览下面的相关文章希望大家以后多多支持脚本之家!


