前端项目极致性能优化
背景
领导:这个怎么一直在loading,打开这么长时间
我:初次加载就是有些慢,你看这里有提示性文字
领导:这体验太差了,想办法优化一下
我:这项目太大了,近两百个页面的系统……
后端同学:那淘宝,阿里云那页面不比咱们这个系统页面多?
领导:(领导瞥了我一眼)
我:好的,领导(嘴上笑嘻嘻心里MMP)

以上内容为了节目效果,纯属虚构,本次优化完全是出于对技术的热爱以及工作的热忱
下面我们对项目进行优化,先剧透一下结果,以基础的Vue Cli3的项目为例:
| 优化项 | 优化前 | 优化后 |
|---|---|---|
| 首屏加载时间 | 30s+ | 2.5s |
| 打包后的大小 | 28.9M | 1M |
根据常规的操作思路,我们从以下几个方面考虑优化:
WEBPACK
sourceMap
生产环境下关闭productionSourceMap、css sourceMap,因为这两个东西是映射源文件的两个配置,作用是用来断点调试用的,所以生产环境根本不需要做这样的映射。
    // vue.config.js
    const isProduction = process.env.NODE_ENV === 'production'
    // 判断是否是生产环境
    module.exports = {
        productionSourceMap: !isProduction, //关闭生产环境下的SourceMap映射文件
        css: {
            sourceMap: !isProduction, // css sourceMap 配置
            loaderOptions: {
                ...
            }
        },
        ...
    }
webpack-bundle-analyzer
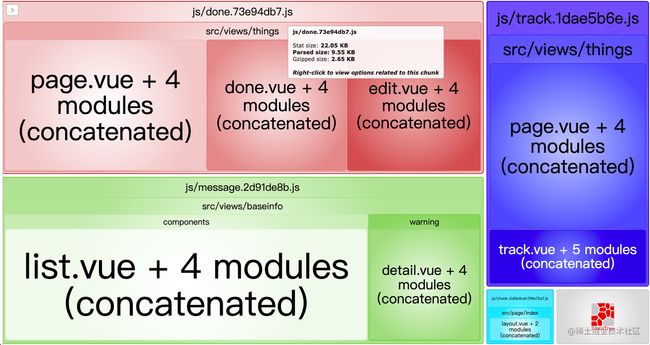
webpack-bundle-analyzer是webpack包分析的神器插件,安装 webpack-bundle-analyzer 插件,打包后会生产一个本地服务,清楚的展示打包文件的包含关系和大小,所以我们废话不多,直接npm install webpack-bundle-analyzer -D
    // vue.config.js
    module.exports = {
       chainWebpack: (config) => {
            // 分析打包大小
            if (process.env.npm_config_report) {
              config.plugin('webpack-bundle-analyzer')
                .use(require('webpack-bundle-analyzer').BundleAnalyzerPlugin)
                .end();
            }
       }
    }

    // package.json
    {
      "name": "name",
      "version": "0.0.1",
      "scripts": {
        "report": "set npm_config_report=true && vue-cli-service build",
      },
      ...
     }
接下来直接跑 npm run report, 浏览器在打包的同时会输出下面一个依赖包关系的报告:

打开对应的dist一看,好家伙,dist文件28.9M,着实有点儿大,喝口水压压惊,继续骚操作
externals
根据分析报告,直观的看到node_modules里面有几个比较大的包,我们处理一下,比如echarts、element-ui、lodash、mock等,而externals可以用来防止将某些 import 的包(package)打包到 bundle 中,而是在运行时(runtime)再去从外部获取这些扩展依赖(external dependencies)
    // vue.config.js
    ....
    chainWebpack: (config) => {
        ....
        //忽略的打包文件
        config.externals({
          'vue': 'Vue',
          'vue-router': 'VueRouter',
          'vuex': 'Vuex',
          'axios': 'axios',
          'element-ui': 'ELEMENT',
          'echarts': 'echarts',
          'lodash': 'lodash',
          'mock': 'mock'
        });
        ....
    }
拆包
一个入口app.js好几兆,这加载起来多费劲,怪不得刚才领导打开系统的时候那么慢
// vue.config.js
....
chainWebpack: (config) => {
    ...
    config.optimization && config.optimization.splitChunks({
        // 拆包配置
        chunks: 'all', //三选一:"initial" 初始化,"all"(默认就是all),"async"(动态加载)
        minSize: 30000, // 形成一个新代码块最小的体积,只有 >= minSize 的bundle会被拆分出来 30000
        maxSize: 0, //拆分之前最大的数值,默认为0,即不做限制
        minChunks: 1, //引入次数,如果为2 那么一个资源最少被引用两次才可以被拆分出来
        maxAsyncRequests: 5, // 按需加载的最大并行请求数
        maxInitialRequests: 3, // 一个入口最大并行请求数
        automaticNameDelimiter: '~', // 文件名的连接符
        name: true,
        cacheGroups: {
        // node_modules模块包
        vendors: {
          test: /[\\/]node_modules[\\/]/,
          name: 'chunk-vendors',
          // name(module) {
          //   const packageName = module.context.match(/[\\/]node_modules[\\/](.*?)([\\/]|$)/)[1];
          //   return `chunk.${packageName.replace('@', '')}`;
          // },
          chunks: 'all',
          priority: -10,
        },
        // UI库单独拆包
        elementUI: {
          name: 'chunk-elementUI',
          priority: 20, //  the weight needs to be larger than libs and app or it will be packaged into libs or app
          test: /[\\/]node_modules[\\/]_?element-ui(.*)/
        },
        // 共享模块
        common: {
          name: 'chunk-common',
          minChunks: 2,
          maxSize: 1024, //拆分之前最大的数值,默认为0,即不做限制
          priority: -20,
          reuseExistingChunk: true
        }
        }
    });
    ...
}
...
压缩js和css
如果你使用的是 webpack v5 或更高版本,是开箱机带的功能,但是你的webpack是5以下或则希望自定义配置,那么需要安装 terser-webpack-plugin。如果使用 webpack v4,则必须安装 terser-webpack-plugin v4 的版本。
// vue.config.js
const TerserJSPlugin = require('terser-webpack-plugin');
....
chainWebpack: (config) => {
    // 开启js、css压缩
    config.plugin('TerserJSPlugin')
      .use(new TerserJSPlugin({
        terserOptions: {
          output: {
            comments: false // 去掉注释
          },
          warnings: false,
          compress: {
            // eslint-disable-next-line camelcase
            drop_console: true,
            // eslint-disable-next-line camelcase
            drop_debugger: true,
            // pure_funcs: ['console.log'] // 移除console
          }
        }
      }));
}
开启Gzip压缩
// 打包压缩静态文件插件
const CompressionWebpackPlugin = require("compression-webpack-plugin")
...
module.exports = {
    ...
    chainWebpack: config => {
        //生产环境开启js/css压缩
        if (isProduction) {
            config.plugin('CompressionWebpackPlugin').use(new CompressionWebpackPlugin({
                test: /\.(js)$/, // 匹配文件名
                threshold: 10240, // 对超过10k的数据压缩
                minRatio: 0.8,
                deleteOriginalAssets: true // 删除源文件
            }))
        }
    }
    ...
}
对用服务端Nginx配置
# nginx前端静态资源配置  // data/docker/nginx/conf.d
server {
    listen 8080;
    server_name _;
    gzip_static on; // 开启gzip压缩
    client_max_body_size 500m;
    root /data/****/web/dist;
    index index.html;
    location ^~ /api {
        proxy_pass http://***.**.**.***:8080/;
        proxy_set_header Host ***.**.**.***;
        proxy_set_header X-Real-IP $remote_addr;
        proxy_set_header X-Forwarded-For $proxy_add_x_forwarded_for;
    }
}
CDN
对于项目用到的静态资源,比如图片,静态资源库,我们直接把文件给甩到CDN上
<script src="https://cdn.bootcdn.net/ajax/libs/vue/2.6.10/vue.min.js" charset="utf-8">script>
<script src="https://cdn.bootcdn.net/ajax/libs/vuex/3.1.1/vuex.min.js" charset="utf-8">script>
<script src="https://cdn.bootcdn.net/ajax/libs/vue-router/3.0.1/vue-router.min.js" charset="utf-8">script>
<script src="https://cdn.bootcdn.net/ajax/libs/axios/0.17.1/axios.min.js" charset="utf-8">script>
<script src="https://cdn.bootcdn.net/ajax/libs/element-ui/2.15.3/index.min.js" charset="utf-8">script>
<script src="https://cdn.bootcdn.net/ajax/libs/echarts/5.1.2/echarts.min.js" charset="utf-8">script>
<script src="https://cdn.bootcdn.net/ajax/libs/lodash.js/4.17.21/lodash.min.js" charset="utf-8">script>
<script src="https://cdn.bootcdn.net/ajax/libs/Mock.js/1.0.1-beta3/mock-min.js" charset="utf-8">script>
按需加载
比如我们引用某一些第三方,使用少量功能,可以选择按需加载,举个例子:
比如引用lodash的时候,如果想要按需加载,可以考虑使用webpack-lodash-plugin和babel-plugin-lodash,按需加载可以节省近1M的空间大小
    // 使用前,需要手动引入指定的模块
    const isElement = require('lodash/isElement');
    const debounce = require('lodash/debounce');

    // 使用后,放心引入
    import { isElement, debounce } from 'lodash'
缓存
另外,我们可以利用浏览器缓存,以及服务器缓存,Redis缓存,去加速我们的系统响应速度,比如配合后端同学利用强缓存或者协商缓存,合理的对客户端请求进行缓存,但是要注意的是,在服务器对web资源代理的时候,对入口的html.index 一定不要做缓存,因为每次更新这个入口依赖的一些js和css都会根据hash指纹有修改,有缓存的话就会造成每次发布用户都要清空浏览器缓存加载才能看到最新的内容
# nginx前端静态资源配置  // data/docker/nginx/conf.d
server {
    listen 8080;
    server_name _;
    gzip_static on; // 开启gzip压缩
    client_max_body_size 500m;
    root /data/****/web/dist;
    index index.html;
    location ^~ /api {
        proxy_pass http://***.**.**.***:8080/;
        proxy_set_header Host ***.**.**.***;
        proxy_set_header X-Real-IP $remote_addr;
        proxy_set_header X-Forwarded-For $proxy_add_x_forwarded_for;
    }
    location = /index.html {
        add_header Cache-Control "no-cache,no-store";
    }
}
结语
再来回顾一下优化前后的对比
| 优化项 | 优化前 | 优化后 |
|---|---|---|
| 首屏加载时间 | 30s+ | 2.5s |
| 打包后的大小 | 28.9M | 1M |

这是从手扶式拖拉机到兰博基尼的跨越,端起手中的水杯,小抿一口,这个月绩效奖金应该稳了☕️
![]()


