微服务之RabbitMQ消息发送失败重试(上)
本博客讲述的是RabbitMQ基于AMQP协议的消息中间件,在互联网应用的开发中,RabbitMQ是确保消息发送和消费成功,设置消息有效期和延迟队列的一个重要的中间件。它的特点具有安全性、可用性、集群、多协议支持、可视化客户端等等。
关于他的详细介绍和作用就不一一赘述了,下面引用一个邮件发送的案例来加深理解。
搭建一个简单的邮件发送服务,需要用到的开发工具有IntelliJ IDEA,RabbitMQ、MySQL,Postman用来作为测试接口。
案例介绍:假如现在某公司新招聘了一批员工,需要给新员工发送入职欢迎邮件,我们要保证在邮件发送成功的基础上,不重复发送邮件,且需要监听邮件发送的进程。
案例分析:这是一个简单的邮件发送服务,需要用到消息中间件来监听消息队列,确保消息发送和消费的可靠性,并且要考虑到幂等性的问题 。
首先,我们开始搭建简单的邮件发送服务器。
小编用的是聚合工程,在旧项目中进行改进,下来小伙伴可以在一个工程中完成操作,原理相同。
一、项目基础搭建
1.1添加依赖
web、websocket、amqp、mysql-connector、mybatis、redis、mail
1.2application.properties
为贴近真实项目,这边的application.properties配置文件用到两个不同的server.port端口
配置文件如下:
spring.datasource.username=root
spring.datasource.password=root
spring.datasource.url=jdbc:mysql:///vhr?serverTimezone=Asia/Shanghai

server.port=8081

spring.rabbitmq.virtual-host=/
spring.rabbitmq.username=guest
spring.rabbitmq.password=guest
spring.rabbitmq.host=192.168.64.128
spring.rabbitmq.port=5672

spring.rabbitmq.publisher-confirm-type=correlated
spring.rabbitmq.publisher-returns=true
这是我们项目的properties配置。
spring.rabbitmq.virtual-host=/
spring.rabbitmq.username=guest
spring.rabbitmq.password=guest
spring.rabbitmq.host=192.168.64.128
spring.rabbitmq.port=5672
这是邮件发送服务的properties配置。(默认server.port端口为8080)
二、搭建邮件服务
为了方便测试,添加新员工返回一段JSON
controller:
@RestController
@RequestMapping("/employee/basic")
public class EmployeeController {

    @Autowired
    EmployeeService employeeService;

    /**
     * 使用 JSON 格式传递参数
     * @param employee @RequestBody
     * @return
     */
    @PostMapping("/addEmps")
    public RespBean addEmps(@RequestBody Employee employee){
        employeeService.addEmps(employee);
        return RespBean.ok("添加成功");
    }
}
当在springboot项目中登录成功后,post请求访问/employee/basic/addEmps时传递JSON格式的参数,即可完成数据添加。
实体类:
employee表实体类:
该表为插入员工的员工表,这里为了简化测试,只添加了两个字段。
public class Employee implements Serializable {
    private Integer id;
    private String name;
    private String email;

    public Integer getId() {
        return id;
    }

    public void setId(Integer id) {
        this.id = id;
    }

    public String getName() {
        return name;
    }

    public void setName(String name) {
        this.name = name;
    }

    public String getEmail() {
        return email;
    }

    public void setEmail(String email) {
        this.email = email;
    }
}
mail_send_log表实体类:
该表为邮件发送的日志表,记录了消息的id、员工id、状态(0为发送中,1为发送成功,2为发送失败)、队列、交换机、重试次数、重试时间、创建及更新时间。
public class MailSendLog {
    //消息的 id,即 correlationId
    private String msgId;
    //添加成功的员工id
    private Integer empId;
    private Integer status;
    private String routeKey;
    private String exchange;
    private Integer count;
    private Date tryTime;
    private Date createTime;
    private Date updateTime;

    public String getMsgId() {
        return msgId;
    }

    public void setMsgId(String msgId) {
        this.msgId = msgId;
    }

    public Integer getEmpId() {
        return empId;
    }

    public void setEmpId(Integer empId) {
        this.empId = empId;
    }

    public Integer getStatus() {
        return status;
    }

    public void setStatus(Integer status) {
        this.status = status;
    }

    public String getRouteKey() {
        return routeKey;
    }

    public void setRouteKey(String routeKey) {
        this.routeKey = routeKey;
    }

    public String getExchange() {
        return exchange;
    }

    public void setExchange(String exchange) {
        this.exchange = exchange;
    }

    public Integer getCount() {
        return count;
    }

    public void setCount(Integer count) {
        this.count = count;
    }

    public Date getTryTime() {
        return tryTime;
    }

    public void setTryTime(Date tryTime) {
        this.tryTime = tryTime;
    }

    public Date getCreateTime() {
        return createTime;
    }

    public void setCreateTime(Date createTime) {
        this.createTime = createTime;
    }

    public Date getUpdateTime() {
        return updateTime;
    }

    public void setUpdateTime(Date updateTime) {
        this.updateTime = updateTime;
    }
}
Mail实体类:
邮件的实体类,简单编辑两个字段,邮件内容和邮件发送给谁。
public class Mail implements Serializable {
    private String mailContent;
    private String to;

    public String getMailContent() {
        return mailContent;
    }

    public void setMailContent(String mailContent) {
        this.mailContent = mailContent;
    }

    public String getTo() {
        return to;
    }

    public void setTo(String to) {
        this.to = to;
    }
}
service层:
EmployeeService
@Service
public class EmployeeService {

    @Autowired
    EmployeeMapper employeeMapper;

    @Autowired
    RabbitTemplate rabbitTemplate;

    @Autowired
    MailSendLogService mailSendLogService;

    /**
     * 1.将用户数据添加到数据库中
     * 2.数据添加完成后,给新员工发送一封欢迎邮件
     * 3.向 mail_send_log 表中添加一条发送日志的记录
     * @param employee
     */
    @Transactional
    public void addEmps(Employee employee) {
        //由于需要用到主键回填,因此需要开启事务
        employeeMapper.addEmps(employee);

        Mail mail = new Mail();
        mail.setMailContent("入职欢迎邮件");
        mail.setTo(employee.getEmail());
        String correlationId = UUID.randomUUID().toString();
        rabbitTemplate.convertAndSend(RabbitConfig.MAIL_EXCHANGE,RabbitConfig.MAIL_QUEUE,mail,new CorrelationData(correlationId));

        MailSendLog mailSendLog = new MailSendLog();
        //重试次数 第一次添加,该值为0
        mailSendLog.setCount(0);
        mailSendLog.setCreateTime(new Date());
        mailSendLog.setUpdateTime(new Date());
        //该id为刚刚设置主键回填的id,从员工表中获取
        mailSendLog.setEmpId(employee.getId());
        mailSendLog.setExchange(RabbitConfig.MAIL_EXCHANGE);
        mailSendLog.setMsgId(correlationId);
        mailSendLog.setRouteKey(RabbitConfig.MAIL_QUEUE);
        //0表示消息处于发送中
        mailSendLog.setStatus(0);
        //重试时间是一分钟之后,一分钟之后如果这条记录的状态还是0,则重试
        mailSendLog.setTryTime(new Date(System.currentTimeMillis()+60*1000));
        mailSendLogService.addLog(mailSendLog);
    }

    /**
     * 根据id查询刚刚添加的日志
     * @param empId
     * @return
     */
    public Employee getEmpById(Integer empId) {
        return employeeMapper.getEmpById(empId);
    }
}
MailSendLogService
@Service
public class MailSendLogService {

    @Autowired
    MailSendLogMapper mailSendLogMapper;

    public Integer addLog(MailSendLog mailSendLog) {
        return mailSendLogMapper.addLog(mailSendLog);
    }

    public List getMailSendLogByStatus(int status) {
        return mailSendLogMapper.getMailSendLogByStatus(status);
    }

    public Integer updateCountByMsgId(int count, String msgId) {
        return mailSendLogMapper.updateCountByMsgId(count,msgId);
    }

    public Integer updateStatusByMsgId(int status, String msgId) {
        return mailSendLogMapper.updateStatusByMsgId(status,msgId);
    }
}
注意:1.自定义的重试时间是一分钟后,可以根据业务需求自行调整
2.在RabiitMQ中,到达交换机的消息表明消息消费成功
自定义定时任务执行重试逻辑:
@Component
public class MailSendLogScheduled {

    @Autowired
    MailSendLogService mailSendLogService;
    @Autowired
    RabbitTemplate rabbitTemplate;
    @Autowired
    EmployeeService employeeService;

    @Scheduled(cron = "0/5 * * * * ?")
    public void ReSend(){
        //获取已经过了 tryTime 且 status 为0的 mailSendLog 对象
        List list = mailSendLogService.getMailSendLogByStatus(0);
        for (MailSendLog mailSendLog: list) {
            //去重试
            //判断过了重试时间的数据,自定义重试次数为3次
            if (mailSendLog.getTryTime().before(new Date())){
                if (mailSendLog.getCount() < 3 ){
                    Employee emp = employeeService.getEmpById(mailSendLog.getEmpId());
                    Mail mail = new Mail();
                    mail.setMailContent("入职欢迎邮件");
                    mail.setTo(emp.getEmail());
                    rabbitTemplate.convertAndSend(mailSendLog.getExchange(),mailSendLog.getRouteKey(),mail,new CorrelationData(mailSendLog.getMsgId()));
                    //修改重试记录 +1
                    mailSendLogService.updateCountByMsgId(mailSendLog.getCount() + 1,mailSendLog.getMsgId());
                }else{
                    mailSendLogService.updateStatusByMsgId(2,mailSendLog.getMsgId());
                }
            }
        }
    }
}
注意:要在程序主入口上添加@EnableScheduling注解
定义一个消息队列,为确保消息消费成功,用到了RabbitMQ的发送方确认机制的原理:
@Configuration
public class RabbitConfig implements RabbitTemplate.ConfirmCallback, RabbitTemplate.ReturnsCallback {
    public static final String MAIL_EXCHANGE = "mail_exchange";
    public static final String MAIL_QUEUE = "mail_queue";

    @Autowired
    RabbitTemplate rabbitTemplate;

    @Autowired
    MailSendLogService mailSendLogService;

    @PostConstruct
    public void initRabbitTemplate(){
        rabbitTemplate.setConfirmCallback(this);
        rabbitTemplate.setReturnsCallback(this);
    }

    @Bean
    Queue mailQueue(){
        return new Queue(MAIL_QUEUE,true,false,false);
    }

    @Bean
    DirectExchange mailExchange(){
        return new DirectExchange(MAIL_EXCHANGE,true,false);
    }

    @Bean
    Binding mailBinding(){
        return BindingBuilder.bind(mailQueue())
                .to(mailExchange())
                .with(MAIL_QUEUE);
    }

    @Override
    public void confirm(CorrelationData correlationData, boolean ack, String s) {
        if(ack){
            //消息到达交换机
            //发送成功,更新状态为1
            //这里拿到的id即msgId
            mailSendLogService.updateStatusByMsgId(1,correlationData.getId());
        }
    }

    @Override
    public void returnedMessage(ReturnedMessage returnedMessage) {
        //消息未到达队列
    }
}
消息能到达交换机,即表示邮件发送成功,更新状态为1,注入mailSendLogService执行更新库操作。
到这里,我们可以完善一下对数据库的操作了。
mapper层:
两个mapper接口:
public interface EmployeeMapper {
    Integer addEmps(Employee employee);

    Employee getEmpById(Integer empId);
}
public interface MailSendLogMapper {
Integer addLog(MailSendLog mailSendLog);
List getMailSendLogByStatus(int status);
Integer updateCountByMsgId(@Param("count") int count,@Param("msgId") String msgId);
Integer updateStatusByMsgId(@Param("status") int status,@Param("msgId") String msgId);
} mapper.xml
insert into employee(name,email) values (#{name},#{email});
insert into mail_send_log(msgId, empId, routeKey, exchange, count, tryTime, createTime, updateTime,status) values (#{msgId},#{empId},#{routeKey},#{exchange},#{count},#{tryTime},#{createTime},#{updateTime},#{status})
update mail_send_log set count=#{count} where msgId=#{msgId}
update mail_send_log set status=#{status} where msgId=#{msgId}
来到这里,我们定义一个消费接口:
@Component
public class MailConsumer {

    @RabbitListener(queues = RabbitConfig.MAIL_QUEUE)
    public void send(Mail mail){
        //消息到达交换机,发送邮件
        System.out.println("mail.getTo() = " + mail.getTo());
        System.out.println("mail.getMailContent() = " + mail.getMailContent());
    }
}
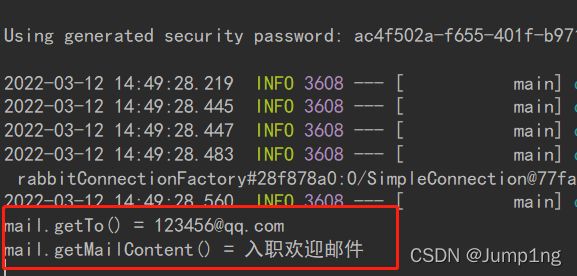
在这里我们可以执行邮件发送的具体操作,所以测试结果中,在控制台能看见输出的这两句话,证明邮件发送成功。
三、测试环节
3.1启动RabbitMQ
首先我们要开启RabbitMQ
启动完成后进入RabbitMQ的Queues队列
可以看到这里的队列是没有数据的,因为我还没有启动我的项目,当我启动项目之后,这里会显示mail_queue,说明RabbitMQ已经连接成功。
3.2启动我们的项目
项目启动后我们进入RabbitMQ,若显示如下画面,则表示RabbitMQ连接成功,项目搭建没有问题。
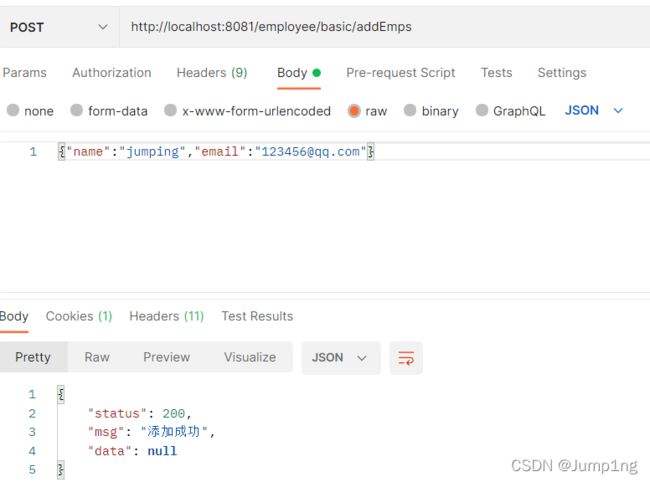
此时我们打开postman测试接口,登录后访问
返回我们自定义的RespBean添加成功的JSON字符串,表明测试接口已调通。这时候可以去看看控制台打印的东西。
控制台显示打印语句,证明邮件发送成功,到这里我们可以看看数据库的mail_send_log插入了一条怎样的消息。
测试完成,有不懂的地方欢迎留言!!


