React封装轮播图组件 超详细文字说明+源码
react轮播图组件封装
开篇先唠唠嗑:
作者最近也是在学习react,到今天为止正好半个月,15天。最近了解到了蚂蚁的Ant-Design UI库,于是想我也想利用之前所学的东西试着去封装一个自己的组件。当初学原生的DOM操作时,轮播图算是一个比较经典的案例了。我看一些面经上也有相关的问题,所以打算封装一个轮播图组件作为自己封装的第一个react组件。
第一次独立上手封装react组件真是不习惯,刚开始毫无思绪,连jsx语法都生疏了,通过借鉴以前用原生js写轮播图的思路,经过大半天,还是慢慢写出来了。下面开始正题:
几个重要的点:
- 如何应用react的思想
- 轮播的原理
- 节流阀的运用
- 如何组织组件的API
整体实现思路(应用react思想):
与原生的JavaScript命令式的直接操作DOM不同,react是采用声明式的模式通过虚拟DOM来操作原生的DOM。所以,我们应该主要聚焦的是如何通过render函数和setState方法来渲染state中的数据,从而实现轮播图效果。
我们知道,轮播图实现的原理,是在子绝父相的布局下,不断改变图片的left属性。
首先观察静态的html与css代码:
<div class="focus">
      <ul class="img">
        <li>
          <a href="#"><img src="focus.jpg" alt="" />a>
        li>
        <li>
          <a href="#"><img src="focus1.jpg" alt="" />a>
        li>
        <li>
          <a href="#"><img src="focus2.jpg" alt="" />a>
        li>
        <li>
          <a href="#"><img src="focus3.jpg" alt="" />a>
        li>
      ul>


      <ul class="pointer">
		<li>li>
		<li>li>
		<li>li>
		<li>li>
	  ul>
    div>
采用ul结构来保存图片,ul在属性名为focus的盒子的包裹下。所以只要将focus盒子设为相对定位,ul设置为绝对定位,通过不断改变ul的left属性值,即可实现轮播。
注意:为了能够实现连续的轮播效果,如果想要轮播四张图片,必须得在图片列表末尾再拷贝第一张图片,同理也必须在图片列表开头拷贝最后一张图片。具体原理后续会详细说明。
css代码:
li {
  list-style: none;
}

* {
  margin: 0;
  padding: 0;
}

.focus {
  position: relative;
  width: 720px;
  height: 455px;
  overflow: hidden;
  margin: 100px auto;
}

.img {
  width: 600%;/* 拷贝之后图片列表中有6张图片,将ul的宽设置为600%,从而使所有图片都在同一行上*/
  position: absolute;
  z-index: -1;
}

.img li {
  float: left;
  width: 720px;
  height: 455px;
}

.pointer {
  position: absolute;
  bottom: 12px;
  left: 320px;
}

.pointer li {
  cursor: pointer;
  display: inline-block;
  margin-right: 5px;
  width: 18px;
  height: 18px;
  background-color: white;
  opacity: 0.3;
  border-radius: 50%;
}

.current {
  opacity: 1 !important;
}
那么如何将静态的html,css结构移植到react组件中呢?
思考一下,如果你想使用一个轮播图组件,这个组件最基本的要求,肯定是得能自定义图片,自定义图片的宽高。所以使用者应该传入自己想要的图片的地址,以及图片的宽高。
而css样式又取决于这三个属性,所以css样式应该是动态的。这里我采用了“all in js” 的思路,使用了styled-components这个库。
下面来看react代码:
整体的结构:

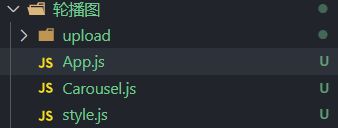
upload里面存放图片,App.js是主入口,Carsouel.js是封装的轮播图组件,style.js是样式文件。
App.js:
import React, { PureComponent } from "react";
import Carousel from "./Carousel";

export default class App extends PureComponent {
  constructor() {
    super();
    this.state = {};
  }
  render() {
    return (
      <Carousel width={720} height={455}>
        <li>
          <a href="/#">
            <img src={require("./upload/focus0.jpg")} alt="" />
          </a>
        </li>
        <li>
          <a href="/#">
            <img src={require("./upload/focus1.jpg")} alt="" />
          </a>
        </li>
        <li>
          <a href="/#">
            <img src={require("./upload/focus2.jpg")} alt="" />
          </a>
        </li>
        <li>
          <a href="/#">
            <img src={require("./upload/focus3.jpg")} alt="" />
          </a>
        </li>
      </Carousel>
    );
  }
}
按照上文的思路,使用该组件时,我们向组件传入图片的宽高属性,同时传入li/a/img结构,来展示图片。这里要注意在react中的img标签中使用src属性时,不能直接用字符串,可以采用require方法,同时require方法不能接收变量作为参数,只能接收字符串。
style.js:
import styled from "styled-components";
export const Focus = styled.div`
  position: relative;
  width: ${(props) => props.width}px;
  height: ${(props) => props.height}px;
  overflow: hidden;
  margin: 100px auto;

  li {
    list-style: none;
  }
  * {
    margin: 0;
    padding: 0;
  }

  .img {
    width: ${(props) => (props.num + 2) * 100}%;
    position: absolute;
    z-index: -1;
  }

  .img li {
    float: left;
    width: ${(props) => props.width}px;
    height: ${(props) => props.height}px;
  }

  .pointer {
    position: absolute;
    bottom: 12px;
    left: 320px;
  }

  .pointer li {
    cursor: pointer;
    display: inline-block;
    margin-right: 5px;
    width: 18px;
    height: 18px;
    background-color: white;
    opacity: 0.3;
    border-radius: 50%;
  }

  .current {
    opacity: 1 !important;
  }
`;
这里移入了上文的css样式,同时根据传入的参数作了动态的修改,导出了一个focus组件,作为轮播图组件具体实现的一个容器。
需要注意的是,除了图片本身的长宽需要根据传递进的参数做动态调整以外,图片切换按钮,也就是选择器.pointer以及.pointer li的内容也应该是动态的。这里作者偷个小懒,读者有需要可以自行实现。
下面要做的就是具体的组件逻辑代码了。
我本次封装的轮播图组件主要有两个功能,一个是自动轮播,一个是通过图片切换按钮手动切换。我们先来实现自动轮播功能。
先看Crousel组件的render函数和构造函数
constructor(props) {
    super(props);
    this.state = {
      width: this.props.width, //图片宽度
      height: this.props.height, //图片高度
      index: 1, //当前展示的图片的下标
      left: this.props.width, //当前位移
      flag: true, //节流阀,当flag为false时,表明图片正在进行移动,不能进行其他操作
    };
  }
构造函数中我们接受了传入的图片的宽高,同时设定了index和left属性,这是我们完成图片轮播的重要依据。flag属性充当了节流阀,节流阀的作用我们稍后学习。
render() {
    return (
      <Focus
        width={this.state.width}
        height={this.state.height}
        num={this.props.children.length}
      >
        <ul className="img" style={{ left: `-${this.state.left}px` }}>
          {this.props.children[this.props.children.length - 1]}
          {this.props.children}
          {this.props.children[0]}
        </ul>
        <ul className="pointer">
        //图片切换按钮
        </ul>
      </Focus>
    );
  }
返回的根组件是我们通过样式文件style.js导出的Focus组件,上文说过,我们用该组件作为轮播图具体实现的一个容器。在类名为img的ul标签中,我们通过this.props.children渲染了传入组件的子标签,同时为了实现连续轮播,我们通过{this.props.children[this.props.children.length - 1]}和this.props.children[0]}对首尾图片进行了拷贝。
图片切换按钮的功能我们稍后添加,现在专心实现图片的轮播。
不难想到,图片自动播放的功能应该是在元素渲染完成后,就应该立马开启。那么,对应的生命周期函数就是componentDidMount(),我们可以在这个生命周期函数中实现自动轮播的功能。
代码如下:
  componentDidMount() {
    setInterval(() => {
      if (this.state.flag) {
        this.setState({
          index: this.state.index + 1,
        });
        this.transform(this.state.width * this.state.index);
      }
    }, 4000);
  }
首先我们来看看上段代码中调用的transform方法:
transform(target) {
    this.setState({
      flag: false,
    });

    let timer = setInterval(() => {
      if (this.state.left === target) {
        clearInterval(timer);
        this.setState({
          flag: true,
        });
      }
      let step = (target - this.state.left) / 10; //图片每次移动的距离
      step = step > 0 ? Math.ceil(step) : Math.floor(step);
      this.setState({
        left: this.state.left + step,
      });
    }, 20);
为了实现图片运动时的动画效果,我采用了js的方式,当然也可使用css中的动画相关属性。采用js实现动画的主要思路就是通过高频率的定时器来高频率的渲染浏览器。这里注意,渲染时图片每次移动的距离step应该要向上取大于其绝对值的整数,否则图片移动不到指定位置。
在代码中,我们定义了一个定时器,且赋给了一个变量,便于后面关闭定时器。参数target传入的是想要图片移动后所处的位置,也就是图片移动后,包裹图片的ul标签的left属性值。我们传入了this.state.width * this.state.index这个表达式,index也就是当前图片的下标。我们第一次展示的图片的下标为1,也就是本来的第一张图片,因为下标为0的图片是最后一张图片的拷贝。不难想象,图片首次被渲染出来时,ul标签的left属性值就是-1*this.state.width,1就是当前图片的下标。所以我们传入了this.state.width * this.state.index作为target的值。在外层的定时器中,我们先通过setState方法改变index的值,然后调用transform方法实现图片运动。
在代码中,我们运用了flag属性作为判断条件,也就是节流阀。那么为什么需要节流阀呢?
可以想象,轮播图中图片的运动有一个客观原因和一个主观原因。客观原因是我们设定的自动轮播,每隔一段规定的时间,图片位置就会改变。主观原因是我们人为的随机的点击了图片切换按钮,导致图片的运动。
设想一下:如果在图片自动轮播且并没有完全切换为另一张图片时,你人为的点击了图片切换按钮,那么这时候会发生什么?
这时候会有奇怪的一些事情发生,比如图片显示不完整,两张图片来回抖动(简称鬼畜)。这都是因为异步消息队列中我们开启了两个会冲突的定时器,一个是自动轮播功能中transform方法开启的定时器,一个是图片切换按钮的点击事件中transform方法开启的定时器(是的,transform方法也会在图片切换按钮的点击事件中被调用,从而实现图片轮播)。这两个冲突的定时器都会高频率的改变图片的位置,所以会产生一些我们不期望的结果,感兴趣的读者可以试试,去掉flag属性的判断语句,会发生什么。
所以我们需要节流阀,一个开关。在图片运动的时候,也就是transform方法的开始,关闭这个开关,使得任务队列中始终只有一个能改变图片位置的定时器。运动结束后,原有的定时器被关闭,再开启这个开关,即重新将flag属性置为true。这样就可以点击按钮切换图片或等待4s让它自动轮播。
一个特殊情况:
当图片运动到最后一张图片时,在本例中,即下标为5的图片时,我们应该怎样处理?
这时候,页面显示的其实是focus0.png,也就是本来的第一张图片,因为我们将第一张图片进行了拷贝并放在图片列表的末尾。这样做的目的是为了图片轮播的连续性,那么为什么这样做就可以实现连续性呢?
直接上代码:
componentWillUpdate(nextProps, nextState) {
    console.log(this.state.index);
    if (nextState.index > this.props.children.length + 1) {
      this.setState({
        index: 2, //下次直接渲染真实的第二张图片
        left: 720,
      });
    }
  }
首先,我们在componentWillUpdate()中定义了相关逻辑判断。根据上文的componentDidMount()中,我们在调用transform方法进行图片切换前,会先调用setState方法改变this.state.index的值,而重新渲染前,我们会在componentWillUpdate()中进行相关判断,当当前展示的图片下标为5时,setState后index变为6,即nextState.index=6,大于了this.props.children.length+1(等于5,只传入了4个li标签),然后又会执行setState方法,将index的值变为2,同时通过将left属性设为720将当前展示的图片切换到下标为1的图片,注意这时切换图片时不会调用transform实现动画效果,因为这样的处理应该是对用户透明的,即悄悄咪咪的改变图片的位置。
注意,这里index的值应该设为2,而不是设为1,因为调用完这个生命周期函数后并刷新了index的数据后,componentDidMount中会接着执行transform函数,以当前index为基准进行图片移动。如果设为1,那么传入的target也等于720,调用transform时图片就不会移动,相当于这4s在用户看来,页面上的图片没有任何改变。那么从下标为5的图片转换到下标为2的图片就会经过8s,而这本应该是4s。所以应该设为2,使得从下标为5的图片光速切换为下标为1的图片后,能接着切换到下标为2的图片,而不是再等待4s。
拷贝最后一张图片放到图片列表的开头的原因同理。一些轮播图会有前进和后退按钮,当通过前进按钮使得切换到下标为0的图片后,即切换到最后一张图片的拷贝时,会做相同的处理。这里我们没有实现前进和后退功能,读者可以自行参考实现。
下面我们继续实现图片切换按钮功能
首先我们补全render函数
render() {
    return (
      <Focus
        width={this.state.width}
        height={this.state.height}
        num={this.props.children.length}
      >
        <ul className="img" style={{ left: `-${this.state.left}px` }}>
          {this.props.children[this.props.children.length - 1]}
          {this.props.children}
          {this.props.children[0]}
        </ul>
        <ul className="pointer">
          {this.props.children.map((item, index) => {
            return (
              <li
                onClick={(e) => this.move(index + 1)}
                className={
                  index === this.state.index - 1 ||
                  index === this.state.index - 5
                    ? "current"
                    : ""
                }
              ></li>
            );
          })}
        </ul>
      </Focus>
    );
  }
我们给代表图片切换按钮的每个小li绑定了一个点击事件和一个动态生成类名的逻辑判断。
先来看动态生成类名的判断条件,我们知道this.state.index是轮播图片进行切换的一个依据,同理图片切换按钮也应该与this.state.index有关。index是每个按钮的下标。我们目前轮播图始终展示的图片有5张,分别是下标为1的图片到下标为5的图片,同时下标为1的图片和下标为5的图片都是同一张图片,对应的也都是下标为0的按钮,其余图片都对应下标减一后的按钮。
接下来看move方法的实现,也就是点击事件的处理函数:
move(index) {
    if (this.state.flag) {
      this.setState({
        index: index,
      });
      this.transform(index * this.state.width);
    }
  }
同样,我们也采用了节流阀。将点击的按钮下标加一后,传入了该函数,然后该函数会改变this.state.index的值并调用transform方法进行图片切换。
完整的组件实现代码:
import React, { PureComponent } from "react";
import { Focus } from "./style";
import PropTypes from "prop-types";

export default class Carousel extends PureComponent {
  constructor(props) {
    super(props);
    this.state = {
      width: this.props.width, //图片宽度
      height: this.props.height, //图片高度
      index: 1, //当前展示的图片的下标
      left: this.props.width, //当前位移
      flag: true, //节流阀,当flag为false时,表明图片正在进行移动,不能进行其他操作
    };
  }

  static propTypes = {
    width: PropTypes.number.isRequired,
    height: PropTypes.number.isRequired,
  };

  //自动轮播
  componentDidMount() {
    setInterval(() => {
      if (this.state.flag) {
        this.setState({
          index: this.state.index + 1,
        });
        this.transform(this.state.width * this.state.index);
      }
    }, 4000);
  }

  componentWillUpdate(nextProps, nextState) {
    console.log(this.state.index);
    if (nextState.index > this.props.children.length + 1) {
      this.setState({
        index: 2, //下次直接渲染真实的第二张图片
        left: 720,
      });
    }
  }

  render() {
    return (
      <Focus
        width={this.state.width}
        height={this.state.height}
        num={this.props.children.length}
      >
        <ul className="img" style={{ left: `-${this.state.left}px` }}>
          {this.props.children[this.props.children.length - 1]}
          {this.props.children}
          {this.props.children[0]}
        </ul>
        <ul className="pointer">
          {this.props.children.map((item, index) => {
            return (
              <li
                onClick={(e) => this.move(index + 1)}
                className={
                  index === this.state.index - 1 ||
                  index === this.state.index - 5
                    ? "current"
                    : ""
                }
              ></li>
            );
          })}
        </ul>
      </Focus>
    );
  }

  move(index) {
    if (this.state.flag) {
      this.setState({
        index: index,
      });
      this.transform(index * this.state.width);
    }
  }

  transform(target) {
    this.setState({
      flag: false,
    });

    let timer = setInterval(() => {
      if (this.state.left === target) {
        clearInterval(timer);
        this.setState({
          flag: true,
        });
      }
      let step = (target - this.state.left) / 10;
      step = step > 0 ? Math.ceil(step) : Math.floor(step);
      this.setState({
        left: this.state.left + step,
      });
    }, 20);
  }
}
总结:
这次组件封装是我的第一次尝试,也算是对前两周react学习的一个综合练习。代码肯定有很多不足,读者们可以借鉴思路,实现更完美的代码,也欢迎在评论区指出错误,互相探讨~
