Spring更简单的读取和存储对象
文章目录
- 1. 概念篇
-
- 1.1 IoC是什么?
- 1.2 IoC 和 传统开发对比总结
- 1.3 DI概念说明
- 2. 使用 Maven 创建 Spring 流程
-
- 2.1 创建 Maven 项目
-
- 1.1.1 添加 Spring 框架支持
- 1.1.2 添加一个启动类
- 2.2 存储 Bean 对象
-
- 2.2.1 创建 Bean
- 2.2.2 将 Bean 注册到容器
- 2.3 获取并使用 Bean 对象
-
- 2.3.1 创建 Spring 上下文
- 2.3.2 获取指定的 Bean 对象
- 2.3.3 注意事项
- 2.3.4 getBean 方法的更多用法
- 2.4 使用 Bean
- 2.5 总结
- 3. 更简单的读取和存储对象
-
- 3.1 配置扫描路径
- 3.2 添加注解存储 Bean 对象
-
- 3.2.1 @Controller「控制器存储」
- 3.2.2 @Service「服务存储」
- 3.2.3 @Repository「仓库存储」
- 3.2.4 @Component「组件存储」
- 3.2.5 @Configuration「配置存储」
- 3.3 这么多注解的原因
-
- 3.3.1 类注解之间的关系
- 3.3.2 Bean 的命名
- 3.4 方法注解 Bean
- 3.5 重命名 Bean
- 4. 获取 Bean 对象「对象装配」
-
- 4.1 属性注入
- 4.2 构造方法注入
- 4.3 Setter 注入
- 4.3 三种注入优缺点
- 4.5 另外一种对象装配的关键字:@Resource
- 4.6 @Autowired VS @Resouce
- 4.7 同一个类型多个 Bean 报错
1. 概念篇
1.1 IoC是什么?
Inversion of Control「控制反转」也就是说 Spring 是一个控制反转的容器。
以前我们操作对象需要 new 对象,由对象的作用域决定生命周期。使用 Spring 之后,就由框架提供了统一的容器来管理,实例化这些对象,并自动组织对象的之间的复杂依赖关系「体现在代码中就是对象中成员变量引入另一个变量」
为何叫控制反转?
从使用上看,之前的 new 对象、设置属性这些控制权限都在使用者身上;使用了 Spring容器 之后,现在全部转移到容器中,容器会自动管理组织这些对象之间的关系依赖。因为控制权限发生了反转,所以叫控制反转
该如何理解呢?
这个是传统的一辆汽车生产过程
代码实现如下
package IOC;

public class Main {
    static class Car {
        private FrameWork frameWork;

        public Car(int size) {
            frameWork = new FrameWork(size);
        }

        public void run() {
            frameWork.init();
        }
    }

    static class FrameWork {
        private Bottom bottom;

        public FrameWork(int size) {
            bottom = new Bottom(size);
        }

        public void init() {
            bottom.init();
        }
    }

    static class Bottom {
        private Tire tire;

        public Bottom(int size) {
            tire = new Tire(size);
        }

        public void init() {
            tire.init();
        }
    }

    static class Tire {
        private int size;

        public Tire(int size) {
            this.size = size;
        }

        public void init() {
            System.out.println("轮胎的尺寸:" + this.size);
        }
    }

    public static void main(String[] args) {
        Tire tire = new Tire(20);
        Bottom bottom = new Bottom(20);
        FrameWork framework = new FrameWork(20);
        Car car = new Car(20);
        car.run();
    }
}
// 运行结果
轮胎的尺寸:20
有一个弊端就是如果想生产不同颜色喷漆的轮胎汽车,代码就需要重底层 Tire 开始修改,整个调用链上的代码全部都要改动才可以把 颜色 像 size尺寸 一样传入。会很麻烦。「耦合性:代码之间的相关性。代码的耦合性太高了,因此也就牵一发动全身」
所以为了解决传统开发过程中的问题,能不能让子类的修改创建不影响上级的呢?也就是说把代码的耦合性降低
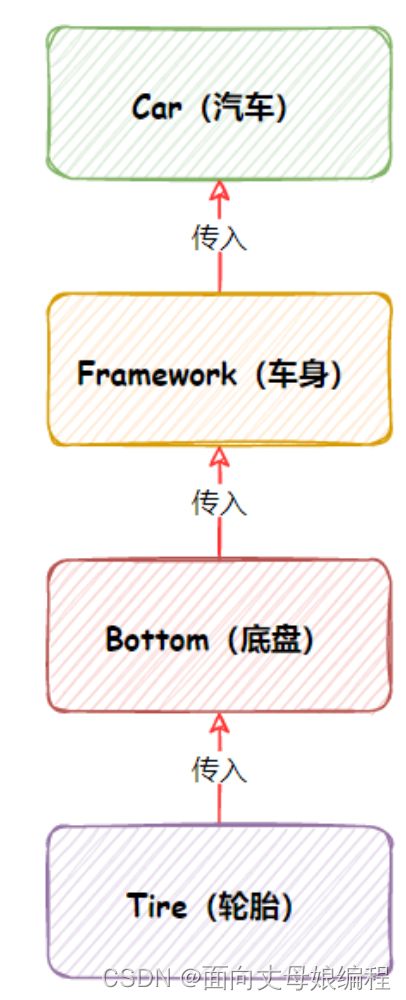
我们可以把原来创建下级类的方式改为通过传递「注入」的方式即可。因此不需要在当前类创建下级类,所以下级类的修改不会影响当前类。
package IOC;

public class Main {
    static class Car {
        private FrameWork frameWork;

        public Car(FrameWork frameWork) {
            this.frameWork = frameWork;
        }

        public void run() {
            frameWork.init();
        }
    }

    static class FrameWork {
        private Bottom bottom;

        public FrameWork(Bottom bottom) {
            this.bottom = bottom;
        }

        public void init() {
            bottom.init();
        }
    }

    static class Bottom {
        private Tire tire;

        public Bottom(Tire tire) {
            this.tire = tire;
        }

        public void init() {
            tire.init();
        }
    }

    static class Tire {
        private int size;

        public Tire(int size) {
            this.size = size;
        }

        public void init() {
            System.out.println("轮胎的尺寸:" + this.size);
        }
    }

    public static void main(String[] args) {
        Tire tire = new Tire(20);
        Bottom bottom = new Bottom(tire);
        FrameWork framework = new FrameWork(bottom);
        Car car = new Car(framework);
        car.run();
    }
}
// 运行结果
轮胎轮胎的尺寸:20的尺寸:20
1.2 IoC 和 传统开发对比总结
传统方式:Car --> Framework --> Bottome --> Tire
IOC:Tire --> Bottom --> Framework --> Car
会发现实现顺序是反的,通过 IDEA 的调试我们也发现传统方式的代码 一直在 不停的 new 对象 和 调用 init,整个过程是 自顶而下
IOC 则是先创建底层在玩层上层建筑,不再是上级对象控制并创建下级对象「Car 控制 Framework …Framework 控制 Bottom…」而是下级对象直接注入到当前类中,下级的创建这一权限不在交给上级控制而有自己创建。下级的修改也就不会对上级有何影响。
1.3 DI概念说明
上问的 IOC 提到的一个新的概念就是 注入「Dependency Injection」
所谓的依赖注入就是在 Spring 容器运行期间,动态地把某种依赖关系注入到 Spring容器
IOC 和 DI 从不同角度描述的同一件事:通过 IOC 利用 DI 实现程序之间的解耦
IOC就比如是一种设计思想,指导原则;而 DI 就是实打实的具体方案
现在我们知道了通过 DI 来把东西放入到 Spring容器 中,下一步就是如何使用。来看一下具体项目流程~
2. 使用 Maven 创建 Spring 流程
2.1 创建 Maven 项目
1.1.1 添加 Spring 框架支持
在项目的 pom.xml 中添加 Spring 支持
<dependencies>
        <dependency>
            <groupId>org.springframeworkgroupId>
            <artifactId>spring-beansartifactId>
            <version>5.2.3.RELEASEversion>
        dependency>
        <dependency>
            <groupId>org.springframeworkgroupId>
            <artifactId>spring-contextartifactId>
            <version>5.2.3.RELEASEversion>
        dependency>
dependencies>
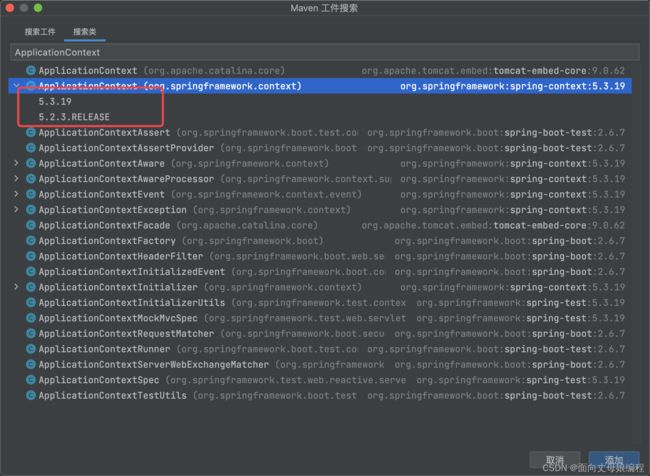
然后就会在外部库中发现添加的支持「注意Maven版本问题,我的是最新的Maven3.8.5。搭配的Spring 5.3.19」
版本问题其实可以通过让项目中自己查找后有一个 添加Maven依赖 就可以让项目自己去解决了
这里可以选择 Spring 框架的版本
然后更新 pom.xml 即可
1.1.2 添加一个启动类
在项目下创建一个 包含main方法的启动类即可
2.2 存储 Bean 对象
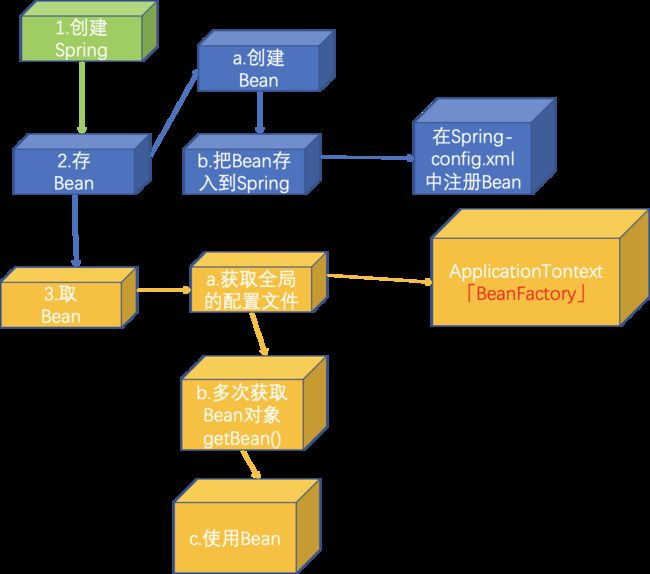
存储 Bean 分为以下 2步
- 存储 Bean 之前,要先有 Bean 才行
- 将创建的 Bean 注册到 Spring 容器中
2.2.1 创建 Bean
所谓的 Bean 就是 Java 语言中的一个对象
2.2.2 将 Bean 注册到容器
再创建好的项目中 **resource目录下 ** 添加 Spring 配置文件:Spring-config.xml
<beans xmlns="http://www.springframework.org/schema/beans"
       xmlns:xsi="http://www.w3.org/2001/XMLSchema-instance"
       xsi:schemaLocation="http://www.springframework.org/schema/beans http://www.springframework.org/schema/beans/spring-beans.xsd">
beans>
把 User 注册到 Spring 容器中「具体操作就是在 中添加如下配置」
<beans>
        <bean id="user" class="Beans.User">bean>
beans>
2.3 获取并使用 Bean 对象
获取并使用 Bean 对象,分为以下 3步
- 得到 Spring 上下文对象,因为对象都交给 Spring 管理了,所以获取对象要从 Spring 中获取,那么就的先得到 Spring 的上下文
- 通过 Spring 上下文,获取某一个指定的 Bean对象
- 使用 Bean 对象
如果获取多个 Bean 的话,重复以上2,3步骤
2.3.1 创建 Spring 上下文
Spring 上下文可以使用 ApplicationContext 或者 BeanFactory获取
ApplicationContext
ApplicationContext context = new ClassPathXmlApplicationContext("Spring-config.xml");
BeanFactory
BeanFactory beanFactory = new XmlBeanFactory(new ClassPathResource("Spring-config.xml"));
ApplicationContext 和 BeanFactory 效果是一样的,BeanFactory 属于 APplicationCOntext 子类,它们区别如下
-
继承角度:Spring 容器有两个顶级接口:BeanFactory 和 ApplicationContext 其中 BeanFactory 提供了基础的访问容器的能力,而 ApplicationContext 属于 BeanFactory 的子类,除了 BeanFactory 的所有功能外,它还拥有独特的特性,添加了对国际化的支持、资源访问的支持、以及事件传播等方面的支持
-
性能角度:ApplicationContext 是一次性加载并初始化所有的 Bean 对象,而 BeanFactory 是需要哪个才去加载哪个「更轻量」
ClassPathXmlApplicationContext 属于 ApplicationContext 的子类,拥有 ApplicationContext 的所有功能,是通过 xml 的配置来获取所有的 Bean 容器的
2.3.2 获取指定的 Bean 对象
ApplicationContext context = new ClassPathXmlApplicationContext("Spring-config.xml");
        User user = (User) context.getBean("user");
        user.sayHi();
        BeanFactory beanFactory = new XmlBeanFactory(new ClassPathResource("Spring-config.xml"));
        User user1 = (User) beanFactory.getBean("user");
        user1.sayHi();


// 运行结果
你好
你好
2.3.3 注意事项
Bean 的 id 要一一对应
<beans>
        <bean id="user" class="Beans.User">bean>
beans>
User user = (User) context.getBean("user");
User user1 = (User) beanFactory.getBean("user");
2.3.4 getBean 方法的更多用法
getBean() 方法很多重载,我们也可以使用其他方法来获取 Bean 对象
先看一下 ClassPathXmlApplicationContext 构造方法的源码
ApplicationContext context = new ClassPathXmlApplicationContext("Spring-config.xml");
User user = (User) context.getBean(User.class);

User user1 = (User) context.getBean("user1", User.class);
二者的区别
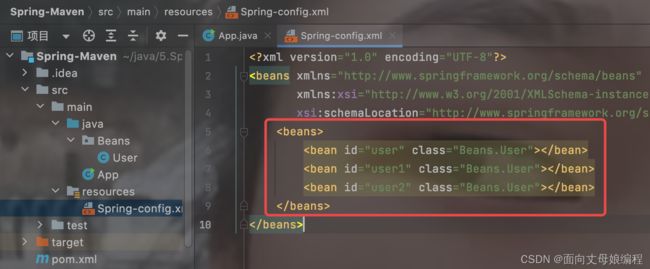
当有多个重复的对象被注册到 Bean 中的时候,只能通过 id属性 来获取
<beans>
        <bean id="user" class="Beans.User">bean>
        <bean id="user1" class="Beans.User">bean>
        <bean id="user2" class="Beans.User">bean>
beans>
如果继续使用 context.getBean(User.class) 就会报错
解决方法就是指定 id 来获取
User user = (User) context.getBean("user2", User.class);
2.4 使用 Bean
import Beans.User;
import org.springframework.context.ApplicationContext;
import org.springframework.context.support.ClassPathXmlApplicationContext;

public class App {
    public static void main(String[] args) {
        ApplicationContext context = new ClassPathXmlApplicationContext("Spring-config.xml");
        User user = (User) context.getBean("user2", User.class);
        user.sayHi();
    }
}

// 运行结果
你好
2.5 总结
- 操作容器之前,先要有容器,所以先要得到容器
- 存对象
- 创建 Bean「普通类」
- 将 Bean 注册「配置」到 Spring-config.xml 中
- 取对象
- 得到 Spring 上下文,并读取到 Spring 的配置文件
- 获取某一个 Bean 对象
- 使用 Bean 对象
以上步骤是用Maven来创建一个Spring项目的流程
3. 更简单的读取和存储对象
在上述操作过程中,我们发现存储对象并没有想象中的那么 简单,所以就有了更简单的操作 Bean对象 的方法
Spring 更简单的存储对象和读取对象核心是使用注解
自此,Java 中的注解是不是和我们想象中的注解开始有了变化
之前我们还需要在 Spring 的配置文件 Spring-config.xml 中添加一行 bean 注册内容才行
因此 Spring 中为了方便注册,我们只需要配置一个存储对象的扫描包即可「目录中的所有 Bean 被添加注解后都会被注册到 Spring 容器中」
3.1 配置扫描路径
<beans xmlns="http://www.springframework.org/schema/beans"
       xmlns:xsi="http://www.w3.org/2001/XMLSchema-instance"
       xmlns:content="http://www.springframework.org/schema/context"
       xsi:schemaLocation="http://www.springframework.org/schema/beans http://www.springframework.org/schema/beans/spring-beans.xsd http://www.springframework.org/schema/context https://www.springframework.org/schema/context/spring-context.xsd">
    <content:component-scan base-package="/Beans">content:component-scan>
beans>
对比之前的 Spring-config.xml 发现多了标红的两行,这两行就是注册扫描的包
也就是说,即使添加了注解,如果不是在配置的扫描报下的泪对象,也是不能被存储的 Spring 中的
3.2 添加注解存储 Bean 对象
想把扫描包中的 Bean 添加到 Spring,由两类注解类型可以实现
- 类注解:@Controller、@Service、@Repository、@Component、@Configuration
- 方法注解:@Bean
知道了这些方法后,我们一个一个来使用
3.2.1 @Controller「控制器存储」
使用 @Controller 存储 Bean
package Beans;

import org.springframework.stereotype.Controller;

@Controller
public class MyController {
    public void sayHi(){
        System.out.println("Controller");
    }
}
import Beans.MyController;
import org.springframework.context.ApplicationContext;
import org.springframework.context.support.ClassPathXmlApplicationContext;

public class App {
    public static void main(String[] args) {
        ApplicationContext context = new ClassPathXmlApplicationContext("Spring-config.xml");
        MyController myController = context.getBean("myController", MyController.class);
        MyController myController1 = (MyController) context.getBean("myController");
        myController.sayHi();
        myController1.sayHi();
    }
}

//运行结果
Controller
Controller
项目的目录和配置如图所示
3.2.2 @Service「服务存储」
在 Beans 目录中创建一个 @Survice注解的Bean
package Beans;

import org.springframework.stereotype.Service;

@Service
public class MyService {
    public void sayHi(){
        System.out.println("Service");
    }
}
import Beans.MyService;
import org.springframework.context.ApplicationContext;
import org.springframework.context.support.ClassPathXmlApplicationContext;

public class App {
    public static void main(String[] args) {
        ApplicationContext context = new ClassPathXmlApplicationContext("Spring-config.xml");
        MyService myService=context.getBean("myService", MyService.class);
        myService.sayHi();
    }
}
// 运行结果
Service
3.2.3 @Repository「仓库存储」
package Beans;

import org.springframework.stereotype.Repository;

@Repository
public class MyRepository {
    public void sayHi(){
        System.out.println("Repository");
    }
}
import Beans.MyRepository;
import org.springframework.context.ApplicationContext;
import org.springframework.context.support.ClassPathXmlApplicationContext;

public class App {
    public static void main(String[] args) {
        ApplicationContext context = new ClassPathXmlApplicationContext("Spring-config.xml");
        MyRepository myRepository = context.getBean("myRepository", MyRepository.class);
        myRepository.sayHi();
    }
}
// 运行结果
Repository
3.2.4 @Component「组件存储」
package Beans;

import org.springframework.stereotype.Component;

@Component
public class MyComponent {
    public void sayHi(){
        System.out.println("Component");
    }
}
import Beans.MyComponent;
import org.springframework.context.ApplicationContext;
import org.springframework.context.support.ClassPathXmlApplicationContext;

public class App {
    public static void main(String[] args) {
        ApplicationContext context = new ClassPathXmlApplicationContext("Spring-config.xml");
        MyComponent myComponent=context.getBean("myComponent", MyComponent.class);
        myComponent.sayHi();
    }
}
// 运行结果
Component
3.2.5 @Configuration「配置存储」
package Beans;

import org.springframework.context.annotation.Configuration;

@Configuration
public class MyConfiguration {
    public void sayHi(){
        System.out.println("Configuration");
    }
}
import Beans.MyConfiguration;
import org.springframework.context.ApplicationContext;
import org.springframework.context.support.ClassPathXmlApplicationContext;

public class App {
    public static void main(String[] args) {
        ApplicationContext context = new ClassPathXmlApplicationContext("Spring-config.xml");
        MyConfiguration myConfiguration=context.getBean("myConfiguration", MyConfiguration.class);
        myConfiguration.sayHi();
    }
}
// 运行结果
Configuration
3.3 这么多注解的原因
我们发现它们的功能是一样的,都能达到 添加注解注册Bean 的功能,那么为何还要有这么多注解类型呢?
这就和每个省市都有自己的车牌号一样。全国的各个地区买的相同类型的车都是一样的,但是车牌号却不同:湖北的车有鄂A:武汉的车;鄂B:黄石的车;鄂C:十堰的车。。。这样做的好处就是节约了车牌号以外还可以查看车辆的归属地方便车管局管理。
那么为什么需要这么多的类注解也是一样的原因,就是让程序员看到类注解之后就能直接了解当前类的用途
- @Controller:业务逻辑层
- @Service:服务层
- @Repository:持久层
- @Configuration:配置层
程序的工程分层调用流程如下:
3.3.1 类注解之间的关系
发现这 4个 注解里都有一个注解 @Component,说明他们本身就是属于 @Component子类
在看 @Component的源码
源码溯源就到此为止了,只需要了解它们四个实现了@Component接口即可
3.3.2 Bean 的命名
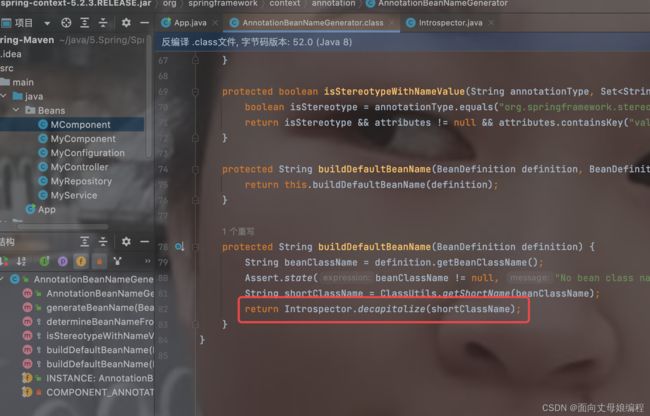
通过上面的代码,Bean「类」的命名都是标准的大驼峰命名,而读取的时候首字母小写可以获取到 bean 了
当读取的时候第一第二首字母都是大写的时候就不能正常读取到 bean 了
这是什么原因呢?
是时候查看一下源码了
搜索 bean 即可
public static String decapitalize(String name) {
    if (name == null || name.length() == 0) {
        return name;
    }
  	// 如果第一个字母和第二字母都为大写的情况,是把 bean 的首字母也大写进行存储
    if (name.length() > 1 && Character.isUpperCase(name.charAt(1)) &&
            Character.isUpperCase(name.charAt(0))) {
        return name;
    }
  	// 否则就是将首字母小写进行存储
    char chars[] = name.toCharArray();
    chars[0] = Character.toLowerCase(chars[0]);
    return new String(chars);
}
所以,对于上面的报错,我们需要修改一下 id 就可以了
3.4 方法注解 Bean
类注解是添加到某个类上的,而方法注解是放到某个方法上的。方法注解要搭配类注解一起使用才可以将方法正常的存储到 Spring 中
package Model;

public class User {
    private int id;
    private String name;

    public int getId() {
        return id;
    }

    public String getName() {
        return name;
    }

    public void setId(int id) {
        this.id = id;
    }

    public void setName(String name) {
        this.name = name;
    }

    @Override
    public String toString() {
        return "UserInfo{" +
                "id=" + id +
                ", name='" + name + '\'' +
                '}';
    }
}
package Beans.Service;

import Model.User;
import org.springframework.context.annotation.Bean;
import org.springframework.stereotype.Service;

@Service
public class UserService {
    @Bean
    public User getUser() {
        User user = new User();
        user.setId(0);
        user.setName("张三");
        return user;
    }
}
package Beans.Controller;

import Beans.Service.UserService;
import Model.User;
import org.springframework.stereotype.Controller;

import javax.annotation.Resource;

@Controller
public class UserController {
    @Resource
    private UserService userService;
    public User getUser(){
        return userService.getUser();
    }
}
import Model.User;
import Beans.Controller.UserController;
import org.springframework.context.ApplicationContext;
import org.springframework.context.support.ClassPathXmlApplicationContext;

public class App {
    public static void main(String[] args) {
        ApplicationContext context = new ClassPathXmlApplicationContext("Spring-config.xml");
        UserController userController = context.getBean(UserController.class);
        System.out.println(userController.getUser());
    }
}
// 运行结果
UserInfo{id=0, name='张三'}
这里为何是张三而不是李四的原因
这里的 userInfo 其实是和 @Bean 注册的方法名类似,所以这里显示的是张三「如果换成 getUser 就是李四」
文件目录如下
Model 没有在扫描路径下,而是通过 扫描路径 Beans 下的 Service 文件中的代码添加指定方法到 Spring 中
3.5 重命名 Bean
UserInfoService
package Beans.Service;

import Model.User;
import org.springframework.context.annotation.Bean;
import org.springframework.stereotype.Service;

@Service
public class UserService {
    @Bean(name = {"getUser", "gU"})
    public User getUser() {
        User user = new User();
        user.setId(0);
        user.setName("张三");
        return user;
    }

    @Bean(name = {"getUser1", "gU1"})
    public User getUser1() {
        User user = new User();
        user.setId(1);
        user.setName("李四");
        return user;
    }
}
其实 name 就是一个数组,并且 name 可以省略
@Bean({“getUser”, “gU”})
App文件
import Model.User;
import org.springframework.context.ApplicationContext;
import org.springframework.context.support.ClassPathXmlApplicationContext;

public class App {
    public static void main(String[] args) {
        ApplicationContext context = new ClassPathXmlApplicationContext("Spring-config.xml");
        User user = context.getBean("gU", User.class);
        User user1 = context.getBean("gU1", User.class);
        System.out.println(user);
        System.out.println(user1);
    }
}
// 运行结果
UserInfo{id=0, name='张三'}
UserInfo{id=1, name='李四'}
4. 获取 Bean 对象「对象装配」
获取 Bean 对象也叫做 对象装配,把对象取出来放在某个类中,有时候也叫 对象注入
对象注入有 3 种方法
- 属性注入
- 构造方法注入
- Setter注入
4.1 属性注入
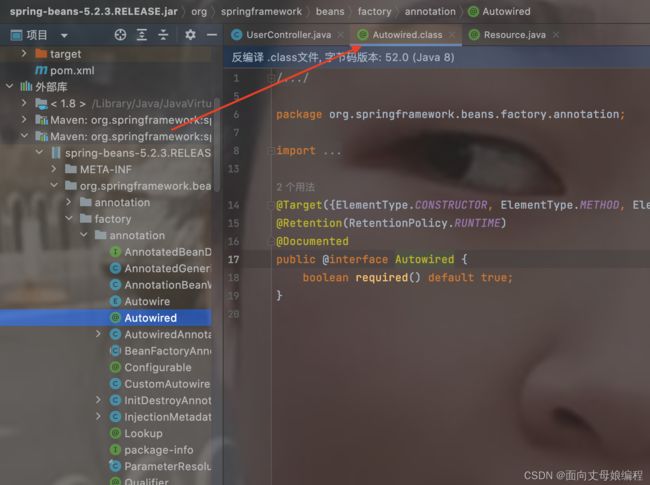
属性注入用的是 Autowired 实现的
UserService
package Beans.Service;

import Model.User;
import org.springframework.context.annotation.Bean;
import org.springframework.stereotype.Service;

@Service
public class UserService {
    @Bean(name = {"getUser", "gU"})
    public User getUser() {
        User user = new User();
        user.setId(0);
        user.setName("张三");
        return user;
    }

    @Bean(name = {"getUser1", "gU1"})
    public User getUser1() {
        User user = new User();
        user.setId(1);
        user.setName("李四");
        return user;
    }
}
UserController
package Beans.Controller;

import Beans.Service.UserService;
import Model.User;
import org.springframework.beans.factory.annotation.Autowired;
import org.springframework.stereotype.Controller;

@Controller
public class UserController {
    @Autowired
    private UserService userService;

    public User getUser() {
        return userService.getUser();
    }
}
private UserService userService;就是属性注入
App
import Beans.Controller.UserController;
import org.springframework.context.ApplicationContext;
import org.springframework.context.support.ClassPathXmlApplicationContext;

public class App {
    public static void main(String[] args) {
        ApplicationContext context = new ClassPathXmlApplicationContext("Spring-config.xml");
        UserController userController = context.getBean(UserController.class);
        System.out.println(userController.getUser());
    }
}
// 运行结果
UserInfo{id=0, name='张三'}
4.2 构造方法注入
构造方法注入用的是 Autowired 实现的
构造方法注入是在类的构造方法中实现「修改属性注入中的 UserController 代码」
package Beans.Controller;

import Beans.Service.UserService;
import Model.User;
import org.springframework.beans.factory.annotation.Autowired;
import org.springframework.stereotype.Controller;

@Controller
public class UserController {
    private UserService userService;

    @Autowired
    public UserController(UserService userService) {
        this.userService = userService;
    }

    public User getUser() {
        return userService.getUser();
    }
}

// App 运行结果
UserInfo{id=0, name='张三'}
核心添加了一个 构造方法,在 Spring 容器中构造 UserController 时候不需要手动传入参数,它会自动装填
4.3 Setter 注入
Setter注入用的是 Autowired 实现的
和属性注入类似,但不是在 变量 上注入,而是在 Setter 中注入
package Beans.Controller;

import Beans.Service.UserService;
import Model.User;
import org.springframework.beans.factory.annotation.Autowired;
import org.springframework.stereotype.Controller;

@Controller
public class UserController {
    private UserService userService;

    @Autowired
    public void setUserService(UserService userService) {
        this.userService = userService;
    }

    public User getUser() {
        return userService.getUser();
    }
}
// App 运行结果
UserInfo{id=0, name='张三'}
4.3 三种注入优缺点
- 属性注入: 只能适用于IOC容器, 非IOC容器无法使用。并且只有在使用的时候才会出现
NullPointerException - 构造方法注入:通用性强,在使用前一定能保证注入的类不为空,是 Spring 推荐方法。但是当有多个注入会显得代码比较臃肿「考虑程序是否符合程序的单一职责的设计模式」
- Setter注入:前期 Spring 推荐方式,但是通用型不强,已被 Spring 换为 构造方法注入
4.5 另外一种对象装配的关键字:@Resource
Setter 注解
package Beans.Controller;

import Beans.Service.UserService;
import Model.User;
import org.springframework.stereotype.Controller;

import javax.annotation.Resource;

@Controller
public class UserController {
    private UserService userService;

    @Resource
    public void setUserService(UserService userService) {
        this.userService = userService;
    }

    public User getUser() {
        return userService.getUser();
    }
}

// 运行结果
UserInfo{id=0, name='张三'}
属性注解
package Beans.Controller;

import Beans.Service.UserService;
import Model.User;
import org.springframework.stereotype.Controller;

import javax.annotation.Resource;

@Controller
public class UserController {
    @Resource
    private UserService userService;

    public User getUser() {
        return userService.getUser();
    }
}

// 运行结果
UserInfo{id=0, name='张三'}
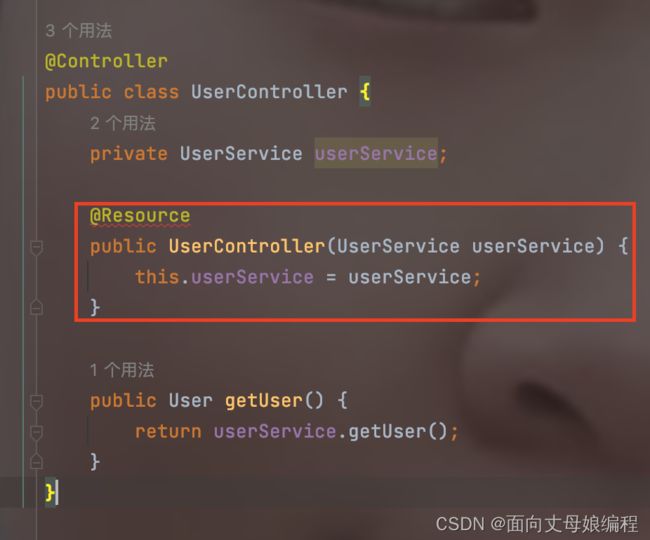
构造方法注解就报错
package Beans.Controller;

import Beans.Service.UserService;
import Model.User;
import org.springframework.stereotype.Controller;

import javax.annotation.Resource;

@Controller
public class UserController {
    private UserService userService;

    @Resource
    public UserController(UserService userService) {
        this.userService = userService;
    }

    public User getUser() {
        return userService.getUser();
    }
}

// 运行结果:抛出异常
java: 注释类型不适用于该类型的声明
4.6 @Autowired VS @Resouce
- 出身不同:@Autorwired 是源自于 Spring;而 @Resource 来自 JDK注解
- 使用时参数不同:相对于 @Autowired 来说,使用 @Resouce 支持更多的参数,可以设置 name 来获取指定 Bean
- 修饰对象不同:@Autowired 可以修饰 变量,构造方法,Setter;@Resource 可以修饰 变量,Setter,不能修饰构造方法
4.7 同一个类型多个 Bean 报错
package Beans.Component;

import Model.User;
import org.springframework.context.annotation.Bean;
import org.springframework.stereotype.Component;

@Component
public class UserComponent {
    @Bean
    public User getUser(){
        User user=new User();
        user.setId(0);
        user.setName("张三");
        return user;
    }
    @Bean
    public User getUser1(){
        User user=new User();
        user.setId(1);
        user.setName("李四");
        return user;
    }
}
package Beans.Controller;

import Model.User;
import org.springframework.stereotype.Controller;

import javax.annotation.Resource;

@Controller
public class UserController {
    @Resource
    private User user;
    public User getUser(){
        return user;
    }
}
import Beans.Controller.UserController;
import org.springframework.context.ApplicationContext;
import org.springframework.context.support.ClassPathXmlApplicationContext;

public class App {
    public static void main(String[] args) {
        ApplicationContext context = new ClassPathXmlApplicationContext("Spring-config.xml");
        UserController userController = context.getBean(UserController.class);
        System.out.println(userController.getUser());
    }
}
报错的原因是:非唯一的 Bean 对象
解决方案有两个
- 使用
@Resource({name="getUser"})定义 - 使用
@Qualifier注解定义名称
使用 @Resource(name = “getUser”)
package Beans.Controller;

import Model.User;
import org.springframework.stereotype.Controller;

import javax.annotation.Resource;

@Controller
public class UserController {
    @Resource(name = "getUser")
    private User user;
    public User getUser(){
        return user;
    }
}
使用 @Qualifier(value =“getUser”)
package Beans.Controller;

import Model.User;
import org.springframework.beans.factory.annotation.Autowired;
import org.springframework.beans.factory.annotation.Qualifier;
import org.springframework.stereotype.Controller;

@Controller
public class UserController {
    @Autowired
    @Qualifier(value = "getUser")
    private User user;

    public User getUser() {
        return user;
    }
}
要搭配 @Autowired「或者@Resource」 使用





![[外链图片转存失败,源站可能有防盗链机制,建议将图片保存下来直接上传(img-bxQ95tb6-1651373641288)(/Users/cxf/Desktop/MarkDown/images/注册重复的Bean报错.png)]](http://img.e-com-net.com/image/info8/7800c23a15274019a9832cdc3b35ae63.jpg)
