Android应用开发学习笔记之Intent
作者:刘昊昱
博客:http://blog.csdn.net/liuhaoyutz
Intent是什么呢?来看Android官网上的定义:
An intent is an abstractdescription of an operation to be performed. It can be used with startActivity tolaunch an Activity, broadcastIntent tosend it to any interestedBroadcastReceiver components,and startService(Intent) or bindService(Intent,ServiceConnection, int) tocommunicate with a background Service.
An Intent provides afacility for performing late runtime binding between the code in differentapplications. Its most significant use is in the launching of activities, whereit can be thought of as the glue between activities. It is basically a passivedata structure holding an abstract description of an action to be performed.
一、Intent的属性构成
Android会根据Intent来启动相应的组件,至于启动哪个组件,则取决于Intent中包含的属性。理论上,Intent可以包含如下属性:Component name、Action、Data、Category、Extra、Flags。下面我们来分别看这些属性的用法:
1、Component name
Component name属性指明用来处理这个Intent的组件的名称,它是一个ComponentName类对象。Componentname是一个Intent的可选属性。如果设置了这个属性,那么该Intent将会被发送给Component name指定的组件,这个Intent被称为“显式Intent”。如果没有设置Component name属性,则Android会使用Intent的其它属性决定合适的发送目标组件,这个Intent被称为“隐式Intent”。
Component name属性可以通过Intent类的setComponent()、setClass()或者setClassName()三个成员函数设置,可以通过getComponent()成员函数读取。例如:
        //创建一个ComponentName对象

        ComponentNamecomponentName = new ComponentName(

        FirstActivity.this,SecondActivity.class);

        Intentintent = new Intent();

        //设置Intent的Component属性

        intent.setComponent(componentName);

        //启动SecondActivity

        startActivity(intent);
上面的代码可以简化为:
        Intent intent = new Intent(FirstActivity.this,SecondActivity.class);

        //启动SecondActivity

        startActivity(intent);
2、Action
Action属性表示Intent所触发的目标组件将要执行的动作。在Broadcast Intent中,Action用来表示已经发生即将报告给目标组件的动作。在Intent类中,已经定义好许多Action常量,开发者也可以自定义Action,自定义Action的名称必须是独一无二的字符串,所以,一个好的习惯是使用基于Java包的命名方式。
Action可以通过Intent类的setAction()成员函数进行设置,通过getAction()成员函数进行读取。看下面的例子:
//声明一个Intent对象

Intentintent = new Intent();

//设置Action属性,ACTION_DIAL表示跳到拨号界面

intent.setAction(Intent.ACTION_DIAL);

startActivity(intent);
3、Data
Data属性是对Action指定的动作要操作的数据的封装,包括动作要操作的数据的URI以及MIME类型。不同类型的Action会有不同的Data封装,例如:如果Action是ACTION_EDIT,则Data应该是包含用来编辑文档的URI。如果Action是ACTION_CALL,则Data应该是包含号码的tel:URI。如果Action是ACTION_VIEW,则Data应该是http:URI。
显示图片的组件不应该拿来播放音频,所以除了数据的URI外,数据的类型也很重要。在很多情况下,数据类型可以从URI中推断,尤其是content:URI,它表示数据存在于设备上并由ContentProvider控制,但是,如果有必要,Data中除了数据的URI外,还可以显式的包含其MIME类型。
我们可以通过Intent类的setData()成员函数设置数据的URI,通过setType()成员函数设置数据的MIME类型,也可以通过setDataAndType()成员函数同时设置数据URI和MIME类型。可以通过getData()成员函数取得数据URI,通过getType()成员函数读取MIME类型。
4、Category
Category属性描述了用来处理这个Intent的目标组件所属的类别。一个Intent最多只能包含一个Action属性,但是可以具有多个Category属性。与Action类似,Intent类也预定义了一些Category常量。
我们可以通过Intent类的addCategory()成员函数添加一个Category属性,通过removeCategory()成员函数删除一个Category属性,通过getCategory()成员函数获得当前对象中包含的全部Category属性。
5、Extras
Extras属性封装了一些额外的附加信息,这些信息是以键值对的形式存在。
就象一些Action与特定类型的Data URI匹配一样,有些Action与特定的Extras匹配。例如,Action为ACTION_HEADSET_PLUG,则Extras用state来表示耳机是否被插入,用name表示耳机的类型。再比如,如果Action为ACTION_TIMEZONE_CHANGED,则Extras用time-zone来表示新时区。
Intent类定义了多个putXXX()方法,如putExtra(),用来设置不同类型的Extra数据。也定义了多个getXXX()方法,如getDoubleExtra(),用来读取Extra数据。这些方法和Bundle类有些类似,实际上,Extra可以通过putExtras()和getExtras()方法进行Bundle的设置和读取。
6、Flags
Flags属性多数用来指示Android系统如何启动Activity(如Activity属于哪个Task)以及启动后如何对待(如它是否属于近期的Activity列表)。所有的Flags都定义在Intent类中。
二、Intent过滤器(Intent Filter)
能够接收处理Intent的组件(如Activity、Service、BroadcastReceiver)必须告诉Android系统它能够响应处理什么样的Intent,这可以通过在AndroidManifest.xml文件中声明Intent过滤器(Intent Filter)实现。
IntentFilter描述该组件所能响应Intent的能力,即组件所能接收的Intent应该具有什么样的Action,Data或Category属性。比如,一个网页浏览器程序的IntentFilter应该声明它所希望接收的Intent应该具有ACTION_WEB_SEARCH,以及与之相关的Data应该是网页地址URI格式。
1、 Action测试
(1) Intent Filter应该至少包含一个Action测试,否则将屏蔽掉所有的Intent。
(2) 如果Intent没有定义Action属性,则只要Intent Filter包含一个Action测试,则这个Intent就会通过测试。
(3) 一个Intent只能有一个Action属性,但是一个Intent Filter可以定义多个Action测试,如果Intent的Action属性与某一条Intent Filter的Action测试匹配,就通过测试。
2、 Category测试
(1) 一个Intent可以定义多个Category属性,Intent Filter也可以包含多个Category测试,只有当Intent的所有Category属性在Intent Filter的Category测试中均有匹配项时,Category测试才算通过。
(2) Intent Filter中多余的Category测试项不会导致测试失败。
(3) 原则上讲,无论Intent Filter如何定义,没有定义Category的Intent总是可以通过Category测试。然而,需要注意,Android默认为所有通过startActivity()方法传递的隐式Intent设置一个Category属性,即android.intent.category.DEFAULT(CATEGORY_DEFAULT),所以,接收隐式Intent的Activity必须在过滤器中声明android.intent.category.DEFAULT(包含android.intent.action.MAIN和android.intent.category.LAUNCHER设置的是一个例外。它们表明Activity作为新任务启动并且显示在启动屏幕上,包含android.intent.category.DEFAULT与否均可)。
(4) 一个没有指定任何Category测试的Intent Flilter只会匹配没有定义Category属性的Intent。
3、 Data测试
Intent Filter的Data测试可以指定URI和数据类型(MIME类型),URI可以分为scheme、host、port和path几个独立的部分:scheme://host:port/path
例如:content://com.liuhaoyu.project:1000/folder/subfolder/config
其中,scheme是content,host是com.liuhaoyu.project,port是1000,path是folder/subfolder/config。
host和port一起组成了URI授权,如果host没有指定,则忽略port。
这些属性都是可选的,但是相互之间并非完全独立。如果授权有效,则scheme必须指定。如果path有效,则scheme和授权必须指定。
当Intent的Data属性与Intent Filter的Data测试相比较时,仅仅与Intent Filter中实际提到的URI部分相比较。例如,如果Intent Filter仅指定了scheme,则所有具有该scheme的URI都能匹配该Intent Filter。
三、Intent应用
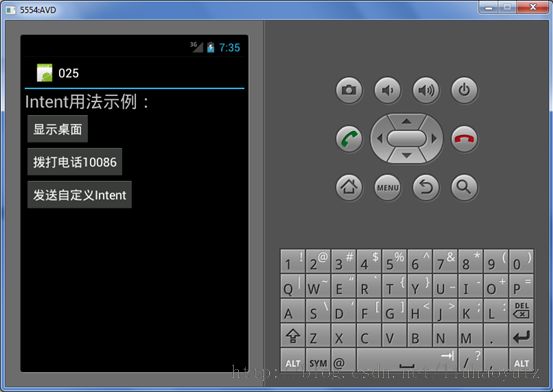
下面来看一个使用Intent的例子,该例子运行效果如下:

点“显示桌面”按钮后,会显示手机桌面。
点“拨打电话10086”按钮后,会拨打10086电话。
点“发送自定义Intent”按钮后,会发送带自定义Action的Intent,调用SecondActivity。
先来看主界面布局main.xml,其内容如下:
<?xml version="1.0" encoding="utf-8"?>

<LinearLayout xmlns:android="http://schemas.android.com/apk/res/android"

    android:layout_width="fill_parent"

    android:layout_height="fill_parent"

    android:orientation="vertical" >


    <TextView

        android:layout_width="fill_parent"

        android:layout_height="wrap_content"

        android:textSize="25dp"

        android:text="@string/hello" />


    <Button

        android:id="@+id/home_button"

        android:layout_width="wrap_content"

        android:layout_height="wrap_content"

        android:text="显示桌面" />


    <Button

        android:id="@+id/dial_button"

        android:layout_width="wrap_content"

        android:layout_height="wrap_content"

        android:text="拨打电话10086" />


    <Button

        android:id="@+id/my_action_button"

        android:layout_width="wrap_content"

        android:layout_height="wrap_content"

        android:text="发送自定义Intent" />


</LinearLayout>
下面看主Activity文件,其内容如下:
package com.liuhaoyu;


import android.app.Activity;

import android.content.Intent;

import android.net.Uri;

import android.os.Bundle;

import android.view.View;

import android.widget.Button;


public class MainActivity extends Activity {

    /** Called when the activity is first created. */

    @Override

    public void onCreate(Bundle savedInstanceState) {

        super.onCreate(savedInstanceState);

        setContentView(R.layout.main);


        Button button_home = (Button)findViewById(R.id.home_button);

        Button button_dial = (Button)findViewById(R.id.dial_button);

        Button button_my_action = (Button)findViewById(R.id.my_action_button);

        button_home.setOnClickListener(new View.OnClickListener() {


			@Override

			public void onClick(View v) {

				// TODO Auto-generated method stub

				Intent intent = new Intent();

				intent.setAction(Intent.ACTION_MAIN);

				intent.addCategory(Intent.CATEGORY_HOME);

				startActivity(intent);

			}

		});


        button_dial.setOnClickListener(new View.OnClickListener() {


			@Override

			public void onClick(View v) {

				// TODO Auto-generated method stub

				Intent intent = new Intent();

				intent.setAction(Intent.ACTION_CALL);

				intent.setData(Uri.parse("tel:10086"));

				startActivity(intent);

			}

		});


        button_my_action.setOnClickListener(new View.OnClickListener() {


			@Override

			public void onClick(View v) {

				// TODO Auto-generated method stub

				Intent intent = new Intent();

				intent.setAction("com.liuhaoyu.my_action");

				startActivity(intent);

			}

		});

    }

}
下面看SecondActivity的实现:
package com.liuhaoyu;


import android.app.Activity;

import android.os.Bundle;


public class SecondActivity extends Activity {

    /** Called when the activity is first created. */

    @Override

    public void onCreate(Bundle savedInstanceState) {

        super.onCreate(savedInstanceState);

        setContentView(R.layout.second);


    }

}
SecondActivity的布局文件second.xml,内容如下:
<?xml version="1.0" encoding="utf-8"?>

<LinearLayout xmlns:android="http://schemas.android.com/apk/res/android"

    android:layout_width="fill_parent"

    android:layout_height="fill_parent"

    android:orientation="vertical" >


    <TextView

        android:layout_width="fill_parent"

        android:layout_height="wrap_content"

        android:textSize="25dp"

        android:text="@string/second" />


</LinearLayout>
最后,我们需要在AndroidManifest.xml文件中声明SecondActivity及其Intent Filter,并申请打电话的权限。该文件内容如下:
<?xml version="1.0" encoding="utf-8"?>

<manifest xmlns:android="http://schemas.android.com/apk/res/android"

    package="com.liuhaoyu"

    android:versionCode="1"

    android:versionName="1.0" >


    <uses-sdk android:minSdkVersion="15" />


    <uses-permission android:name="android.permission.CALL_PHONE" />E


    <application

        android:icon="@drawable/ic_launcher"

        android:label="@string/app_name" >

        <activity

            android:name=".MainActivity"

            android:label="@string/app_name" >

            <intent-filter>

                <action android:name="android.intent.action.MAIN" />

                <category android:name="android.intent.category.LAUNCHER" />

            </intent-filter>

        </activity>


        <activity

            android:name=".SecondActivity" >

            <intent-filter>

                <action android:name="com.liuhaoyu.my_action" />

                <category android:name="android.intent.category.DEFAULT" />

            </intent-filter>

        </activity>

    </application>


</manifest>
四、Intent的常用功能
下面列举一些Intent的常用功能:
1,调用web浏览器
Java代码
Uri myBlogUri = Uri.parse("http://kuikui.javaeye.com");
returnIt = newIntent(Intent.ACTION_VIEW, myBlogUri);
2,地图
Java代码
Uri mapUri =Uri.parse("geo:38.899533,-77.036476");
returnIt = newIntent(Intent.ACTION_VIEW, mapUri);
3,调拨打电话界面
Java代码
Uri telUri =Uri.parse("tel:100861");
returnIt = newIntent(Intent.ACTION_DIAL, telUri);
4,直接拨打电话
Java代码
Uri callUri = Uri.parse("tel:100861");
returnIt = newIntent(Intent.ACTION_CALL, callUri);
5,卸载
Java代码
UriuninstallUri = Uri.fromParts("package", "xxx", null);
returnIt = newIntent(Intent.ACTION_DELETE, uninstallUri);
6,安装
Java代码
Uri installUri= Uri.fromParts("package", "xxx", null);
returnIt = newIntent(Intent.ACTION_PACKAGE_ADDED, installUri);
7,播放
Java代码
Uri playUri = Uri.parse("file:///sdcard/download/everything.mp3");
returnIt = newIntent(Intent.ACTION_VIEW, playUri);
8,调用发邮件
Java代码
Uri emailUri = Uri.parse("mailto:[email protected]");
returnIt = newIntent(Intent.ACTION_SENDTO, emailUri);
9,发邮件
Java代码
returnIt = newIntent(Intent.ACTION_SEND);
String[] tos = { "[email protected]"};
String[] ccs = { "[email protected]"};
returnIt.putExtra(Intent.EXTRA_EMAIL,tos);
returnIt.putExtra(Intent.EXTRA_CC,ccs);
returnIt.putExtra(Intent.EXTRA_TEXT,"body");
returnIt.putExtra(Intent.EXTRA_SUBJECT,"subject");
returnIt.setType("message/rfc882");
Intent.createChooser(returnIt,"Choose Email Client");
10,发短信
Java代码
Uri smsUri =Uri.parse("tel:100861");
returnIt = newIntent(Intent.ACTION_VIEW, smsUri);
returnIt.putExtra("sms_body","shenrenkui");
returnIt.setType("vnd.android-dir/mms-sms");
11,直接发邮件
Java代码
Uri smsToUri =Uri.parse("smsto://100861");
returnIt = newIntent(Intent.ACTION_SENDTO, smsToUri);
returnIt.putExtra("sms_body","shenrenkui");
12,发彩信
Java代码
Uri mmsUri =Uri.parse("content://media/external/images/media/23");
returnIt = newIntent(Intent.ACTION_SEND);
returnIt.putExtra("sms_body","shenrenkui");
returnIt.putExtra(Intent.EXTRA_STREAM,mmsUri);
returnIt.setType("image/png");
用获取到的Intent直接调用startActivity(returnIt)就ok了。