10.高并发Lua、OpenResty、redis
变更频率低的数据,查询频率高得数据,如何提升访问速度?
- 数据做成静态页[商品详情页]
- 做缓存[Redis]
Lua入门
Lua 是一种轻量小巧的脚本语言,用标准C语言编写并以源代码形式开放, 其设计目的是为了嵌入应用
程序中,从而为应用程序提供灵活的扩展和定制功能
特性
- 支持面向过程(procedure-oriented)编程和函数式编程(functional programming);
- 自动内存管理;只提供了一种通用类型的表(table),用它可以实现数组,哈希表,集合,对象;
- 语言内置模式匹配;闭包(closure);函数也可以看做一个值;提供多线程(协同进程,并非操作系统所支持的线程)支持;
- 通过闭包和table可以很方便地支持面向对象编程所需要的一些关键机制,比如数据抽象,虚函
数,继承和重载等
应用场景
- 游戏开发
- 独立应用脚本
- Web 应用脚本
- 扩展和数据库插件如:MySQL Proxy 和 MySQL WorkBench
- 安全系统,如入侵检测系统
- redis中嵌套调用实现类似事务的功能
- web容器中应用处理一些过滤 缓存等等的逻辑,例如nginx。
lua的安装(linux)
yum -y install gcc gcc-c++ kernel-devel
curl -R -O http://www.lua.org/ftp/lua-5.3.5.tar.gz
tar zxf lua-5.3.5.tar.gz
cd lua-5.3.5
make linux test
make install
基本语法
交互式编程
脚本式编程
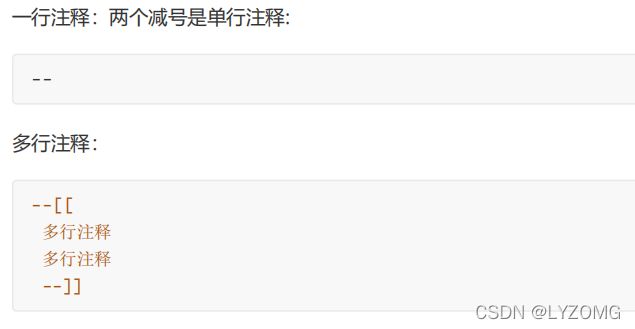
注释
数据类型
变量
默认的情况下,定义一个变量都是全局变量,如果要用局部变量 需要声明为local
-- 全局变量赋值
a=1
-- 局部变量赋值
local b=2
流程控制
- if语句
if(布尔表达式)
then
	--[ 在布尔表达式为 true 时执行的语句 --]
end
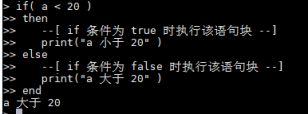
- if…else语句
if(布尔表达式)
then
	--[ 布尔表达式为 true 时执行该语句块 --]
else
	--[ 布尔表达式为 false 时执行该语句块 --]
end
- 循环
while(condition)
do
	statements
end
- for循环
var 从 exp1 变化到 exp2,每次变化以 exp3 为步长递增 var,并执行一次 “执行体”。exp3 是可选的,如果不指定,默认为1
for var=exp1,exp2,exp3
do
	<执行体>
end
- repeat…until
repeat
	statements
until( condition )
函数
--[[ 函数返回两个值的最大值 --]]
function max(num1, num2)
	if (num1 > num2)
	then
		result = num1;
		elseresult = num2;
	end
	return result;
end
-- 调用函数
print("两值比较最大值为 ",max(10,4))
print("两值比较最大值为 ",max(5,6))
表
table 是 Lua 的一种数据结构用来帮助我们创建不同的数据类型,如:数组、字典等。Lua也是通过table来解决模块(module)、包(package)和对象(Object)的。
-- 初始化表
mytable = {}
-- 指定值
mytable[1]= "Lua"
-- 移除引用
mytable = nil
模块
模块类似于一个封装库,从 Lua 5.1 开始,Lua 加入了标准的模块管理机制,可以把一些公用的代码放在一个文件里,以 API 接口的形式在其他地方调用,有利于代码的重用和降低代码耦合度
-- 文件名为 module.lua
-- 定义一个名为 module 的模块
module = {}
-- 定义一个常量
module.constant = "这是一个常量"
-- 定义一个函数
function module.func1()
	print("这是一个公有函数")
end

local function func2()
	print("这是一个私有函数!")
end
function module.func3()
	func2()
end

return module
模块的结构就是一个 table 的结构,因此可以像操作调用 table 里的元素那样来操作调用模块里的常量或函数。 func2 声明为程序块的局部变量,即表示一个私有函数,因此是不能从外部访问模块里的这个私有函数,必须通过模块里的公有函数来调用
将上面定义的module模块引入使用
-- test_module.lua 文件
-- module 模块为上文提到到 module.lua
require("module")
print(module.constant)
module.func3()
OpenResty
安装openresty
yum install yum-utils
yum-config-manager --add-repo https://openresty.org/package/centos/openresty.rep

yum install openresty
默认的目录
/usr/local/openresty
修改默认的nginx
默认已经安装好了nginx,在目录:/usr/local/openresty/nginx 下
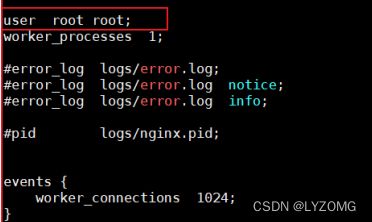
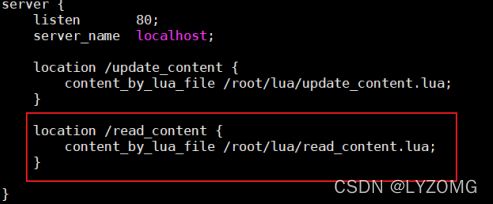
修改/usr/local/openresty/nginx/conf/nginx.conf,将配置文件使用的根设置为root,目的就是将来要使用lua脚本的时候 ,直接可以加载在root下的lua脚本
cd /usr/local/openresty/nginx/conf
vi nginx.conf
docker安装redis
docker pull redis
docker run --name redis -p 6379:6379 -d redis
Lua+Nginx配置
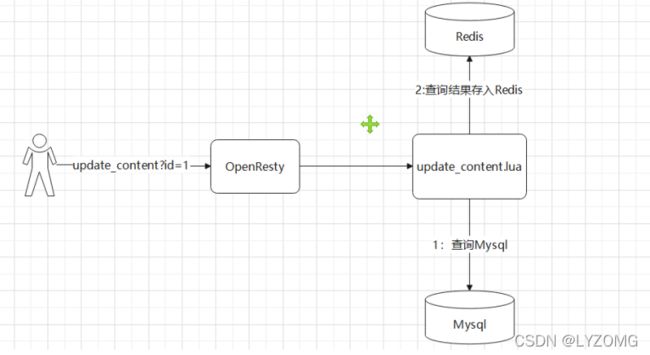
使用Lua缓存数据到redis
ngx.header.content_type="application/json;charset=utf8"
local cjson = require("cjson")
local mysql = require("resty.mysql")
local uri_args = ngx.req.get_uri_args()
local id = uri_args["id"]

local db = mysql:new()
db:set_timeout(1000)
local props = {
	host = "192.168.220.110",
	port = 3306,
	database = "legou",
	user = "root",
	password = "root"
}

local res = db:connect(props)
local select_sql = "SELECT id_,is_parent_,order_,parent_id_,title_,expand_ FROM category_ WHERE id_= "..id
res = db:query(select_sql)
db:close()

local redis = require("resty.redis")
local red = redis:new()
red:set_timeout(2000)

local ip ="192.168.220.110"
local port = 6379
red:connect(ip,port)
red:set("content_"..id,cjson.encode(res))
red:close()
ngx.say("{flag:true}")
修改/usr/local/openresty/nginx/conf/nginx.conf文件

重启nginx
nginx -s reload
从redis中获取数据
--设置响应头类型
ngx.header.content_type="application/json;charset=utf8"
--获取请求中的参数ID
local uri_args = ngx.req.get_uri_args()
local id = uri_args["id"]
--引入redis库
local redis = require("resty.redis")
--创建redis对象
local red = redis:new()
--设置超时时间
red:set_timeout(2000)
--连接
local ok, err = red:connect("192.168.220.110", 6379)
--获取key的值
local rescontent=red:get("content_"..id)
--输出到返回响应中
ngx.say(rescontent)
--关闭连接
red:close()
加入openresty本地缓存
ngx.header.content_type="application/json;charset=utf8"
local uri_args = ngx.req.get_uri_args();
local id = uri_args["id"];
--获取本地缓存
local cache_ngx = ngx.shared.dis_cache;
--根据ID 获取本地缓存数据
local contentCache = cache_ngx:get('content_cache_'..id);

if contentCache == "" or contentCache == nil
then
	local redis = require("resty.redis");
	local red = redis:new()
	red:set_timeout(2000)
	red:connect("192.168.220.110", 6379)
	local rescontent=red:get("content_"..id);

	if ngx.null == rescontent
	then
		local cjson = require("cjson");
		local mysql = require("resty.mysql");
		local db = mysql:new();
		db:set_timeout(2000)
		local props = {
			host = "192.168.220.110",
			port = 3306,
			database = "legou",
			user = "root",
			password = "root"
		}
		local res = db:connect(props);
		local select_sql = "SELECT id_,is_parent_,order_,parent_id_,title_,expand_ FROM category_ WHERE id_= "..id
		res = db:query(select_sql);
		local responsejson = cjson.encode(res);
		red:set("content_"..id,responsejson);
		ngx.say(responsejson);
		db:close()
	else
		cache_ngx:set('content_cache_'..id, rescontent, 10*60);
		ngx.say(rescontent)
	end
		red:close()
else
		ngx.say(contentCache)
end
location /category/list {
	content_by_lua_file /root/lua/read_category.lua;
}
canal同步缓存数据
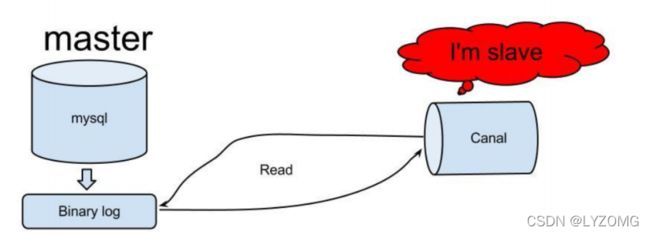
canal可以用来监控数据库数据的变化,从而获得新增数据,或者修改的数据
原理
mysql开启binlog模式
并修改/etc/mysql/mysql.cnf
vi /etc/mysql/mysql.cnf
创建账号
使用root账号创建用户并授予权限
create user canal@'%' IDENTIFIED by 'canal';
GRANT SELECT, REPLICATION SLAVE, REPLICATION CLIENT,SUPER ON *.* TO 'canal'@'%'; FLUSH PRIVILEGES;
重启mysql容器
canal容器安装
docker pull docker.io/canal/canal-server
docker run -p 11111:11111 --name canal -d docker.io/canal/canal-server
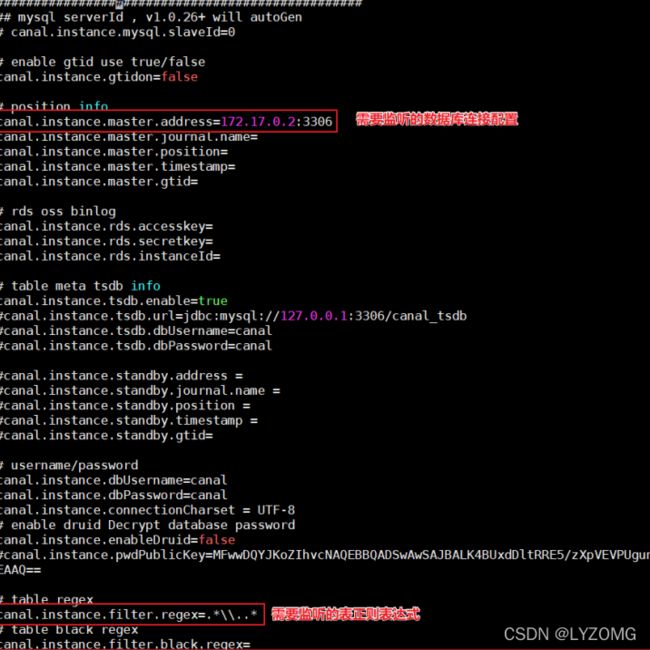
进入容器,修改核心配置canal.properties 和instance.properties,canal.properties 是canal自身的配置,instance.properties是需要同步数据的数据库连接配置。
docker exec -it canal /bin/bash
cd canal-server/conf/
vi canal.properties
改canal.properties的id,不能和mysql的server-id重复

cd example/
vi instance.properties
docker update --restart=always canal
docker restart canal
canal微服务搭建
创建canal微服务工程,通过连接canal服务器,监控mysql的binlog,当mysql分类数据发生改变时,我们同步数据库数据到redis中,这样做到mysql和redis数据同步
安装辅助jar包
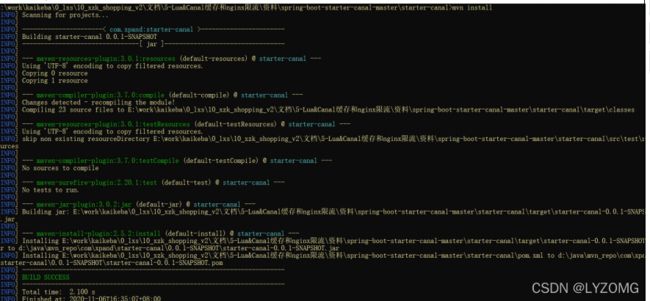
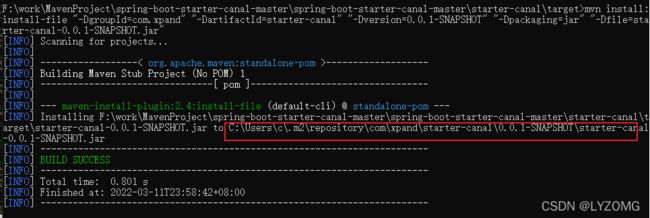
在 canal\spring-boot-starter-canal-master 中有一个工程 starter-canal ,它主要提供了SpringBoot环境下 canal 的支持,我们需要先安装该工程,在 starter-canal 目录下执行 mvn install
mvn install:install-file "-DgroupId=com.xpand" "-DartifactId=starter-canal" "-Dversion=0.0.1-SNAPSHOT" "-Dpackaging=jar" "-Dfile=starter-canal-0.0.1-SNAPSHOT.jar"
工程搭建
<!--canal依赖-->
<dependency>
	<groupId>com.xpand</groupId>
	<artifactId>starter-canal</artifactId>
	<version>0.0.1-SNAPSHOT</version>
</dependency>

<!-- redis 使用-->
<dependency>
	<groupId>org.springframework.boot</groupId>
	<artifactId>spring-boot-starter-data-redis</artifactId>
</dependency>
spring:
	redis:
		host: 192.168.220.110
		port: 6379
#canal配置
canal:
	client:
		instances:
			# exmaple
			example:
				host: 192.168.220.110
				port: 11111
//去掉数据库自动装配
@SpringBootApplication(exclude = DataSourceAutoConfiguration.class)
@EnableCanalClient
public class CanalApplication {
	public static void main(String[] args) {
		SpringApplication.run(CanalApplication.class,args);
	}
}
// 事件监听的注解 监听数据库的变化
@CanalEventListener
public class MyEventListener {
	//当数据被添加的时候触发
	// CanalEntry.EventType eventType 监听到的操作的类型 INSERT UPDATE ,DELETE ,CREATE INDEX ,GRAND
	// CanalEntry.RowData rowData 被修改的数据()
	@InsertListenPoint
	public void onEvent1(CanalEntry.EventType eventType, CanalEntry.RowData rowData) {
		//do something...
		System.out.println("添加数据监听。。。。");
		List<CanalEntry.Column> afterColumnsList = rowData.getAfterColumnsList();
		for (CanalEntry.Column column : afterColumnsList) {
			System.out.println(column.getName()+":"+column.getValue());
		}
	}

	//当数据被更新的时候触发
	@UpdateListenPoint
	public void onEvent2(CanalEntry.RowData rowData) {
		//do something...
		System.out.println("修改数据监听。。。。");
		List<CanalEntry.Column> afterColumnsList = rowData.getAfterColumnsList();
		for (CanalEntry.Column column : afterColumnsList) {
			System.out.println(column.getName()+":"+column.getValue());
		}
	}
	// 当数据被删除的时候触发
	@DeleteListenPoint
	public void onEvent3(CanalEntry.EventType eventType, CanalEntry.RowData rowData) {
		//do something...
		System.out.println("删除数据监听。。。。");
		//List afterColumnsList = rowData.getAfterColumnsList();
		List<CanalEntry.Column> afterColumnsList = rowData.getBeforeColumnsList();
		for (CanalEntry.Column column : afterColumnsList) {
			System.out.println(column.getName()+":"+column.getValue());
		}
	}
	//自定义事件的触发
	// destination = "example" 指定某一个目的地 一定要和配置文件中的目录保持一致
	//schema = "canal-test" 要监听的数据库实例
	//table = {"t_user", "test_table"}, 要监听的表
	// eventType = CanalEntry.EventType.UPDATE 要监听的类型
	@ListenPoint(destination = "example", schema = "legou", table = {"category_"}, eventType ={CanalEntry.EventType.UPDATE,CanalEntry.EventType.INSERT,CanalEntry.EventType.DE LETE})
	public void onEvent(CanalEntry.EventType eventType, CanalEntry.RowData rowData) {
		//do something...
		System.out.println("只监听legou数据库下category表。。。。");
		//List afterColumnsList = rowData.getAfterColumnsList();
		//List afterColumnsList = rowData.getAfterColumnsList();
		for (CanalEntry.Column column : afterColumnsList) {
			System.out.println(column.getName()+":"+column.getValue());
		}
	}
分类数据同步

每次执行分类操作的时候,会记录操作日志到,然后将操作日志发送给canal,canal将操作记录发送给canal微服务,canal微服务在同步最新的分类数据到redis中
nginx限流
一般情况下,首页的并发量是比较大的,即使 有了多级缓存,当用户不停的刷新页面的时,或者有大量
恶意的请求达到,也会对系统造成影响。而限流就是保护措施之一
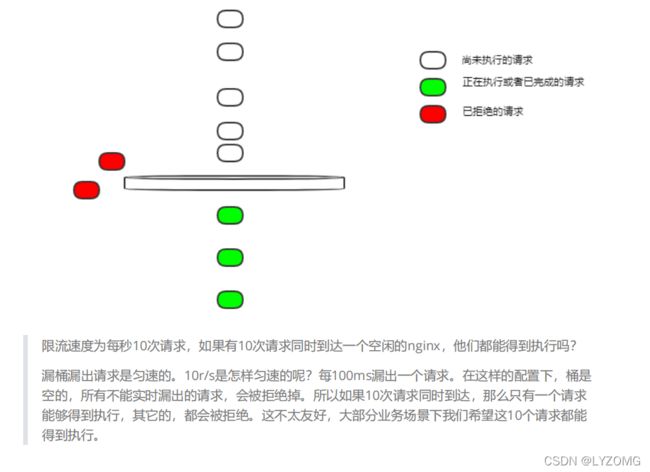
漏桶算法
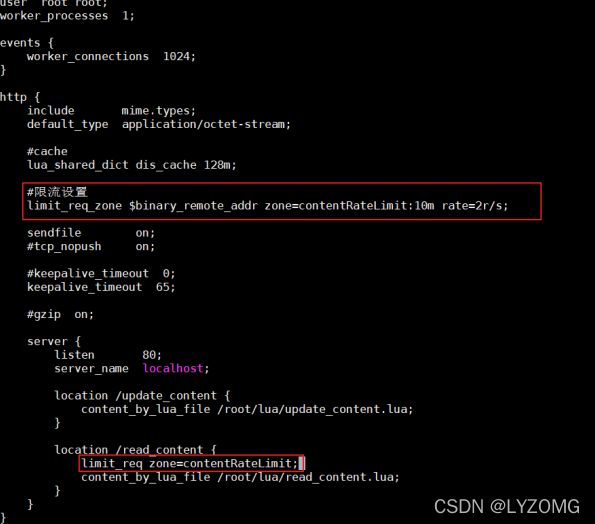
- limit_req_zone 用来限制单位时间内的请求数,即速率限制,采用的漏桶算法 “leaky bucket”。
- limit_req_conn 用来限制同一时间连接数,即并发限制。
控制速率
处理突发流量
上面例子限制 2r/s,如果有时正常流量突然增大,超出的请求将被拒绝,无法处理突发流量,可以结合burst 参数使用来解决该问题


控制并发量(连接数)
Syntax: limit_conn zone number;
Default: —;
Context: http, server, location;


