redis配置mysql缓存_Redis做mysql的缓存服务器
一redis简介:redis 是一个高性能的 key-value 数据库。 redis 的出现,很大程度补偿了memcached 这类 keyvalue 存储的不足,在部分场合可以对关系数据库起到很好的补充作用。它提供了 Python,Ruby,Erlang,PHP 客户端,使用很方便。Redis 的所有数据都是保存在内存中,然后不定期的通过异步方式保存到磁盘上(这称为“半持久化模式”);也可以把每一次数据变化都写入到一个appendonly file(aof)里面(这称为“全持久化模式”)。
二主机环境 rhel6.5 selinx and iptales disabled
1. Redis 安装
实验环境 172.25.254.2 vm2.example.com 上
首先得到 zxf redis-3.0.2.tar.gz
tar zxf redis-3.0.2.tar.gz
cd redis-3.0.2
make && make install
1.1. 配置并启动服务
cd utils/
./install_server.sh 这里一路回车都使用的默认
点击(此处)折叠或打开
[root@vm2 utils]# ./install_server.sh
Welcome to the redis service installer
This script will help you easily set up a running redis server
Please select the redis port for this instance: [6379]
Selecting default: 6379
Please select the redis config file name [/etc/redis/6379.conf]
Selected default - /etc/redis/6379.conf
Please select the redis log file name [/var/log/redis_6379.log]
Selected default - /var/log/redis_6379.log
Please select the data directory for this instance [/var/lib/redis/6379]
Selected default - /var/lib/redis/6379
Please select the redis executable path [/usr/local/bin/redis-server]
Selected config:
Port : 6379
Config file : /etc/redis/6379.conf
Log file : /var/log/redis_6379.log
Data dir : /var/lib/redis/6379
Executable : /usr/local/bin/redis-server
Cli Executable : /usr/local/bin/redis-cli
Is this ok? Then press ENTER to go on or Ctrl-C to abort.
Copied /tmp/6379.conf => /etc/init.d/redis_6379
Installing service...
Successfully added to chkconfig!
Successfully added to runlevels 345!
Starting Redis server...
Installation successful!
1.2简单测试,如下就证明成功
点击(此处)折叠或打开
[root@vm2 utils]# redis-cli
127.0.0.1:6379> ping
PONG
2 安装lnmp架构2.1 安装以下软件包
点击(此处)折叠或打开
[root@vm2 lnmp]# ls
nginx-1.8.0-1.el6.ngx.x86_64.rpm php-fpm-5.3.3-38.el6.x86_64.rpm
php-5.3.3-38.el6.x86_64.rpm php-gd-5.3.3-38.el6.x86_64.rpm
php-cli-5.3.3-38.el6.x86_64.rpm php-mbstring-5.3.3-38.el6.x86_64.rpm
php-common-5.3.3-38.el6.x86_64.rpm php-mysql-5.3.3-38.el6.x86_64.rpm
php-devel-5.3.3-38.el6.x86_64.rpm php-pdo-5.3.3-38.el6.x86_64.rpm
[root@vm2 lnmp]# yum install -y *
2.2安装 php 的 redis 扩展
首先得到 phpredis-master.zip
unzip phpredis-master.zip
cd phpredis-master
phpize
./configure
make && make install
cd /etc/php.d/
cp mysql.ini redis.ini
vim /etc/php.ini #添加以下行
extension=redis.so #加载 redis 模块
点击(此处)折叠或打开
[root@vm2 php.d]# /etc/init.d/php-fpm start
Starting php-fpm: [ OK ]
2.3简单配置 nginx
vim /etc/nginx/conf.d/default.conf
location / {
root /usr/share/nginx/html;
index index.php index.html index.htm;
}
location ~ \.php$ {
root /usr/share/nginx/html;
fastcgi_pass 127.0.0.1:9000;
fastcgi_index index.php;
fastcgi_param SCRIPT_FILENAME /usr/share/nginx/html$fastcgi_script_name;
include fastcgi_params;
}
启动 nginx
点击(此处)折叠或打开
[root@vm2 php.d]# nginx -t
nginx: the configuration file /etc/nginx/nginx.conf syntax is ok
nginx: configuration file /etc/nginx/nginx.conf test is successful
[root@vm2 php.d]# nginx
[root@vm2 php.d]# netstat -antlpe| grep nginx
tcp 0 0 0.0.0.0:80 0.0.0.0:* LISTEN 0 14520 6352/nginx
vim /etc/php-fpm.d/www.conf 将这个配置文件中user和group改为nginx 默认是apache
user = nginx
group = nginx
/etc/init.d/php-fpm restart
点击(此处)折叠或打开
[root@vm2 php.d]# /etc/init.d/php-fpm restart
Stopping php-fpm: [ OK ]
Starting php-fpm: [ OK ]
3 在另一台虚拟机上安装mysql
实验环境 172.25.254.3 vm3.example.com 上
yum install -y mysql-server
点击(此处)折叠或打开
[root@vm3 mnt]# mysql
Welcome to the MySQL monitor. Commands end with ; or \g.
Your MySQL connection id is 2
Server version: 5.1.71 Source distribution
Copyright (c) 2000, 2013, Oracle and/or its affiliates. All rights reserved.
Oracle is a registered trademark of Oracle Corporation and/or its
affiliates. Other names may be trademarks of their respective
owners.
Type 'help;' or '\h' for help. Type '\c' to clear the current input statement.
mysql> grant all on test.* to redis@'172.25.254.2' identified by 'redhat';
Query OK, 0 rows affected (0.00 sec)
mysql> flush privileges;
Query OK, 0 rows affected (0.00 sec)
编写如下代码
点击(此处)折叠或打开
[root@vm3 mnt]# cat test.sql
use test;
CREATE TABLE `test` (`id` int(7) NOT NULL AUTO_INCREMENT, `name` char(8) DEFAULT NULL, PRIMARY KEY (`id`)) ENGINE=InnoDB DEFAULT CHARSET=utf8;
INSERT INTO `test` VALUES (1,'test1'),(2,'test2'),(3,'test3'),(4,'test4'),(5,'test5'),(6,'test6'),(7,'test7'),(8,'test8'),(9,'test9');
[root@vm3 mnt]# mysql < test.sql
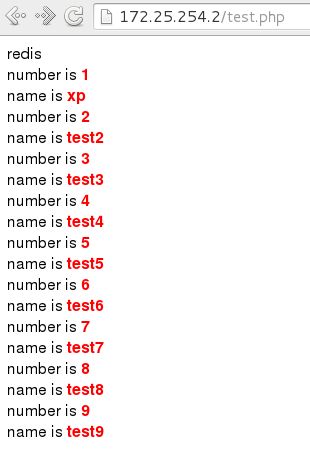
4创建 php 测试页面在172.25.254.2上面进入nginx默认发布目录
cd /usr/share/nginx/html
vim test.php
点击(此处)折叠或打开
$redis = new Redis();
$redis->connect('127.0.0.1',6379) or die ("could net connect redis server");
# $query = "select * from test limit 9";
$query = "select * from test";
for ($key = 1; $key < 10; $key++)
{
if (!$redis->get($key))
{
$connect = mysql_connect('172.25.254.3','redis','redhat');
mysql_select_db(test);
$result = mysql_query($query);
//如果没有找到$key,就将该查询sql的结果缓存到redis
while ($row = mysql_fetch_assoc($result))
{
$redis->set($row['id'],$row['name']);
}
$myserver = 'mysql';
break;
}
else
{
$myserver = "redis";
$data[$key] = $redis->get($key);
}
}
echo $myserver;
echo "
";
for ($key = 1; $key < 10; $key++)
{
echo "number is $key";
echo "
";
echo "name is $data[$key]";
echo "
";
}
?>然后在浏览器进行测试,这时候我们已经实现了 redis 作为 mysql 的缓存服务器,但是如果更新了 mysql,redis
中仍然会有对应的 KEY,数据就不会更新,此时就会出现 mysql 和 redis 数据不一致的情
况。所以接下来就要通过 mysql 触发器将改变的数据同步到 redis 中。
5,配置 gearman 实现数据同步
1. 安装 gearman 软件包:
gearmand libgearman-devel libgearman libevent libevent-devel
libevent-doc libevent-headers tokyocabinet
2,启动服务
点击(此处)折叠或打开
[root@vm2 html]# /etc/init.d/gearmand start
Starting gearmand: [ OK ]
3.安装 php 的 gearman 扩展
https://pecl.php.net
yum install -y db*-devel
tar zxf gearman-1.1.2.tgz
cd gearman-1.1.2
./configure --with-php-config=/usr/bin/php-config
make && make install
# vim /etc/php.ini
extension=gearman.so
/etc/init.d/php-fpm restart
点击(此处)折叠或打开
[root@vm2 html]# /etc/init.d/php-fpm restart
Stopping php-fpm: [ OK ]
Starting php-fpm: [ OK ]
4. 安装 lib_mysqludf_json
lib_mysqludf_json UDF 库函数将关系数据映射为 JSON 格式。通常,数据库中的数据映
射为 JSON 格式,是通过程序来转换的。
https://github.com/mysqludf/lib_mysqludf_json
yum install -y mysql-devel# unzip lib_mysqludf_json-master.zip
cd lib_mysqludf_json-master
gcc $(mysql_config --cflags) -shared -fPIC -o lib_mysqludf_json.so
lib_mysqludf_json.c
查看 mysql 的模块目录:
5. 安装 gearman-mysql-udf
这个插件是用来管理调用 Gearman 的分布式的队列。
https://launchpad.net/gearman-mysql-udf
tar zxf gearman-mysql-udf-0.6.tar.gz
cd gearman-mysql-udf-0.6
./configure --with-mysql=/usr/bin/mysql_config
--libdir=/usr/lib64/mysql/plugin/
make# make install
拷贝 lib_mysqludf_json.so 模块:
cp lib_mysqludf_json.so /usr/lib64/mysql/plugin/
注册 UDF 函数
点击(此处)折叠或打开
mysql> CREATE FUNCTION json_object RETURNS STRING SONAME
'lib_mysqludf_json.so';
mysql> CREATE FUNCTION gman_do_background RETURNS STRING SONAME
'libgearman_mysql_udf.so';
mysql> CREATE FUNCTION gman_servers_set RETURNS STRING SONAME
'libgearman_mysql_udf.so';
查看函数
指定 gearman 的服务信息
6. 编写 mysql 触发器(根据实际情况编写)
点击(此处)折叠或打开
vim test.sql
use test;
DELIMITER $$
CREATE TRIGGER datatoredis AFTER UPDATE ON test FOR EACH ROW BEGIN
SET @RECV=gman_do_background('syncToRedis', json_object(NEW.id as
`id`, NEW.name as `name`));
END$$
DELIMITER ;
查看触发器
7. 编写 gearman 的 worker 端
点击(此处)折叠或打开
vim worker.php
$worker = new GearmanWorker();
$worker->addServer();
$worker->addFunction('syncToRedis', 'syncToRedis');
$redis = new Redis();
$redis->connect('127.0.0.1', 6379);
while($worker->work());
function syncToRedis($job)
{
global $redis;
$workString = $job->workload();
$work = json_decode($workString);
if(!isset($work->id)){
return false;
}
$redis->set($work->id, $work->name); #这条语句就是将 id 作 KEY 和
name 作 VALUE 分开存储,需要和前面写的 php 测试代码的存取一致。
}
?>
后台运行 worker
nohup php worker.php &
然后在3上更新数据库
然后再浏览器中进行测试


