SpingCloud集成zookeeper实现服务注册并访问
目录
SpingCloud整合zookeeper实现服务注册
前言:
一.环境准备
二.编写服务提供者模块
三.测试服务提供者模块是否搭建成功
四.编写服务消费者模块
五.测试服务消费者模块是否搭建成功
SpingCloud整合zookeeper实现服务注册
前言:
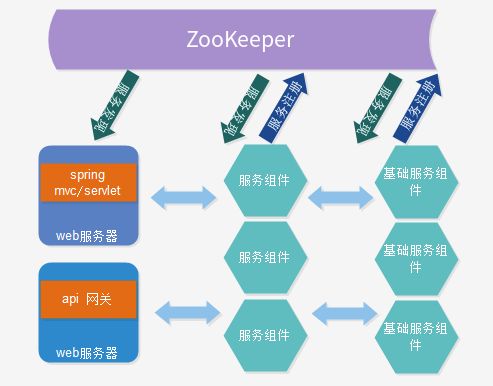
zookeeper是一个分布式协调工具,可以实现注册中心功能。换而言之,zookeeper和eureka一样,是用于充当服务注册功能服务器的一个springcloud插件。而随着eureka停止更新,zookeeper也成为了市面大量使用的替代eureka的一门技术,为分布式项目实现注册中心的功能。
一.环境准备
1.linux环境下的zookeeper环境
如果还未配置zookeeper环境的同学可以移步我的另外一篇文章喔,那里对如何在Linux环境下安装zookeeper有着很详细的介绍~
Linux环境下zookeeper的安装教程(超详细!!)![]() https://blog.csdn.net/weixin_47025166/article/details/125405156?spm=1001.2014.3001.5502
https://blog.csdn.net/weixin_47025166/article/details/125405156?spm=1001.2014.3001.5502
2.一个简单的springcloud父项目环境
在cloud2022项目中的pom.xml导入springcloud依赖和一些常规依赖
    4.0.0

    com.canrioyuan
    cloud2022
    1.0-SNAPSHOT
    pom


        cloud-provider-payment8001
        cloud-consumer-order80
        cloud-api-commons
        cloud-eureka-server7001
        cloud-eureka-server7002
        cloud-provider-payment8002
        cloud-provider-payment8004


        UTF-8
        1.8
        1.8
        4.12
        1.2.17
        1.18.24
        8.0.21
        1.1.21
        3.5.1


                org.springframework.boot
                spring-boot-dependencies
                2.2.2.RELEASE
                pom
                import


                org.springframework.cloud
                spring-cloud-dependencies
                Hoxton.SR1
                pom
                import


                com.alibaba.cloud
                spring-cloud-alibaba-dependencies
                2.1.0.RELEASE
                pom
                import


                mysql
                mysql-connector-java
                ${mysql.version}


                com.alibaba
                druid-spring-boot-starter
                ${druid.version}


                com.baomidou
                mybatis-plus-boot-starter
                ${mybatis-plus.spring.boot.version}


                junit
                junit
                ${junit.version}


                log4j
                log4j
                ${log4j.version}


                org.projectlombok
                lombok
                ${lombok.version}
                true


                org.springframework.boot
                spring-boot-maven-plugin

                    true
                    true
二.编写服务提供者模块
1.在cloud2022下创建一个cloud-provider-payment8004作为服务提供者
2.在pom.xml文件中添加常规依赖和zookeeper、springboot整合zookeeper客户端等依赖
            org.springframework.boot
            spring-boot-starter-web


            org.springframework.cloud
            spring-cloud-starter-zookeeper-discovery


                    org.apache.zookeeper
                    zookeeper


            org.apache.zookeeper
            zookeeper
            3.7.1


            org.springframework.boot
            spring-boot-devtools
            runtime
            true


            org.projectlombok
            lombok
            true


            org.springframework.boot
            spring-boot-starter-test
            test
3.编写application.yaml
#8004表示注册到zookeeper服务器的支付服务提供者端口号
server:
  port: 8004
#服务别名----注册zookeeper到注册中心名称
spring:
  application:
    name: cloud-provider-payment
    #连接zookeeper
  cloud:
    zookeeper:
      connect-string: 192.168.154.133:2181  #此处为对应的zookeeper客户端地址
4.编写主启动类PaymentMain8004
package com.canrioyuan;

import org.springframework.boot.SpringApplication;
import org.springframework.boot.autoconfigure.SpringBootApplication;
import org.springframework.cloud.client.discovery.EnableDiscoveryClient;

@SpringBootApplication
@EnableDiscoveryClient   //该注解用于向使用consul或者zookeeper作为注册中心时注册服务
public class PaymentMain8004 {

    public  static void main(String[] args){
        SpringApplication.run(PaymentMain8004.class,args);
    }
}
5.编写PaymentController
package com.canrioyuan.controller;

import lombok.extern.slf4j.Slf4j;
import org.springframework.beans.factory.annotation.Value;
import org.springframework.web.bind.annotation.RequestMapping;
import org.springframework.web.bind.annotation.RestController;

import java.util.UUID;

@RestController
@Slf4j
public class PaymentController {

    //获取配置文件中端口对应的值
    @Value("${server.port}")
    private String serverPort;

    @RequestMapping(value = "/payment/zk")
    public String paymentzk()
    {
        return "springcloud with zookeeper: "+serverPort+"\t"+ UUID.randomUUID().toString();
    }

}
三.测试服务提供者模块是否搭建成功
1.运行zookeeper的客户端
进入zookeeper安装目录下的bin目录,启动zookeeper服务器
[root@zookeeper1 bin]# ./zkServer.sh start
启动zookeeper客户端
[root@zookeeper1 bin]# zkCli.sh
启动成功
可以看到,此时zookeeper中的节点只有locks和zookeeper:
2.运行PaymentMain8004
运行成功后如下图所示:
3.查看zookeeper中的节点
我们再一次查看zookeeper下的节点,可以看到services已经被注册且services下的节点即为我们application.yaml为该模块配置的名字
4.访问http://localhost:8004/payment/zk
出现如下字符串则证明搭建成功
四.编写服务消费者模块
1.在cloud2022下创建一个cloud-consumerzk-order80作为服务消费者
2.在pom.xml文件中添加常规依赖和zookeeper、springboot整合zookeeper客户端等依赖
            org.springframework.boot
            spring-boot-starter-web


            org.springframework.cloud
            spring-cloud-starter-zookeeper-discovery


                    org.apache.zookeeper
                    zookeeper


            org.apache.zookeeper
            zookeeper
            3.7.1


            org.springframework.boot
            spring-boot-devtools
            runtime
            true


            org.projectlombok
            lombok
            true


            org.springframework.boot
            spring-boot-starter-test
            test
3.编写application.yaml
server:
  port: 80

spring:
  application:
    name: cloud-consumer-order
  cloud:
    #注册到zookeeper地址
    zookeeper:
      connect-string: 192.168.154.133:2181   #zookeeper环境所在的Ip地址
4.编写主启动类OrderZk80
package com.canrioyuan;

import org.springframework.boot.SpringApplication;
import org.springframework.boot.autoconfigure.SpringBootApplication;

@SpringBootApplication
public class OrderZk80 {
    public static void main(String[] args) {
        SpringApplication.run(OrderZk80.class,args);
    }
}
5.编写配置类ApplicationContextConfig(用于注册RestTemplate)
package com.canrioyuan.controller;

import org.springframework.cloud.client.loadbalancer.LoadBalanced;
import org.springframework.context.annotation.Bean;
import org.springframework.context.annotation.Configuration;
import org.springframework.web.client.RestTemplate;

@Configuration
public class ApplicationContextConfig {
    /**
     * RestTemplate是Spring提供的用于访问Rest服务的客户端,
     * 它提供了很多可以方便访问远程http服务的方法,这些方法可以帮助开发人员减少编写客户端代码的工作量。
     * @return
     */
    @Bean  //将RestTemplate注册到容器中
    /**
     * @LoadBalanced注解,我们在使用这个注解后,就能在调用其他微服务的时候,通过服务实例名称就能进行调用其他的微服务,
     * 而不是直接把要调用的微服务的ip和端口号写死在代码当中。
     */
    @LoadBalanced
    public RestTemplate getRestTemplate(){
        return new RestTemplate();
    }
}
6.编写OrderController
package com.canrioyuan.controller;

import org.springframework.web.bind.annotation.GetMapping;
import org.springframework.web.bind.annotation.RestController;
import org.springframework.web.client.RestTemplate;

import javax.annotation.Resource;

@RestController
public class OrderZkController {
    //声明固定的服务访问前缀
    public static final String INVOKE_URL ="http://cloud-provider-payment";
    //注入容器中注册的RestTemplate
    @Resource
    private RestTemplate restTemplate;

    @GetMapping(value="/consumer/payment/zk")
    public String PaymentInfo(){
        String result = restTemplate.getForObject(INVOKE_URL+"/payment/zk", String.class);
        System.out.println("消费者调用支付服务_result:"+result);
        return result;
    }

}
五.测试服务消费者模块是否搭建成功
1.启动该服务消费者模块
2.访问http://localhost/consumer/payment/zk
结果如下则搭建成功


