一文梳理SpringSecurity中的登录认证流程
前言
SpringSecurity作为一个出自Spring家族很强大的安全框架时长被引用到SpringBoot项目中用作登录认证和授权模块使用,但是对于大部分使用者来说都只停留在实现使用用户名和密码的方式登录。而对于企业的项目需求大多要实现多种登录认证方式,例如一个的登录功能往往需要支持下面几种登录模式:
-
用户名和密码模式
-
手机号和短信验证码模式
-
邮箱地址和邮件验证码模式
-
微信、QQ、微博、知乎、钉钉、支付宝等第三方授权登录模式
-
微信或QQ扫码登录模式
可以说一个看似简单的登录认证功能要同时实现方便用户选择的多种登录认证功能还是比较复杂的,尤其在项目集成了SpringSecurity框架作为登录认证模块的场景下。这个时候我们就不得不去通过阅读源码的方式弄清楚SpringSecurity中实现登录认证的具体流程是怎样的,在这个基础上实现框架的扩展功能。以笔者研究源码的经验告诉大家,如果从头开始研究源码其实是一件非常耗时耗力的活,如果有牛人把自己研究过的源码整理出一篇不错的文章出来的话,那当然拿来用即可,如果读了别人研究源码的文章之后依然无法解决你的困惑或者问题,那么这个时候建议你亲自去研究一番源码,从而找到别的作者研究源码的时候没有总结到的内容。
本文的目的就通过梳理SpringSecurity框架登录认证部分源码的方式,带你搞清楚以SpringSecurity实现登录认证的详细流程。为不久后在集成SpringSecurity作为登录认证模块的SpringBoot项目中,实现添加手机号+短信验证码或者邮箱地址+邮箱验证码模式的登录认证功或者实现其他认证方式能作好实现思路准备。
认识SpringSecurity中的过滤器链
我们知道SpringSecurity框架实现登录认证的底层原理是基于一系列的过滤器对请求进行拦截实现的,而且它有一个过滤器链,当一个过滤器对请求进行拦截认证通过之后会进入到下一个过滤器,知道所有的过滤器都通过认证才会到达请求要访问的端点。
在 Spring Security 中,其核心流程的执行也是依赖于一组过滤器,这些过滤器在框架启动后会自动进行初始化,如图所示:

在上图中,我们看到了几个常见的 Filter,比如 BasicAuthenticationFilter、UsernamePasswordAuthenticationFilter 等,这些类都直接或间接实现了 Servlet 中的 Filter 接口,并完成某一项具体的认证机制。例如,上图中的 BasicAuthenticationFilter`` 用来验证用户的身份凭证;而 UsernamePasswordAuthenticationFilter会检查输入的用户名和密码,并根据认证结果决定是否将这一结果传递给下一个过滤器。
请注意,整个 Spring Security 过滤器链的末端是一个 FilterSecurityInterceptor,它本质上也是一个 Filter。但与其他用于完成认证操作的 Filter 不同,它的核心功能是实现权限控制,也就是用来判定该请求是否能够访问目标 HTTP 端点。FilterSecurityInterceptor对于权限控制的粒度可以到方法级别,能够满足精细化访问控制。
SpringSecurity中与用户名密码登录认证相关的几个重要类
Authentication接口类
认证凭据类需要实现的接口,它的源码如下:
public interface Authentication extends Principal, Serializable {
    // 获取权限列表
    Collection<? extends GrantedAuthority> getAuthorities();
    // 获取凭据,登录密码或者短信验证码、访问token
    Object getCredentials();
    // 获取认证详情,可自定义
    Object getDetails();
    // 获取认证信息,用户名或者手机号码等
    Object getPrincipal();
    // 是否认过证标识
    boolean isAuthenticated();
    // 设置是否认证过
    void setAuthenticated(boolean authenticated) throws IllegalArgumentException;
}
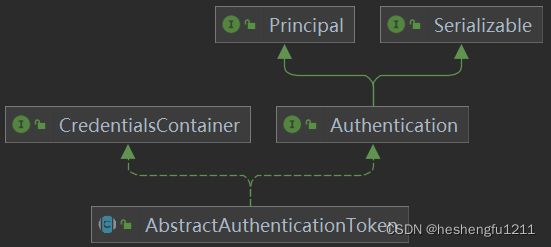
与用户名和密码登录相关的Authentication接口实现类为UsernamePasswordAuthenticationToken
该类继承自AbstractAuthenticationToken抽象类, 它实现了Authentication接口中的大部分方法
AbstractAuthenticationToken抽象类的继承和实现关系图如下:

UsernamePasswordAuthenticationToken类继承自AbstractAuthenticationToken抽象类,并提供了两个构造方法,用于构造实例

AuthenticationProvider接口类
这是一个认证器根接口类,几乎所有的认证认证逻辑类都要实现这个接口,它里面主要有两个方法
public interface AuthenticationProvider {
    // 认证接口方法
    Authentication authenticate(Authentication authentication) throws AuthenticationException;
    // 支持对给定类型的AuthenticationToken类进行认证
    boolean supports(Class<?> authentication);
}
AbstractUserDetailsAuthenticationProvider抽象类
该抽象类实现了AuthenticationProvider接口中的所有抽象方法,但是新增了一个additionalAuthenticationChecks抽象方法并定义了一个检验Authentication是否合法的,用于在它的实现类中实现验证登录密码是否正确的逻辑;同时定义了一个私有类DefaultPreAuthenticationChecks用于检验authentication方法传递过来的AuthenticationToken参数是否合法。
DaoAuthenticationProvider实现类
该类继承自上面的抽象类AbstractUserDetailsAuthenticationProvider, 实现了从数据库查询用户和校验密码的功能
用户名密码登录认证用到的AuthenticationProvider就是这个类
AuthenticationManager接口类
这个类可以叫做认证管理器类,在过滤器中的认证逻辑中正是通过该类的实现类去调用认证逻辑的,它只有一个认证方法
public interface AuthenticationManager {
    Authentication authenticate(Authentication authentication) throws AuthenticationException;
}
ProviderManager 实现类
该类实现了AuthenticationManager接口类,同时还实现了MessageSourceAware和InitializingBean两个接口,该类有两个构造方法用来传递需要认证的AuthenticationProvider集合以及父AuthenticationManager
AuthenticationManagerBuilder 类
该类是WebSecurityConfigurerAdapter#configure方法中的参数类,可用于设置各种用户想用的认证方式,设置用户认证数据库查询服务UserDetailsService类以及添加自定义AuthenticationProvider类实例等
它的几个重要的方法如下:
1) 设置parentAuthenticationManager
AuthenticationManagerBuilder parentAuthenticationManager(AuthenticationManager authenticationManager)
2)设置内存认证
public InMemoryUserDetailsManagerConfigurer<AuthenticationManagerBuilder> inMemoryAuthentication() throws Exception {
        return (InMemoryUserDetailsManagerConfigurer)this.apply(new InMemoryUserDetailsManagerConfigurer());
    }
3)设置基于jdbc数据库认证的认证
 public JdbcUserDetailsManagerConfigurer<AuthenticationManagerBuilder> jdbcAuthentication() throws Exception {
        return (JdbcUserDetailsManagerConfigurer)this.apply(new JdbcUserDetailsManagerConfigurer());
    }
4)设置自定义的UserDetailsService认证
public <T extends UserDetailsService> DaoAuthenticationConfigurer<AuthenticationManagerBuilder, T> userDetailsService(T userDetailsService) throws Exception {
        this.defaultUserDetailsService = userDetailsService;
        return (DaoAuthenticationConfigurer)this.apply(new DaoAuthenticationConfigurer(userDetailsService));
    }
5)设置基于Ldap的认证方式
public LdapAuthenticationProviderConfigurer<AuthenticationManagerBuilder> ldapAuthentication() throws Exception {
        return (LdapAuthenticationProviderConfigurer)this.apply(new LdapAuthenticationProviderConfigurer());
    }
6)添加自定义AuthenticationProvider类
public AuthenticationManagerBuilder authenticationProvider(AuthenticationProvider authenticationProvider) {
        this.authenticationProviders.add(authenticationProvider);
        return this;
    }
后面我们自定义的AuthenticationProvider实现类就通过这个方法加入到认证器列表中
AuthenticationManagerBuilder类在spring-security-config-5.2.4-RELEAS.jar中的org.springframework.security.config.annotation.authentication.configuration包中的配置类
AuthenticationConfiguration中对AuthenticationManagerBuilder类中定义了bean
AuthenticationConfiguration.class
 @Bean
    public AuthenticationManagerBuilder authenticationManagerBuilder(ObjectPostProcessor<Object> objectPostProcessor, ApplicationContext context) {
        AuthenticationConfiguration.LazyPasswordEncoder defaultPasswordEncoder = new AuthenticationConfiguration.LazyPasswordEncoder(context);
        AuthenticationEventPublisher authenticationEventPublisher = (AuthenticationEventPublisher)getBeanOrNull(context, AuthenticationEventPublisher.class);
        AuthenticationConfiguration.DefaultPasswordEncoderAuthenticationManagerBuilder result = new AuthenticationConfiguration.DefaultPasswordEncoderAuthenticationManagerBuilder(objectPostProcessor, defaultPasswordEncoder);
        if (authenticationEventPublisher != null) {
            result.authenticationEventPublisher(authenticationEventPublisher);
        }

        return result;
    }
所以该类可以直接出现在自定义配置类WebSecurityConfigurerAdapter#configure方法的参数中
HttpSecurity类
该类是WebSecurityConfigurerAdapter#configure(HttpSecurity http)方法中的参数类型
通过这个类我们可以自定义各种与web相关的配置器和添加过滤器,其中的formLogin方法就是设置了一个基于用户名和密码登录认证的配置
常用的配置Configurer方法
 /**
 * 配置用户名密码登录认证,该方法返回一个FormLoginConfigure类可用于
 * 设置登录页面Url,登录请求Url以及登录认证成功和失败处理器以及设置登录请求Url获取
 * username和password的参数名称等。
 */
public FormLoginConfigurer<HttpSecurity> formLogin() throws Exception {
        return (FormLoginConfigurer)this.getOrApply(new FormLoginConfigurer());
    }
 /**
 * 这个设置用户名密码登录认证方法可在其中对FormLoginConfigurer类型参数进行回调处理,
 * 相当于代替了上一个方法中在返回的FormLoginConfigurer实例中进行处理,最后返回一个
 * HttpSecurity实例
 */
 public HttpSecurity formLogin(Customizer<FormLoginConfigurer<HttpSecurity>> formLoginCustomizer) throws Exception {
        formLoginCustomizer.customize(this.getOrApply(new FormLoginConfigurer()));
        return this;
    }
/**
* 配置跨域,可在返回的CorsConfigurer实例中作进一步的处理
*/
public CorsConfigurer<HttpSecurity> cors() throws Exception {
        return (CorsConfigurer)this.getOrApply(new CorsConfigurer());
    }
/**
* 配置跨域,并自定义跨域配置器回调
*/
public HttpSecurity cors(Customizer<CorsConfigurer<HttpSecurity>> corsCustomizer) throws Exception {
        corsCustomizer.customize(this.getOrApply(new CorsConfigurer()));
        return this;
    }
/**
* 使用匿名登录
*/
 public AnonymousConfigurer<HttpSecurity> anonymous() throws Exception {
        return (AnonymousConfigurer)this.getOrApply(new AnonymousConfigurer());
    }
/**
* 使用匿名登录,并自定义匿名登录配置器回调
*/
public HttpSecurity anonymous(Customizer<AnonymousConfigurer<HttpSecurity>> anonymousCustomizer) throws Exception {
        anonymousCustomizer.customize(this.getOrApply(new AnonymousConfigurer()));
        return this;
    }

/**
* 使用HttpBasic认证
*/
public HttpBasicConfigurer<HttpSecurity> httpBasic() throws Exception {
        return (HttpBasicConfigurer)this.getOrApply(new HttpBasicConfigurer());
    }
/**
* 使用自定义回调的HttpBasic认证
*/
    public HttpSecurity httpBasic(Customizer<HttpBasicConfigurer<HttpSecurity>> httpBasicCustomizer) throws Exception {
        httpBasicCustomizer.customize(this.getOrApply(new HttpBasicConfigurer()));
        return this;
    }
/**
* session管理配置
*/
 public SessionManagementConfigurer<HttpSecurity> sessionManagement() throws Exception {
        return (SessionManagementConfigurer)this.getOrApply(new SessionManagementConfigurer());
    }
/**
* 自定义回调的session管理配置
*/
    public HttpSecurity sessionManagement(Customizer<SessionManagementConfigurer<HttpSecurity>> sessionManagementCustomizer) throws Exception {
        sessionManagementCustomizer.customize(this.getOrApply(new SessionManagementConfigurer()));
        return this;
    }
可以看到以上方法都是成对出现,一个不带参数的方法和一个带参数可自定义回调的方法;不带参数的方法返回一个XXConfigure实例,可在返回的XXConfigure实例中作进一步的处理;而带参数的方法返回一个HttpSecurity当前对象
调用以上的各种登录认证方法都在实例化XXConfigure类时自动实例化一个对应的过滤器并添加到过滤器链中
以下是添加注册过滤器方法
/**
* 在某个指定的过滤器后面添加自定义过滤器
*/
public HttpSecurity addFilterAfter(Filter filter, Class<? extends Filter> afterFilter) {
        this.comparator.registerAfter(filter.getClass(), afterFilter);
        return this.addFilter(filter);
    }
/**
* 在某个指定的过滤器前面添加自定义过滤器
*/
 public HttpSecurity addFilterBefore(Filter filter, Class<? extends Filter> beforeFilter) {
        this.comparator.registerBefore(filter.getClass(), beforeFilter);
        return this.addFilter(filter);
    }
 /**
 * 直接添加过滤器,过滤器必须指定一个顺序值
*/
 public HttpSecurity addFilter(Filter filter) {
        Class<? extends Filter> filterClass = filter.getClass();
        if (!this.comparator.isRegistered(filterClass)) {
            throw new IllegalArgumentException("The Filter class " + filterClass.getName() + " does not have a registered order and cannot be added without a specified order. Consider using addFilterBefore or addFilterAfter instead.");
        } else {
            this.filters.add(filter);
            return this;
        }
    }
其他方法这里就不赘述了,读者可以在IDEA中打开HttpSecurity类的源码进行查看
AbstractAuthenticationProcessingFilter抽象类
该类为抽象认证处理过滤器,SpringSecutity中的自定义过滤器只需要继承这个过滤器即可
该类的几个重要方法如下:
/**
* 带处理认证请求URL的构造方法
*/
protected AbstractAuthenticationProcessingFilter(String defaultFilterProcessesUrl) {
        this.setFilterProcessesUrl(defaultFilterProcessesUrl);
    }
/**
* 带RequestMatcher类型请求参数的构造方法,
* 可通过其实现类实例化该参数时设置匹配拦截的请求路径
*/
protected AbstractAuthenticationProcessingFilter(RequestMatcher requiresAuthenticationRequestMatcher) {
        Assert.notNull(requiresAuthenticationRequestMatcher, "requiresAuthenticationRequestMatcher cannot be null");
        this.requiresAuthenticationRequestMatcher = requiresAuthenticationRequestMatcher;
    }

/**
* 自定义继承自AbstractAuthenticationProcessingFilter类的过滤器
* 需要实现该抽象方法,在这个方法里面从拿到请求参数
* 并封装成自定义的AuthenticationToken对象
*/
public abstract Authentication attemptAuthentication(HttpServletRequest httpServletRequest, HttpServletResponse httpServletResponse) throws AuthenticationException, IOException, ServletException;

/**
* 对请求进行拦截的处理方法
*/
public void doFilter(ServletRequest req, ServletResponse res, FilterChain chain) {
    HttpServletRequest request = (HttpServletRequest)req;
        HttpServletResponse response = (HttpServletResponse)res;
        if (!this.requiresAuthentication(request, response)) {
            chain.doFilter(request, response);
        } else {
            if (this.logger.isDebugEnabled()) {
                this.logger.debug("Request is to process authentication");
            }

            Authentication authResult;
            try {
                // 调用子类的attemptAuthentication方法
                authResult = this.attemptAuthentication(request, response);
                if (authResult == null) {
                    return;
                }

                this.sessionStrategy.onAuthentication(authResult, request, response);
            } catch (InternalAuthenticationServiceException var8) {
                this.logger.error("An internal error occurred while trying to authenticate the user.", var8);
                // 认证失败后会调用失败认证方法
                this.unsuccessfulAuthentication(request, response, var8);
                return;
            } catch (AuthenticationException var9) {
                this.unsuccessfulAuthentication(request, response, var9);
                return;
            }

            if (this.continueChainBeforeSuccessfulAuthentication) {
                chain.doFilter(request, response);
            }
            // 认证成功后会调用成功认证方法
            this.successfulAuthentication(request, response, chain, authResult);
        }
}

/**
* 认证成功后的处理方法
*/
protected void successfulAuthentication(HttpServletRequest request, HttpServletResponse response, FilterChain chain, Authentication authResult) throws IOException, ServletException {
        if (this.logger.isDebugEnabled()) {
            this.logger.debug("Authentication success. Updating SecurityContextHolder to contain: " + authResult);
        }
        /**认证通过后会把认证信息保存到与当前线程绑定的SecurityContext对象的
        * authentication属性中, 后面在项目的任意非测试类中获取用户的认证信息可通过
        * 调用全局方法SecurityContextHolder.getContext().getAuthentication()即可
        */
        SecurityContextHolder.getContext().setAuthentication(authResult);
        // 这个方法会根据是否开启了记住当前认证信息而把认证信息持久化并添加到到response的cookie中
        this.rememberMeServices.loginSuccess(request, response, authResult);
        if (this.eventPublisher != null) {
            this.eventPublisher.publishEvent(new InteractiveAuthenticationSuccessEvent(authResult, this.getClass()));
        }
        // 回调认证成功处理器逻辑,这个认证成功回调处理器可在自定义的认证处理过滤器中配置
        this.successHandler.onAuthenticationSuccess(request, response, authResult);
    }


/**
* 设置过滤处理Url,也就是过滤器拦截的登录认证请求Url
*/
public void setFilterProcessesUrl(String filterProcessesUrl) {
        this.setRequiresAuthenticationRequestMatcher(new AntPathRequestMatcher(filterProcessesUrl));
    }
/**
* 认证失败后的处理方法
*/
protected void unsuccessfulAuthentication(HttpServletRequest request, HttpServletResponse response, AuthenticationException failed) throws IOException, ServletException {
        // 清空与当前线程绑定的SecurityContext
        SecurityContextHolder.clearContext();
        if (this.logger.isDebugEnabled()) {
            this.logger.debug("Authentication request failed: " + failed.toString(), failed);
            this.logger.debug("Updated SecurityContextHolder to contain null Authentication");
            this.logger.debug("Delegating to authentication failure handler " + this.failureHandler);
        }
        // 清除之前持久化保存的认证信息并设置response中的cookie失效
        this.rememberMeServices.loginFail(request, response);
        // 认证失败处理器回调,这个处理器回调也可以在自定义的认证处理过滤器中进行自定义设置
        this.failureHandler.onAuthenticationFailure(request, response, failed);
    }

/**
* 设置认证管理器
*/
public void setAuthenticationManager(AuthenticationManager authenticationManager) {
        this.authenticationManager = authenticationManager;
    }

/**
* 设置认证成功处理器
*/
public void setAuthenticationSuccessHandler(AuthenticationSuccessHandler successHandler) {
        Assert.notNull(successHandler, "successHandler cannot be null");
        this.successHandler = successHandler;
}

/**
* 设置认证失败失败处理器
*/
public void setAuthenticationFailureHandler(AuthenticationFailureHandler failureHandler) {
        Assert.notNull(failureHandler, "failureHandler cannot be null");
        this.failureHandler = failureHandler;
}
以用户名密码登录认证为例理清登录认证的完整流程
在集成了SpringSecurity项目的SpringBoot的项目中我们一般通过在我们自定义的继承了WebSecurityConfigurerAdapter类中重写的configure(HttpSecurity http)方法中通过调用HttpSecurity#formLogin来配置用户名和密码登录。示例代码如下:
 @Override
    protected void configure(HttpSecurity http) throws Exception {
        http.authorizeRequests()
                .antMatchers("/user/reg").anonymous()
                .antMatchers("/sendLoginVerifyCode").anonymous()
                .antMatchers("/doc.html").hasAnyRole("user", "admin")
                .antMatchers("/admin/**").hasRole("admin")
                ///admin/**的URL都需要有超级管理员角色,如果使用.hasAuthority()方法来配置,需要在参数中加上ROLE_,如下.hasAuthority("ROLE_超级管理员")
                .anyRequest().authenticated()//其他的http端点必须登录后才能访问
                .and().formLogin().loginPage("http://localhost:3000/#/login")
                .successHandler(new FormLoginSuccessHandler())
                .failureHandler(new FormLoginFailedHandler()).loginProcessingUrl("/user/login")
                .usernameParameter("username").passwordParameter("password").permitAll()
                .and().logout().permitAll().and().csrf().disable().exceptionHandling().accessDeniedHandler(getAccessDeniedHandler());
    }
那么我们进入HttpSecurity#formLogin方法的源码:
public FormLoginConfigurer<HttpSecurity> formLogin() throws Exception {
        return (FormLoginConfigurer)this.getOrApply(new FormLoginConfigurer());
    }
可以看到它会注册一个FormLoginConfigurer类实例,进入该类的构造方法:
public FormLoginConfigurer() {
        super(new UsernamePasswordAuthenticationFilter(), (String)null);
        this.usernameParameter("username");
        this.passwordParameter("password");
    }
可以看到在实例化时,实例化了一个UsernamePasswordAuthenticationFilter过滤器作为参数调用了其父类的构造方法,在查看器父类的构造方法:
AbstractAuthenticationFilterConfigurer.class
protected AbstractAuthenticationFilterConfigurer(F authenticationFilter, String defaultLoginProcessingUrl) {
        this();
        this.authFilter = authenticationFilter;
        if (defaultLoginProcessingUrl != null) {
            this.loginProcessingUrl(defaultLoginProcessingUrl);
        }

    }
可以看到其把传入的过滤其作为自己的认证过滤器
然后我们进入UsernamePasswordAuthenticationFilter类中查看其构造方法和attemptAuthentication方法源码
// 默认拦截 /login路径,且必须时POST请求方法
public UsernamePasswordAuthenticationFilter() {
        super(new AntPathRequestMatcher("/login", "POST"));
    }
/**
* attemptAuthentication方法中从HttpServletRequest请求对象中
* 提取username和password参数并封装成UsernamePasswordAuthenticationToken对象
* 最后调用其认证管理器的authentication方法,并返回该方法的返回值
* 也就是
*/
public Authentication attemptAuthentication(HttpServletRequest request, HttpServletResponse response) throws AuthenticationException {
        if (this.postOnly && !request.getMethod().equals("POST")) {
            throw new AuthenticationServiceException("Authentication method not supported: " + request.getMethod());
        } else {
            String username = this.obtainUsername(request);
            String password = this.obtainPassword(request);
            if (username == null) {
                username = "";
            }

            if (password == null) {
                password = "";
            }

            username = username.trim();
            UsernamePasswordAuthenticationToken authRequest = new UsernamePasswordAuthenticationToken(username, password);
            this.setDetails(request, authRequest);
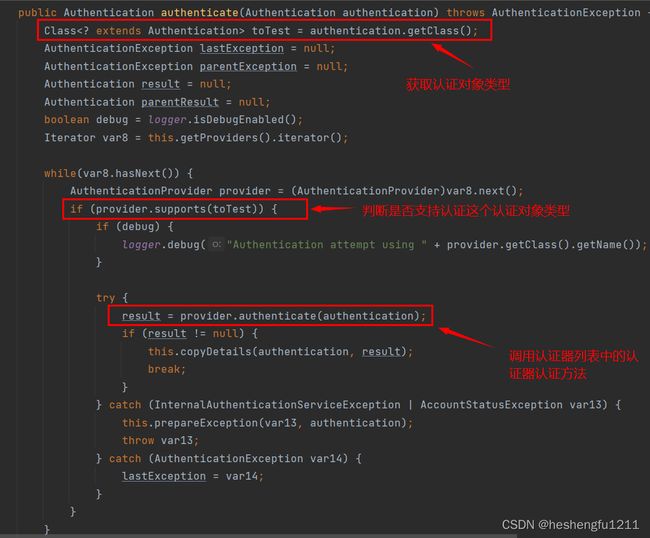
            /**下面这个方法也就是ProviderManager#authenticate方法
            * 在前面的ProviderManager#authenticate方法源码中已经分析过了,
            * 这里就不啰嗦了
            */
            return this.getAuthenticationManager().authenticate(authRequest);
        }
    }
小结
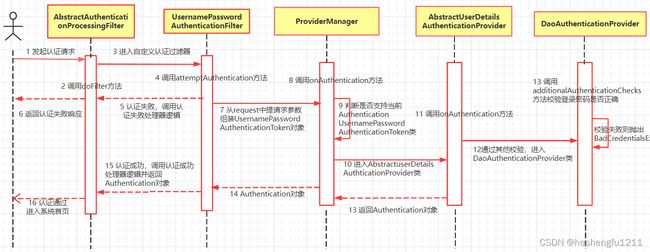
一图胜千言,下图是笔者基于用户名+密码登录流程画的一个登录认证时序图,如有不准确的地方还请读者不吝指出

下一篇文章笔者将使用自定义的MobilePhoneAuthenticationProvider认证器和MobilePhoeAuthenticationFilter过滤器,在集成spring-security的SpringBoot项目中实现
手机号码+短信验证码登录。功能在笔者的本地开发环境已实现,只等着明天输出文章即可,敬请期待!
参考文章
【1】认证体系:如何深入理解 Spring Security 用户认证机制?
【2】 松哥手把手带你捋一遍 Spring Security 登录流程
本位首发个人微信公众号【阿福谈Web编程】,觉得我的文章对你有帮助的读者朋友欢迎添加我的微信公众号关注,让我们一同在技术精进的路上一同成长!


