Springboot学习笔记
Springboot学习
- 入门
-
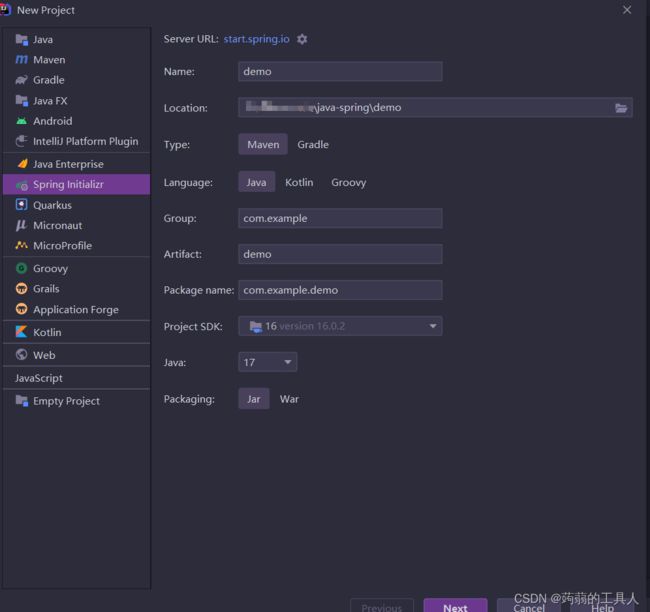
- 创建一个springboot项目
- 编写一个get带参数接口
- 添加依赖
- 基础
-
- web开发
-
- 静态资源访问
- 改变静态资源默认路径
- 欢迎页
- 请求方式
- springweb案例
-
- 创建一个新项目
- 国际化配置
-
- 识别国际化配置
- 拦截器
- 展示员工列表
- 增加CRUD操作
-
- 新增
-
- 删除
入门
创建一个springboot项目
编写一个get带参数接口
import org.springframework.web.bind.annotation.GetMapping;
import org.springframework.web.bind.annotation.RestController;

@RestController //返回是json格式
public class Hello {
    @GetMapping("/hello")   //get请求的路由  Request Post
    public String Hello(@RequestParam("name") String name) {
        return "get-hello"+name;
    }
}
@RestController
public class Hello {
    @GetMapping("/user/{id}/car/{number}/p")
    //   路径变量和header
    public String getUser(@PathVariable("id") Integer id,
                          @PathVariable("number") Integer number,
                          //   所有的都在Map存储
                          @PathVariable Map<String,Integer> mp,
                          @RequestHeader("User-agent") String userAgent,
                          @RequestHeader Map<String,Object> header
                        ){

        return "getUser id="+id+"cars number="+number+"\n all is "+mp+"userAgent="+userAgent;

    }
}
添加依赖
在pom.xml文件中添加
例如添加lombok
 <dependency>
      <groupId>org.projectlombokgroupId>
      <artifactId>lombokartifactId>
dependency>
基础
web开发
静态资源访问
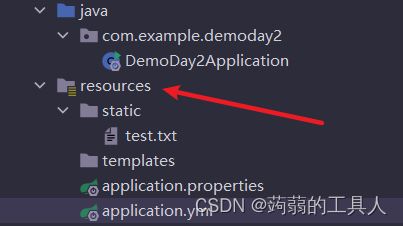
其中resources 下的 /static /public /resource /META-INF 文件下的资源为默认静态资源
在网页中可直接访问

当url相同时候,先请求动态资源,才会请求静态资源
改变静态资源默认路径
spring:
  mvc:
#    自定义请求静态资源前缀
    static-path-pattern: /res/**
  web:
    resources:
      static-locations:
      #    自定义静态资源文件路径
        [classpath:/stat/]

如出现中文乱码,修改一下配置
1
2 application.properties配置
server.servlet.encoding.charset=utf-8
server.servlet.encoding.force=true
server.servlet.encoding.enabled=true
欢迎页
静态资源路径下访问index.html
不能自定义访问前缀
可以自定义默认文件
  mvc:
    static-path-pattern: /res/**
否则无法正确访问

请求方式
Controller.Hello
四种请求方式
package com.example.demoday3.Controller;

import org.springframework.web.bind.annotation.RequestMapping;
import org.springframework.web.bind.annotation.RequestMethod;
import org.springframework.web.bind.annotation.RestController;

@RestController
public class Hello {
    @RequestMapping(value = "/user",method = RequestMethod.GET)
    public String getUser(){
        return "getUser";
    }
    @RequestMapping(value = "/user",method = RequestMethod.POST)
    public String postUser(){
        return "postUser";
    }
    @RequestMapping(value = "/user",method = RequestMethod.DELETE)
    public String deleteUser(){
        return "deleteUser";
    }
    @RequestMapping(value = "/user",method = RequestMethod.PUT)
    public String putUser(){
        return "putUser";
    }
}
static的index.html
DOCTYPE html>
<html lang="en">
<head>
    <meta charset="UTF-8">
    <title>Titletitle>
head>
<body>
    <form action="/user" method="post">
        <input type="text" name="userName"/>
        <input type="submit">
    form>
body>
html>
因为得form表单method只有get和post方式
所以要在配置添加
spring:
  mvc:
    hiddenmethod:
      filter:
#        能够处理delete和put请求 根据
        enabled: true
 <form action="/user" method="post">
        <input name="_method"  type="hidden" value="delete"/>
        <input type="text" name="userName"/>
        <input type="submit" value=delete>
    form>
    <form action="/user" method="post">
        <input name="_method"  type="hidden" value="PUT"/>
        <input type="text" name="userName"/>
        <input type="submit" value="put">
    form>
如果使用postman,可以直接使用delete、put方式,不用添加以上 filter配置。
另外,可以自定义 name="_method"的名称。
方法如下

springweb案例
创建一个新项目
引入依赖
lombok 自动补充构造函数
Thymeleaf 是一款用于渲染 XML/XHTML/HTML5 内容的模板引擎
pojo文件夹下创建两个类

dao文件夹下创建两个类
@Repository
public class DepartmentDao {

    //模拟数据库中的数据
    private static Map<Integer, Department> departments = null;
    static{
        departments = new HashMap<Integer,Department>();

        departments.put(101,new Department(101,"教学部"));
        departments.put(102,new Department(102,"市场部"));
        departments.put(103,new Department(103,"教研部"));
        departments.put(104,new Department(104,"运营部"));
        departments.put(105,new Department(105,"市场部"));
    }

    // 获取所有部门信息
    public Collection<Department> getAllDepartments(){
        return departments.values();
    }

    public Department getDepartmentById(Integer id){
        return departments.get(id);
    }

}
@Repository
public class EmployeeDao {
    private static Map<Integer, Employee> employees = null;
    @Autowired
    private DepartmentDao departmentDao;
    //静态代码块不能加载非静态域
    static{
        employees = new HashMap<Integer,Employee>();

        employees.put(101,new Employee(1001,"AA","[email protected]",1,new Department(1001,"教学部")));
        employees.put(102,new Employee(1002,"BB","[email protected]",0,new Department(1002,"市场部")));
        employees.put(103,new Employee(1003,"CC","[email protected]",0,new Department(1003,"教研部")));
        employees.put(104,new Employee(1004,"DD","[email protected]",1,new Department(1004,"运营部")));
        employees.put(105,new Employee(1005,"EE","[email protected]",1,new Department(1005,"市场部")));
    }

    /*增删改查*/
    //主键自增
    private static Integer initId = 1006;
    public void save(Employee employee){
        //如果没有id,则新增。
        if(employee.getId()==null){
            employee.setId(++initId);
        }
        employee.setDepartment(departmentDao.getDepartmentById(employee.getDepartment().getId()));
        employees.put(employee.getId(),employee);
    }
    public void delete(Integer id){
        employees.remove(id);
    }

    public Collection<Employee> getAllEmployees() {
        return employees.values();
    }
    public Employee getEmployeeById(Integer id){
        return employees.get(id);
    }
}
1.@Repository注解修饰哪个类,则表明这个类具有对对象进⾏CRUD的功能,⽽且@Repository是@Component注解的⼀个派⽣品,所以可以使用@Autowired调用@Repository注解的类
2.@ResponseBody的作用其实是将java对象转为json格式的数据,
加上@ResponseBody代表return “index”返回字符串 ,而不加则代表跳转index页面
国际化配置
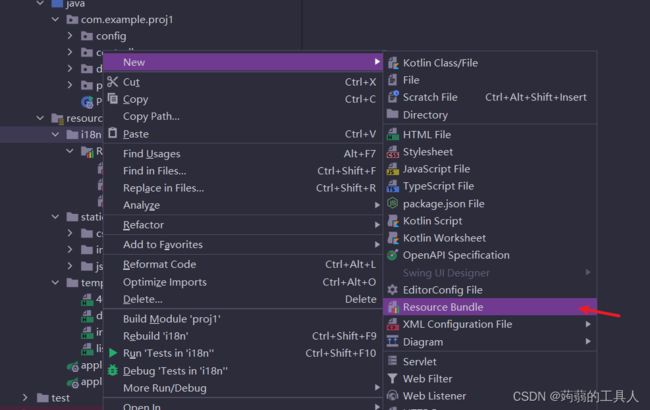
新建i18n文件夹
创建名为login的bundle文件夹
在下方可视化配置中添加key

识别国际化配置
在配置中添加
spring:
  messages:
    basename: i18n.login

拦截器
当登录后才能进入主页面,所以要进行路由拦截。
通过查询session判断是否登录
登录成功后添加
java session.setAttribute("loginUser",username);
创建LoginHandlerInterceptor文件
import org.springframework.web.servlet.HandlerInterceptor;
import javax.servlet.http.HttpServletRequest;
import javax.servlet.http.HttpServletResponse;

public class LoginHandlerInterceptor implements HandlerInterceptor {
    @Override
    public boolean preHandle(HttpServletRequest request, HttpServletResponse response, Object handler) throws Exception {
        Object loginUser=request.getSession().getAttribute("loginUser");
        if(loginUser==null){
            request.setAttribute("msg","没有权限,请先登录");
            request.getRequestDispatcher("/").forward(request,response);
            return false;
        }
        else{
            return true;
        }
    }
}
在配置中添加拦截器

会出现静态资源全部被拦截(css样式不生效),还要修改规则
registry.addInterceptor(new LoginHandlerInterceptor()).addPathPatterns("/**").excludePathPatterns("/index.html","/","/user/login","/css/*","/js/*","/img/*");
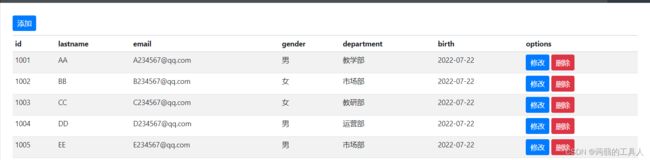
展示员工列表
创建EmployeeController.java
@Controller
public class EmployeeController {
    @Autowired
    EmployeeDao employeeDao;

    @RequestMapping("/emps")
//    返回值要返回给前端,要添加参数model。前端就可获取变量
    public String list(Model model){
        Collection<Employee> employees = employeeDao.getAllEmployees();
        model.addAttribute("emps",employees);
        return "list";
    }
}
修改list.html
<table class="table table-striped table-sm">
	<thead>
		<tr>
			<th>idth>
			<th>lastnameth>
			<th>emailth>
			<th>genderth>
			<th>departmentth>
			<th>birthth>
			<th>optionsth>

		tr>
	thead>
	<tbody>

		<tr th:each="emp:${emps}">
			<td th:text="${emp.getId()}">td>
			<td th:text="${emp.getLastName()}">td>
			<td>[[${emp.getEmail()}]]td>
			<td th:text="${emp.getGender()==0 ?'女':'男'}">td>
			<td th:text="${emp.getDepartment().getDepartmentName()}">td>
			<td th:text="${#dates.format(emp.getBirth(),'yyyy-MM-dd')}">td>
			<td>
				<button class="btn btn-sm btn-primary">修改button>
				<button class="btn btn-sm btn-danger">删除button>
			td>
		tr>
	tbody>
table>
增加CRUD操作
新增
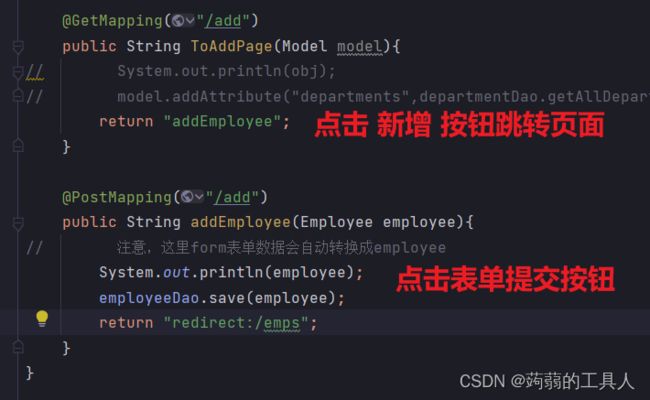
<form  action="/add" method="post">
    <input type="number" name="id" placeholder="1234">id
    <input type="text" name="lastName" placeholder="张三" >lastname
    <input type="text" name="email" placeholder="[email protected]">email
    <input type="number" name="gender" placeholder="1">gender
    <input type="number" name="department.id" placeholder="101" >department
    <input type="text" name="birth" placeholder="2002/8/20">birth
    <input type="submit">
form>
不确定数据类型就默认全选为text类型!
出现400报错为数据类型有问题
出现500报错为类中调用方法错误(比如为方法名错误或者数据错误)
删除
<a class="btn btn-sm btn-danger" th:href="@{/delete/}+${emp.getId()}">删除a>
@GetMapping("/delete/{id}")
    public String deleteEmp( @PathVariable("id") int id){
        System.out.println(id);
        employeeDao.delete(id);
        return "redirect:/emps";
    }