07-SpringBoot入门概述与SpringBoot原理
本文的重头戏在于Spring的运行的原理机制,同时也从入门介绍SpringBoot的项目概况技术架构与项目搭建
-
SpringBoot概述
SpringBoot是基于Spring的,在Spring的生态中SpringBoot的版本的迭代速度是非常快的,通常来说SpringBoot的小版本之间没有核心功能上的改动但是对于大版本来说是有本质的改变的例如SpringBoot1.X与SpringBoot2.X。来了解Spring之前我们来了解一下Spring的能力:
- 微服务——Microservices
- 响应式编程——Reactive
- 云开发——Cloud
- Web应用开发——WebAPP:日常中我们使用的SpringMVC就属于这一范畴
- 无服务——Serverless:开发操作函数放到云上,需要的时候来进行调用,这种形式下不需要我们本地有服务
- 事件驱动——Event Driven
- 任务批处理——Batch
上面也已经讲述我们SpringBoot是基于Spring的那么SpringBoot2.X的一些能力也是基于Spring的,下面说到的两大特性就是基于Spring5.X的。在SpringBoot2中分为两个技术栈响应式的与非响应式的,这我们日常的使用中通常使用的是非响应式的Servlet Stack
-
SpringBoot的特性:
-
Create stand-alone Spring applications——创建独立的Spring应用
-
Embed Tomcat, Jetty or Undertow directly (no need to deploy WAR files)——提供内嵌的服务容器
-
Provide opinionated 'starter' dependencies to simplify your build configuration——提供可选的start形式依赖,starter可以理解为场景,他是一个比jra包更大的概念
-
Automatically configure Spring and 3rd party libraries whenever possible——当需要的时候提供第三方的依赖配置,例如我们去系统中集成Mybatis等第三方框架
-
Provide production-ready features such as metrics, health checks, and externalized configuration——提供监控机制
-
Absolutely no code generation and no requirement for XML configuration——简化省去xml形式的配置
-
SpringBoot项目搭建
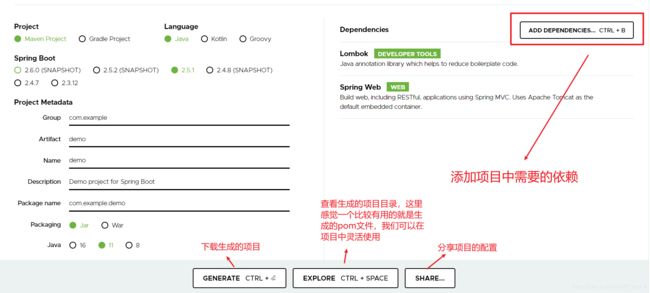
创建SpringBoot项目可以有两种方式通过官网构建或是通过IDEA等工具直接来进行构建,通过官网来进行构建的地址与界面为:
官网下载项目脚手架:
https://start.spring.io/
-
SpringBoot常用注解
@RestController
@RestController相当于是@Controller+@RequestBody,他与诸多其他的注解一样也是一种复合注解@Target({ElementType.TYPE})
@Retention(RetentionPolicy.RUNTIME)
@Documented
@Controller
@ResponseBody
public @interface RestController {
@AliasFor(
annotation = Controller.class
)
String value() default "";
}
- @RequestMapping
-
starter的使用
- SpringBoot中start是相当于一个场景的概念我们只需要通过指定一个场景,meavn就会帮我们引入这个场景下所需要的所有包
SpringBoot相对于Spring项目的简化配置体现在哪里,原理是什么:
- SpringBoot可以给我们解决不同jira包之间版本冲突的问题,这是因为他在pom文件中有父依赖的存在,如果我们搭建一个项目就可以看到pom中有
····

        org.springframework.boot
        spring-boot-starter-parent
        2.5.1
点击其中的spring-boot-starter-parent可以看到他又依赖于一个父pom文件:
    org.springframework.boot
    spring-boot-dependencies
    2.5.1
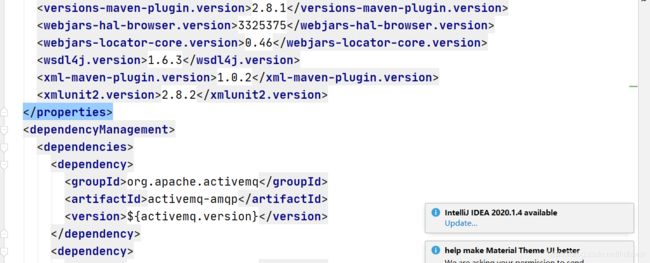
再点击spring-boot-dependencies的时候就可以看到SpringBoot为我们配置的一套关于jira包的版本:
在我们使用的时候如果对于其中一些jira包的版本有些不满意我们可以自己来直接在项目的pom文件中指定。
-
SpringBoot中配置文件的原理与应用
-
SpringBoot启动时对Bean的加载与位置扫描
在启动项目的时候执行启动类的main方法,通过应用上下文我们可以看出应用启动的时候就已经加载了大量的bean:
@SpringBootApplication
public class DemoApplication {
    public static void main(String[] args) {
        ConfigurableApplicationContext context = SpringApplication.run(DemoApplication.class, args);
        for (String beanDefinitionName:context.getBeanDefinitionNames()){
            System.out.println(beanDefinitionName);
        }
    }
}
我们在controller包中自己定义的Bean也被记载了进来这是因为,SpringBoot有默认的加载目录——启动类的同级或是同级一下的包。当我们想要改变这个规则的时候可以这样使用:
其中的@SpringBootApplication注解也是一个复合注解,他主要包括@SpringBootConfiguration @EnableAutoConfiguration @ComponentScan
@SpringBootApplication(scanBasePackages={"com.example"})
public class DemoApplication {
扫描包的这个属性,可以传多个包进去,这是他从底层上来说说与一个String的字符串:
String[] scanBasePackages() default {};-
SpringBoot中Bean的创建与相关注解
-
自定义配置文件与使用
首先为我们定义一个可以被加载如容器的类:
@Component
@ConfigurationProperties(value = "lml")
public class DemoConfig {
    private String realName;
    private String mysqlAddress;

    public String getRealName() {
        return realName;
    }

    public void setRealName(String realName) {
        this.realName = realName;
    }

    public String getMysqlAddress() {
        return mysqlAddress;
    }

    public void setMysqlAddress(String mysqlAddress) {
        this.mysqlAddress = mysqlAddress;
    }

    @Override
    public String toString() {
        return "DemoConfig{" +
                "realName='" + realName + '\'' +
                ", mysqlAddress='" + mysqlAddress + '\'' +
                '}';
    }
}
实现了这一步之后系统默认我们的配置文件是在application.porperties文件中,这时候如果直接在这个文件中使用前缀名会发现是无效的,这是后我们需要clean项目同时重新打包——package
server.port= 8888
lml.mysql-address= localhost:8080
之后我们在代码中就可以这样正常使用我们自定义的配置,这样的配置取值有两种常见的方式:
 ConfigurableApplicationContext context = SpringApplication.run(DemoApplication.class, args);
DemoConfig demoConfig = context.getBean(DemoConfig.class);
System.out.println(demoConfig.toString());
//第二种
@Autowired
DemoConfig demoConfig;
SpringBoot中配置文件相关的使用还有其他的很多种方法可以参考:
Spring Boot中的Properties的使用详解_java_脚本之家 (jb51.net)
-
@SpringBootApplication注解能力
这个图是自己有ProcessOn画的,需要看内部详细信息的可以参考链接:
@SpringBootApplication | ProcessOn免费在线作图,在线流程图,在线思维导图
-
SpringBoot启动原理
有关SpringBoot启动原理的这一块内容非常之多,老师讲不动了我也学不动了,留着到后面再学再看吧
SpringBoot启动原理 | ProcessOn免费在线作图,在线流程图,在线思维导图


