cv2.getRotationMatrix2D()
前言
最近考虑在对数据集做一些额外的数据增强(主要是随机以任意角度进行旋转),在阅读别人的源码时发现了cv2.getRotationMatrix2D()这一函数,顿时觉得该函数确实有用,查阅相关资料后,得到相关的用法总结(为了保证阅读观感不会涉及到太多原理的矩阵推导,仅为直观理解)。
正文
旋转矩阵(逆时针)为:
M = ( c o s ( θ ) − s i n ( θ ) s i n ( θ ) c o s ( θ ) ) M= \begin{pmatrix} cos(\theta) & -sin(\theta) \\ sin(\theta) & cos(\theta) \end{pmatrix} M=(cos(θ)sin(θ)−sin(θ)cos(θ))
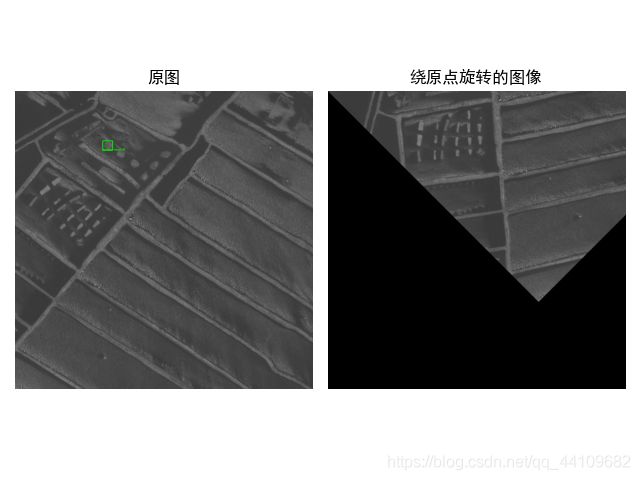
而在opencv中,原点是默认在图片的左上角,单纯的对图片使用该旋转矩阵,只是让图片绕着左上角进行旋转,如下图所示(图示为顺时针旋转45度的效果)。
opencv的特点就是如此虽然图片的直观表现上是逆时针旋转,但是由于原点的位置关系,想要达到该效果需要顺时针旋转矩阵。

所以,我们需要的是能够让图片在任意一点进行旋转,又或者说在原点进行完旋转之后还需要进行相应的平移,将目标的中心点平移回原来的位置。所以我们真正需要的矩阵为:
M = ( c o s ( θ ) − s i n ( θ ) ( 1 − c o s ( θ ) ) × x c e n t e r + s i n ( θ ) × y c e n t e r s i n ( θ ) c o s ( θ ) − s i n ( θ ) × x c e n t e r + ( 1 − c o s ( θ ) ) × y c e n t e r ) M= \begin{pmatrix} cos(\theta) & -sin(\theta) & (1-cos(\theta))\times x_{center}+sin(\theta)\times y_{center}\\ sin(\theta) & cos(\theta) & -sin(\theta)\times x_{center}+(1-cos(\theta))\times y_{center} \end{pmatrix} M=(cos(θ)sin(θ)−sin(θ)cos(θ)(1−cos(θ))×xcenter+sin(θ)×ycenter−sin(θ)×xcenter+(1−cos(θ))×ycenter)
多出来的第三列分别为x和y轴上所需要平移的距离。
所以opencv提供cv2.getRotationMatrix2D()就是方便我们进行上述矩阵的获取。
其经常被使用到的参数有三个:
- 旋转中心
- 旋转角度
- 旋转后的缩放比例
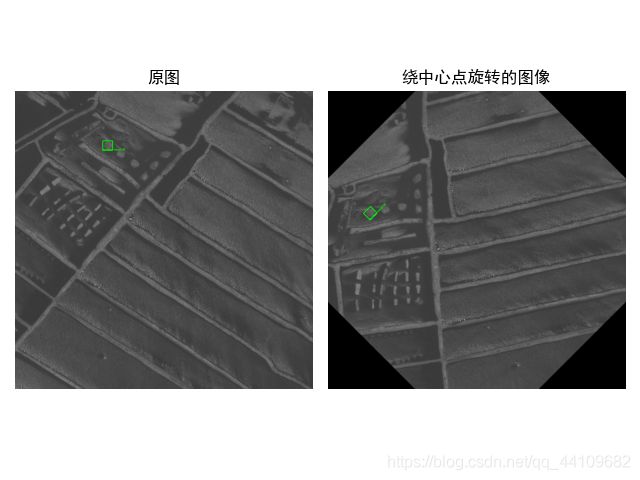
具体在程序中如何表现请看下述代码:
import cv2
import matplotlib.pyplot as plt

img = cv2.imread('1.png')
rows, cols = img.shape[:2]
# 第一个参数旋转中心,第二个参数旋转角度,第三个参数:缩放比例
M = cv2.getRotationMatrix2D((cols / 2, rows / 2), 45, 1)
# 得到矩阵后得用到图像的仿射变换函数才可以进行最终图像的变化
res1 = cv2.warpAffine(img, M, (cols, rows))

# 画图部分
plt.subplot(121)
plt.imshow(img)
plt.rcParams['font.sans-serif'] = ['SimHei']
plt.rcParams['axes.unicode_minus'] = False
plt.title('原图')
plt.axis(False)
plt.subplot(122)
plt.imshow(res1)
plt.rcParams['font.sans-serif'] = ['SimHei']
plt.rcParams['axes.unicode_minus'] = False
plt.title('绕中心点旋转的图像')
plt.axis(False)
plt.show()
拓展
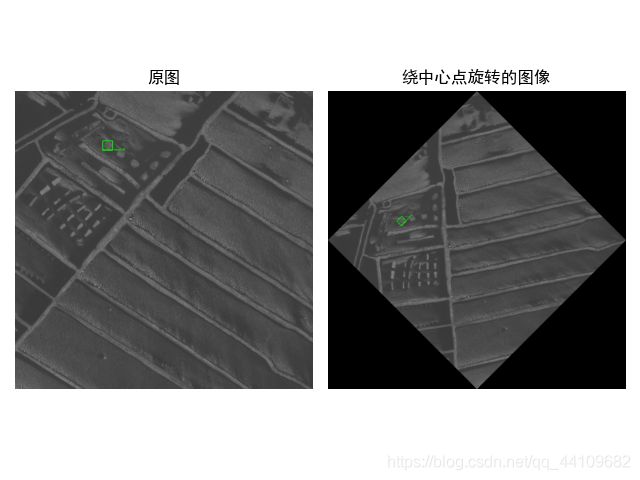
虽然已经能够绕任意点旋转,但是图片并不能显示完全,所以还可以使用如下代码进行自适应调整图片大小。
import cv2
import matplotlib.pyplot as plt
import numpy as np

img = cv2.imread('1.png')
rows, cols = img.shape[:2]
# 第一个参数旋转中心,第二个参数旋转角度,第三个参数:缩放比例
M = cv2.getRotationMatrix2D((cols / 2, rows / 2), 45, 1)

# 自适应图片边框大小
cos = np.abs(M[0, 0])
sin = np.abs(M[0, 1])
new_w = rows * sin + cols * cos
new_h = rows * cos + cols * sin
M[0, 2] += (new_w - cols) * 0.5
M[1, 2] += (new_h - rows) * 0.5
w = int(np.round(new_w))
h = int(np.round(new_h))
res2 = cv2.warpAffine(img, M, (w, h))

# 画图部分
plt.subplot(121)
plt.imshow(img)
plt.rcParams['font.sans-serif'] = ['SimHei']
plt.rcParams['axes.unicode_minus'] = False
plt.title('原图')
plt.axis(False)
plt.subplot(122)
plt.imshow(res2)
plt.rcParams['font.sans-serif'] = ['SimHei']
plt.rcParams['axes.unicode_minus'] = False
plt.title('绕中心点旋转的图像')
plt.axis(False)
plt.show()
结束
如有错误,欢迎各位指正!!!

