C++实现推理, 基于Tensorflow,OpenCV,NCNN,OpenVINO平台
**
基于tensorflow c++接口实现推理
基于opencv c++接口实现推理
基于ncnn c++接口实现推理
深度学习模型推理,
为啥需要学习tensorflow, 因为需要C++部署,
为啥又需要学习opencv的深度学习推理, 因为超级简单;
1: Tensorflow C++环境配置
源码编译版本相关文件下载
参考进行核对:
相关环境配置的文件, 可用提取下载好
如下参考:
protobuf-all-3.7.0
eigen3.3
tensorflow1.14.1
bazel-0.24.1-installer-linux-x86_64.sh
cuda-repo-ubuntu1604-10-0-local-10.0.130-410.48_1.0-1_amd64.deb
NVIDIA-Linux-x86_64-410.78.run
cudnn-10.0-linux-x64-v7.6.1.34.deb**
可参考如下教程:
http://freedomtrail.cn/tensorflow-c%E7%89%88%E7%BC%96%E8%AF%91%E5%AE%89%E8%A3%85%E6%96%B9%E6%B3%95/
1.1 : Tensorflow 源码进行编译
1: 网站下载bazel, 安装即可
2: tensorflow-r1.14下载
github选择tensorflow-r1.14下载即可
如果网络不好, 直接下载对应分支,无需进行git;
git clone https://github.com/tensorflow/tensorflow
cd tensorflow
git checkout r1.14
./configure
3: ./configure后 配置安装环境,
对应路径和选项, 其他都是no, cuda项选择 yes
4: 编译C++ API,生成.so文件, Tensorflow调用CUDA
bazel build --config=opt --config=cuda
//tensorflow:libtensorflow_cc.so#编译C++ API,生成.so文件,Tensorflow不调用CUDA
bazel build --config=opt //tensorflow:libtensorflow_cc.sobazel build --config=opt --config=cuda
//tensorflow:libtensorflow_cc.sobazel build --config=opt //tensorflow:libtensorflow.so
编译好后, 会生产相关文件;
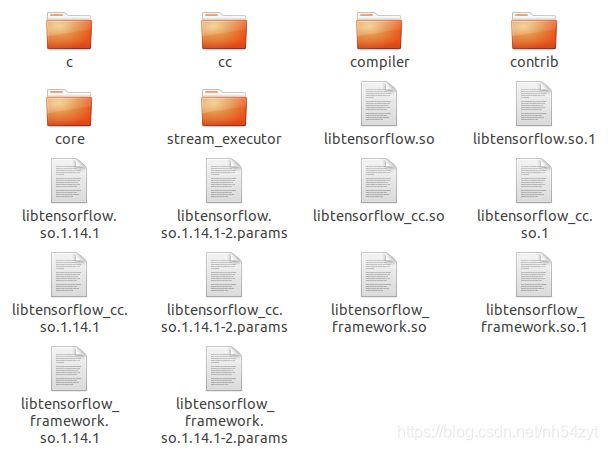
5: 判断是否存在.so
位于路径 ./tensorflow-r1.14/bazel-bin/tensorflow下
libtensorflow.so.1.14.1.so,
libtensorflow_cc.so
libtensorflow_framework.so.1.14.1.so
等.so文件
2: Tensorflow C++ pb文件生成
由训练代码获取ckpt模型后直接转换为pb文件
这样固化好模型.可用直接用.pb文件进行推理
import tensorflow as tf
from core.yolov3 import YOLOV3
import load_weights

input_size = 416
darknet_weights = 'yolov3.weight'
pb_file = 'yolov3.pb'
output_node_names = ["input", "pred_sbbox", "pred_mbbox", "pred_lbbox"]

with tf.name_scope('input'):
    input_data = tf.placeholder(dtype=tf.float32, shape=(None, input_size, input_size, 3), name='input_data')
model = YOLOV3(input_data, trainable=False)
load_ops = load_weights(tf.global_variables(), darknet_weights)

with tf.Session() as sess:
    sess.run(load_ops)
    output_graph_def = tf.graph_util.convert_variables_to_constants(
        sess,
        tf.get_default_graph().as_graph_def(),
        output_node_names=output_node_names
    )
    with tf.gfile.GFile(output_graph, "wb") as f:
        f.write(output_graph_def.SerializeToString())

    print("{} ops written to {}.".format(len(output_graph_def.node), output_graph))
3: Tensorflow C++ 模型推理
如下代码:
为利用yolov3进行检测,利用tensorflow-1.14.1实现
#include () << std::endl;
#define YOLOV3_SIZE 416
#define IMG_CHANNELS 3
float bboxThreshold = 0.3; // BBox threshold
float nmsThreshold = 0.45; // Non-maximum suppression threshold
std::vector<string> classes;
Status LoadGraph(const string &graph_file_name,
std::unique_ptr<tensorflow::Session> *session)
{
}
cv::Mat resizeImg(const cv::Mat &input, int width, int height)
{
}
Status readTensorFromMat(const cv::Mat &mat, Tensor &outTensor)
{
}
void drawPred(int classId, float conf, int left, int top, int right, int bottom, cv::Mat &frame)
{
}
void postprocess(cv::Mat &frame, const std::vector<cv::Mat> &outs)
{
}
int main(int argc, char *argv[])
{
string graph = "/home/ting/yolov3_coco.pb";
std::vector<string> files;
string input_layer = "input"; //input ops
string root_dir = "";
string classesFile = "/home/ting/coco.names";
std::ifstream ifs(classesFile.c_str());
string line;
while (getline(ifs, line))
classes.push_back(line);
std::cout << "load txt ok" << std::endl;
tensorflow::port::InitMain(argv[0], &argc, &argv);
if (argc > 1){
LOG(ERROR) << "Unknown argument " << argv[1] << "\n";
return -1;
}
std::unique_ptr<tensorflow::Session> session;
string graph_path = tensorflow::io::JoinPath(root_dir, graph);
Status load_graph_status = LoadGraph(graph_path, &session);
if (!load_graph_status.ok())
{
LOG(ERROR) << load_graph_status;
return -1;
}
cv::VideoCapture cap;
if (!cap.open("mini.mp4")){
return 0;
}
for (;;){
cv::Mat srcImage, rgbImage;
cap >> srcImage;
std::cout << "srcImage.rows:" << srcImage.rows << std::endl;
if (srcImage.empty()){
break;
}
cv::cvtColor(srcImage, rgbImage, CV_BGR2RGB);
rgbImage.convertTo(rgbImage, CV_32FC3);
cv::Mat padImage = resizeImg(rgbImage, YOLOV3_SIZE, YOLOV3_SIZE);
Tensor resized_tensor(tensorflow::DT_FLOAT, tensorflow::TensorShape({1, YOLOV3_SIZE, YOLOV3_SIZE, IMG_CHANNELS}));
Status read_tensor_status = readTensorFromMat(padImage, resized_tensor);
if (!read_tensor_status.ok()){
LOG(ERROR) << read_tensor_status;
return -1;
}
std::cout << " image2tensor ok." << std::endl;
cv::TickMeter tm;
tm.start();
std::vector<Tensor> outputs;
Status run_status = session->Run({{input_layer, resized_tensor}},{"pred_sbbox", "pred_mbbox", "pred_lbbox"}, {}, &outputs);
if (!run_status.ok()) {
LOG(ERROR) << "Running model failed: " << run_status;
return -1;
}
tm.stop();
std::cout << "Inference time, ms: " << tm.getTimeMilli() << std::endl;
std::cout << "tensorflow output tensor shape:" << outputs.size() << "\n";
postprocess(srcImage, outs);
outs.clear();
cv::imshow("Yolov3", srcImage);
if (cv::waitKey(10) == 27)
break;
}
return 0;
}
4: OpenCV C++环境配置
下载对应源码,

运行如下指令即可
sudo cmake -D CMAKE_BUILD_TYPE=RELEASE \
    -D CMAKE_INSTALL_PREFIX=/usr/local \
    -D INSTALL_PYTHON_EXAMPLES=ON \
    -D OPENCV_EXTRA_MODULES_PATH=~/opencv_contrib-3.4.3/modules \
    -D BUILD_EXAMPLES=ON \
    -D WITH_CUDA=ON ..

cmake -D CMAKE_BUILD_TYPE=RELEASE -D CMAKE_INSTALL_PREFIX=/usr/local -D INSTALL_PYTHON_EXAMPLES=ON -D OPENCV_EXTRA_MODULES_PATH=~/opencv_contrib-3.4.3/modules -D BUILD_EXAMPLES=ON -D WITH_CUDA=ON UILD_TIFF=ON ..

cmake -D CMAKE_BUILD_TYPE=RELEASE -D CMAKE_INSTALL_PREFIX=/usr/local -D INSTALL_PYTHON_EXAMPLES=ON -D OPENCV_EXTRA_MODULES_PATH=~/opencv_contrib-3.4.3/modules -D BUILD_EXAMPLES=ON -D WITH_CUDA=ON ..
5: OpenCV C++模型推理
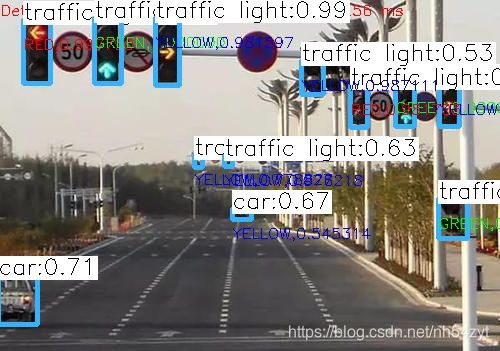
如下代码为
目标检测和红绿灯分类的简单demo. 纯粹利用opencv进行实现
检测模型为yolov3进行目标检测,
分类模型为简单的卷积网络实现。
//main.cpp
#include
//detection.cpp
#include
//classification.cpp
#include "classification.hpp"
#include 网络上随意找一张图片
进行目标检测及红绿灯分类, 效果如下:
即使利用OpenCV进行推理,也能很快的实现效果
但是速度会慢些;

以上是基于tensorflow和Opencv分别实现推理的简单流程
如果要想又快又好
请看另外一篇blog,基于TensorRT和CUDA实现
https://blog.csdn.net/nh54zyt/article/details/110423223
如需要完整代码, 可留言沟通,一起交流学习,
谢谢!
6: 基于ncnn框架
ncnn是腾讯最近开放的一个专门针对移动设备(尤其是android)的开源深度学习前向框架。
其优点如下:
纯c/c++实现,无第三方依赖,库体积很小,部署方便; 针对arm做SIMD优化,采用OpenMP多核并行技术,速度快;
支持较多常见的layer; 框架非常简单容易理解,类似caffe以及EasyCNN,很容易扩展;
提供caffe、tensorflow等框架模型的转换; 注:只包含前向计算,因此无法进行训练,需要导入其他框架训练好的模型参数。
依赖
sudo apt-get install -y gfortran
sudo apt-get install -y libprotobuf-dev libleveldb-dev libsnappy-dev libopencv-dev libhdf5-serial-dev protobuf-compiler
sudo apt-get install --no-install-recommends libboost-all-dev
sudo apt-get install -y libgflags-dev libgoogle-glog-dev liblmdb-dev libatlas-base-dev
下载
git clone https://github.com/Tencent/ncnn
cd ncnn
在编译之前,我们希望和示例程序一起编译
需要修改CmakeList.txt文件。去掉下面两段代码前面的#
add_subdirectory(examples)
add_subdirectory(benchmark)
mkdir build
cd build
cmake ..
make -j4
make install
编译完成后,在 build 目录下看到会有:

# 示例程序的可执行文件全部在examples内
# ncnn库文件以及头文件全部在install目录下
# tools目录下是一些转化工具
examples  install   tools
可用测试caffe转ncnn模型的相关代码
/
顶层目录包含LICENSE,README,CMakeLists以及android、iOS的编译配置。

./examples/
该目录下包含一个使用squeezenet做图像分类的c++例子程序,android例子程序,以及squeezenet模型文件。就喜欢这样的!啥都不用管就能跑起来。

./src/

目录顶层下是一些基础代码,如宏定义,平台检测,mat数据结构,layer定义,blob定义,net定义等。
./src/layer下是所有的layer定义代码
./src/layer/arm是arm下的计算加速的layer
./src/layer/x86是x86下的计算加速的layer。
./tools/

该目录是ncnn转换caffe、tensorflow模型的工具代码
7: 基于OpenVINO框架
主要特点:
推断引擎(Inference Engine)支持硬件指令集层面的深度学习模型加速运行,同时对传统的OpenCV图像处理库也进行了指令集优化,有显著的性能与速度提升。

支持的硬件设备:
CPU
GPU
FPGA
VPU
8: GPU算力图
