【css】CSS3有哪些新特性
文章目录
- 前言
-
- 1、css3边框——圆角效果 border-radius
- 2、css3边框——边框阴影 box-shadow
- 3、css3边框——边框图片 border-image
- 4、css3颜色——颜色之RGBA
- 5、css3颜色——渐变色彩
-
- 5.1、liner-gradient线性渐变
- 5.2、radial-gradient径向渐变
- 5.3、 conic-gradient圆锥渐变
- 5.4、 重复渐变
- 6、CSS3文字与字体——text-overflow与word-wrap
- 7、CSS3文字与字体——@font-face 字体
- 8、CSS3文字与字体——文本的阴影 text-shadow
-
- 8.1、CSS3文字与字体—— font-stretch
- 8.2、CSS3文字与字体—— font-size-adjust
- 9、CSS3背景——background-origin 原始起始位置
- 10、CSS3背景——background-clip 剪裁
- 11、CSS3背景——background-size 图片的大小
- 12、CSS3变形–旋转 rotate()
- 13、CSS3变形–缩放 scale()
- 14、CSS3多列布局——Columns
- 15、CSS3多列布局——column-width 列宽
- 16、CSS3多列布局——column-count 列数
- 17、CSS3 列间距——column-gap
- 18、CSS3 列边框——column-rule 类似border
- 19、CSS3 跨列设置——column-span
- 20、CSS3 盒子模型——box-sizing
- 21、CSS3 伸缩布局(弹性盒布局)——Flexbox
- 22、CSS3 动画——animation
- 23、CSS3 元素框——box-decoration-break
- 24、CSS3——object-fit
- 25、CSS3——object-position
- 26、CSS3—— perspective
- 27、css3——perspective-origin
- 28、CSS3指针—— pointer-events
- 29、CSS3—— resize 重置
前言
在 Web 开发中采用 CSS3 技术将会显著的美化我们的应用程序,提高用户体验,同时也能极大的提高程序的性能。本文将重点介绍一些比较绚丽且实用 CSS3 新特性。
1、css3边框——圆角效果 border-radius
border-radius:5px 4px 3px 2px;/*四个值分别代表左上角,右上角,右下角,左下角,顺时针*/
例子:
		<style>
			ul {
				margin: 0;
				padding: 0;
			}
			li {
				list-style: none;
				margin: 10px 0 0 10px;
				width: 200px;
				height: 200px;
				float: left;
				background: #bbb;
			}
			h2 {
				clear: left;
			}
			.test .one {
				border-radius: 20px;
			}
			.test .two {
				border-radius: 20px 40px;
			}
			.test .three {
				border-radius: 20px 40px 60px;
			}
			.test .four {
				border-radius: 20px 40px 60px 80px;
			}
			.test2 .one {
				border-radius: 20px/10px;
			}
			.test2 .two {
				border-radius: 20px 40px/10px 20px;
			}
			.test2 .three {
				border-radius: 20px 40px 60px/10px 20px 30px;
			}
			.test2 .four {
				border-radius: 20px 40px 60px 80px/10px 20px 30px 40px;
			}
		</style>
	</head>
	<body>
		<h2>水平与垂直半径相同时:</h2>
		<ul class="test">
			<li class="one">提供1个参数<br>border-radius:20px;</li>
			<li class="two">提供2个参数<br>border-radius:20px 40px;</li>
			<li class="three">提供3个参数<br>border-radius:20px 40px 60px;</li>
			<li class="four">提供4个参数<br>border-radius:20px 40px 60px 80px;</li>
		</ul>
		<h2>水平与垂直半径不同时:</h2>
		<ul class="test2">
			<li class="one">提供1个参数<br>border-radius:20px/10px;</li>
			<li class="two">提供2个参数<br>border-radius:20px 40px/10px 20px;</li>
			<li class="three">提供3个参数<br>border-radius:20px 40px 60px/10px 20px 30px;</li>
			<li class="four">提供4个参数<br>border-radius:20px 40px 60px 80px/10px 20px 30px 40px;</li>
		</ul>
	</body>
2、css3边框——边框阴影 box-shadow
box-shadow:X轴偏移量 Y轴偏移量 [阴影模糊半径] [阴影扩展半径] [阴影颜色] [投影方式];
值描述:
- X轴偏移量:必需。水平阴影的位置,允许负值。
- Y轴偏移量:必需。垂直阴影的位置,允许负值。
- 阴影模糊半径:可选。模糊距离,其值只能是正值,如果值为0,表示阴影没有模糊效果。
- 阴影扩展半径:可选。阴影的尺寸。
- 阴影颜色:可选。阴影的颜色。省略默认会黑色。
- 投影方式:可选。设置为inset时为内部阴影方式,若省略为外阴影方式。
为元素设置外阴影:
.box-shadow{
    box-shadow:4px 2px 6px #333333;
}
为元素设置内阴影:
.box-shadow{
    box-shadow:4px 2px 6px #333333 inset;
}
为元素添加多个阴影(只需用逗号隔开即可):
.box-shadow{
    box-shadow:4px 2px 6px #f00,-4px -2px px #000,0px 0px 12px 5px #33cc00 inset;
}
3、css3边框——边框图片 border-image
可以把border-image理解为就是一个切片工具,会自动把用做边框的图片切割。
border-image 属性是五个 border-image-* 属性的简写,其语法格式如下:
border-image:border-image-source [border-image-slice] [border-image-width] [border-image-outset] [border-image-repeat];
- border-image-source:定义边框图像的路径;
- border-image-slice:定义边框图像从什么位置开始分割;
- border-image-width:定义边框图像的厚度(宽度);
- border-image-outset:定义边框图像的外延尺寸(边框图像区域超出边框的量);
- border-image-repeat:定义边框图像的平铺方式。
border-image:url(border.png) 70 70 70 70 repeat;
4、css3颜色——颜色之RGBA
color:rgba(R,G,B,A)
以上R,G,B三个参数,正整数的取值范围为:0-255。百分数值的取值范围为0.0%-100%。A为透明度参数,取值在0-1之间,不可为负值。
background-color:rgba(255,255,255,0.5);/*透明度为0.5的白色*/
5、css3颜色——渐变色彩
5.1、liner-gradient线性渐变
线性渐变指的是颜色沿一条直线进行渐变(例如右上到下,从左到右等),要创建线性渐变,至少需要定义两个色标(色标指的是想要平滑过渡的颜色),若要创建更加复杂的渐变效果,则需要定义更多的色标。创建线性渐变的基本语法如下:
liner-gradient(to bottom,#fff,#999)/*to bottom渐变方向,后面两个参数表示颜色的起始点和结束点*/
第一个参数为渐变方向,可以用角度的关键词或英文来表示:
| 角度 | 英文 | 作用 |
|---|---|---|
| 0deg | to top | 从下向上 |
| 90deg | to right | 从左向右 |
| 180deg | to bottom | 从上向下 |
| 270deg | to left | 从右向左 |
| to top left | 从右下角到左上角 | |
| to top right | 从左下角到右上角 |
第二个和第三个参数,表示颜色的起始点和结束点,可以有多个颜色值。
background: liner-gradient(to left,red,orange,yellow,green,blue,indigo,violet);
5.2、radial-gradient径向渐变
径向渐变与线性渐变类型,不同之处在于径向渐变是由中心向外延申的渐变,可以指定中心点的位置,也可以设置渐变的形状。定义径向渐变的基本语法如下所示:
radial-gradient(shape size at position, color-stop1, color-stop2, ...);
参数说明如下:
- at:一个关键字,需要放置在参数 position 的前面;
- position:指定渐变起点的坐标,您可以使用数值加单位、百分比或者关键字(例如 left、bottom 等)等形式指定渐变起点的坐标,如果提供 2 个参数,那么第一个参数用来表示横坐标,第二个参数用来表示纵坐标,如果只提供一个参数,那么第二个参数将被默认设置为 50%,即 center;
- shape:指定渐变的形状,可选值为 circle(圆形)、ellipse(椭圆);
- size:指定渐变形状的大小,除了可以使用具体的数值来指定 circle、ellipse 的半径外,还可以使用下面所示的关键字来指定渐变形状的大小:
- closest-side:指定径向渐变的半径长度为从圆心到离圆心最近的边;
- closest-corner:指定径向渐变的半径长度为从圆心到离圆心最近的角;
- farthest-side:默认值,指定径向渐变的半径长度为从圆心到离圆心最远的边;
- farthest-corner:指定径向渐变的半径长度为从圆心到离圆心最远的角。
- color-stop1、color-stop2、…:表示定义的多个色标,在每个色标中除了可以定义颜色外,还可以通过数值加单位或者百分比的形式定义颜色的起止位置。
【示例】使用 radial-gradient() 函数定义径向渐变:
<!DOCTYPE html>
<html>
<head>
    <style>
        div {
            width: 210px;
            height: 100px;
            float: left;
            margin: 10px;
            border: 1px solid black;
        }
        .one {
            background: radial-gradient(circle at 50%, red, yellow, lime);
        }
        .two {
            background: radial-gradient(ellipse 100px 30px at 30%, red, yellow, lime);
        }
        .three {
            background: radial-gradient(circle 100px at 50%, red 10%, yellow 50%, lime 100px);
        }
        .four {
            background: radial-gradient(circle closest-corner at 50px 30px, red, yellow, lime);
        }
    </style>
</head>
<body>
    <div class="one"></div>
    <div class="two"></div>
    <div class="three"></div>
    <div class="four"></div>
</body>
</html>
5.3、 conic-gradient圆锥渐变
圆锥渐变类似于径向渐变,两者都有一个中心点作为色标的源点,不同的是圆锥渐变是围绕中心点旋转(而不是从中心点向往辐射),定义圆锥渐变的基本语法如下:
conic-gradient(from angle at position, start-color, ..., last-color);
语法说明如下:
- from:一个关键字,需要放置在参数 angle 之前;
- angle:定义圆锥渐变的起始角度,可以为空,默认值为 0deg;
- at:一个关键字,需要放置在参数 position 之前;
- position:定义圆锥渐变锥心的坐标,您可以使用数值加单位、百分比或者关键字(例如 left、bottom 等)等形式指定锥心的坐标,如果提供 2 个参数,那么第一个参数用来表示横坐标,第二个参数用来表示纵坐标,如果只提供一个参数,那么第二个参数将被默认设置为 50%,即 center(居中);
- start-color、…、last-color:表示定义的多个色标,在每个色标中除了可以定义颜色外,还可以通过百分比或者角度来定义颜色的起始位置。
【示例】使用 conic-gradient() 定义圆锥渐变:
<!DOCTYPE html>
<html>
<head>
    <style>
        div {
            width: 210px;
            height: 100px;
            float: left;
            margin: 10px;
            border: 1px solid black;
        }
        .one {
            background: conic-gradient(at 50%, red, orange, yellow, green, blue, indigo, violet, red);
        }
       .two {
            background: conic-gradient(red 0deg 30deg, orange 30deg 50deg, yellow 50deg 200deg, green 200deg 300deg, blue 300deg 360deg);
        }
        .three {
            background: conic-gradient(from 90deg, red 0% 55%, yellow 55% 90%, lime 90% 100%);
        }
        .four {
            background: conic-gradient(#fff 0.25turn, #000 0.25turn 0.5turn, #fff 0.5turn 0.75turn, #000 0.75turn);
        }
    </style>
</head>
<body>
    <div class="one"></div>
    <div class="two"></div>
    <div class="three"></div>
    <div class="four"></div>
</body>
</html>
5.4、 重复渐变
在 CSS 中,您还可以使用 repeating-linear-gradient()、repeating-radial-gradient() 和 repeating-conic-gradient() 等函数来分别创建线性渐变、径向渐变和圆锥渐变的重复渐变,所谓重复渐变就是指将渐变的过程重复多次,以铺满整个元素。
提示: repeating-linear-gradient()、repeating-radial-gradient() 和 repeating-conic-gradient() 函数的语法分别与 linear-gradient()、radial-gradient() 和 conic-gradient() 函数的语法相同。
【示例】使用 repeating-linear-gradient()、repeating-radial-gradient() 和 repeating-conic-gradient() 三个函数定义重复渐变:
<!DOCTYPE html>
<html>
<head>
    <style>
        div {
            width: 210px;
            height: 100px;
            float: left;
            margin: 10px;
            border: 1px solid black;
        }
        .one {
            background: repeating-linear-gradient(190deg, #000 0px 10px, #FFF 10px 20px);
        }
       .two {
            background: repeating-radial-gradient(circle 100px at 50%, red 0% 10%, yellow 10% 30%, lime 30% 40%);
        }
        .three {
            background: repeating-conic-gradient(#69f 0 36deg, #fd44ff 36deg 72deg);
        }
        .four {
            background: conic-gradient(#fff 0.25turn, #000 0.25turn 0.5turn, #fff 0.5turn 0.75turn, #000 0.75turn) top left / 25% 25% repeat;
        }
    </style>
</head>
<body>
    <div class="one"></div>
    <div class="two"></div>
    <div class="three"></div>
    <div class="four"></div>
</body>
</html>
6、CSS3文字与字体——text-overflow与word-wrap
text-overflow用来设置是否使用一个省略标记(……)表示对象内文本的溢出。
text-overflow:clip(表示剪切) | ellipsis(表示显示省略标记);
但是text-overflow只是用来说明文字溢出时用什么方式显示,要实现溢出时产生省略号的效果,还须其他条件:
- 定义强制文本在一行显示(white-space:nowrap)
- 溢出内容为隐藏(overflow:hidden)
text-overflow:ellipsis;
overflow:hidden;
white-space:nowrap;
word-wrap用来设置文本行为,当前行超过指定容器的边界时是否断开转行
word-wrap:normal |break-word;
7、CSS3文字与字体——@font-face 字体
@font-face能够加载服务器端的字体文件,让浏览器端可以显示用户电脑里没有安装的字体。
@font-face{
    font-family:"字体名称";
    src:url("字体文件在服务器上的相对或绝对路径");
}
这样设置之后,就可以像使用普通字体一样在(font-*)中设置字体样式。比如:
p{
    font-size:12px;
    font-family:"my font";/*必须项,设置@font-face中font-family同样的值*/
}
8、CSS3文字与字体——文本的阴影 text-shadow
text-shadow用来设置文本的阴影效果。
text-shadow:X-offset Y-offset blur color;
值描述
- X-offset:阴影的水平偏移距离,正值向右偏移,负值向左偏移;
- Y-offset:阴影的垂直偏移距离,正值向下偏移,负值向上偏移;
- blur:阴影的模糊程度,不能是负值,值越大越模糊;
- color:阴影的颜色;
text-shadow:0 1px 1px #fff;
text-shadow:0 1px 1px #fff, 0 0 25px blue, 0 0 5px darkblue;
8.1、CSS3文字与字体—— font-stretch
让所有的div元素的文本更宽:
div { font-stretch: expanded; }
目前没有主流浏览器支持font-Stretch属性。
值说明:
- wider:使得文本更宽
- narrower:使得文本窄
- ultra-condensed:使文本窄得不能再窄
- extra-condensed:指定紧缩程度第二大的字体
- condensed:指定略微紧缩程度第二大的字体
- semi-condensed:指定略微紧缩的字体
- normal:指明字体既不紧缩也不加宽
- semi-expanded:指定略微加宽的字体
- expanded:指定加宽的字体
- extra-expanded:指定加宽程度第二大的字体
- ultra-expanded:指定加宽程度最大的字体
- inherit:指定该属性与元素父项的属性采用相同的计算值
8.2、CSS3文字与字体—— font-size-adjust
通过指定font-size-adjust属性,浏览器将调整字体大小,无论字体系列("宋体"性质值0.58):
div{ font-size-adjust: 0.58;}
目前只有Firefox支持 font-size-adjust 属性.
值描述:
- number:定义字体的 aspect 值比率。 可使用的公式: 首选字体的字体尺寸 * (font-size-adjust 值 / 可用字体的 aspect 值)=可应用到可用字体的字体尺寸 举例: 如果 14px 的 Verdana(aspect 值是 0.58)不可用,但是某个可用的字体的 aspect 值是 0.46,那么替代字体的尺寸将是 14 * (0.58/0.46) = 17.65px。
- none:默认。如果此字体不可用,则不保持此字体的 x-height。
- inherit:继承父元素的字体大小调整属性
9、CSS3背景——background-origin 原始起始位置
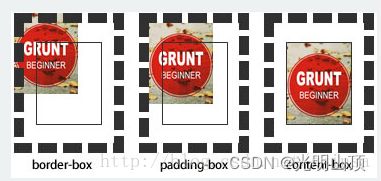
background-origin设置元素背景图片的原始起始位置。
background-origin:border-box |padding-box|content-box;
值描述
- border-box:表示背景图片是从边框开始显示
- padding-box:表示背景图片是从内边距(默认值)开始显示
- content-box:表示背景图片是从内容区域开始显示
效果图如下:

需要注意的是,background-origin属性只有在背景设置为no-repeat的情况下起作用,如果背景不是no-repeat,该属性无效,会从边框开始显示。
10、CSS3背景——background-clip 剪裁
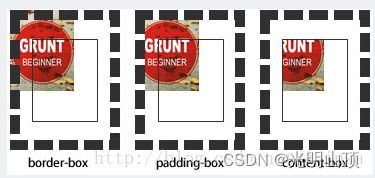
background-clip用来将背景图片做适当的剪裁以适应实际需要。
background-clip:border-box | padding-box | content-box |no-clip;
值描述
- border-box:表示从边框向外剪裁背景
- padding-box:表示从内边距向外剪裁背景
- content-box:表示从内容区域向外剪裁背景
- no-clip:表示不剪裁,和参数border-box显示同样的效果
剪裁效果如下:

11、CSS3背景——background-size 图片的大小
background-size设置背景图片的大小,以长度或百分比显示,还可以通过cover和contain来对图片进行伸缩。
background-size:auto|<长度值>|<百分比>|cover|contain
值描述
- auto:默认值,不改变背景图片的原始高度和宽度
- <长度值>:成对出现,设置了背景的宽高,如果就一个值,将其作为图片的宽度值来等比缩放
- <百分比>:成对出现,背景的宽高乘以设置的百分比得出的数即为当前宽高,如果就一个值,作为宽度值来等比缩放
- cover:覆盖,将图片等比缩放以填满整个容器
- contain:容纳,将图片等比缩放至某一边紧贴容器边缘为止
12、CSS3变形–旋转 rotate()
旋转rotate()函数通过指定的角度参数使元素相对原点进行旋转。角度值为正值,顺时针旋转角度值为负值,逆时针旋转
.wrapper {
    width: 200px;
    height: 200px;
    border:1px dotted red;
    margin:100px auto;
}
.wrapper div {
    width: 200px;
    height: 200px;
    background: orange;
    -webkit-transform:rotate(45deg);
    transform:rotate(45deg);
}
 <div class="wrapper">
        <div>旋转 rotate()</div>
 </div>
13、CSS3变形–缩放 scale()
scale()函数让元素根据中心原点对对象进行缩放。scale(X,Y)使元素水平方向和垂直方向同时缩放scaleX(x)scaleY(y)
.wrapper{
    width: 200px;
    height: 200px;
    border:1px dashed red;
    margin:100px auto;
}
.wrapper div{
    width: 200px;
    height: 200px;
    line-height:200px;
    background: orange;
    text-align:center;
    color:#fff;
}
.wrapper div:hover{
    opacity:.5;
    transform:scale(1.5);
    -webkit-transform:scale(1.5);
    -moz-transform:scale(1.5);
}
 <div class="wrapper">
        <div>我将放大1.5倍</div>
 </div>
14、CSS3多列布局——Columns
它主要应用在文本的多列布局方面,这种布局在报纸和杂志上都使用了几十年了,但要在Web页面上实现这样的效果还是有相当大的难度,庆幸的是,CSS3的多列布局可以轻松实现。接下来咱们一起学习多列布局相关的知识。
columns:<column-width> || <column-count>
值描述:
- column-width:主要用来定义多列中每列的宽度
- column-count:主要用来定义多列中的列数
举例:要显示2栏显示,每栏宽度为200px,代码为:
columns: 200px 2;
需要注意的是,目前所有主流浏览器其该属性都支持,只是仍需加浏览器私有前缀,如-moz,-webkit,-ms,-o等。
15、CSS3多列布局——column-width 列宽
column-width的使用和CSS中的width属性一样,不过不同的是,column-width属性在定义元素列宽的时候,既可以单独使用,也可以和多列属性中其他属性配合使用。其基本语法如下所示 ;
column-width: auto | <length>1
值描述
- auto:如果column-width设置值为auto或者没有显式的设置值时,元素多列的列宽将由其他属性来决定,比如前面的示例就是由列数column-count来决定。
- length:使用固定值来设置元素列的宽度,其主要是由数值和长度单位组成,不过其值只能是正值,不能为负值。
-webkit-column-width:200px;
 -moz-column-width:200px;
  -o-column-width:200px;
  -ms-column-width:200px;  column-width:200px;
16、CSS3多列布局——column-count 列数
column-count属性主要用来给元素指定想要的列数和允许的最大列数。其语法规则:
column-count:auto | <integer>1
值描述
- auto:此值为column-count的默认值,表示元素只有一列,其主要依靠浏览器计算自动设置。
- integer:此值为正整数值,主要用来定义元素的列数,取值为大于0的整数,负值无效。
-webkit-column-count:4;  -moz-column-count:4;
  -o-column-count:4;  -ms-column-count:4;  column-count:4;
17、CSS3 列间距——column-gap
column-gap主要用来设置列与列之间的间距,其语法规则如下:
column-gap: normal || <length>
值描述
- normal默认值,默值为1em(如果你的字号是px,其默认值为你的font-size值)。
- length:此值用来设置列与列之间的距离,其可以使用px,em单位的任何整数值,但不能是负值。
例如:将内容分三列显列,列与列之间的间距为2em,实现代码为:
column-count: 3;
column-gap: 2em;
18、CSS3 列边框——column-rule 类似border
column-rule主要是用来定义列与列之间的边框宽度、边框样式和边框颜色。简单点说,就有点类似于常用的border属性。但column-rule是不占用任何空间位置的,在列与列之间改变其宽度不会改变任何列的位置。
column-rule:<column-rule-width>|<column-rule-style>|<column-rule-color>1
值描述
- column-rule-width:类似于border-width属性,主要用来定义列边框的宽度,其默认值为“medium”,column-rule-width属性接受任意浮点数,但不接收负值。但也像border-width属性一样,可以使用关键词:medium、thick和thin。
- column-rule-style:类似于border-style属性,主要用来定义列边框样式,其默认值为“none”。column-rule-style属性值与border-style属值相同,包括none、hidden、dotted、dashed、solid、double、groove、ridge、inset、outset。
- column-rule-color:类似于border-color属性,主要用来定义列边框颜色,其默认值为前景色color的值,使用时相当于border-color。column-rule-color接受所有的颜色。如果不希望显示颜色,也可以将其设置为transparent(透明色)
column-rule: 2px dotted green;
19、CSS3 跨列设置——column-span
column-span主要用来定义一个分列元素中的子元素能跨列多少。column-width、column-count等属性能让一元素分成多列,不管里面元素如何排放顺序,他们都是从左向右的放置内容,但有时我们需要基中一段内容或一个标题不进行分列,也就是横跨所有列,此时column-span就可以轻松实现,此属性的语法如下。
column-span: none | all
值描述
- none:此值为column-span的默认值,表示不跨越任何列。
- all:这个值跟none值刚好相反,表示的是元素跨越所有列,并定位在列的Z轴之上。
例如:将第一个标题跨越所有列,代码:
column-span:all;
20、CSS3 盒子模型——box-sizing
在CSS3中新增加了box-sizing属性,能够事先定义盒模型的尺寸解析方式,其语法规则如下:
box-sizing: content-box | border-box | inherit
- content-box:默认值,其让元素维持W3C的标准盒模型,也就是说元素的宽度和高度(width/height)等于元素边框宽度(border)加上元素内距(padding)加上元素内容宽度或高度(content width/ height),也就是element width/height = border + padding + content width / height
- border-box:重新定义CSS2.1中盒模型组成的模式,让元素维持IE传统的盒模型(IE6以下版本和IE6-7怪异模式),也就是说元素的宽度或高度等于元素内容的宽度或高度。根据传统IE盒模型可知,这里的内容宽度或高度包含了元素的border、padding、内容的宽度或高度(此处的内容宽度或高度=盒子的宽度或高度—边框—内距)
- inherit:使元素继承父元素的盒模型模式
21、CSS3 伸缩布局(弹性盒布局)——Flexbox
Flex 布局教程:语法篇
22、CSS3 动画——animation
23、CSS3 元素框——box-decoration-break
box-decoration-break 属性规定当元素框被分段时,如何应用元素的 background、padding、border、border-image、box-shadow、margin 以及 clip-path。
box-decoration-break: slice|clone|initial|inherit|unset;
属性值:
- slice:默认。框装饰作为整体应用于元素,并在元素片段的边缘断裂。
- clone:框装饰适用于元素的每个片段,就像片段是单个元素一样。边框包裹元素的每个片段的四个边缘,并且完整地重绘每个片段的背景。
- initial:将此属性设置为其默认值。参阅 initial。
- inherit:从其父元素继承此属性。参阅 inherit。
24、CSS3——object-fit
object-fit 属性指定元素的内容应该如何去适应指定容器的高度与宽度。
object-fit 一般用于 img 和 video 标签,一般可以对这些元素进行保留原始比例的剪切、缩放或者直接进行拉伸等。
您可以通过使用 object-position 属性来切换被替换元素的内容对象在元素框内的对齐方式。
img.a {
  width: 200px;  height: 400px;  object-fit: cover;
}
属性值
- fill:默认,不保证保持原有的比例,内容拉伸填充整个内容容器。
- contain:保持原有尺寸比例。内容被缩放。
- cover:保持原有尺寸比例。但部分内容可能被剪切。
- none:保留原有元素内容的长度和宽度,也就是说内容不会被重置。
- scale-down:保持原有尺寸比例。内容的尺寸与 none 或 contain 中的一个相同,取决于它们两个之间谁得到的对象尺寸会更小一些。
- initial:设置为默认值,关于 initial
- inherit:从该元素的父元素继承属性。关于 inherit
25、CSS3——object-position
根据容器大小重置图片的大小,并设置图片的位置:
img.a {
  width: 200px;  height: 400px;  object-fit: none;  object-position: 5px 10%;  border: 5px solid red;
}
object-position 属性一般与 object-fit一起使用,用来设置元素的位置。
object-position 一般用于 img 和 video 标签。
- position:指定 image 或 video 在容器中的位置。第一个值为 x 坐标位置的值,第二个值为 y 坐标位置的值。表示的方式有:
	object-position: 50% 50%;
	object-position: right top;
	object-position: left bottom;
	object-position: 250px 125px;
- initial:设置为默认值,关于 initial
- inherit:从该元素的父元素继承属性。关于 inherit
26、CSS3—— perspective
设置元素被查看位置的视图:
div {
    perspective: 500;    -webkit-perspective: 500; /* Safari 和 Chrome */
}
perspective 属性定义 3D 元素距视图的距离,以像素计。该属性允许您改变 3D 元素查看 3D 元素的视图。
当为元素定义 perspective 属性时,其子元素会获得透视效果,而不是元素本身。
注释:perspective 属性只影响 3D 转换元素。
提示:请与 perspective-origin 属性一同使用该属性,这样您就能够改变 3D 元素的底部位置。
perspective: number|none;
27、css3——perspective-origin
设置一个3D元素的基数位置:
div {
    perspective:150;    perspective-origin: 10% 10%;
    -webkit-perspective:150; /* Safari and Chrome */
    -webkit-perspective-origin: 10% 10%; /* Safari and Chrome */
 }
perspective-origin 属性定义 3D 元素所基于的 X 轴和 Y 轴。该属性允许您改变 3D 元素的底部位置。
定义时的perspective -Origin属性,它是一个元素的子元素,透视图,而不是元素本身。
语法:
perspective-origin: x-axis y-axis;
- x-axis:定义该视图在 x 轴上的位置。默认值:50%。可能的值:left、center、right、length、%
- y-axis:定义该视图在 y 轴上的位置。默认值:50%。可能的值:top、center、bottom、length、%
28、CSS3指针—— pointer-events
pointer-events:字面理解是点击鼠标事件,值分别是auto和none。
当使用pointer-events:none,表示它将捕获不到任何点击,而只是让事件穿透到它的下面
pointer-events: auto|none;
属性值:
- auto:默认值。元素对指针事件做出反应,比如 :hover 和 click。
- none:元素不对指针事件做出反应。
29、CSS3—— resize 重置
规定可以由用户调整 div 元素的大小:
div {
    resize:both;    overflow:auto;
}
resize 属性规定是否可由用户调整元素的尺寸。
注释:如果希望此属性生效,需要设置元素的 overflow 属性,值可以是 auto、hidden 或 scroll。
- none:用户无法调整元素的尺寸。
- both:用户可调整元素的高度和宽度。
- horizontal:用户可调整元素的宽度。
- vertical:用户可调整元素的高度。