深度学习应用开发-TensorFlow实践 mooc 笔记
深度学习应用开发-TensorFlow实践 mooc 笔记
- 第四课 tensorflow的基础概念, 运算 和 可视化初步
-
- tensorflow 2.x :
-
- 基础概念:
-
-
-
- 1. tensor 张量
- 2. flow
- 3. tensorflow
- 5.常量 .constant()
- 6.变量 .Variable()
- 7. 改为v1的静态图模式
-
-
- 代码
-
-
-
- session 会话
-
-
第四课 tensorflow的基础概念, 运算 和 可视化初步
tensorflow 2.x :
动态图 (建议采用Keras高层接口,封装程度更高)
基础概念:
1. tensor 张量
张量 维度: 描述的术语 阶, 形状, 维度
分为: 常量, 向量, 矩阵, 多维矩阵
没有保存数,只是保存了计算过程
直接输出, 包含很多信息, 包括 id(标识号), 大小, 值类型, 值
以上信息如何获取详见代码
单个元素的获取 同上
类型 严格 如果不是相同类型会保错
2. flow
流 :过程
3. tensorflow
是计算图表示的 编程系统
图上的每一个节点 是 一个计算
节点的边 表示 计算关系
5.常量 .constant()
tf.constant(
value, #必填 其余可选, 具体使用代码一开始就实现了, 不再赘述
dtype=None,
shape=None,
name=‘Const’
)
6.变量 .Variable()
注意第一个字母大写
tf.Variable (
initial_value,
dtype=None,
shape=None,
trainable =True # 表征是否需要自动优化
name=’Variable’
)
定义后一般无需人工赋值, 一般会自动调整数值
特殊情况需要人工赋值 .assign()
7. 改为v1的静态图模式
1)构建阶段:建立一个 “计算图”,通过图来定义数据与操作的执行;
2)执行阶段:建立一个会话session,用该对话来实现执行。
v1 node 输出的是结构,而无具体的值
import tensorflow.compat.v1 as tf 代替import tensorflow as tf;
tf.disable_eager_execution() 禁用TensorFlow 2默认的即时执行
此时没有数值
要使用session 管理资源
try … except … finally…
Python的上下文管理器来管理这个会话
with tf.Session() as sess
print(sess.run(tensor))
指定默认会话
sess = tf.Session()
with sess.as_defaults:
print(sess.run(tensor))

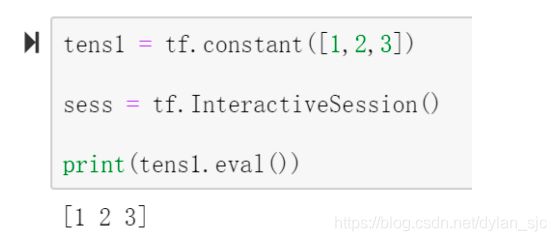
交互式环境 默认会话

变量的初始化
变量的
单个 node1_init = node1.initializer
代码
#v2
import tensorflow as tf
print(tf.__version__)
#注意分块 运行
node1 = tf.constant([[3.0,1.5],[2.5,6.0]],tf.float32)
node2 = tf.constant([[4.0,1.0],[5.0,2.5]],tf.float32)
node3 = tf.add(node1, node2)
node3 #输出tensor,包含很多信息, 包括 id(标识号), 大小, 值类型, 值,单独获取方式往下看

node1 #tensor,同上

print(node3.numpy()) # 使用numpy()方法(函数),可以得到值(多个信息中的一个信息)
print(node3.shape)
print(node3.get_shape())
print(node3.dtype)
print(node3[1,1])

a = tf.constant([1,2])
b = tf.constant([2.0,3.0])
#通过删除和添加#来实验
#c = tf.add(a,b)
a = tf.cast(a,tf.float32)
c = tf.add(a,b)
c

reshape = tf.constant([1,2,3,4,5,6],shape[2,3])

v1 = tf.Variable([1,2])
v2 = tf.Variable([1,2],tf.float32)
v1,v2 #注意输出的类型是int32

c = tf.constant(1)
v = tf.Variable(c) #张量赋值为变量
v

v.assign(2)
assign_sub
assign_add

import tensorflow.compat.v1 as tf
tf.disable_eager_execution()

node1 = tf.constant([[3.0,1.5],[2.5,6.0]],tf.float32)
node2 = tf.constant([[4.0,1.0],[5.0,2.5]],tf.float32)
node3 = tf.add(node1, node2)
node3

sess = tf.Session()
print(sees.run(node1))
sess.close()
tensorflow 1.x : 静态图 tensorflow