海思开发:yolo v5的 focus层 移植到海思上的方法
一、前言
经网友提醒,yolo v2的 passthrough 层与 v5 的 focus 层很像,因为海思是支持 passthrough 层的,鉴于此,花了点时间了解了一下,提出一些浅见,抛砖引玉。另附:yolo v5 海思开发
二、区别
上文我说的是,二者很像,说明它们还是有区别的,现在说说区别。
1. passthrough 层
出于严谨,结合海思文档图片与 passthrough 源码来一起理解,先看看 passthrough 源码:
// 它的源码是 c++ 的,不是 python 格式
int reorg_cpu(THFloatTensor *x_tensor, int w, int h, int c, int batch, int stride, int forward, THFloatTensor *out_tensor)
 3 {
 4     // Grab the tensor
 5     float * x = THFloatTensor_data(x_tensor);
 6     float * out = THFloatTensor_data(out_tensor);
 7
 8     // https://github.com/pjreddie/darknet/blob/master/src/blas.c
 9     int b,i,j,k;
10     int out_c = c/(stride*stride);
11
12     for(b = 0; b < batch; ++b){  //batch_size
13
14         for(k = 0; k < c; ++k){  //channel
15
16             for(j = 0; j < h; ++j){  //height
17
18                 for(i = 0; i < w; ++i){  //width,可以看见passthrough 是行优先 !
19
20                     int in_index  = i + w*(j + h*(k + c*b));
21                     int c2 = k % out_c;
22                     int offset = k / out_c;
23                     int w2 = i*stride + offset % stride;
24                     int h2 = j*stride + offset / stride;
25                     int out_index = w2 + w*stride*(h2 + h*stride*(c2 + out_c*b));
26                     if(forward) out[out_index] = x[in_index]; // 压缩channel
27                     else out[in_index] = x[out_index];        // 扩展channel
28                 }
29             }
30         }
31     }
32
33     return 1;
34 }
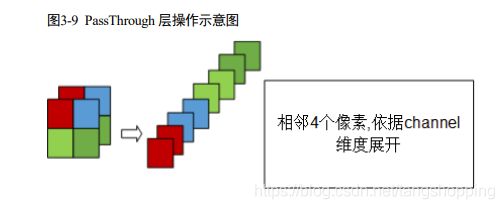
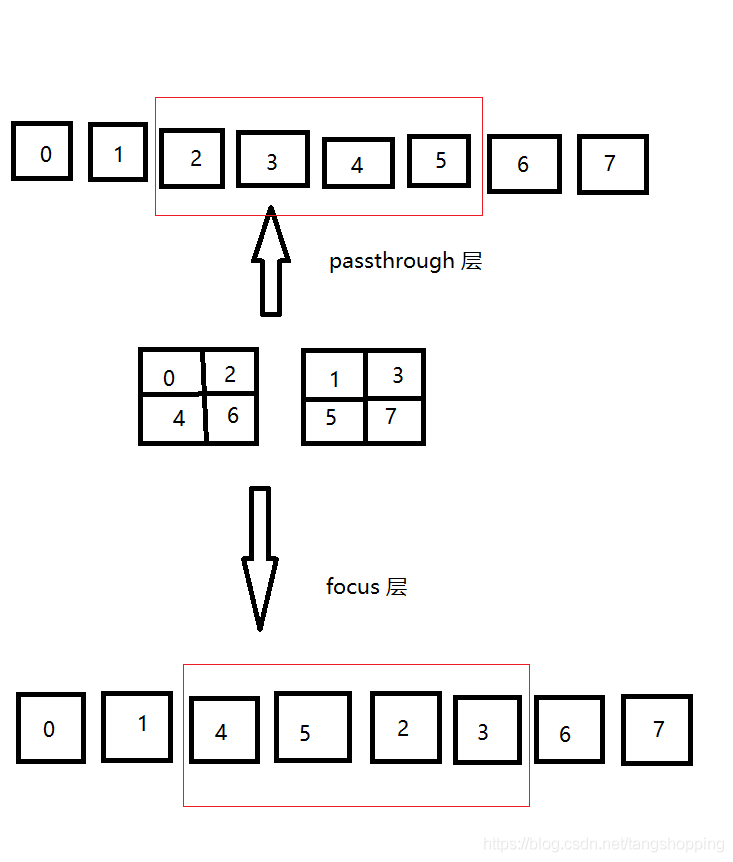
再结合海思的文档的图示来看,更加清晰,上图可以看见数据重新排布的顺序是 红色 -> 天蓝色 -> 淡绿(左下) -> 深绿(右下),即行优先。再结合上文第18行代码可得出,passthrough 层确实是行优先,这个先记住。
2. focus 层
focus层没有上面的图示,只有代码,我们根据源码举个例子加强理解一下。
# 源码镇楼
class Focus(nn.Module):
    # Focus wh information into c-space
    def __init__(self, c1, c2, k=1, s=1, p=None, g=1, act=True):  # ch_in, ch_out, kernel, stride, padding, groups
        super(Focus, self).__init__()
        self.conv = Conv(c1 * 4, c2, k, s, p, g, act)

    def forward(self, x):  # x(b,c,h,w) -> y(b,4c,h/2,w/2)
        return self.conv(torch.cat([x[..., ::2, ::2], x[..., 1::2, ::2], x[..., ::2, 1::2], x[..., 1::2, 1::2]], 1))
下面举例:
a = np.array(range(8)).reshape(1, 2, 2, 2)
print(a.shape)
print(a)

d = np.concatenate([a[..., ::2, ::2], a[..., 1::2, ::2], a[..., ::2, 1::2], a[..., 1::2, 1::2]], 1)
print(d.shape)
print(d)

# 结果为

a.shape = (1, 2, 2, 2)

a =  [[[[0 1]
	   [2 3]]

	  [[4 5]
	   [6 7]]]]
------------------------
d.shape = (1, 8, 1, 1)

d =	[[[[0]]  # 0 、4 是每个通道左上角位置处的元素值

	  [[4]]
	----------
	  [[2]]  # 2 、6 是每个通道左下角位置处的元素值

	  [[6]]  # 这说明 focus 层是列优先
	----------
	  [[1]]

	  [[5]]
	----------
	  [[3]]

	  [[7]]]]
从上面打印结果可看出,focus 层是列优先。
3. 总结
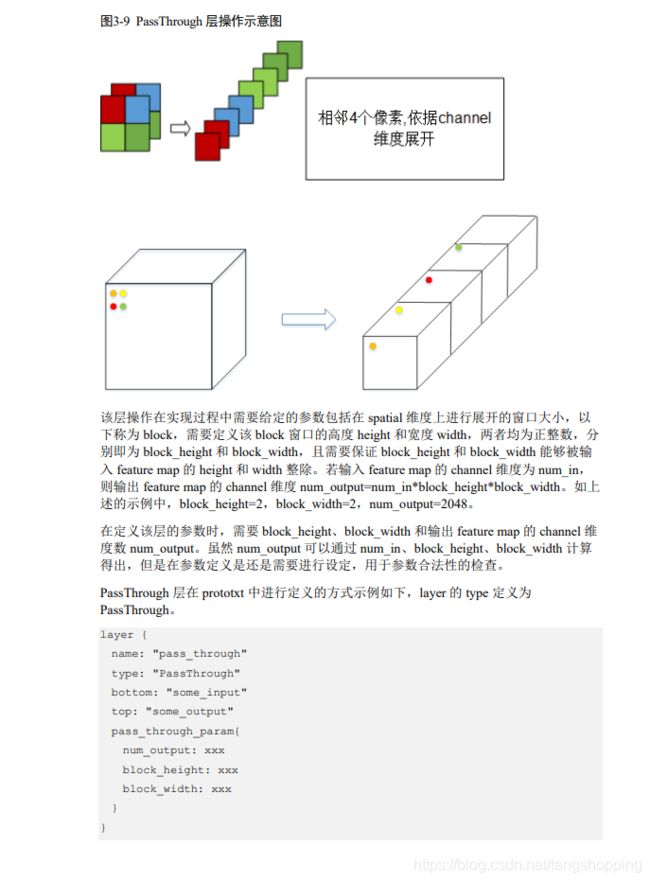
感觉没图还是不够直观,特意画了几张图,这下应该能说清楚了。

一图胜前言,这样就很明确了。现在问题是,如果还是要植入到海思部署,我们该怎么操作?
三、植入
谈谈我的三个思路,愚见勿喷。
1. 改 python 源码,然后再训练
这种方法可能会觉得很麻烦,但是yolo v5里还有其他 op 也要做调整,一起改完算数,免得转换后精度下降较多。
# 将上面官方源码改为下面样子,再训练
def forward(self, x):  # x(b,c,w,h) -> y(b,4c,w/2,h/2)
        return self.conv(torch.cat([x[..., ::2, ::2], x[..., ::2, 1::2], x[..., 1::2, ::2],  x[..., 1::2, 1::2]], 1))
2. caffe 模型加 permute op
permute 即 numpy 里的转置,这个思路是什么意思呢,我解释下:
pytorch : input_data -> focus(列优先) -> 卷积
caffe : input_data -> passthrough(行优先) -> 卷积
caffe_add_permute : input_data -> permute(0, 1, 3, 2) -> passthrough(行优先) -> 卷积
因为转换模型时,如果后面那个卷积层权值不做变动,那 pytorch 模型与 caffe 模型的输出肯定不一样。我上图也讲述过,它们数据排布不一样,而权值排布不变,导致输出肯定不一样!就此,如果我们在数据输入时,加个 permute 操作,将行、列的数据对换一下,这样就可以对应的上了。我做了个实验,结果如下:
a = np.array(range(8)).reshape(1, 2, 2, 2)
print(a.shape)
print(a)
# focus 代码,列优先                         ↓↓↓↓↓
d = np.concatenate([a[..., ::2, ::2], a[..., 1::2, ::2], a[..., ::2, 1::2], a[..., 1::2, 1::2]], 1)
print(d)

a1 = a.transpose(0, 1, 3, 2)  # 做转置,caffe 里是 permute(0, 1, 3, 2)
# 注意,此处代码有变动,它不是 focus 代码,它是行优先   ↓↓↓↓↓
d1 = np.concatenate([a1[..., ::2, ::2], a1[..., ::2, 1::2], a1[..., 1::2, ::2], a1[..., 1::2, 1::2]], 1)
print(d1)

# 输出结果如下:

# 输入数据 shape
(1, 2, 2, 2)
# 输入数据打印结果
[[[[0 1]
   [2 3]]

  [[4 5]
   [6 7]]]]
------------
# 模拟 focus 层输出结果
[[[[0]]

  [[4]]

  [[2]]

  [[6]]

  [[1]]

  [[5]]

  [[3]]

  [[7]]]]
--------------
# 先转置,再行优先采样,输出结果
[[[[0]]

  [[4]]

  [[2]]

  [[6]]

  [[1]]

  [[5]]

  [[3]]

  [[7]]]]
可以发现,二者输出是一致的。但是还有个问题,海思中的 permute 操作受限很大,这个我在这里说过。总之第二点思路在海思中没法实现,当然大神另说。
3. caffe 模型的权值做变化
第二点是对 x 做变换,由于一些 op 受限,使得想法没能实现。能否对 w 进行变换?因为转换模型是在 pc 端进行的,而模型的转换对于模型参数来说,几乎就是简单的复制粘贴,板端它的 shape 是不变的,既然它是在 pc 端做的变换,限制可以说基本没有,所以实现可能性大大增加。
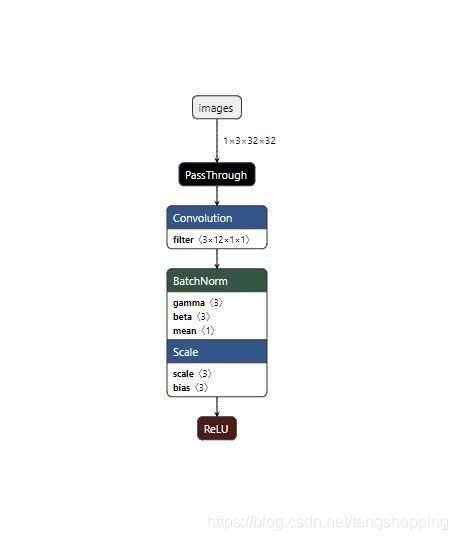
先看看 focus 输出及其后面的 op 参数 shape,考虑到yolo v5不方便打印中间层参数,自建了个网络,结构如下 :
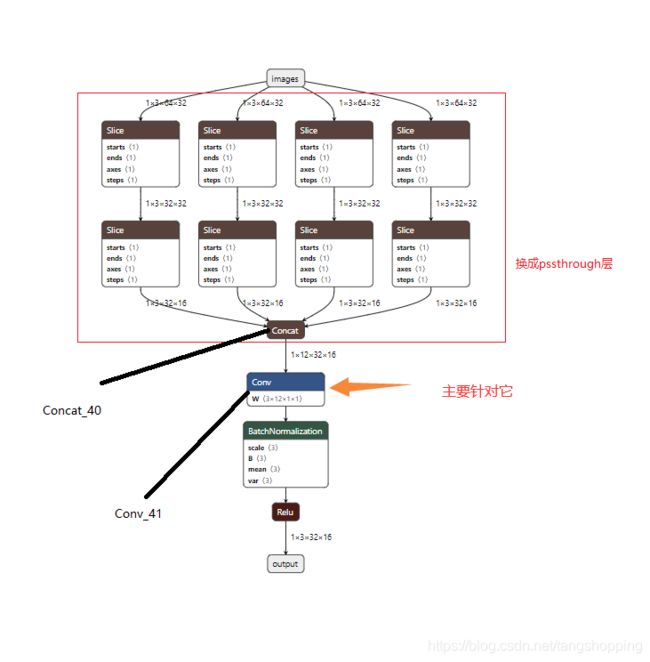
以上是pytorch模型,要把红框里的结构干掉,换成 passthrough 层,此外图中的卷积层也要做变换,我们一件件来说。提供一下海思的相关文档截屏,我就是参考这个实现的,加强大伙的理解:
打开我发的 onnx2caffe demo下的 convertCaffe.py 文件,输入简化后的onnx模型,开始做转换,报错如下:
# 这个bug卡了我一下午
(op_type:Slice, name:Slice_4): Inferred shape and existing shape differ in dimension 2: (32) vs (16)
由于onnx的切片操作时是先对 height 方向做切片,再对 width 方向做切片,所以会导致中间的 feature shape 宽高不一致,搞不懂这为什么也能报错,后来误打误撞注释其中一行代码就好了:
#  该函数在 convertCaffe.py 下
def getGraph(onnx_path):
    model = onnx.load(onnx_path)
    #model = shape_inference.infer_shapes(model)  # 注释它,不然会报上面的错
    model_graph = model.graph
    graph = Graph.from_onnx(model_graph)
    graph = graph.transformed(transformers)
    graph.channel_dims = {}

    return graph
看过我之前博客的朋友,会知道下面操作是正规流程了。打开 onnx2caffe 目录下的 _operators.py 文件,添加内容如下:
# onnx2caffe\_operators.py 最下面
_ONNX_NODE_REGISTRY = {
    "Conv": _convert_conv,
    "Relu": _convert_relu,
    "PRelu": _convert_prelu,
    "BatchNormalization": _convert_BatchNorm,
    "Add": _convert_Add,
    "Mul": _convert_Mul,
    "Reshape": _convert_Reshape,
    "MaxPool": _convert_pool,
    "AveragePool": _convert_pool,
    "Dropout": _convert_dropout,
    "Gemm": _convert_gemm,
    "MatMul": _convert_matmul,
    "Upsample": _convert_upsample,
    "Concat": _convert_concat,
    "ConvTranspose": _convert_conv_transpose,
    "Sigmoid": _convert_sigmoid,
    "Flatten": _convert_Flatten,
    "Transpose": _convert_Permute,
    "Softmax": _convert_Softmax,
    "PassThrough": _convert_PassThrough  # 在最后一行加上我们需要的 passthrough 层键值
}
之后再在 op 字典上面选个看顺眼的位置,加上下面的代码:
# onnx2caffe\_operators.py 中
def _convert_PassThrough(node_name, input_name, output_name, input_channel, block_height, block_width):

    layer = myf('PassThrough', node_name, [input_name], [output_name],
                pass_through_param=dict(
                    num_output=input_channel * block_height * block_width,
                    block_height=block_height,
                    block_width=block_width,
    ))

    return layer
之后打开 onnx2caffe 目录下的 _weightloader.py 文件,添加内容如下:
# onnx2caffe\_weightloader.py 最下面
_ONNX_NODE_REGISTRY = {
    "Conv": _convert_conv,
    "Relu": _convert_relu,
    "PRelu": _convert_prelu,
    "BatchNormalization": _convert_BatchNorm,
    "Add": _convert_Add,
    "Mul": _convert_Mul,
    "Reshape": _convert_Reshape,
    "MaxPool": _convert_pool,
    "AveragePool": _convert_pool,
    "Dropout": _convert_dropout,
    "Gemm": _convert_gemm,
    "MatMul": _convert_matmul,
    "Upsample": _convert_upsample,
    "Concat": _convert_concat,
    "ConvTranspose": _convert_conv_transpose,
    "Sigmoid": _convert_sigmoid,
    "Flatten": _convert_Flatten,
    "Transpose": _convert_Permute,
    "Softmax": _convert_Softmax,
    "PassThrough": _convert_PassThrough  # 添加我们需要的 passthrough 层
}
之后再在 op 字典上面选个看顺眼的位置,加上下面的代码(友情提示:你没有看眼花,我也没有重复内容):
# onnx2caffe\_weightloader.py 中,因为这个 op 没有权值,所以不需要复制权值,写个 pass 就好
def _convert_PassThrough(node, graph, err):
    pass
注: _operators.py 是生成 prototxt 文件用的,而 _weightloader.py 是生成 caffemodel 文件用的,故二者很相似。
这就可以了吗?还没有,挖个坑,下面会说。回到 convertCaffe.py 文件,修改下面这个函数,建议开两个网页,对着我的网络图来加强理解:
# convertCaffe.py 文件下
def convertToCaffe(graph, prototxt_save_path, caffe_model_save_path):
    exist_edges = []
    layers = []
    exist_nodes = []
    err = ErrorHandling()
    for i in graph.inputs:  # input 就是可视化中,第一个灰色东西,显示输入名 和 输入 shape,不是 op.
        edge_name = i[0]  # 一般是 images, data, input 这种名字

        input_layer = cvt.make_input(i)  # 生成 prototxt 风格的input

        layers.append(input_layer)
        exist_edges.append(i[0])
        graph.channel_dims[edge_name] = graph.shape_dict[edge_name][1]  # shape_dict[edge_name] 如 (1, 3, 112, 112) 这种

    for id, node in enumerate(graph.nodes):

        node_name = node.name  # node name 参数,就是节点在当前模型中的名字

        op_type = node.op_type  # op 类型,卷积, relu 这种

        if op_type == "Slice":  # 因为 focus 是切片 + 卷积,而切片我们是不需要的,所以要忽略掉
            continue
        # 这个节点就是切片后面那个 concat op, 我们要在这替换成我们的 passthrough 层
        if node_name == "Concat_40":  # 这样 passthrough 层就完美融入了网络
            converter_fn = cvt._ONNX_NODE_REGISTRY["PassThrough"]
            output_name = str(node.outputs[0])  # 这个就是下面卷积的输入
            layer = converter_fn("focus", "images", output_name, 3, 2, 2)
            if type(layer) == tuple:
                for l in layer:  # 一般是 bn 层, caffe 中的 bn 是分为两部分, BN 和 Scale 层
                    #  print("layer.name = ", l.layer_name)
                    layers.append(l)
            else:
                layers.append(layer)
            outs = node.outputs  # 节点输出名
            for out in outs:
                exist_edges.append(out)
            continue

        inputs = node.inputs  # 列表,由可视化中 input 一栏中 name 字段组成,顺序同可视化界面一致。如果某个键有参数数组,则也会在 input_tensors 存在

        inputs_tensor = node.input_tensors  # 字典,可视化界面中,如果有参数数组就是这里面的值,键也在input 中, 有多少参数数组就有多少键值

        input_non_exist_flag = False

        for inp in inputs:  # input 组成元素有两种,一是上层节点 name,二是本层参数 name
            if inp not in exist_edges and inp not in inputs_tensor:  # 筛除,正常节点判断条件是不会成立的
                input_non_exist_flag = True
                break
        if input_non_exist_flag:
            continue

        if op_type not in cvt._ONNX_NODE_REGISTRY:  # 如果没在 op 字典中,报错
            err.unsupported_op(node)
            continue
        converter_fn = cvt._ONNX_NODE_REGISTRY[op_type]  # 相应转换函数
        layer = converter_fn(node, graph, err)
        if type(layer) == tuple:
            for l in layer:  # 一般是 bn 层, caffe 中的 bn 是分为两部分, BN 和 Scale 层
                #  print("layer.name = ", l.layer_name)
                layers.append(l)
        else:
            layers.append(layer)
        outs = node.outputs  # 节点输出名
        for out in outs:
            exist_edges.append(out)  # 储存输出节点,方便下面使用

    net = caffe_pb2.NetParameter()  # caffe 模型结构
    for id, layer in enumerate(layers):

        layers[id] = layer._to_proto()  # 转为 proto 风格?
        print(layers[id])
    net.layer.extend(layers)  # 将层名加入网络模型

    with open(prototxt_save_path, 'w') as f:  # 形成 prototxt 文件
        print(net, file=f)
    # ------ 到此 prototxt 文件转换结束 ------
    # ------ 下面转换 caffemodel 文件 ------
    caffe.set_mode_cpu()
    deploy = prototxt_save_path
    net = caffe.Net(deploy,
                    caffe.TEST)

    for id, node in enumerate(graph.nodes):
        node_name = node.name
        op_type = node.op_type
        inputs = node.inputs
        inputs_tensor = node.input_tensors
        input_non_exist_flag = False

        if op_type == "Slice":  # 复制权值时也要跳过 slice 层
            continue
        if op_type not in wlr._ONNX_NODE_REGISTRY:
            err.unsupported_op(node)
            continue
        converter_fn = wlr._ONNX_NODE_REGISTRY[op_type]
        if node_name == "Conv_41":  # 这里是 切片 后紧接的那个 卷积,它要做些变化,下面讲
            converter_fn(net, node, graph, err, pass_through=1)  # pass_through=1 做定制化操作
        else:
            converter_fn(net, node, graph, err)  # 复制模型参数

    net.save(caffe_model_save_path)  # 保存模型
    return net
这里讲下为什么切片后的第一个卷积要稍微变换一下。请出我这个图:
由于做切片操作时,passthrough 与 focus 层的方式不同,前者是行优先,后者是列优先,这就使得二者输出的 feature map 虽然 shape 一样,但是里面的数据排布有些不同,我用红框做了提示,上面也说过,对 feature map 在海思里没法实现,只能对权值做变换,具体就是调换一下权值的参数顺序,看我代码吧,有些抽象:
# onnx2caffe\_weightloader.py 中,找到这个函数(这个函数已经存在了,它是卷积的转换函数),做些修改
def _convert_conv(net, node, graph, err, pass_through=0):
    weight_name = node.inputs[1]
    input_name = str(node.inputs[0])
    output_name = str(node.outputs[0])
    node_name = node.name
    W = None
    if weight_name in node.input_tensors:
        W = node.input_tensors[weight_name]
    else:
        err.missing_initializer(node,
                                "Weight tensor: {} not found in the graph initializer".format(weight_name, ))
    bias_flag = False
    bias = None
    if len(node.inputs) > 2:
        bias = node.input_tensors[node.inputs[2]]
        bias_flag = True
    # net.params[node_name][0].data = W
    # if bias_flag:
    #     net.params[node_name][1].data = bias
    if pass_through:  # 如果涉及到 passthrough
        pass_through_group = W.shape[1] // 4  # 分成四组,这是 passthrough 的性质, e.g W.shape = (3, 12, 1, 1)
        w1 = W[:, 0: pass_through_group, :, :]  # shape = (3, 3, 1, 1)
        w2 = W[:, pass_through_group: pass_through_group * 2, :, :]  # shape = (3, 3, 1, 1)
        w3 = W[:, pass_through_group * 2:pass_through_group * 3, :, :]  # shape = (3, 3, 1, 1)
        w4 = W[:, pass_through_group * 3:pass_through_group * 4, :, :]  # shape = (3, 3, 1, 1)
        W = np.concatenate((w1, w3, w2, w4), 1)  # 调换一下 w2、w3 的位置
        np.copyto(net.params[node_name][0].data, W, casting='same_kind')
    else:
        np.copyto(net.params[node_name][0].data, W, casting='same_kind')
    if bias_flag:  # b 不用做修改,因为是卷积核内部的通道变换,并不是卷积核之间的变化
        np.copyto(net.params[node_name][1].data, bias, casting='same_kind')
提醒一下,由于我水平有限,是直接加个条件执行,例如 if node_name == "Conv_41"这种,并不是每个网络的相应节点名都叫Conv_41,你们根据实际情况来改,不需要时最好注释掉,免得莫名其妙的错误。
转换后的网络结构为:
可见 focus 中的 slice 已经被替换了。
四、 后话
转换成功后测试过 pytorch 模型与转换的caffe模型,除了精度导致的差异之外,其余一模一样!如果有朋友出现不一样的情况,请告知我,我完善一下,谢谢!仓促之下写成,如有遗漏勿怪,谢谢。