前言
在生产中已有实践,本组件仅做个人学习交流分享使用。github:https://github.com/axinSoochow/redis-caffeine-cache-starter
个人水平有限,欢迎大家在评论区轻喷。
所谓二级缓存
缓存就是将数据从读取较慢的介质上读取出来放到读取较快的介质上,如磁盘-->内存。
平时我们会将数据存储到磁盘上,如:数据库。如果每次都从数据库里去读取,会因为磁盘本身的IO影响读取速度,所以就有了像redis这种的内存缓存。可以将数据读取出来放到内存里,这样当需要获取数据时,就能够直接从内存中拿到数据返回,能够很大程度的提高速度。
但是一般redis是单独部署成集群,所以会有网络IO上的消耗,虽然与redis集群的链接已经有连接池这种工具,但是数据传输上也还是会有一定消耗。所以就有了进程内缓存,如:caffeine。当应用内缓存有符合条件的数据时,就可以直接使用,而不用通过网络到redis中去获取,这样就形成了两级缓存。应用内缓存叫做一级缓存,远程缓存(如redis)叫做二级缓存。
- 系统是否需要缓存CPU占用:如果你有某些应用需要消耗大量的cpu去计算获得结果。
- 数据库IO占用:如果你发现你的数据库连接池比较空闲,那么不应该用缓存。但是如果数据库连接池比较繁忙,甚至经常报出连接不够的报警,那么是时候应该考虑缓存了。
分布式二级缓存的优势
Redis用来存储热点数据,Redis中没有的数据则直接去数据库访问。
已经有Redis了,干嘛还需要了解Guava,Caffeine这些进程缓存呢:
- Redis如果不可用,这个时候我们只能访问数据库,很容易造成雪崩,但一般不会出现这种情况。
- 访问Redis会有一定的网络I/O以及序列化反序列化开销,虽然性能很高但是其终究没有本地方法快,可以将最热的数据存放在本地,以便进一步加快访问速度。这个思路并不是我们做互联网架构独有的,在计算机系统中使用L1,L2,L3多级缓存,用来减少对内存的直接访问,从而加快访问速度。
所以如果仅仅是使用Redis,能满足我们大部分需求,但是当需要追求更高的性能以及更高的可用性的时候,那就不得不了解多级缓存。
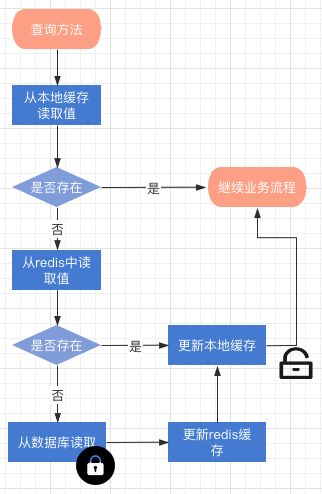
二级缓存操作过程数据读流程描述
redis 与本地缓存都查询不到值的时候,会触发更新过程,整个过程是加锁的缓存失效流程描述
redis更新与删除缓存key都会触发,清除redis缓存后
如何使用组件?
组件是基于Spring Cache框架上改造的,在项目中使用分布式缓存,仅仅需要在缓存注解上增加:cacheManager ="L2_CacheManager",或者 cacheManager = CacheRedisCaffeineAutoConfiguration.分布式二级缓存
//这个方法会使用分布式二级缓存来提供查询
@Cacheable(cacheNames = CacheNames.CACHE_12HOUR, cacheManager = "L2_CacheManager")
public Config getAllValidateConfig() {
}
如果你想既使用分布式缓存,又想用分布式二级缓存组件,那你需要向Spring注入一个 @Primary 的 CacheManager bean
@Primary
@Bean("deaultCacheManager")
public RedisCacheManager cacheManager(RedisConnectionFactory factory) {
    // 生成一个默认配置,通过config对象即可对缓存进行自定义配置
    RedisCacheConfiguration config = RedisCacheConfiguration.defaultCacheConfig();
    // 设置缓存的默认过期时间,也是使用Duration设置
    config = config.entryTtl(Duration.ofMinutes(2)).disableCachingNullValues();

    // 设置一个初始化的缓存空间set集合
    Set cacheNames =  new HashSet<>();
    cacheNames.add(CacheNames.CACHE_15MINS);
    cacheNames.add(CacheNames.CACHE_30MINS);

    // 对每个缓存空间应用不同的配置
    Map configMap = new HashMap<>();
    configMap.put(CacheNames.CACHE_15MINS, config.entryTtl(Duration.ofMinutes(15)));
    configMap.put(CacheNames.CACHE_30MINS, config.entryTtl(Duration.ofMinutes(30)));

    // 使用自定义的缓存配置初始化一个cacheManager
    RedisCacheManager cacheManager = RedisCacheManager.builder(factory)
        .initialCacheNames(cacheNames)  // 注意这两句的调用顺序,一定要先调用该方法设置初始化的缓存名,再初始化相关的配置
        .withInitialCacheConfigurations(configMap)
        .build();
    return cacheManager;
}
然后:
//这个方法会使用分布式二级缓存
@Cacheable(cacheNames = CacheNames.CACHE_12HOUR, cacheManager = "L2_CacheManager")
public Config getAllValidateConfig() {
}

//这个方法会使用分布式缓存
@Cacheable(cacheNames = CacheNames.CACHE_12HOUR)
public Config getAllValidateConfig2() {
}
核心实现方法
核心其实就是实现 org.springframework.cache.CacheManager接口与继承org.springframework.cache.support.AbstractValueAdaptingCache,在Spring缓存框架下实现缓存的读与写。
RedisCaffeineCacheManager实现CacheManager 接口
RedisCaffeineCacheManager.class 主要来管理缓存实例,根据不同的 CacheNames 生成对应的缓存管理bean,然后放入一个map中。
package com.axin.idea.rediscaffeinecachestarter.support;

import com.axin.idea.rediscaffeinecachestarter.CacheRedisCaffeineProperties;
import com.github.benmanes.caffeine.cache.Caffeine;
import com.github.benmanes.caffeine.cache.stats.CacheStats;
import lombok.extern.slf4j.Slf4j;
import org.slf4j.Logger;
import org.slf4j.LoggerFactory;
import org.springframework.cache.Cache;
import org.springframework.cache.CacheManager;
import org.springframework.data.redis.core.RedisTemplate;
import org.springframework.util.CollectionUtils;

import java.util.*;
import java.util.concurrent.ConcurrentHashMap;
import java.util.concurrent.ConcurrentMap;
import java.util.concurrent.TimeUnit;

@Slf4j
public class RedisCaffeineCacheManager implements CacheManager {

    private final Logger logger = LoggerFactory.getLogger(RedisCaffeineCacheManager.class);

    private static ConcurrentMap cacheMap = new ConcurrentHashMap();

    private CacheRedisCaffeineProperties cacheRedisCaffeineProperties;

    private RedisTemplate stringKeyRedisTemplate;

    private boolean dynamic = true;

    private Set cacheNames;
    {
        cacheNames = new HashSet<>();
        cacheNames.add(CacheNames.CACHE_15MINS);
        cacheNames.add(CacheNames.CACHE_30MINS);
        cacheNames.add(CacheNames.CACHE_60MINS);
        cacheNames.add(CacheNames.CACHE_180MINS);
        cacheNames.add(CacheNames.CACHE_12HOUR);
    }
    public RedisCaffeineCacheManager(CacheRedisCaffeineProperties cacheRedisCaffeineProperties,
                                     RedisTemplate stringKeyRedisTemplate) {
        super();
        this.cacheRedisCaffeineProperties = cacheRedisCaffeineProperties;
        this.stringKeyRedisTemplate = stringKeyRedisTemplate;
        this.dynamic = cacheRedisCaffeineProperties.isDynamic();
    }

    //——————————————————————— 进行缓存工具 ——————————————————————
    /**
    * 清除所有进程缓存
    */
    public void clearAllCache() {
        stringKeyRedisTemplate.convertAndSend(cacheRedisCaffeineProperties.getRedis().getTopic(), new CacheMessage(null, null));
    }

    /**
    * 返回所有进程缓存(二级缓存)的统计信息
    * result:{"缓存名称":统计信息}
    * @return
    */
    public static Map getCacheStats() {
        if (CollectionUtils.isEmpty(cacheMap)) {
            return null;
        }

        Map result = new LinkedHashMap<>();
        for (Cache cache : cacheMap.values()) {
            RedisCaffeineCache caffeineCache = (RedisCaffeineCache) cache;
            result.put(caffeineCache.getName(), caffeineCache.getCaffeineCache().stats());
        }
        return result;
    }

    //—————————————————————————— core —————————————————————————
    @Override
    public Cache getCache(String name) {
        Cache cache = cacheMap.get(name);
        if(cache != null) {
            return cache;
        }
        if(!dynamic && !cacheNames.contains(name)) {
            return null;
        }

        cache = new RedisCaffeineCache(name, stringKeyRedisTemplate, caffeineCache(name), cacheRedisCaffeineProperties);
        Cache oldCache = cacheMap.putIfAbsent(name, cache);
        logger.debug("create cache instance, the cache name is : {}", name);
        return oldCache == null ? cache : oldCache;
    }

    @Override
    public Collection getCacheNames() {
        return this.cacheNames;
    }

    public void clearLocal(String cacheName, Object key) {
        //cacheName为null 清除所有进程缓存
        if (cacheName == null) {
            log.info("清除所有本地缓存");
            cacheMap = new ConcurrentHashMap<>();
            return;
        }

        Cache cache = cacheMap.get(cacheName);
        if(cache == null) {
            return;
        }

        RedisCaffeineCache redisCaffeineCache = (RedisCaffeineCache) cache;
        redisCaffeineCache.clearLocal(key);
    }

    /**
    * 实例化本地一级缓存
    * @param name
    * @return
    */
    private com.github.benmanes.caffeine.cache.Cache caffeineCache(String name) {
        Caffeine cacheBuilder = Caffeine.newBuilder();
        CacheRedisCaffeineProperties.CacheDefault cacheConfig;
        switch (name) {
            case CacheNames.CACHE_15MINS:
                cacheConfig = cacheRedisCaffeineProperties.getCache15m();
                break;
            case CacheNames.CACHE_30MINS:
                cacheConfig = cacheRedisCaffeineProperties.getCache30m();
                break;
            case CacheNames.CACHE_60MINS:
                cacheConfig = cacheRedisCaffeineProperties.getCache60m();
                break;
            case CacheNames.CACHE_180MINS:
                cacheConfig = cacheRedisCaffeineProperties.getCache180m();
                break;
            case CacheNames.CACHE_12HOUR:
                cacheConfig = cacheRedisCaffeineProperties.getCache12h();
                break;
            default:
                cacheConfig = cacheRedisCaffeineProperties.getCacheDefault();
        }
        long expireAfterAccess = cacheConfig.getExpireAfterAccess();
        long expireAfterWrite = cacheConfig.getExpireAfterWrite();
        int initialCapacity = cacheConfig.getInitialCapacity();
        long maximumSize = cacheConfig.getMaximumSize();
        long refreshAfterWrite = cacheConfig.getRefreshAfterWrite();

        log.debug("本地缓存初始化:");
        if (expireAfterAccess > 0) {
            log.debug("设置本地缓存访问后过期时间,{}秒", expireAfterAccess);
            cacheBuilder.expireAfterAccess(expireAfterAccess, TimeUnit.SECONDS);
        }
        if (expireAfterWrite > 0) {
            log.debug("设置本地缓存写入后过期时间,{}秒", expireAfterWrite);
            cacheBuilder.expireAfterWrite(expireAfterWrite, TimeUnit.SECONDS);
        }
        if (initialCapacity > 0) {
            log.debug("设置缓存初始化大小{}", initialCapacity);
            cacheBuilder.initialCapacity(initialCapacity);
        }
        if (maximumSize > 0) {
            log.debug("设置本地缓存最大值{}", maximumSize);
            cacheBuilder.maximumSize(maximumSize);
        }
        if (refreshAfterWrite > 0) {
            cacheBuilder.refreshAfterWrite(refreshAfterWrite, TimeUnit.SECONDS);
        }
        cacheBuilder.recordStats();
        return cacheBuilder.build();
    }
}
RedisCaffeineCache 继承 AbstractValueAdaptingCache
核心是get方法与put方法。
package com.axin.idea.rediscaffeinecachestarter.support;
import com.axin.idea.rediscaffeinecachestarter.CacheRedisCaffeineProperties;
import com.github.benmanes.caffeine.cache.Cache;
import lombok.Getter;
import org.slf4j.Logger;
import org.slf4j.LoggerFactory;
import org.springframework.cache.support.AbstractValueAdaptingCache;
import org.springframework.data.redis.core.RedisTemplate;
import org.springframework.util.StringUtils;
import java.time.Duration;
import java.util.HashMap;
import java.util.Map;
import java.util.Set;
import java.util.concurrent.Callable;
import java.util.concurrent.ConcurrentHashMap;
import java.util.concurrent.TimeUnit;
import java.util.concurrent.locks.ReentrantLock;
public class RedisCaffeineCache extends AbstractValueAdaptingCache {
private final Logger logger = LoggerFactory.getLogger(RedisCaffeineCache.class);
private String name;
private RedisTemplate redisTemplate;
@Getter
private Cache caffeineCache;
private String cachePrefix;
/**
* 默认key超时时间 3600s
*/
private long defaultExpiration = 3600;
private Map defaultExpires = new HashMap<>();
{
defaultExpires.put(CacheNames.CACHE_15MINS, TimeUnit.MINUTES.toSeconds(15));
defaultExpires.put(CacheNames.CACHE_30MINS, TimeUnit.MINUTES.toSeconds(30));
defaultExpires.put(CacheNames.CACHE_60MINS, TimeUnit.MINUTES.toSeconds(60));
defaultExpires.put(CacheNames.CACHE_180MINS, TimeUnit.MINUTES.toSeconds(180));
defaultExpires.put(CacheNames.CACHE_12HOUR, TimeUnit.HOURS.toSeconds(12));
}
private String topic;
private Map keyLockMap = new ConcurrentHashMap();
protected RedisCaffeineCache(boolean allowNullValues) {
super(allowNullValues);
}
public RedisCaffeineCache(String name, RedisTemplate redisTemplate,
Cache caffeineCache, CacheRedisCaffeineProperties cacheRedisCaffeineProperties) {
super(cacheRedisCaffeineProperties.isCacheNullValues());
this.name = name;
this.redisTemplate = redisTemplate;
this.caffeineCache = caffeineCache;
this.cachePrefix = cacheRedisCaffeineProperties.getCachePrefix();
this.defaultExpiration = cacheRedisCaffeineProperties.getRedis().getDefaultExpiration();
this.topic = cacheRedisCaffeineProperties.getRedis().getTopic();
defaultExpires.putAll(cacheRedisCaffeineProperties.getRedis().getExpires());
}
@Override
public String getName() {
return this.name;
}
@Override
public Object getNativeCache() {
return this;
}
@Override
public T get(Object key, Callable valueLoader) {
Object value = lookup(key);
if (value != null) {
return (T) value;
}
//key在redis和缓存中均不存在
ReentrantLock lock = keyLockMap.get(key.toString());
if (lock == null) {
logger.debug("create lock for key : {}", key);
keyLockMap.putIfAbsent(key.toString(), new ReentrantLock());
lock = keyLockMap.get(key.toString());
}
try {
lock.lock();
value = lookup(key);
if (value != null) {
return (T) value;
}
//执行原方法获得value
value = valueLoader.call();
Object storeValue = toStoreValue(value);
put(key, storeValue);
return (T) value;
} catch (Exception e) {
throw new ValueRetrievalException(key, valueLoader, e.getCause());
} finally {
lock.unlock();
}
}
@Override
public void put(Object key, Object value) {
if (!super.isAllowNullValues() && value == null) {
this.evict(key);
return;
}
long expire = getExpire();
logger.debug("put:{},expire:{}", getKey(key), expire);
redisTemplate.opsForValue().set(getKey(key), toStoreValue(value), expire, TimeUnit.SECONDS);
//缓存变更时通知其他节点清理本地缓存
push(new CacheMessage(this.name, key));
//此处put没有意义,会收到自己发送的缓存key失效消息
// caffeineCache.put(key, value);
}
@Override
public ValueWrapper putIfAbsent(Object key, Object value) {
Object cacheKey = getKey(key);
// 使用setIfAbsent原子性操作
long expire = getExpire();
boolean setSuccess;
setSuccess = redisTemplate.opsForValue().setIfAbsent(getKey(key), toStoreValue(value), Duration.ofSeconds(expire));
Object hasValue;
//setNx结果
if (setSuccess) {
push(new CacheMessage(this.name, key));
hasValue = value;
}else {
hasValue = redisTemplate.opsForValue().get(cacheKey);
}
caffeineCache.put(key, toStoreValue(value));
return toValueWrapper(hasValue);
}
@Override
public void evict(Object key) {
// 先清除redis中缓存数据,然后清除caffeine中的缓存,避免短时间内如果先清除caffeine缓存后其他请求会再从redis里加载到caffeine中
redisTemplate.delete(getKey(key));
push(new CacheMessage(this.name, key));
caffeineCache.invalidate(key);
}
@Override
public void clear() {
// 先清除redis中缓存数据,然后清除caffeine中的缓存,避免短时间内如果先清除caffeine缓存后其他请求会再从redis里加载到caffeine中
Set
关于分布式本地缓存失效
现在的线上生产的都是多个节点,如果本节点的缓存失效了,是需要通过中间件来通知其他节点失效消息的。本组件考虑到学习分享让大家引入的依赖少点,就直接通过 redis 来发送消息了,实际生产过程中换成成熟的消息中间件(kafka、RocketMQ)来做通知更为稳妥。
到此这篇关于Redis+Caffeine实现分布式二级缓存组件实战教程的文章就介绍到这了,更多相关Redis Caffeine分布式二级缓存内容请搜索脚本之家以前的文章或继续浏览下面的相关文章希望大家以后多多支持脚本之家!

