MPLS实验
目录
一:实验要求
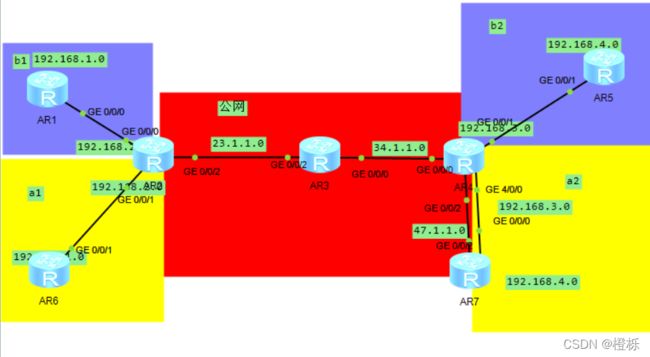
二:拓扑图
三:对公网配置IP和环回地址
三:对公网区域使用ospf连通
四: 使用MPLS搭建环境
五:使用连接a1,b1.a2.b2
R2:
R4:
六:在R2和R4上使用BGP建立MPLS的邻居
七:配置客户的IP与环回
八:对a1使用RIP,a2使用OSPF
九:双向重发布
十:静态和直连
结果:
一:实验要求
二:拓扑图
三:对公网配置IP和环回地址
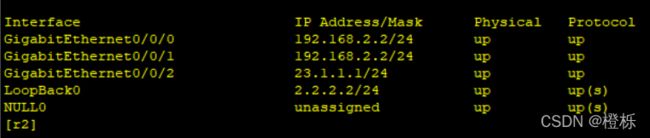
R2:
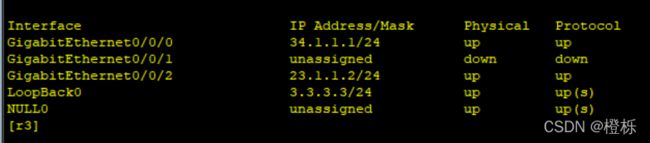
R3:
R4: 
三:对公网区域使用ospf连通
R4是需要宣告47.1.1.1这个路由,如果没有宣告的话,R2和R3是没有办法访问R7的,同时也要将连接R7的公网部分的接口改成沉默接口,应为虽然R4是宣告R7的,但是不应该向R7发hello包,也不需要建立邻居
R2:
ospf 1 router-id 2.2.2.2area 0network 2.2.2.2 0.0.0.0network 23.1.1.1 0.0.0.0R3:
ospf 1 router-id 3.3.3.3area 0network 3.3.3.3 0.0.0.0network 23.1.1.2 0.0.0.0network 34.1.1.1 0.0.0.0R4:
ospf 1 router-id 4.4.4.4area 0network 4.4.4.4 0.0.0.0network 34.1.1.2 0.0.0.0network 47.1.1.1 0.0.0.0qsilent-interface g0/0/2R7:
ip router-static 0.0.0.0 0 47.1.1.1四: 使用MPLS搭建环境
R2:
mpls lsr-id 2.2.2.2mpls mpls ldp int g0/0/2 mpls mpls ldpR3:
mpls lsr-id 3.3.3.3mpls mpls ldp int g0/0/2 mpls mpls ldp int g0/0/0 mpls mpls ldpR4:
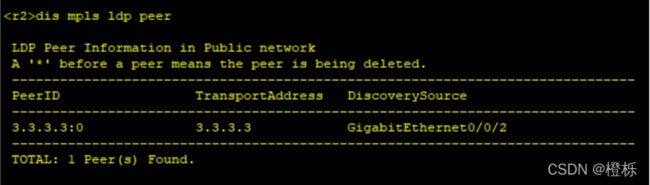
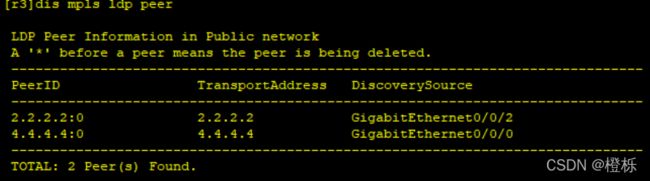
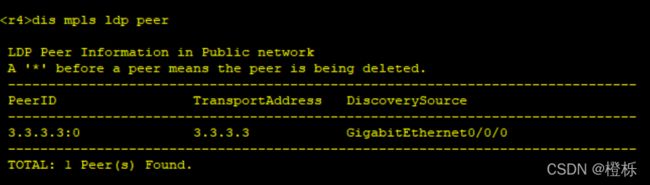
mpls lsr-id 4.4.4.4mpls mpls ldp int g0/0/0 mpls mpls ldp结果:
五:使用连接a1,b1.a2.b2
R2:
b1:
ip -instance b1 ipv4-family router-distinguisher 1:1 -target 1:1a1:
ip -instance a1 ipv4-family router-distinguisher 2:2 -target 2:2对R1和R6指定空间并且对接口配置IP,且在两个路由表中,a1和b1不冲突,所以两个路由连接r2路由的接口IP相同。
b1:
在R2上对b1进行操作int g0/0/0 ip binging -instance b1 ip add 192.168.2.2 24a1:
在r2上对a1进行配置int g0/0/1 ip binging -insteance a1 ip add 192.168.2.2 24R4:
b2:
ip -instance b2 ipv4-family routing-distinguishe 1:1 -target 1:1a2:
ip -instance a2 ipv4-family routing-distinguishe 2:2 -target 2:2对R5和R7指定空间并且对接口配置IP,且在两个路由表中,
b2:
int g0/0/1 ip binging -instance b2 ip add 192.168.3.1 24a2:
int g4/0/0 ip binging -instance a2 ip add 192.168.3.1 24六:在R2和R4上使用BGP建立MPLS的邻居
R2:
bgp 1router-id 2.2.2.2peer 4.4.4.4 as-number 1peer 4.4.4.4 connect-interfaace LoopBack0ipv4-family v4 peer 4.4.4.4 enableR4:
bgp 1router-id 4.4.4.4peer 2.2.2.2 as-number 1peer 2.2.2.2 connect-interfaace LoopBack0ipv4-family v4 peer 2.2.2.2 enable七:配置客户的IP与环回
R1:
R6:

R5: 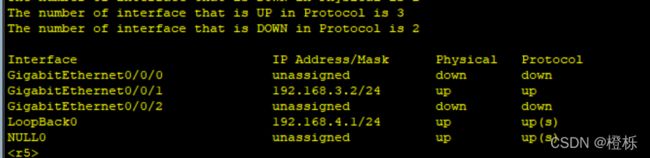
R7:
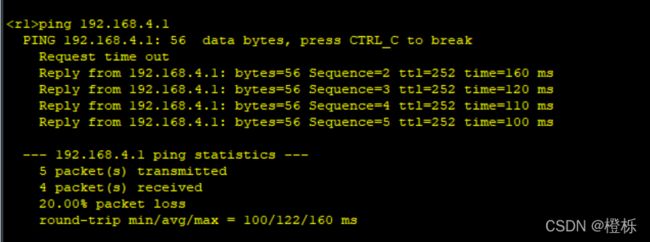
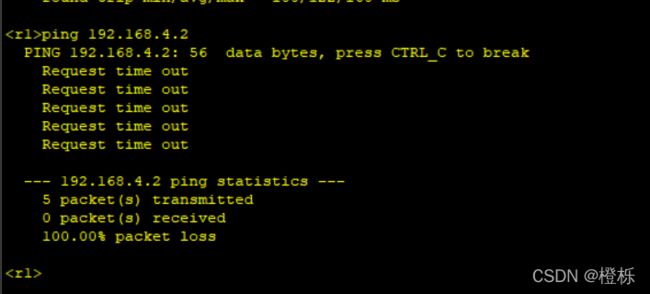
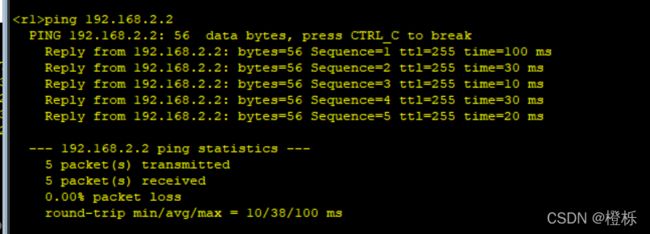
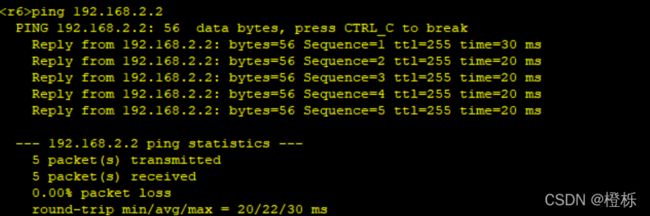
测试结果:
八:对a1使用RIP,a2使用OSPF
R6:
rip 1ver 2network 192.168.1.0network 192.168.2.0R2:
rip 1 -instance a1ver 2network 192.168.2.0结果:
R7:
ospf 1 router-id 7.7.7.7area 0network 192.168.3.2 0.0.0.0network 192.168.4.2 0.0.0.0R4:
ospf 2 -instance a2area 0network 192.168.3.1 0.0.0.0结果是: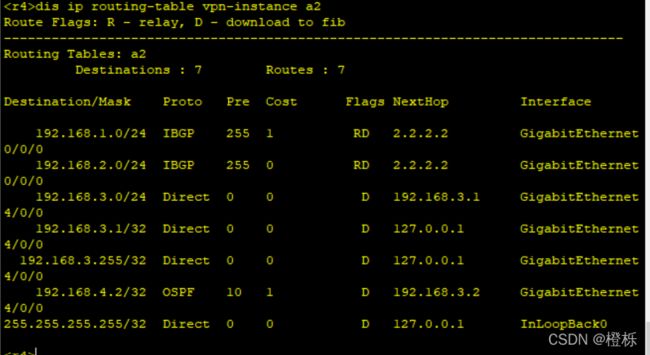
九:双向重发布
R2:
rip1 -instance a1
import-route bgp
bgp 1
ipv4-family -intance a1
import-router rip 1
R4:
bgp 1
ipv4-family -instance a2
impoort-route ospf 2
ospf 2 -instance a2
import-route bgp
十:静态和直连
b1:
ip route-static 192.168.3.0 24 192.168.2.2
ip route-static 192.168.4.0 24 192.168.2.2
ip route-static -instance b1 192.168.1.0 24 192.168.2.1
空间重发布(R2上)
bgp 1
ipv4-family -instance b1
import-route static
import-route direct
b2:【已经学到了b1的路由,将R4学到直连路由】
ip route-static -instance b2 192.168.4.0 24 192.168.3.2
将R4的3.0和4.0网段重发布给R2
ipv4-family -instance b2
import-route direct
import-route static
设置R5去到R1的下一跳
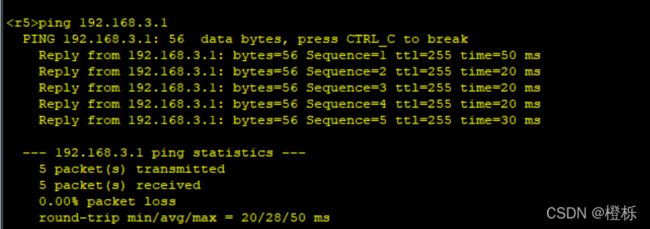
ip router-static 192.168.1.0 24.192.168.3.1ip router-static 192.168.2.0 24.192.168.3.1结果: